background image


Fire damper BSK-RPR-EU 


Technical 

documentation 

 Installation

 details 

Construction subject to change 


No return possible 

Version: 2015-02-01 | Document: 09/48 | Page 6 

General information 


During mounting or installation, there is a risk of injuries. 
To avoid any possible injuries, personal protective 
equipment (PPE) must be worn. 


Fire dampers must be installed such that external forces 
do not impair their permanent functioning. During 
mounting it might be necessary to provide reinforce-
ments for the housing or the like. The requirement of 
statically load-bearing lintels may have to be taken into 
consideration.  


Improper transport/handling may result in dama-
ge/functional impairment. In addition to that, the film of 
the transport packaging must be removed and the de-
livery inspected for completeness.


In storage, fire dampers must be protected from dust, 
dirt, moisture and the effects of temperature (e.g. direct 
sunlight, heat-emitting light source, etc.). They must not 
be exposed to direct effects of the weather and must not 
be stored below -40 °C or above 50 °C.


The fire dampers must be protected from dirt and dama-
ge. After installation is complete, any dirt must be remo-
ved immediately.


Enough space must be provided for installation, mortar 
lining etc. 


Perform a functional check of the fire dampers before 
and after mounting and ensure ready access. 


Electrical installations or work on electrical components 
may only be carried out by skilled electricians. The supp-
ly voltage must be switched off when performing this 
work. 


INSTALLATION DETAILS 


Installation in solid walls 


Installation in solid walls (shaft walls, shafts, ducts and fire 
walls) made of, for example, concrete, masonry according 
to EN 1996 or DIN 1053; solid plaster wall boards accord-
ing to EN 12859 or DIN 18163; apparent density 

 450 

kg/m³ and wall thickness W 

 150 mm. 


Circumferential gaps "s" must be completely filled with 
mortar of category M15 according to EN 998-2, NM II DIN 
V 18580 (previously: MG III according to DIN 1053) or fire 
protection mortar of suitable grades. The minimum gap si-
ze s

min

 is 40 mm (maximum gap size s

max


 60 mm). 

If the fire damper is installed during the construction of 
the wall, the gaps "s" can be omitted. The mortar bed 
depth must be designed according to the minimum wall 
thickness and may not be less than this thickness. When 
performing a mortar lining or a direct installation, make 
sure that the housing is not pressed toward the inside 
(reinforcement). If necessary, a statically active lintel must 
be provided. 


The distance of the fire dampers to one another must be 
at least 200 mm. 


The distance to load-bearing, adjacent components (wall / 
solid ceiling) is minimum 75 mm. 


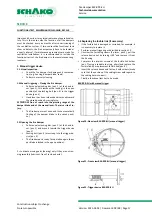
Minimum gap size with complete mortar lining 


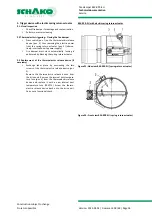
Figure 8: Minimum gap size for complete mortar lining in 
solid walls 

Summary of Contents for BSK-RPR-EU Series

Page 1: ...ances or p data es ch urn actuators rts on texts ranch offices ures tables di chad KG 10 drive s n projecting end agrams ds 1 1 1 1 1 1 2 2 Te Fa ww 1 3 6 7 7 8 10 10 11 13 15 17 21 23 Install elephon...

Page 2: ...tumescent seals Horizontal position of the damper blade axle The installation position is independent of the air flow direction Thermal trigger via fusible link 72 C optionally at an extra charge with...

Page 3: ...urn possible Version 2015 02 01 Document 09 48 Page 3 MODELS AND DIMENSIONS BSK RPR EU S plug in connection Figure 1 Dimensions BSK RPR EU S BSK RPR EU F flanged connection Figure 2 Dimensions BSK RPR...

Page 4: ...PR EU S is delivered by default with a rubber lip seal Figure 3 Rubber lip seal Trigger device thermomechanical Figure 4 Trigger device BSK RPR EU Flange bores BSK RPR EU F Figure 5 Flange bores Table...

Page 5: ...de and the finishing protective grating ASG RF RS Use The fire damper type BSK RPR EU can be installed as shown in the following table Table 4 Usability BSK RPR EU F Figure 7 Damper blade projecting e...

Page 6: ...e dampers before and after mounting and ensure ready access Electrical installations or work on electrical components may only be carried out by skilled electricians The supp ly voltage must be switch...

Page 7: ...des with ventila tion ducts BK Fire damper BSK RPR EU ASG Finishing protective grating type ASG 1 VT Extension piece type VT LL Ventilation duct SW Shaft wall SR Closing direction LR Air flow directio...

Page 8: ...to 250 Nominal sizes 250 to 500 Diagram 1 Pressure loss and flow generated noise without finishing protective grating Application limits max operating pressure of 1000 Pa at vstirn 10 m s Pressure los...

Page 9: ...00 98 2 44 2 74 2 49 2 80 125 123 2 83 3 21 2 89 3 29 140 138 3 06 3 49 3 13 3 57 160 158 3 35 3 84 3 43 3 93 180 178 3 65 4 20 3 74 4 31 200 198 3 97 4 59 4 07 4 70 224 222 4 37 5 07 4 48 5 19 250 24...

Page 10: ...ignalling and switching bus system type EasyBus Fire damper mini controller BKSYS Extension piece type VT RF 1 Assembly part type REBT 2 required for installation of the smoke detection system type RM...

Page 11: ...upply voltage in accordance with regula tions and unlocked mechanically Display of the damper end positions is possible by me ans of integrated micro switches via potential free changeover contacts co...

Page 12: ...position W 0 8 1 1 Power consumption dimensioning 4 VA Imax 8 3 A 5 ms 6 5 VA Imax 4 A 5 ms Auxiliary switch 2 x EPU Switching capacity of auxiliary switch 1 mA 3 0 5 inductive A AC 250 V Connection...

Page 13: ...2 on page 4 Nominal size D mm L mm The dimension L depends on the nominal size 100 98 160 125 123 140 138 160 158 180 178 200 198 224 222 250 248 280 278 315 313 355 353 400 398 450 448 500 498 190 T...

Page 14: ...248 280 278 315 313 355 353 400 398 450 448 500 498 Table 10 Dimensions REBT Figure 18 Round duct assembly type REBT side view front view and top view Position indicator type MSZ Figure 19 Position in...

Page 15: ...1 V2A Housing with DD coating solvent containing two component top coat based on polyurethane var nish RAL 7035 light grey inside outside Housing with powder coating RAL 9010 pure white inside and out...

Page 16: ...charge for anticorrosive paint inside and outside DD coating two component top coat based on polyurethane varnish RAL 7035 light grey Extra charge for powder coating RAL 9010 pure white inside and out...

Page 17: ...e of the damper blade and of the manual lever There is a risk of in jury The fire damper must close and lock automatically locking of the damper blade in the closed positi on 1 3 Opening the fire damp...

Page 18: ...pply Fire damper must close automatically locking is performed by blocking the spring return actuator 2 3 Replacement of the thermoelectric release device if necessary Exchange takes place by unscrewi...

Page 19: ...no Series Release device The following function steps have been carried out according to the documents installation mounting and operating instructions Prior to com missioning Next functional test in...

Page 20: ...chako de Web www schako de Sample Functional test protocol for fire dampers Cons No ____________________ Defects found during the test on ________________________________________ Sluggishness due to s...

Page 21: ...02 51620946 Fax 385 51 701 470 info europersis gr insupco netvision net il info schako it ri intel trade hr www europersis gr www insupco com www schako it www intel trade hr Luxembourg Niederlande st...

Page 22: ...00 Praha 10 Zabehlice San ve Tic Ltd Sti Tel 421 337 741 843 Calle B nave 3 Tel 42 02 727 680 43 Pursaklar Sanayi Sitesi Fax 421 337 741 843 E 50840 San Mateo de G llego Fax 42 02 727 693 93 Karaca re...

Page 23: ...ng return actuator 11 Figure 15 Connecting diagram B10 B11 11 Figure 16 Extension piece type VT RF 13 Figure 17 Finishing protective grating type ASG RS RF 13 Figure 18 Round duct assembly type REBT s...

Reviews: