


- 16 -
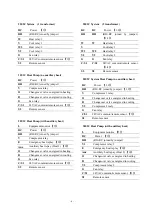
Screen cleaning
Press
CLEAN DISPLAY
to lock the screen
for cleaning. The screen will remain locked for 30
seconds so you can clean the screen without
changing any setting.
After 30 seconds, press
DONE
to resume normal
operation, or press
CLEAN DISPLAY
again if
you require more time for cleaning.
Note: Do not spray any liquid directly on the
thermostat. Spray liquids onto a cloth, then use the
damp cloth to clean the screen. Use water or
household glass cleaner. Avoid abrasive cleansers
Screen lock
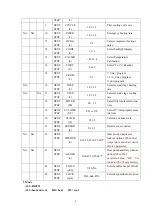
To prevent tampering, the screen can be partially or fully locked. Configuration menu item 24 explain the
way to partially or fully locked the screen
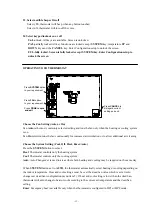
Special feature
Intelligent Recovery:
See configuration menu item 6- Intelligent Recovery operation.
Compressor protection:
See configuration menu item 10- Select compressor lockout delay
Heat Pump Temperature Lockout:
See configuration menu item 21-Heat pump compressor lockout
temperature
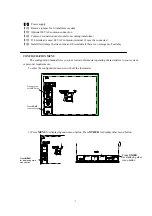
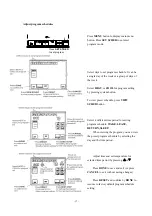
PROGRAMMING
Set Current Time clock and Day of the week
Press
MENU
for displaying main menu button.
Press
SET TIME
button to enter to the
clock-setting mode. Press the day to set current
day of the week. Press
△
or
▽
to adjust the
minutes or hours. Press
NEXT STEP
to shift
between setting minutes and setting hours.
Press
DONE
to save & exit (or press
CANCEL
to exit without changing the time).
Press
CLEAN DISPLAY
Screen lock timer
(count back 30 seconds)
Set current day
of the week
Set current minutes
or hours
Press
NEXT STEP
to
shift from setting minuts
to setting hours
Press
DONE
to
confirm and exit
Press
CANCEL
to
cancel current setting
and exit
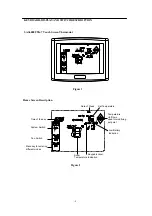
Summary of Contents for SAS6000UTK-7
Page 20: ...20...


