background image

56 

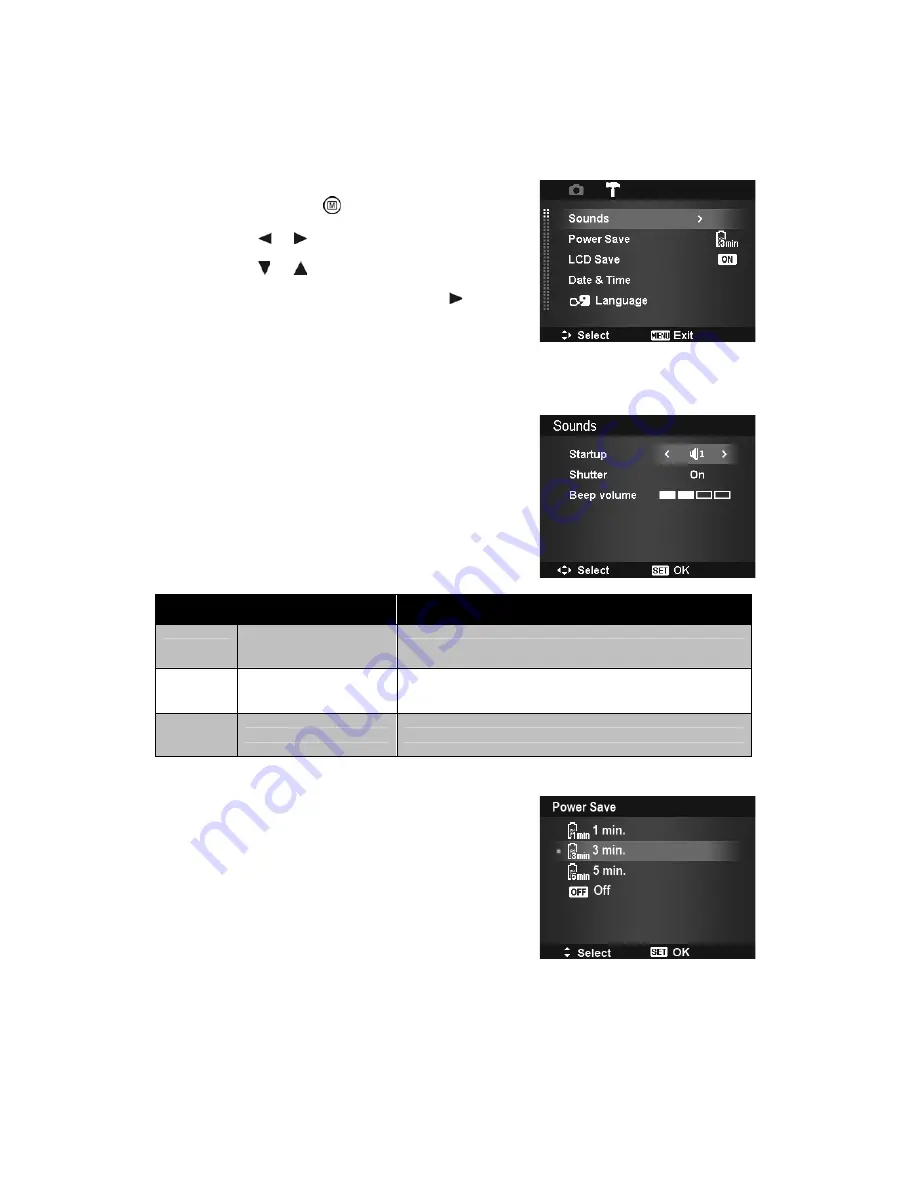
Using the Setup Menu 

You can access the Setup menu whether you are in Record or Playback mode. 
The Setup menu allows to configure general camera settings. 

To go to Setup Menu: 

1. Press 

Menu

 button 

  to launch the Record/Playback 

Menu. 

2. Use the 

 or 

  keys to switch the menu tab to 

Setup 

menu.

3. Use the 

 or 

  keys to move through the menu 

selections. 

4. To select an item, press the 

SET 

button or 

 key. 

5. Change the submenu settings using the 4-way navigation 

control. 

6. Press the 

SET 

button to save and apply settings.

Setting Sounds 

Use the Sound menu functions to control the sounds produced by the camera. 

1. From the Setup menu, select 

Sounds

.

2. Adjusts sound settings. 
3. Press the 

SET 

button to apply changes.

Item 

Available Settings 

Description 

Startup 

Sound 1, Sound 2, 
Sound 3, Off

Selects the startup sound when camera is turned on. 

Shutter 

On, Off 

Enables or disables shutter sound when Shutter button is 
pressed. Shutter sound is not available when recording videos 
or voice clips.

Beep

volume 

0-4  

Adjusts volume.

Setting Power Save 

The Power Save function allows you to set an idle time after 
which the camera automatically sets to sleep mode to save 
power. After a minute of being in sleep mode, the camera 
eventually turns off power. 

This function is not available in the following instances: 

Recording a video or audio file 

Playing a slideshow/video/audio file 

Using the USB connector 

Summary of Contents for VPC-E1403

Page 1: ...14 Mega Pixels Digital Camera INSTRUCTION MANUAL VPC E1403 Please read these instructions carefully before using the camera Keep this manual in a safe place for later reference ...

Page 2: ... Camera Strap 13 Inserting the Battery 13 Inserting an SD SDHC Memory Card 14 Charging the Battery 14 Turning the Power On and Off 15 Initial Settings 15 Modes 15 Using the LCD Monitor 16 LCD Monitor Layout 16 Changing the LCD Monitor Display 21 Recording Images Videos and Voices 21 Taking Images 21 Using the Stabilizer 22 Setting the Zoom Control 22 Using Flash 23 Setting the Focus Mode 23 Using ...

Page 3: ...7 Setting Date Time 57 Setting Language 57 Setting File Numbering 57 Setting TV Out 58 Setting LCD Brightness 58 Setting Memory Kit 58 Reset All 59 Making Connections 59 Connecting the Camera to a TV 59 Connecting the Camera to a PC 59 Connecting the Camera to a Printer 61 Setting the Print Mode Menu 61 Appendix 62 About Folder and File Names 62 Troubleshooting 63 Specifications 64 ...

Page 4: ...r Connect the equipment to an outlet on a circuit different from that to which the receiver is connected Consult the dealer or an experienced radio TV technician for help Warning A shielded type power cord is required in order to meet FCC emission limits and to prevent interference to radio and television reception Use only shielded cable to connect I O devices to this equipment Any changes or mod...

Page 5: ...age to the person s eyesight Do not subject the LCD monitor to impact This might damage the glass on the screen or cause the internal fluid to leak If the internal fluid enters your eyes or comes into contact with your body or clothes rinse with fresh water If the internal fluid has entered your eyes consult a physician to receive treatment A camera is a precision instrument Do not drop it strike ...

Page 6: ...ssly approved by the party responsible for compliance could void the user s authority to operate the equipment For Canadian Users This Class B digital apparatus complies with Canadian ICES 003 For EU Users The symbol mark and recycling systems described below apply to EU countries and do not apply to countries in other areas of the world Your SANYO product is designed and manufactured with high qu...

Page 7: ...spective owners Read this First Notice Product design and specifications are subject to change without notice This includes primary product specifications software software drivers and user s manual This User Manual is a general reference guide for the product The product and accessories that come with your camera may be different from those described in this manual This is due to the fact that di...

Page 8: ...V 700mAh 㩷 2 6Wh Before capturing those important shots be sure to first take a test shot to confirm that your camera is set up and ready to go Sanyo Electric shall not be held responsible for any problems resulting from the use of this camera Sanyo Electric declines all responsible for damages due to improper use of the camera failure to adhere to the instructions given in this manual or repairs ...

Page 9: ...tor Microsoft DirectX 9 0C USB port and CD ROM drive For Macintosh Power Mac G3 or later Mac OS 10 3X 10 6 Mass storage Memory 512MB or above Q Time player ver 6 0 3 or above USB port and CD ROM drive Main Features 14 mega pixels resolution Up to 3x optical zoom and 5x digital zoom 3 inch color LCD monitor 64MB internal flash memory with optional external SD SDHC card Supports up to 4GB of SD card...

Page 10: ...ents Please check the contents of your camera package It should contain Digital camera Rechargeable battery x 1 pcs Battery charger Wrist strap USB cable AV cable CD ROM Quick Start Guide SD SDHC memory card optional ...

Page 11: ...Lamp 3 Lens 4 Microphone Back View 5 LCD monitor 6 Mode Switch Photo mode Movie mode Playback mode 7 LED indicator 8 Menu button 9 SET button 4 way navigation control 10 Function Delete button Top View 11 Stabilizer button 12 Zoom lever 13 Shutter button 14 ON OFF ...

Page 12: ...ue according to light levels to compensate for camera shake Press to set stabilizer on off Shutter Press to capture an image or start stop recording video or audio clip Zoom lever In photo and movie mode spin the zoom lever to left to zoom out right to zoom in In Playback mode spin to zoom in to magnify image or zoom out enter 9 image calendar thumbnails Menu Press to enter or exit menu submenu Fu...

Page 13: ...the submenu or to navigate through the menu selections Macro Left 1 In Photo Mode press to scroll through Macro options Macro Pan Infinity focus and normal 2 In Playback mode press to view the previous image video or audio clip 3 In playback Movie mode press to Rewind video playback 4 In Menu press to exit a submenu or to navigate through the menu selections Up Face Tracking Rotate 1 In Photo Mode...

Page 14: ...s in the external storage card The icon indicates the camera is using SD card Not all cards may be compatible with your camera When purchasing a card please check the card s specifications and take the camera with you Getting Started Attach the Camera Strap Inserting the Battery Follow these instructions to insert the rechargeable battery into the battery memory card compartment Please read Batter...

Page 15: ...the card until it pops out 3 Pull out the card carefully Charging the Battery The battery is not charged when you purchase the camera You need to charge the battery before using the camera 1 Place the battery in the charger as shown 2 Plug it into a power outlet The light of the LED on the charger is orange when charging is started and lights green when charging is completed It is recommended that...

Page 16: ...ed on the LCD monitor Setting the Language 1 Press or to move through the selection 2 Select a language and then press SET to apply Setting the Date Time 1 Press or to move through the selection 2 Press or keys to change the value for the date and time 3 Press SET to apply 4 If necessary press to close the menu Now you are ready to start taking images and videos Holding down or keys to change the ...

Page 17: ...abled 9 AEB Indicates AEB function is enabled 10 Stabilizer Indicates stabilizer function is enabled 11 Saturation Displays saturation settings 12 Contrast Displays contrast settings 13 Histogram Graphic display of ISO settings 14 ISO Displays ISO settings 15 Focus area Use to frame subject to capture 16 Shutter speed Displays shutter speed settings 17 Aperture value Displays aperture settings 18 ...

Page 18: ...6 Focus area Use to frame subject to record 7 Macro Indicates macro is enabled 8 White balance Displays white balance settings 9 Metering Displays metering settings 10 Movie size Displays movie size settings 11 Key indicator Displays the commands on 4 way Navigation Control button 12 Recorded time Displays recorded time 13 Recording status Indicates recording status 14 Pre record Indicates pre rec...

Page 19: ...ndicates voice memo is attached 4 Button intro Indicates the button to press on the camera to play a video or audio file 5 File no Total no Indicates the file number over the total number of files in the storage card 6 Battery Indicates battery level 7 Storage media Indicates used storage memory 8 Recording information Displays recording information of the file 9 DPOF Indicates the file is marked ...

Page 20: ...ber over the total number of files in the storage card 6 Battery Indicates battery level 7 Storage media Indicates used storage memory 8 Recording date time Displays the date and time of the video clip 9 Video size Indicates the size of the video clip 10 Volume Indicates the volume while playing 11 Video length Display the total length of the video clip 12 Played time Indicates the played time of ...

Page 21: ...le 4 File no Total no Indicates the file number over the total number of files in the storage card 5 Battery Indicates battery level 6 Storage media Indicates used storage memory 7 Recording information Displays recording information of the file 8 Volume Indicates volume settings 9 Audio length Display the total length of the audio clip 10 Played time Indicates played time 11 Playing status Displa...

Page 22: ...ng Basic Full None Help screen LCD display cannot be changed in the following situations Manual exposure mode Recording video or audio clips Playing video or audio clips Playing slideshow Recording Images Videos and Voices Taking Images Now that you are familiar with your camera you are now ready to take your images Taking images with your camera is very simple 1 Turn on the camera by pressing the...

Page 23: ...ing a combination of 3 times optical zoom and 5 times digital zoom permits zoom photography at up to 15 times magnification While the digital zoom can be a useful feature the more an image is enlarged zoomed the more pixelated grainier the image will appear Please refer to Setting the Digital Zoom on page 40 on how to setup digital zoom To adjusts the optical zoom 1 Spin the Zoom lever to zoom in ...

Page 24: ...ooting still images but not available in Burst and AEB modes Do not charge the flash while pressing the zoom button Charge the flash after releasing the zoom button if necessary Setting the Focus Mode This function allows users to define the type focus when recording a still image or a video clip To set the Focus mode Press the Macro Left button repeatedly until the desired focus mode icon is disp...

Page 25: ...e SET button to save and apply changes Menu bar My Mode The My Mode function displays the 6 most recent modes used in order When you move through the different modes in the menu options the items on the menu bar changes synchronously to the corresponding available settings Photo Size The Photo Size function is used to set the resolution before you capture the image Changing the Photo Size affects ...

Page 26: ...erall scene intentionally made brighter or darker These settings are used when a suitable brightness exposure cannot otherwise be obtained in circumstances where the difference in brightness between the subject and the background the contrast is large or when the subject that you wish to capture is very small within the scene Available for still images only To adjust EV settings press the or keys ...

Page 27: ...for indoor images with reddish fluorescent lighting conditions Fluorescent 2 Ideally used for indoor images with bluish fluorescent lighting conditions Custom Used when light source cannot be specified Press the Shutter button for the camera to automatically adjust the appropriate white balance setting according to the environment ISO This sets the sensitivity for capturing images When the sensiti...

Page 28: ...r videos As you move through the selection the preview on the LCD monitor changes synchronously Icon Item Description Normal The camera records normally Vivid The camera captures the image with more contrast and saturation emphasizing on the bold colors Sepia Images are captured in sepia tones B W Images are captured in black and white Vivid Red Captured image becomes reddish Ideally used to recor...

Page 29: ... Record Menu 2 Use the or keys to move through the menu 3 To select an item press or SET button 4 Change the submenu settings using the 4 way navigation control 5 Press the SET button to save and apply settings Setting the Scene Mode By simply selecting one of the following 32 modes you can capture the image with the most appropriate settings 1 From the Record Menu press to select Scene Mode 2 Use...

Page 30: ...y changing the metering Kids This feature is used to capture still images of moving kids Night Scene This feature is used to capture images with night scenery background Fireworks This feature slows shutter speed to capture fireworks explosions Snow This feature is used for beach and snow scenes Sports This feature captures still images in high speed motions Party This feature is used for wedding ...

Page 31: ...tivated The camera starts count down and captures a picture in two seconds Self Portrait This feature set zoom to wide end When over two faces are detected AF automatically activated and plays the sound Bi for notice Then camera starts count down and captures a picture in two seconds HDR This feature applies digital processing only to the necessary portion s of the image and preserves details in h...

Page 32: ...mode 4 Half press the Shutter button to focus the subject The frame turns green to indicate focus is set 5 Press the Shutter button to take the shot Using Kids Mode Tactically kids are the most difficult to photograph They tend to be highly animated and can be a real challenge to make them pay attention for more than just a second or two To capture a great moment for your kids just keep the camera...

Page 33: ...ur blog by close up images Just get the camera and set the scene with food mode This mode features on macro focus and auto flash designed for close up photography Macro focus and Auto Flash are enabled by using Food mode Using Foliage Mode A scenic image such as a garden or forest scene that full of doll green colors is boring In foliage mode the greens blues are brilliantly enhanced making scenic...

Page 34: ...utton to save the composed image 9 Or press Menu button to go back last shot 10 The camera save the image to memory 11 Use USB cable or memory card reader Please refer to Connecting the Camera to a PC on page 59 to transfer the image to PC and upload it to website Auction mode provides 4 kinds of pattern as follow The image is set to low quality and VGA 640x480 size only ...

Page 35: ...t or subjects move on To activate Blink Detection 1 Select Blink Detection Mode from Scene Mode submenu 2 Half press the Shutter button to focus the subject The frame turns green to indicate focus is set 3 Press the Shutter button to capture the image and automatically save the Image 4 If the camera detects subject blinked eye a Save image or Cancel option appears on the screen 5 Select Save image...

Page 36: ... chin Angle your body and bend your arms to look slimmer Keep your shoulders back Using HDR Mode Active HDR mode preserves details in highlights and shadows creating photos with natural contrast Use for high contrast scenes for example when photographing brightly light outdoor scenery through a door window or taking pictures of shaded subjects on a sunny day With this feature the adjustment of con...

Page 37: ...amera is in the manual exposure mode you can change either aperture or shutter speed or both To activate Manual Exposure 1 Select from the Scene Mode submenu 2 Press SET button to enter the adjust mode 3 Use the or keys to select the shutter speed 4 Or use the or keys to select the aperture value 5 Use the SET button to switch between aperture and shutter speed adjustment and vice versa 6 Press th...

Page 38: ...he SET button to save and apply changes The table below shows the available Drive mode settings Icon Item Description 10 Sec Sets a 10 second delay to capture image after pressing the Shutter button 2 Sec Sets a 2 second delay to capture image after pressing the Shutter button Double Performs delay and capture twice Performs a 10 second delay then captures the image Performs another 2 second delay...

Page 39: ...o go through the selection 3 Press the SET button to save and apply changes The table below shows the available AF area settings Icon Item Description Wide The camera automatically selects focus area within the wide frame Center The focus area is fixed on the center Setting the AF Lamp The AF Lamp function allows you to record images even low light conditions If AF Lamp is set to Auto the AF lamp ...

Page 40: ...ormal Normal sharpness Low Softens the image Setting Saturation The Saturation function lets you adjust the color saturation in your images Use a higher saturation setting for rich colors and a lower saturation setting for more natural tones To set Saturation 1 From the Record menu select Saturation 2 Use the or keys to go through the selection 3 Press the SET button to save and apply changes The ...

Page 41: ...eds 3x the camera uses digital zoom To set Digital Zoom 1 From the Record menu select Digital Zoom 2 Use the or keys to go through the selection 3 Press the SET button to save and apply changes The table below shows the available Digital Zoom settings Icon Item Description Intelligent Zoom Enlarges the image digitally with almost no distortion This feature is available for still images only Standa...

Page 42: ... keys to go through the selection 3 Press the SET button to save and apply changes Recording Videos You can record videos with the camera the available recording time depends on the capacity of the memory card Videos can be recorded until the maximum memory capacity has been reached However the length of a single video may be limited the limitation depends on the camera model 1 Slide the Mode swit...

Page 43: ...de The Internet Mode allows you to record videos with predefined video settings for easy upload to the Internet website The Internet supports two file upload standards Single File Uploader The maximum video file size is up to 100 MB Internet Uploader The maximum video file size is up to 1 GB Most uploaded video length ranges within 5 minutes Therefore when you record using the YouTube mode the fol...

Page 44: ... of menu is turned on Enter USB mode Playback You can playback the still images video and audio clips on the LCD monitor Viewing in Single Navigation The Single navigation mode displays the image one by one on the LCD monitor To view images videos audio clips follow the steps below 1 Slide the Mode switch to Playback mode 2 The LCD monitor displays an image To understand the icons and other inform...

Page 45: ...creen can be scrolled Thumbnail view To set calendar mode 1 Set the camera to Playback mode 2 Spin the Zoom lever counterclockwise left twice to view thumbnails in calendar mode 3 Use the navigation controls to move through the items 4 Press the SET button to select a image and view it normally In calendar mode The first file Including image video audio and error file recorded on each date appears...

Page 46: ...pin clockwise right to increase volume Spin counterclockwise left to decrease volume 6 Press the key to pause playback Press the key again to resume When paused the play info will remain on screen except 7 To forward or rewind the video frame by frame press the key to pause playback then press the or keys 8 Press the key to stop the playback The LCD monitor displays the video frame image in Single...

Page 47: ...cannot be adjusted during Pause mode Playing Voice Memo Voice memo is separately recorded and attached to a captured image See Voice Memo on page 51 on how to record voice memo 1 Set the camera to Playback mode 2 Use the navigation controls to scroll through the saved images An image file with voice memo has a voice memo icon located on the top center of the LCD monitor See picture on the right 3 ...

Page 48: ...ocked files cannot be deleted at any time When you try to delete a locked file the camera displays File Locked message on the LCD monitor Playback Menu The Playback menu allows you to edit images record voice memo and setup playback settings To go to Playback Menu 1 Slide the mode switch to Playback mode 2 Press Menu button to launch the Playback Menu 3 Use the or keys to move through the menu sel...

Page 49: ...o delete a single file 1 Select Single in the Delete submenu the images are displayed on the LCD monitor in single navigation mode 2 Use the or keys to scroll the display 3 When the desired image video audio clip is displayed on the LCD monitor select Delete 4 Press the SET button to delete 5 The next image is displayed on the LCD monitor To delete another file use the or keys to scroll through th...

Page 50: ...es to confirm 7 Press the SET button to delete marked files To delete all files 1 Select All in the Delete submenu A confirmation message appears 2 Select Yes 3 Press the SET button to delete all files Protect Set the data to read only to prevent images from being erased by mistake A protected file has a lock icon when viewed on Playback mode To protect files 1 From the Playback menu select Protec...

Page 51: ...onitor 2 Use the navigation control to move through the files 3 When the desired file is highlighted press the SET button to mark unmark the file clip for protection 4 Repeat step 3 until all desired files to protect are marked 5 Press the MENU button A confirmation selection appears 6 Select Yes 7 Press the SET button to lock files and go back to Playback mode To protect all files 1 Select Lock a...

Page 52: ...n appears Select whether to Overwrite Save and replace old file with a new one Save As Save the new file as a new one Cancel Cancel red eye correction 8 Press the SET button to save cancel changes Voice Memo A maximum of 30 seconds of audio can be recorded as a memo for captured still images To record voice memo 1 Set the camera to Playback mode 2 Press the or keys to scroll and select an image to...

Page 53: ...or mode submenu appears 5 Press the or keys to scroll and select an option As you move through the selection the preview on the LCD monitor changes synchronously The succeeding table shows the available settings Icon Item Description Normal No effect is added to the image Sepia Image is saved with a sepia tone B W Image is saved in black and white Negative Image appears to be the opposite of the o...

Page 54: ...e size as zoom in out No Description 1 Enlarged image 2 4 way indicator 3 Trimmed size 4 The approx location of the trimmed area 5 Image area 6 Use the navigation controls to move the image 7 Press the SET button to apply changes A menu selection appears 8 Select whether to Overwrite Save and replace the old file with the new one Save As Save the new file as a new one Cancel Cancel Trim 9 Press th...

Page 55: ...selection appears Select whether to Overwrite Save and replace old file with a new one Save As Save the new file as a new one Cancel Cancel resize 7 Press the SET button to save cancel changes Resize function is not available for images with image size set to VGA Startup Image You can specify the startup image from the captured images for camera 1 Press the MENU button to launch the Playback menu ...

Page 56: ...gle image all images 1 Select Single or All on the DPOF submenu 2 For single image use the or keys to scroll and select an image to mark for printing 3 Specify the number of copies Use the or to increase decrease number 4 Press the FUNC button to toggle between turning on off the date stamp 5 Press the SET button to save DPOF settings To reset DPOF 1 Select Reset on the DPOF submenu A confirmation...

Page 57: ...he camera 1 From the Setup menu select Sounds 2 Adjusts sound settings 3 Press the SET button to apply changes Item Available Settings Description Startup Sound 1 Sound 2 Sound 3 Off Selects the startup sound when camera is turned on Shutter On Off Enables or disables shutter sound when Shutter button is pressed Shutter sound is not available when recording videos or voice clips Beep volume 0 4 Ad...

Page 58: ...ime format 1 Press the navigation controls to adjust date and time value By holding down the or keys the numeric values changes continuously 2 Press the SET button to apply changes Setting Language Specify in which language menus and messages are to be displayed on the LCD monitor 1 Use the navigation control to scroll through the list and select the desired language 2 Press the SET button to conf...

Page 59: ...al Normal LCD brightness Setting Memory Kit This utility formats the internal memory or memory card and erases all stored images and data Available settings are Format Select to format currently used memory Copy to Card Select to copy all files stored in the internal memory to the memory card If the images were saved in the internal memory when inserting memory card into the camera You can use Cop...

Page 60: ...ipment you are going to connect to the camera To connect your camera to a TV 1 Turn on the camera 2 Set the TV out to match the TV s video out format See Setting TV Out on page 58 3 Connect the USB AV 3 in 1 cable to the USB port on the bottom of your camera 4 Connect the other end of the cable to the TV s AV input port 5 The LCD monitor turns black and all images and video clips are displayed on ...

Page 61: ...CD monitor appears Connecting 6 Connection established after PC MODE appeared on the LCD monitor 7 Access the files in the camera by your PC The camera s internal memory or memory card would display as removable drives in PC The extrinsic memories are given to priority more than internal memories After the connection no image is displayed on the LCD monitor ...

Page 62: ...he following page Setting the Print Mode Menu Setting the Print Mode Menu Print Mode menu appears on the screen after the connection between a printer and your camera is established Print Mode includes three major settings Print Select An image can then be selected to print Print All Prints all images Print Index Prints all images as thumbnails To set Print Select 1 Use the or keys to scroll and s...

Page 63: ...older in the internal memory cards to organize captured images videos and audio files File Naming File names begin with SANY and followed by a 4 digit number that increases in sequence File numbering starts from 0001 when a new folder is created If the highest folder number is 999 and the highest file number exceeds 9999 the camera will display the warning message Folder cannot be created When thi...

Page 64: ...plays File locked This file is locked Unlock the file See Protect on page 49 LCD monitor displays Card locked The memory card is protected Remove the card and slide the write protect switch to its unlock position LCD monitor displays Format error The card may be damaged You can either change the card or wipe to clean the connected points LCD monitor displays Copy error The memory card is protected...

Page 65: ...scape Sunset Backlight Kids Night Scene Fireworks Snow Sports Party Candlelight Night Portrait Soft Skin Flowing Water Food Building Text Foliage Auction Smile Capture Blink Detection Pre Composition Love Portrait Self Portrait HDR Aperture Priority Shutter Priority Manual Exposure Voice Recording ISO Equivalent Auto ISO 100 200 400 800 1600 3200 3M 16 9 1920 x 1080 VGA 6400 3M 16 9 1920 x 1080 VG...

Page 66: ...atian Slovak Slovenian Greek Swedish Norwegian Finnish Danish Arabic Indonesia Malay Thai Korean S Chinese T Chinese Interface USB AV OUT TV system NTSC PAL selected by Setup MENU Battery Lithium ion battery Operating Temperature 0º C 40º C Operating Humidity 0 90 Microphone Built in Speaker Built in Dimensions 90 x 56 8 x 18 8 Weight 105g no battery ...

Page 67: ...Printed in china ...

Reviews: