


Setting
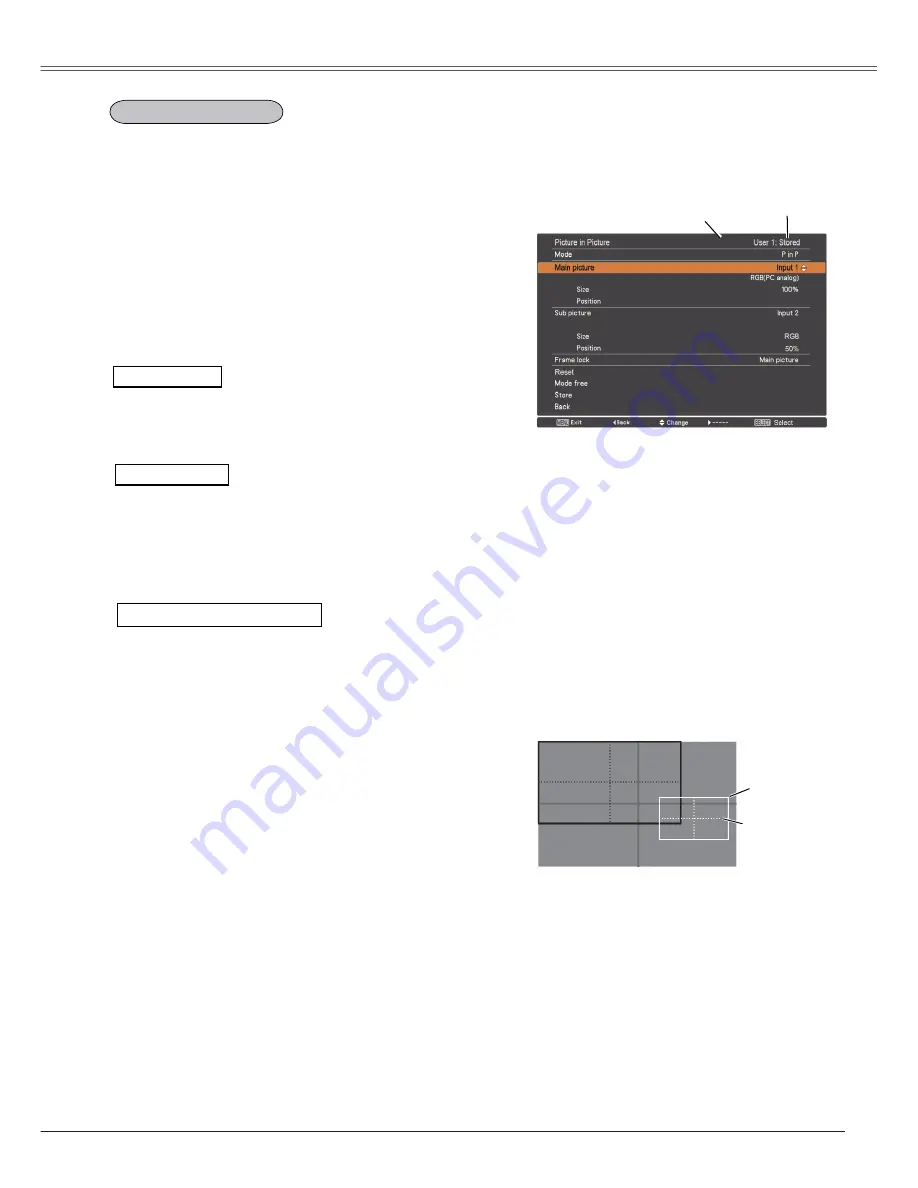
Picture in Picture
Picture in Picture
Show the selected mode (
Off
/
User 1-5
) and its status
(
Stored
/
Free
/
Adj.
).
User 1
and
User 2
have stored
default values. See page 30 for details.
User setting
P in P:
Provide the images of Main picture and Sub
picture at the ratio of Screen aspect in the Screen
Menu.
P by P:
Provide the images of Main picture and Sub
picture at the ratio of 4:3.
P in P/P by P
Selected
Mode
Status (
Stored
/
Free
/
Adj.
) of the
selected mode.
Main picture / Sub picture
Input
……
Select an input from Input 1-3.
Source
…
Select an input source. The display varies
depending on the selected input.
Size
………
Select the display size. Main picture can be
changed between 10 and 100%, and Sub
picture can be changed between 10 to 50% in
increments of 10%. When P by P is selected in
Mode, the projection size is fixed to 50%.
Position
…
Press the SELECT button at Position and the
display position setting screen appears.
Use the Point
ŸźŻŹ
buttons to adjust the display
position of active frame indicated in white. The frame will
disappear after 10 seconds or when the SELECT button is
pressed.
Position Menu
Active frame
(White)
Center line
display
Selecting the Main picture or Sub picture
During Picture in Picture mode, and being undisplayed On
Screen Menu, press the SELECT button to select Main or
Sub picture. (A red frame will be displayed on the selected
picture.)
Switching Input and Source
When selecting Main picture or Sub picture, input and
source can be set by pressing the INPUT button on the
side control or INPUT 1/2/3 button on the remote control.
Operation on the On Screen Menu is not necessary.
3
Note:
7KH3LFWXUHLQ3LFWXUHIXQFWLRQLV
QRWDYDLODEOHGHSHQGLQJRQWKH
LQSXWVLJQDOVDQGWKHVHOHFWHGLQSXW
WHUPLQDOV5HIHUWR
List of Picture in
Picture
IRUGHWDLOVS
:KHQWKHLQSXWVLJQDOVLVDUH
LQFRPSDWLEOH
X
PDUNZLOOEHGLVSOD\HG
IRUVHFRQGVRQWKH0DLQ6XE
SLFWXUH
This function is used to project two images simultaneously
by placing a separate small sub screen within or next to the
main screen.
Use the Point
Ÿź
buttons to select
Picture in Picture
and
then press the SELECT button to display a dialog box. You
can also display the dialog box by pressing and holding the
PIP button on the remote control for more than 3 seconds.
Only the sound from the source of Main picture is valid,
while the source of Sub picture cannot output the sound. ( In
P in P
, the larger picture is main picture, and the smaller one
is sub picture; in
P by P
, the left picture is main picture, and
the right one is sub picture.)
3
Note:
P by P
LVQRWDYDLODEOHZKHQWKH
IXQFWLRQLVVHOHFWHGLQ6FUHHQDVSHFW
SS
:KHQ
P by P
LVVHOHFWHGLQHYHU\8VHU
DQGWKHIXQFWLRQLVVHOHFWHG
LQ6FUHHQDVSHFW3,3EXWWRQRQWKH
UHPRWHFRQWUROLVQRWDYDLODEOH7RVHW
Picture in Picture
VHOHFW
Default
(16:10)
RU
16:9
LQ6FUHHQDVSHFW
SS
:KHQ
PIP
LVVHOHFWHG
screen
LVQRW
DYDLODEOH
55


