


-18-
WARNING:
- For continued safety, replace with a lamp assembly of the same type.
- Allow the projector to cool for at least 45 minutes before you open the
lamp cover. The inside of the projector can become very hot.
- Do not drop the lamp module or touch the glass bulb! The glass can
shatter and cause injury.
Procedure
1
Turn off the projector and disconnect the AC cord. Allow the projector to
cool for at least 45 minutes.
2
Loosen 2 screws with a screwdriver and open the lamp cover.
3
Loosen 2 screws and pull out the lamp assembly by grasping the handle.
4
Replace the lamp assembly securely and tighten 2 screws.
5
Close the lamp cover and tighten 2 screws.
6
Connect the AC cord to the projector and turn on.
Note:
- Do not reset the Lamp Replace Counter, except after lamp is replaced.
- The projector can not be turned-on with lamp cover removed, because
when the lamp cover is removed, the interlock switch is also released to
switch off the mains power for safety.
7
Reset the Lamp Replace Counter, see below explanation
.
■
Lamp Replacement
1
Turn the projector on, and press the
MENU
button
and the on-screen menu will appear. Press the
POINT
LEFT/RIGHT
buttons to move a red frame pointer to
SETTING menu icon.
2
Press the
POINT DOWN
button to move a red frame
pointer to “Lamp counter reset” and then press the
SELECT
button. The message “Lamp replace counter
reset?” is displayed. Move the pointer to [Yes] and the
press the
SELECT
button.
3
Another confirmation dialog box appears and select
[Yes] to reset Lamp Replace Counter .
Please refer to the owners manual for further informa-
tion.
Recommendation
Should the air filter become clogged with dust particles,
it will reduce the cooling fan’s effectiveness and may
result in internal heat build up and short lamp life. We
recommend cleaning the air filter after the projection
lamp is replaced.
Refer to “Air Filter Cleaning”.
The LAMP REPLACEMENT indicator will illuminate
when the Lamp Replace Counter reaches 1000
hours. This is to indicate that lamp replacement is
required.
You can check the lamp replace counter following to
below procedure.
1
Press and hold the pointer
UP
on the projector for
more than 20 seconds.
2
The Lamp replace Counter is displayed on top left
corner of the screen briefly.
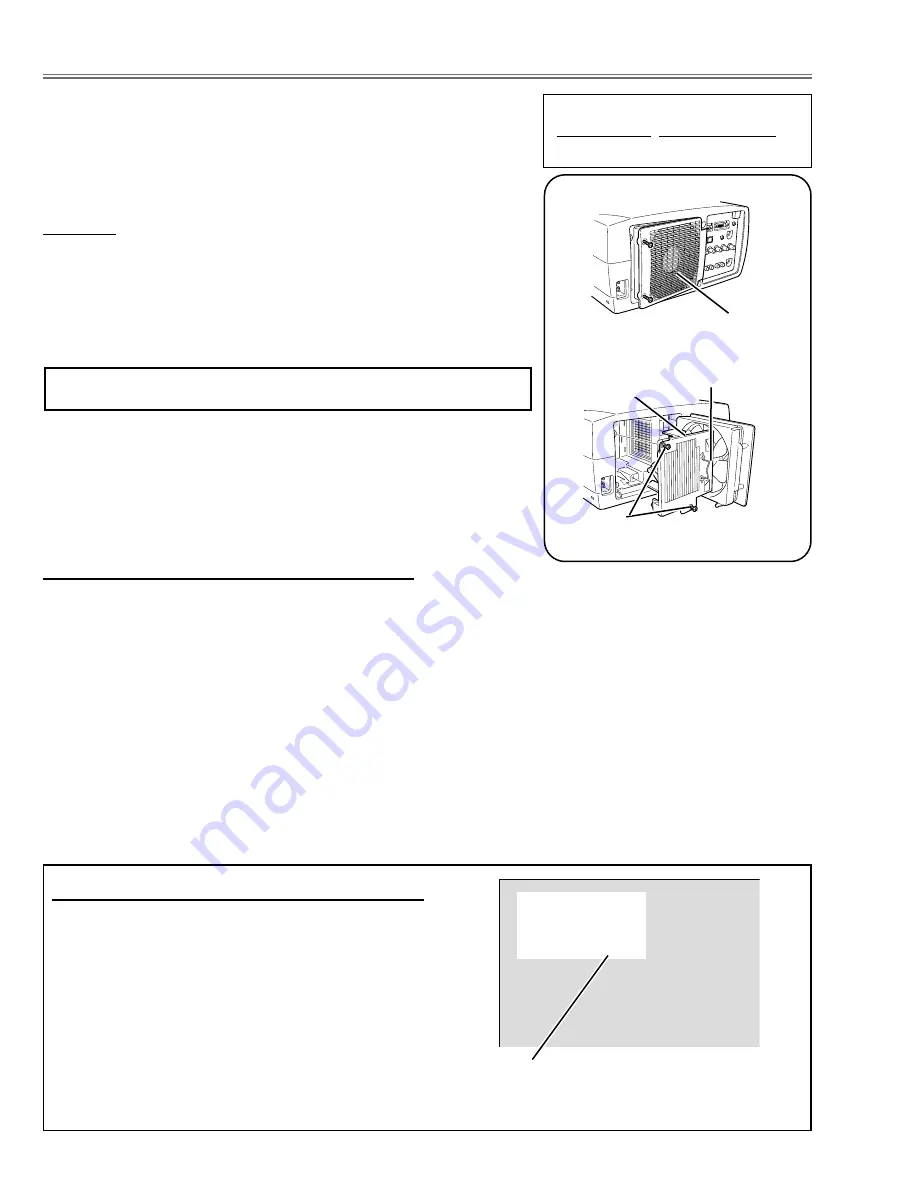
Lamp cover
Normal
123 h
Eco
105 h
Total
228 h
Lamp replace counter data
ORDER REPLACEMENT LAMP
Type No.
Service Parts No.
POA-LMP47
610 297 3891
How to reset Lamp Replace Counter
How to check Lamp Replace Counter
Screws
Handle
Lamp Assembly
Summary of Contents for PLC-XP41
Page 50: ... 50 CXA2101AQ RGB Matrix IC4101 IC Block Diagrams BH3540 Volume Control IC1652 ...
Page 54: ... 54 LB1645 Motor Drive IC1601 LC863316 SUB CPU IC1851 IC Block Diagrams ...
Page 55: ... 55 ML60851 USB I F IC9801 M62393 D A IC212 IC2381 IC Block Diagrams ...
Page 56: ... 56 M62399 D A IC3501 IC3551 IC Block Diagrams PW365 System Control Scan Converter IC301 ...
Page 57: ... 57 STR Z2156 Power Switching IC651 IC Block Diagrams SII161ACT DVI I F IC8001 ...
Page 58: ... 58 TA1287 RGB YUV Converter IC4551 TB1274AF Video Decoder IC1101 IC Block Diagrams ...
Page 59: ... 59 IC Block Diagrams TDA7056 Audio Output IC1631 IC1632 ...
Page 93: ...MA8 XP4600 MA8 XP46L00 MB8 XP4100 MB8 XP41L00 93 ...
Page 94: ... MA8AA Apr 2002 BB 400 Printed in Japan SANYO Electric Co Ltd ...
Page 95: ...Diagrams Drawings PLC XP46 PLC XP46L PLC XP41 PLC XP41L ...


