background image


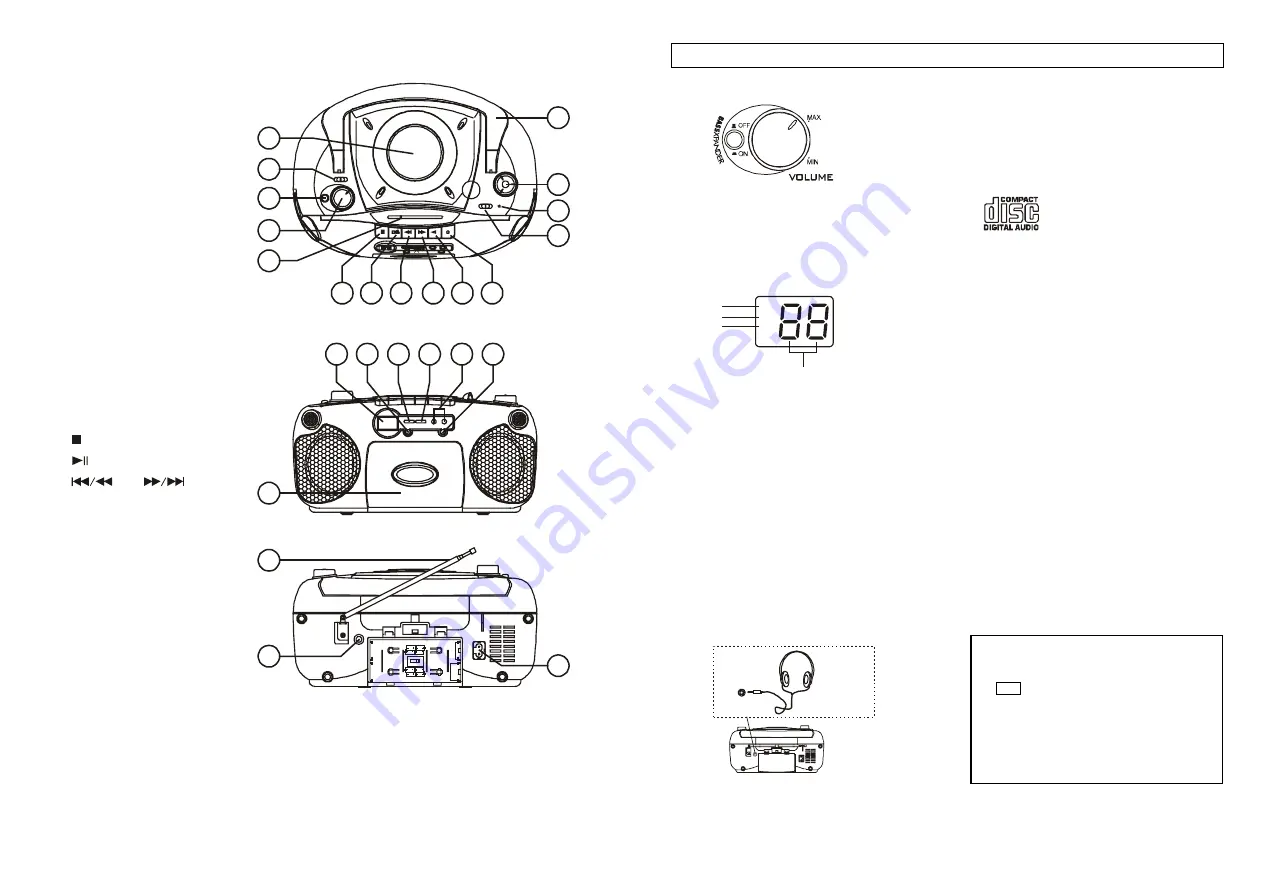
CONTROLS

 (Fig. 1) 


1.    CD Compartment Door 

2.  FUNCTION Selector 

3.  

BASS

XPANDER Button 

4.  VOLUME Control 

5.  Dial pointer 

6.  Handle 

7.  TUNING Control 

8.    FM STEREO Indicator 

9.  BAND Selector 

10.  PAUSE Button 

11.  STOP/EJECT Button 

12.   F. FWD Button 

13.  REWIND Button 

14.  PLAY Button 

15.  RECORD Button 

16.  Display 

17.  PROGRAM Button 

18.   STOP Button 

19.  

PLAY/PAUSE Button 

20.  

SKIP

 Button 

21.  REPEAT Button 

22.  Cassette Door 

23.  Rod Antenna 

24.  Phones Jack 

25.   AC Socket 


Fig. 1 

6

7

8

9

4

3

2

1

10

13

11 12

14 15

5

24

22

23

16 17 18 19 20 21

25


4

GENERAL OPERATION 


To control the sound 


BASS

XPANDER 

 
ON: Increase the bass output level. 
OFF: For normal bass output level. 
 

LCD DISPLAY SEGMENT 


1. Play 

indicator. 

2. Program 

Indicator. 

3. Repeat 

indicator. 

4. 

CD Track number indicator.   


NOTES: 

If a disc is loaded upside down. “00” will be 
displayed. 

If no disc is loaded, “00” will be displayed. 

Opening the CD compartment lid while a 
CD is playing could scratch the disc. 
Always press the STOP button and wait for 
the disc to stop rotating before opening the 
CD compartment lid. 


Using headphones 

When the headphones are plugged in, the 
speakers are automatically disconnected. 


CAUTION: Listening at high power for a long 
moment could damage users’ ears. 

 
Compact discs 

Both 8cm and 12cm discs can be played in 
this unit. 

NOTE: Place only one disc at a time in the CD 

compartment. 

Only discs bearing the logo as shown can be 
played in this unit. 


-


This unit can play back the CD-R/RW as well, 
however, some CD-R/RWs can not be played 
back due to various recording condition: such 
as CD-R/RW recorder performance, writing 
software etc. 

-  It is normal for some noise comes from CD 

laser head when the unit is searching tracks 
or there is no disc in the CD compartment. 

Always place the compact disc in the CD 
compartment with the label side facing up. 

  Compact discs can be played on only on side. 

Fingerprints and dust should be carefully 
wiped off the disc’s signal surface (opposite 
the label side) with a soft cloth. Gently wipe in 
a straight motion from the inside to the outside 
of the disc. 

Discs should be returned to their case after 
use to avoid serious scratches, which could 
cause the player to skip. 

Do not expose a disc to direct sunlight, high 
humidity, or high temperatures for extended 
periods of time to prevent warping the disc. 

Do not apply paper or write anything on the 
surface of the disc. 

Do not use cleaners or antistatic sprays on 
discs, such as those used for phonograph 
recorder. 


IMPORTANT NOTE:

If an abnormal display indication, audio 
noise or an operating problem occurs, back 
to OFF position, then disconnect the mains 
lead and all cables. Remove the batteries 
(see page 2). Wait at least 5 seconds, and 
then reconnect all cables to correct 
position. Reconnect the mains lead and 
reinstall the batteries. 

RPT

PLAY
PRG

1

2
3

4

PHONES

Stereo headphone 
(not included)

or CD-R or CD-RW


Summary of Contents for MCD-XJ780A

Page 1: ...6 AU SANYO Electric Co Ltd Made in China 7 MCD XJ780A AU INSTRUCTION MANUAL CD Radio Cassette Recorder ENGLISH P1 P12 ...

Page 2: ...BY ANYONE EXCEPT PROPERLY QUALIFIED SERVICE PERSONNEL CAUTION THIS PRODUCT CONTAINS A LOW POWER LASER DEVICE TO ENSURE CONTINUED SAFETY DO NOT REMOVE ANY COVERS OR ATTEMPT TO GAIN ACCESS TO INSIDE OF THE PRODUCT REFER ALL SERVICING TO QUALIFIED PERSONNEL 5 6 CLASS 1 LASER PRODUCT LASER KLASSE 1 APPAREIL A LASER D E CLASSE 1 LUOKAN 1 LASERLAITE KLASS 1 LASERAPPARAT Rating plate 2 POWER SUPPLY AC po...

Page 3: ...BY ANYONE EXCEPT PROPERLY QUALIFIED SERVICE PERSONNEL CAUTION THIS PRODUCT CONTAINS A LOW POWER LASER DEVICE TO ENSURE CONTINUED SAFETY DO NOT REMOVE ANY COVERS OR ATTEMPT TO GAIN ACCESS TO INSIDE OF THE PRODUCT REFER ALL SERVICING TO QUALIFIED PERSONNEL 5 6 CLASS 1 LASER PRODUCT LASER KLASSE 1 APPAREIL A LASER D E CLASSE 1 LUOKAN 1 LASERLAITE KLASS 1 LASERAPPARAT Rating plate 2 POWER SUPPLY AC po...

Page 4: ...artment Only discs bearing the logo as shown can be played in this unit This unit can play back the CD R RW as well however some CD R RWs can not be played back due to various recording condition such as CD R RW recorder performance writing software etc It is normal for some noise comes from CD laser head when the unit is searching tracks or there is no disc in the CD compartment Always place the ...

Page 5: ...artment Only discs bearing the logo as shown can be played in this unit This unit can play back the CD R RW as well however some CD R RWs can not be played back due to various recording condition such as CD R RW recorder performance writing software etc It is normal for some noise comes from CD laser head when the unit is searching tracks or there is no disc in the CD compartment Always place the ...

Page 6: ...gram press STOP during stop mode To review the program memory status that you have made recently 1 To review programmed music track number press PRGRAM once during stop mode with PRG indication LCD display shows programmed music track number in sequence and stops with flashing indication of program memory no 1 2 To review programmed memory number After operating 1 press PROGRAM one by one LCD disp...

Page 7: ...gram press STOP during stop mode To review the program memory status that you have made recently 1 To review programmed music track number press PRGRAM once during stop mode with PRG indication LCD display shows programmed music track number in sequence and stops with flashing indication of program memory no 1 2 To review programmed memory number After operating 1 press PROGRAM one by one LCD disp...

Page 8: ... Press STOP EJECT once to stop the tape Press to remove the cassette Recommended Cassette Tapes In order to obtain optimum performance with the built in cassette tape deck it is essential to use only high quality cassette tapes The bias and equalization of this tape deck is adjusted to yield excellent results if used with brand name tapes Use C 30 C 60 and C 90 cassette tapes only We do not recomm...

Page 9: ... Press STOP EJECT once to stop the tape Press to remove the cassette Recommended Cassette Tapes In order to obtain optimum performance with the built in cassette tape deck it is essential to use only high quality cassette tapes The bias and equalization of this tape deck is adjusted to yield excellent results if used with brand name tapes Use C 30 C 60 and C 90 cassette tapes only We do not recomm...

Page 10: ...s necessary SANYO does not approve of and cannot be held responsible for any unlawful of this machine 2 1 3 2 STOP EJECT Dial pointer REWIND PLAY RECORD STOP EJECT Built in microphone behind the speaker grille 10 C Sync recording from a compact disc 1 Press STOP EJECT Insert cassette 2 Set Function selector to CD Open the CD door and place disc with label side facing up 3 Program the CD tracks if ...

Page 11: ...s necessary SANYO does not approve of and cannot be held responsible for any unlawful of this machine 2 1 3 2 STOP EJECT Dial pointer REWIND PLAY RECORD STOP EJECT Built in microphone behind the speaker grille 10 C Sync recording from a compact disc 1 Press STOP EJECT Insert cassette 2 Set Function selector to CD Open the CD door and place disc with label side facing up 3 Program the CD tracks if ...

Page 12: ...O indicator does not light BAND Selector is set at FM position Set BAND Selector to FM STEREO position Function Selector is not at RADIO mode Set Function selector to RADIO AM or FM no sound Volume at minimum Increase Volume 12 Cassette Player Function selector is not at TAPE mode Set Function selector to TAPE No sound Volume at minimum Increase Volume Sound distorted Dirty head Clean the head Tap...

Page 13: ...O indicator does not light BAND Selector is set at FM position Set BAND Selector to FM STEREO position Function Selector is not at RADIO mode Set Function selector to RADIO AM or FM no sound Volume at minimum Increase Volume 12 Cassette Player Function selector is not at TAPE mode Set Function selector to TAPE No sound Volume at minimum Increase Volume Sound distorted Dirty head Clean the head Tap...

Page 14: ...6 AU SANYO Electric Co Ltd Made in China 7 MCD XJ780A AU INSTRUCTION MANUAL CD Radio Cassette Recorder ENGLISH P1 P12 ...

Reviews: