background image

Turning on your TV for the first time

15

Select

Move

MENU

Previous

Next

English

Fran ais

ç

Español

Choose your menu language

2

1

3

ENTER

Next

4

Select

Move

MENU

Previous

Next

Time

ENTER

Next

DST
Mode

Off

Auto

Time Zone

 Pacific

Year
Month

2010

03

Day
Time

15

09 : 05  AM

Select

Move

MENU

Previous

Next

Home Mode

Store Mode

Choose your Picture Mode

ENTER

Next

9

Choose your TV source

Analog Channels

Digital Channels

0

0

Antenna 

Cable 

Cable/Satellite Box

RF CH   :    0

Scan for channels

10

Running initial setup 

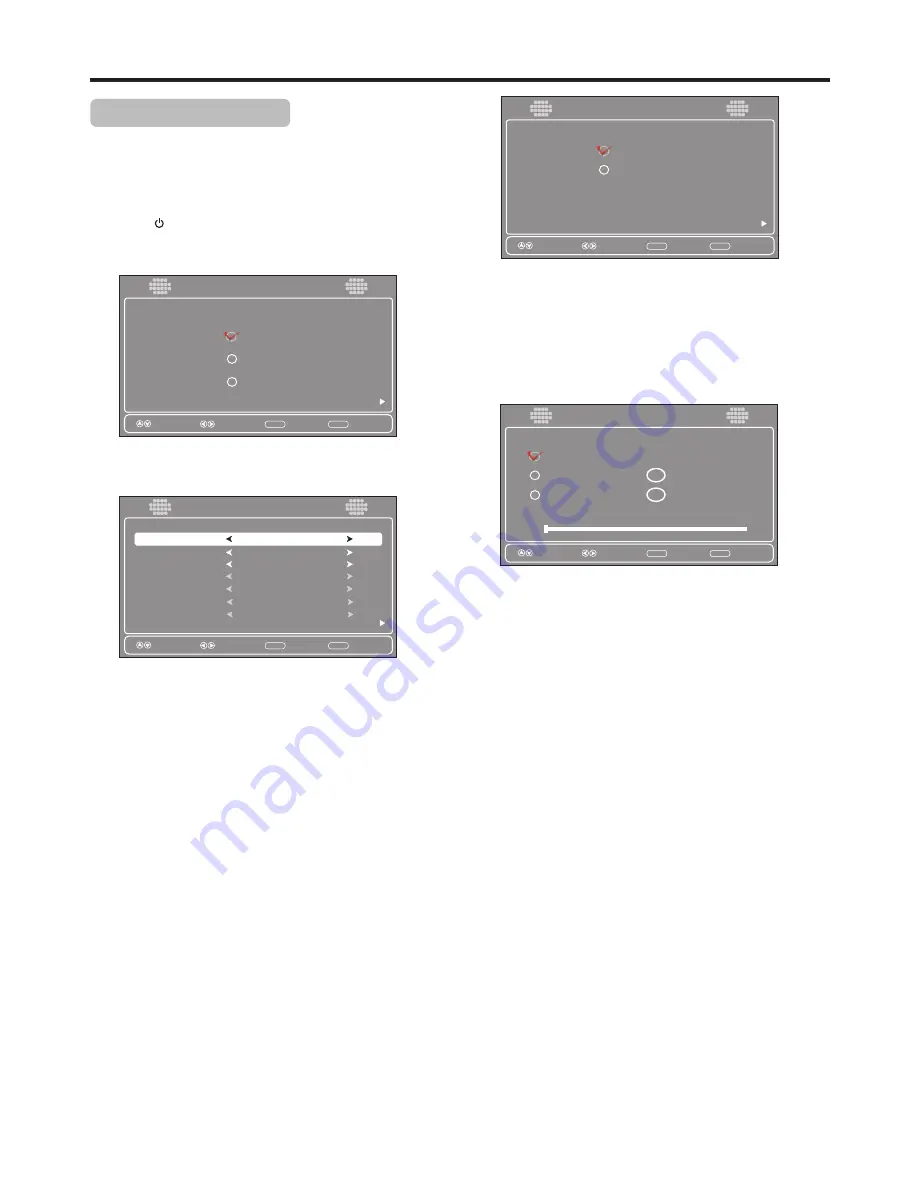
Make sure that you have inserted the batteries in the 
remote control, connected the antenna to the TV, and 
connected the AC power. 

Press   (Power), then wait several seconds. The initial 

Setup Wizard

 screen opens (only the first time you 

turn on your TV). 

Setup Wizard

Setup Wizard

Setup Wizard

Setup Wizard

Press 

6

or


5

 to select the menu language you want, 

then press 

ENTER

. The 

Time

 screen opens. 


Press


6

or


5


to highlight 

Time Zone

,  press 

3

or

4

 to 

select  your  time  zone. 

Pacific,  Alaska,  Hawaii, 

Atlantic,  Eastern,  Central,  Mountain

  can  be 

selected.   

If  your  viewing  area  observes  daylight  savings  time, 
press 

5

 or 

6

to highlight 

DST

, then press 

3

or

4

to 

select 

On

Press 

5

 or 

6

to highlight 

Mode

, then press 

3

or

4

to 

select 

Manual 

(to set the date/time manually), or 

Auto


(the  date/time  are  automatically  set  by  the  TV  signal 
source, based on the time zone you selected). 

If  you  select 

Manual

  mode,  make  the  settings  as 

follows: 

Press 

5

 or 

6


to highlight 

Year, Month, 

or

 Day

, then 

press 

3

or

4

to adjust the setting. 

Set the time by pressing 

5

 or 

6

to highlight 

Time

then  press 

3

or

4

to  highlight  the  hour,  minute,  or 

AM/PM field. Press 

5

 or 

6


to adjust the setting. 

5

6

7

8

After the above setting, press 

ENTER

 and the 

Choose 

your Picture Mode

 screen opens. 

Press 

6


or


5


to  select 

Home  Mode

  (qualifies  for 

ENERGY STAR) or 

Store Mode 

(for the retail display 

setup), then press 

ENTER

If  you  select 

Home  Mode

,  the 

Choose  your  TV  source


screen opens. 
If you select 

Store Mode

, a message stating 

“Are you sure you 

want  Store  mode?  Since  in  this  mode  Energy  saving  is  not 
realized”

 appears. Select 

Yes

 to proceed or 

No

 to exit. 

Press 

6


or


5


to  select 

Antenna,  Cable, 

or


Cable/Satellite  Box

,  depending  on  the  type  of 

connection you have. 

If you are using an antenna for a standard or HD TV signal, 

select 

Antenna

.

 If your cable is connected directly to the TV (without a 

tuner box), select 

Cable

.

 If your cable is connected to your TV through a tuner box, 

select 

Cable/Satellite Box

.  

Press 

ENTER

 when you have made your selection. The 

channel scan screen opens. 
If you selected 

Antenna 

or

 Cable

, your TV automatically 

scans  for  available  channels  in  your  area  and  stores  the 
channel information in the channel list. This may take several 
minutes. While scanning, the TV displays a progress report. 

– OR – 

If you selected 

Cable/Satellite Box

, the auto scan is not 

necessary and the screen will ask you to select the correct 
input source for your set top box. Press 

EXIT 

to close the 

menu.  

11

Notes:

During auto scan, digital programs will be scanned first, then 

analog  programs.  When  all  available  digital  programs  have 
been searched, the screen will ask you to “Press 

MENU 

or


EXIT

 if you don’t need analog channel scan.” At this point you 

can press 

EXIT

 to exit the analog channel scan, or just ignore 

it and the TV will go on scanning. 

Channel scan can take up to 30+ minutes. 

You can press 

EXIT

 at any time to stop the auto scan, but you 

will need to run the auto scan again to create a channel list.   

Select the corresponding video input source through the 

INPUT SOURCE

 menu. 

12

Select

Move

MENU

Previous

ENTER

Next

“Store mode” is for the retail display setup.

“Home mode” qualifies for ENERGY STAR,

Summary of Contents for LCD-32R45F

Page 1: ...INSTRUCTION MANUAL High Definition LCD TV LCD 32R45F Help line 1 800 263 2244 Monday to Friday 9 am to 5 pm Eastern http ca sanyo com ...

Page 2: ...irst time 15 Basic Operations 16 Adjusting PICTURE Menu Options Adjusting AUDIO Menu Options 2 Adjusting SETUP Menu Options 3 Parental Controls 24 Closed Caption 27 Time Menu Settings Input Label Restore Default Audio Only 29 Adjusting CHANNEL Menu Options Troubleshooting 33 Specifications 34 Warranty 35 20 2 2 28 30 Image Adjustments for VGA PC Mode 32 2 ...

Page 3: ... be sure the antenna system is grounded so as to provide some protection against voltage surges and built up static charges In the U S Selection 810 21 of the National Electrical Code provides information with respect to proper grounding of the mast and supporting structure grounding of the lead in wire to an antenna discharge unit size of grounding conductors location of antenna discharge unit co...

Page 4: ...r Partner Sanyo Electric co Ltd has determined that this product meets the Energy Star guidelines for energy efficiency This symbol on the nameplate means the product is Listed by Underwriters Laboratories Inc It is designed and manufactured to meet rigid U L safety standards against risk of fire casualty and electrical hazards PROTECTING THE LCD SCREEN The screen can be damaged if it is not maint...

Page 5: ...or extended periods of time C Turn the power off when not in actual use Important Information Regarding Use of Video Games Computers Captions or Other Fixed Image Displays Do not allow a still picture to be displayed for an extended period as this can cause a permanent after image to remain on the screen Examples of still pictures include logos video games computer images teletext and images displ...

Page 6: ... other flat surface If you intend to mount your TV on a wall or other vertical surface you must remove the stand column If the stand is provided please read these instructions thoroughly before attempting this installation NOTE The appearance of this product in these illustrations may differ from your actual product and is for comparative purposes only To remove the stand from the TV perform these...

Page 7: ...s 2 Replace the cover 3 Preparations Continued Using the Remote Control Installing the Batteries 7 Precaution on battery use Improper use of batteries can result in a leakage of chemicals and or explosion Be sure to follow the instructions below 1 Place batteries with their terminals corresponding to the and indications 2 Different types of batteries have different characteristics Do not mix batte...

Page 8: ...tand indirectlightingisrecommended for comfortable viewing Optimum reception of colour requires a good signal and will generally mean that an outdoor antenna must be used The exact typeand positionofthe antenna willdependuponyourparticulararea It is recommended that the 75 ohm coaxial cable be used to eliminate interference and noise which may occur due to radio wave conditions The antenna cable s...

Page 9: ...ill fulfill its function Touching the icons needs to be quickly done before the illumination disappears Main Unit front view AV2 IN L R VIDEO AUDIO S VIDEO2 HDMI3 SERVICE PORT AC IN HDMI 1 HDMI 2 PC IN COMPONENT IN ANT CABLE IN AUDIO OUT S VIDEO1 AV1 IN PB PR PB PR DIGITAL OUTPUT VGA 6 7 8 9 10 1112 13 5 1 SERVICE PORT For software updates only Do not use 2 Headphone Connect headphones to this jac...

Page 10: ... program number for multiple program channels such as 2 1 or 2 2 CH Changes channel up and down ZOOM Selects the screen size SLEEP Sets the sleep timer TV Press to selectTV INPUT Displays input source menu COMP Press repeatedly to cycle between Component inputs VGA Press to view a computer connected to your TV CCD Press to turn closed captioning on or off MTS SAP To select STEREO SAP or MONO sound...

Page 11: ...ns Connecting a VCR Connect the Audio Video cables between the Audio L R Video jacks on the unit and VCR Note For better video you can use the S video terminal if your source supports it How to connect 1 Turn on your TV then press INPUT button The INPUT SOURCE menu opens 2 Press 5 or6 to select AV1or S Video1 then press ENTER to confirm Or you can press VIDEO button one or more times to select dir...

Page 12: ...and set it to output mode For details refer to your camcorder user manual 4 Insert the tape into the camcorder and press Play button or Camcorder PlayStation Cables are often color coded to connectors Connect red to red white to white etc TV Side AV cable Connecting an Audio Amplifier Connect the Audio cables between the Audio L R jacks on the unit and Audio System How to connect TV REAR Cables ar...

Page 13: ... external device has DVI output only use a DVI to HDMI adapter cable to connect to the HDMI terminal Connect the audio cable to the VGA AUDIO IN jack on the TV rear Note HDMI cable Device with HDMI output TV REAR Connecting a Computer How to connect 1 Turn on your TV then press INPUT button The INPUT SOURCE menu opens 2 Press5 or6 to select VGA then press ENTER to confirm Or you just press VGA but...

Page 14: ...s on the device Connect the Audio cable between the AUDIO input jacks on the unit and AUDIO output jacks on the device 14 Component video cable Audio cable Device with component video TV REAR Cables are often color coded to connectors Connect red to red white to white etc Insert the plug of the headphone into the TV s Headphone jack When using headphones adjust the headphone volume so as to avoid ...

Page 15: ...e Mode screen opens Press 6 or 5 to select Home Mode qualifies for ENERGY STAR or Store Mode for the retail display setup then press ENTER If you select Home Mode the Choose your TV source screen opens If you select Store Mode a message stating Are you sure you want Store mode Since in this mode Energy saving is not realized appears Select Yes to proceed or No to exit Press 6 or 5 to select Antenn...

Page 16: ...1 S Video2 3 Press ENTER button to confirm the selection TV Watch the TV signal AV1 Watch the signal from the AV 1 input terminals AV2 Watch the signal from the AV 2 input terminals S Video1 Watch the signal from the S VIDEO1 input terminal S Video2 Watch the signal from the S VIDEO2 input terminal Component1 Watch the signal from the COMPONENT 1 input terminals Component2 Watch the signal from th...

Page 17: ...htly from the actual ones Refer to Adjusting PICTURE Menu Options section for details 17 Select Move MENU Exit Picture Mode Contrast Brightness Color Tint Advanced Video Custom 70 40 60 0 Sharpness 50 Treble Surround Refer to Adjusting AUDIO Menu Options section for details Setup menu Parental Controls Time Closed Caption Menu Settings VGA Settings Input Label Restore Default Audio Only Select Mov...

Page 18: ...ss the number buttons for the main channel then wait for the channel to change or press ENTER to immediately change the channel To select a digital sub channel press the number buttons for the main channel press the dot then press the number button for the sub channel Wait for the channel to change or press ENTER to immediately change the channel Note Button presses must be within three seconds of...

Page 19: ...onds and the banner closes automatically Displaying the DTV Program Guide You can press INFO button to display information banner The information banner will display current program information such as channel number or video input source resolution etc To close the banner press this button again or wait a few seconds and the banner closes automatically l Some DTV programs information banner may n...

Page 20: ...Video Adjusts color saturation Adjusts tint for image Adjusts image sharpness and displays a sharp image Allows you to adjust Color Temperature Zoom Mode to turn on off Noise Reduction Overscan Adaptive Contrast DCR and Auto Zoom See Advanced Video Adjustment section on the following page for more information Color Adjusts image contrast 1 2 3 Theater Select for a finely detailed picture Brightnes...

Page 21: ...ource s image 4 3 to 4 3 16 9 to 16 9 Wide Displays a full screen picture Note In D SUB HDMI mode when native resolution is 1920x1080 and input resolution is1920 x 1080p displays an input source without scaling it Cinema Stretches the picture at the edges while maintaining a good aspect ratio at the center of the screen Noise Reduction Select from Weak Middle Strong to reduce noise in the picture ...

Page 22: ... a program broadcast in stereo SAP Select to automatically switch the TV to second audio programs when this signal is received Only for digital programs Stereo SAP Broadcasts Setup Only for analog programs This TV can receive MTS stereo programs and any SAP Secondary Audio Program that accompanies the stereo program if the station transmits an additional sound signal as well as the original one St...

Page 23: ...or4 to adjust the selected items If the selected item has sub menu press ENTER to access 2 3 Time Making use of Time sub menu to set sleep timer and auto clock which automatically sets the time based on time information from a digital channel See Setting Sleep Timer and Auto Clock section for details Lets you set menu transparency and menu language through the menu See Menu Settings section for de...

Page 24: ...essfully To avoid forgetting the password write it down and keep it in the safe place There is a super password 9999 provided for you to access the Parental Controls menu or access the blocked channel Make sure to not let children know the super password Note 1 Use password to access Setup Parental Controls menu To enable the blocking scheme you set up you should set to ON To disable the blocking ...

Page 25: ...lect a rating that rating and all other higher ratings are locked Adjusting SETUP Menu Options Parental Controls Continued Select Move MENU Exit System Lock Canada RRT Setting Reset RRT Change Password On US Select Move MENU Exit MPAA TV Age based TV ratings Use these rating guidelines to prevent your children from watching certain TV programs based on the rating limits set Rating Description V Vi...

Page 26: ... Note If you want to clear the downloaded rating information select Reset RRT The rating information is cleared If rating information is broadcast by another program your TV downloads the new rating information Adjusting SETUP Menu Options Parental Controls Continued Canadian English ratings C All children C8 Children 8 years and older G General programming PG Parental guidance 14 Viewers 14 and o...

Page 27: ...splays network station information presented using either half or the whole screen if available Advanced Selection Only for digital programs Allows you to select advanced digital closed caption options Select from the available options Service1 Service 6 Option You can customize the digital closed captions that appear on your screen by doing the following steps Highlight Option item press ENTER bu...

Page 28: ...u Language Selects the on screen menu language English French Spanish are provided Setting the date and time Sleep timer lets you select the amount of time you want your TV to wait before it automatically turns off This setting is cleared when the TV is turned off 4 Press EXIT to close the menu 1 Press MENU use 3 or4 to select Setup menu press 6 to access Select Time item then press ENTER to open ...

Page 29: ...unning this function will reset most settings of current source to its default settings Playing TV audio only 1 Press MENU use 3 or4 to select Setup menu press 6 to access Press 5 or 6 to select Audio Only item then press 3 or4 to select On 2 You can turn off the video for a TV broadcast and listen to the audio only Notes Audio Only only works when the input source is TV and your TV is receiving a...

Page 30: ...ite a check mark appears or not the check mark disappears 2 In Channel menu select Favorites item press ENTER to access 1 To select a channel in the favorite channel list press FAVORITE press 5 or6 to highlight the channel then press ENTER Press EXIT to close the menu 3 Now a confirmation box appears Use 3 or4 to highlight Yes and press ENTER to start auto scan If you want to abandon highlight No ...

Page 31: ...The check mark appears if you add back the channel by pressing ENTER again 2 Lets you delete channels from the channel list so your TV skips the channels when you press Channel up down button You can still tune to the channel using the number buttons Show Hide In Channel menu select Show Hide item press ENTER to access 1 Select Move MENU Exit Channel No Channel Name Show 1 2 Sencore 2 0 2 1 WGBH S...

Page 32: ...ing Computer Settings 1 4 In VGA mode press MENU and the main menu screen displays Press 5 6 3 4 to navigate through the options or adjust an option To confirm press ENTER Press 3 or4 to select Setup menu press 6 to access the menu 2 5 Clock Adjusts the sample frequency 32 Press EXIT to close the menu 3 Press 5 or6 to select VGA Settings item then press ENTER to access Select Move MENU Exit Time C...

Page 33: ...olve the problem Good picture no sound The sound may be muted Press MUTE again to cancel Make sure the stereo mode is set to stereo or mono Audio noise Communication problems may occur if infrared communication equipment e g infrared cordless headphones is used near the TV Move the infrared communication equipment away from the TV until the noise is eliminated Troubleshooting 33 General Problem Po...

Page 34: ... Requirement AC 120 V 60 Hz Power Consumption 98 W Dimensions W x H x D with stand Weight Terminals Viewing angle 776 555 210 mm 10 3 kg stand included o 178 Vertical 178 Horizontal o Response time 6 5 milliseconds Contrast ratio 5000 1 Typ TV system NTSC M ATSC Receiving channel VHF 2 13 UHF 14 69 CATV 1 125 CADTV 1 135 DTV 2 69 Audio multiplex BTSC system Audio out 8 W x 2 Antenna in 1 AV in 2 S...

Page 35: ...inal retail purchaser are responsible for any costs of TRANSPORTING the product to and from SANYO Canada Inc or an authorized Sanyo Service Depot You also are responsible for the cost of any MAINTENANCE necessary in respect of the product In home service is only available to the units whose screen size is 46 inches or over and limited to the locations within a 30 km radius of any authorized Sanyo ...

Page 36: ...5944037590 Ver 1 0 PRINTED ON RECYCLED PAPER ...

Reviews: