background image


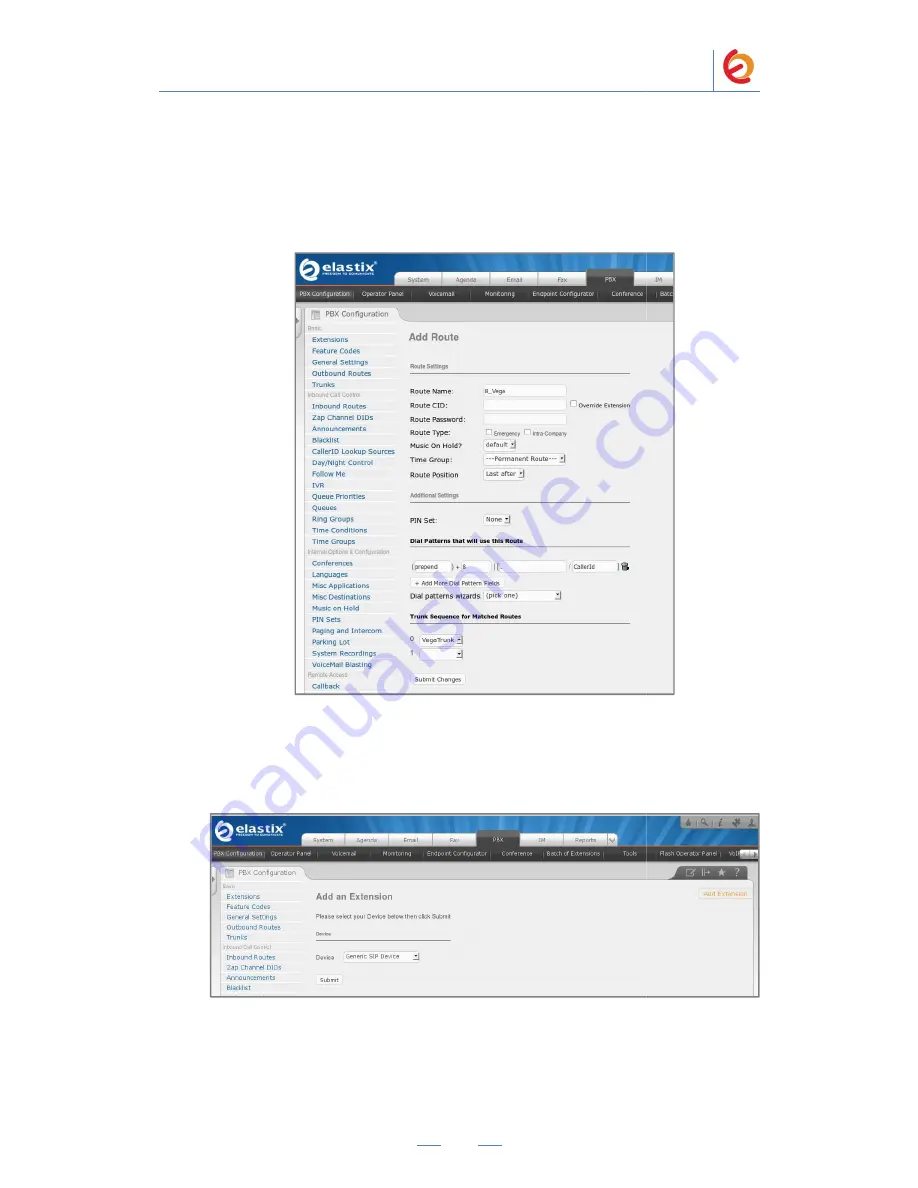
Route Name:

Dial patterns 


Prefix: (“8” in this example) | 

Trunk Sequence for Matched Routes


0: (“VegaTrunk

10. Click on “Submit
extension  for  an  IP  Phone.  Go  to  “PBX  => 
click on “Submit” having the “Generic SIP Device” option selected. (Figure 4

11. Fill in the following information on the Add SIP Extension page (Figure 4

PaloSanto Solutions

Sangoma Europa Vega 50 BRI Server Setup Guide


6


Route Name: (“8_Vega” in this example) 

” in this example) | Match pattern: (“.” in this example)

Trunk Sequence for Matched Routes 

Trunk” in this example) 

Figure 4-6. Add Route


Submit” at the end of the page and Apply changes. Now, we’ll create an 

extension  for  an  IP  Phone.  Go  to  “PBX  =>  PBX  Configuration  =>  Extensions”  and 
click on “Submit” having the “Generic SIP Device” option selected. (Figure 4

Figure 4-7. Add SIP Extension 

11. Fill in the following information on the Add SIP Extension page (Figure 4

anto Solutions 

Sangoma Europa Vega 50 BRI Server Setup Guide 


(“.” in this example) 


. Now, we’ll create an 

PBX  Configuration  =>  Extensions”  and 

click on “Submit” having the “Generic SIP Device” option selected. (Figure 4-7) 


11. Fill in the following information on the Add SIP Extension page (Figure 4-8): 

Summary of Contents for Europa Vega 50 BRI and Elastix

Page 1: ...rg Sangoma Europa Vega 50 BRI and Elastix Server Setup Guide http www elastix org Sangoma Europa Vega 50 BRI and Elastix Server Setup Guide http www elastix org Sangoma Europa Vega 50 BRI and Elastix...

Page 2: ...2 Setup Diagram is a setup diagram for a single Vega 50 BRI gateway configuration configure a SIP Trunk for communication between the IP Phone Figure 1 1 Setup Diagram Host PC Environment Table 2 1 Ho...

Page 3: ...omer for this guide we have used the IP address 192 168 1 65 2 On the Login page type the username and password for an administrative user into the Username and Password fields see Figure 4 1 The user...

Page 4: ...ure a SIP Trunk Figure 4 3 Add a SIP Trunk 6 On the Add SIP Trunk page Figure 4 4 fill in the following information General Settings Trunk Name VegaTrunk in this example Outgoing Settings Trunk Name V...

Page 5: ...at the end of the page The SIP Trunk and you will see the page on Figure 4 5 displaying the Apply Configuration Changes on top of the screen n the Apply Configuration Changes Here link Figure 4 5 App...

Page 6: ...ce for Matched Routes Trunk in this example Figure 4 6 Add Route Submit at the end of the page and Apply changes Now we ll create an extension for an IP Phone Go to PBX PBX Configuration Extensions an...

Page 7: ...9si0t in this example Figure 4 8 Add SIP Extension 12 Click on Submit at the end of the page and Apply changes Create an IVR for the incoming calls to Elastix To do this go to PBX PBX Configuration IV...

Page 8: ...k ribbon that appears at the top of the page Now go to PBX PBX Configuration Inbound Routes Click on Add Incoming Route link Figure 4 10 Set the following Name of inbound route Incoming_Calls in this...

Page 9: ...Elastix Server 15 To configure the gateway you will need to enter the information from the trunk created on the Elastix Server into the Vega 50 and set other parameters by logging into the WebUI Go to...

Page 10: ...4 xxx yyy Web Access Administrator User admin Web Access Administrator Password admin 16 When the WebUI is loaded go to Quick Configuration located on the left side of the page and click on Continue b...

Page 11: ...stix Server s IP Address 192 168 1 65 in this example Registrar Address Elastix Server s IP Address Registration Mode Gateway Registration and Authentication ID Vega50BRI in this example Authenticatio...

Page 12: ...igure 4 16 Applying changes 21 Click on Accept Now go to Status located on the left side of the page to check whether the registration was successful Figure 4 17 Figure 4 17 Status 22 If the gateway i...

Page 13: ...re 4 18 Expert Config SIP 23 In the SIP Profiles section click on Modify and set From header user info parameter to Calling party option Figure 4 19 Figure 4 19 SIP 24 Click on Submit button Apply cha...

Page 14: ...D 0301 see figure 4 15 will be redirected to interface with ID 9901 SIP Interface see figure 4 19 TEL is the called number and TELC is the calling number The characters means that any number is accept...

Page 15: ...cted to interface with ID 0301 see figure 4 15 TEL is the called number The characters means that any dialed number is accepted In this example we are using only the Interface 1 in the Vega 50 BRI You...

Page 16: ...ions Sangoma Europa Vega 50 BRI Server Setup Guide 16 30 Configure the other IP SIP Phone with the correct parameters 31 At this point Sangoma Vega 50 BRI Gateway is ready for using This step complete...

Reviews: