background image

24

GB

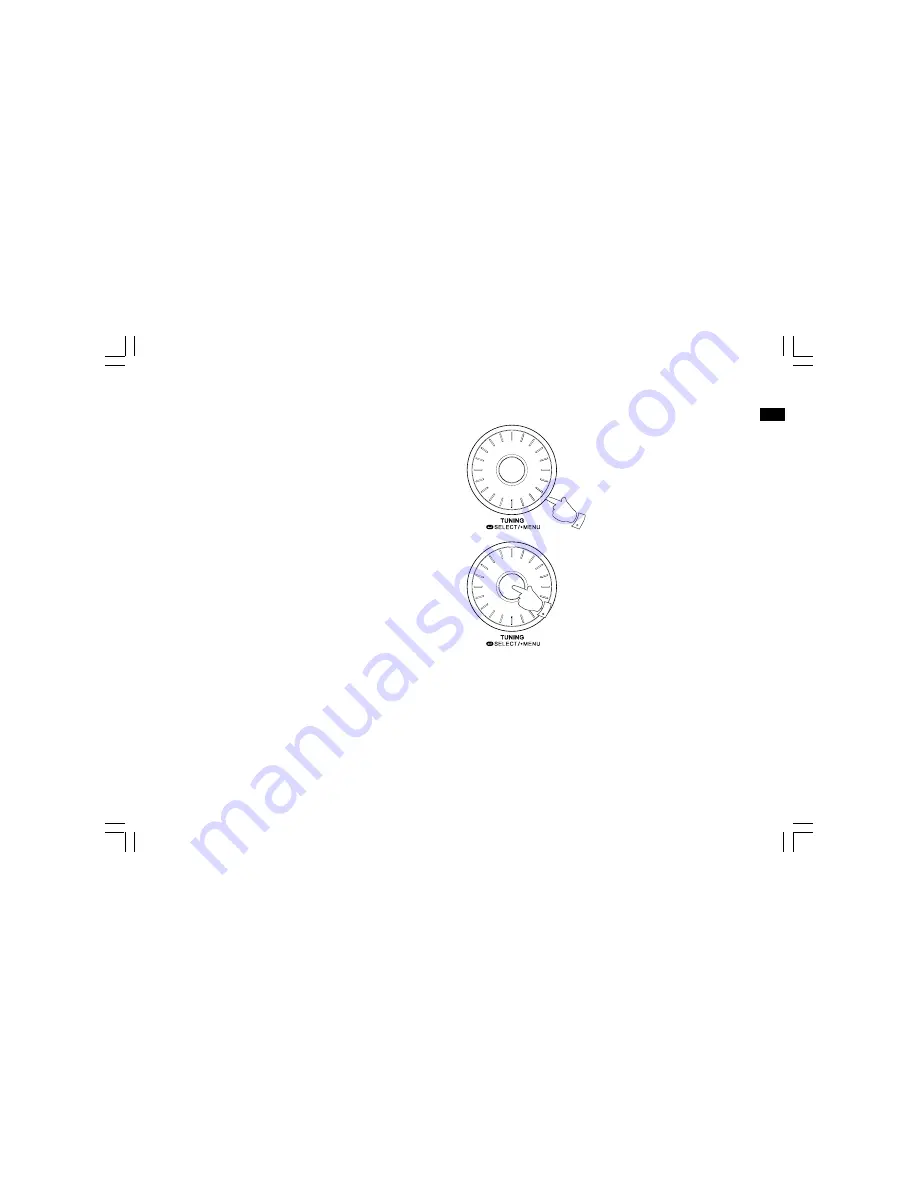
FM stereo / mono

1. If an FM station is received with a weak signal some hiss may
    be audible. To reduce the hiss press and hold the Tuning control,
    and rotate the Tuning control until “FM AUDIO” appears on
    the display. Press the Select button to enter the setting.
    Rotate the Tuning control to select Mono and press the
    Select button. Your radio will switch to mono mode.

2. To return to stereo mode rotate the Tuning control to choose Auto,
    and press the Select button. The radio will switch to stereo mode.

1,2

1,2

Summary of Contents for DCR-10

Page 1: ...DCR 10 Version 1 GB...

Page 2: ...meet Apple performance standards Apple is not responsible for the operation of this device or its compliance with safety and regulatory standards Please note that the use of this accessory with iPod m...

Page 3: ...5 16 Finding new stations DAB 17 Manual tuning DAB 18 Station order setup DAB 19 20 Dynamic Range Control DRC setting DAB only 21 Operating your radio Search tuning FM 22 Manual tuning FM stereo mono...

Page 4: ...place the radio on au unstable cart stand bracket or table The radio may fall causing serious physical injury and damage to the radio 8 Unplug the radio from the AC power outlet before cleaning Use o...

Page 5: ...o alarm timers with snooze to wake you either with radio alarm iPod or buzzer alarm Human Wake System Adjustable sleep timer which can be set to turn the clock radio off after between 15 and 120 minut...

Page 6: ...ep button Volume Tone control Preset 1 Folder down Preset 2 Back forward Preset 3 Fast forward Controls and connections iPod Universal Dock Adjuster iPod Dock connector Preset 4 Play pause Preset 5 St...

Page 7: ...6 GB 16 17 LCD display Remote control sensor Loudspeakers 18 Controls and connections...

Page 8: ...7 19 20 21 22 23 24 Controls and connections Headphone socket DC in socket SD card slot FM antenna Aux in socket Line out socket...

Page 9: ...isplay icons A B C D E F G H I J PM indicator Time display Signal bar RDS icon CT clock time icon Alarm 2 icon Alarm 1 icon Frequency information for station display DAB FM band icon Sleep timer Snooz...

Page 10: ...er Up button Tuning Down Rewind button Menu button Repeat button Media button Sleep Clock set button Record button Equalizer button Alarm button Radio button Auto tune button Random repeat button Play...

Page 11: ...lose the battery cover by inserting the retaining lugs first then apply pressure to the free end such that the catch latches the cover securely 4 If the remote is not to be used for an extended period...

Page 12: ...ns lead into the wall socket IMPORTANT The mains plug is used as the means of connecting the radio to the mains supply The mains socket used for the radio must remain accessible during normal use In o...

Page 13: ...wn Press the Select button to tune to this station or rotate the Tuning control to select an alternative station The display will show the station name on the lower line of the text display 5 If the s...

Page 14: ...the text display Stop rotating the Tuning control when you find the station that you wish to hear 3 Press and release the Select button to cause the radio to tune to the chosen station The display may...

Page 15: ...ith them If a station has a secondary services associated with it the display will show next to the station name on the station list The secondary service will then appear immediately after the primar...

Page 16: ...modes a b c d e Displays scrolling text messages such as artist track name phone in number etc Displays the type of station being listened to e g Pop Classic News etc Displays the name of the multipl...

Page 17: ...ency for the current DAB radio station Displays the digital bit rate for the current DAB radio station Displays the audio type of the station being listened to Displays signal strength for the station...

Page 18: ...ss and hold the Tuning control to enter the main menu Rotate the Tuning control until the display show FUL SCAN 2 Press and release the Select button and the radio will perform a scan of the DAB frequ...

Page 19: ...lease the Select button 3 Rotate the Tuning control to select the required DAB channel 4 Press and release the Select button to select the channel A signal strength display will appear The clear recta...

Page 20: ...id Note The default station order setting is alphanumeric 1 Press and hold the Tuning control so that STA LIST appears on the display 2 Rotate the Tuning control until STA ORDER appears on the display...

Page 21: ...Z Ensemble Rotate the Tuning control until ENSEMBLE appears on the display This mode organizes the station list by DAB multiplex Valid Rotate the Tuning control until VALID appears on the display The...

Page 22: ...lease the Select button to enter the DRC adjustment mode 5 Rotate the Tuning control to select the required DRC setting the default is 0 DRC 0 DRC is switched off Broadcast DRC will be ignored DRC 1 2...

Page 23: ...s a station of sufficient strength 5 After a few seconds the display will update The display will show the frequency of the signal found If the signal is strong enough and there is RDS data preset the...

Page 24: ...the wire spring aerial for optimal FM reception 3 Rotate the Tuning control to tune to a station The frequency will change in steps of 50kHz 4 When the end of the waveband is reached the radio will r...

Page 25: ...otate the Tuning control until FM AUDIO appears on the display Press the Select button to enter the setting Rotate the Tuning control to select Mono and press the Select button Your radio will switch...

Page 26: ...M mode the lower line of the text display can be set to any of the following options If RDS data is received the lower line of the text display is used to show the radio station name 1 Press the Info...

Page 27: ...is able to receive RDS information from the broadcaster 2 If there is no RDS data available or if the signal is too weak then the radio will display only the FM frequency Time Date Frequency Display t...

Page 28: ...Tune to the required station as previously described 3 Press and hold the required Preset button 1 to 5 until the display shows for example P3 SAVED The station will be stored using the chosen preset...

Page 29: ...required waveband by pressing the Source button 3 Momentarily press the required Preset button 1 to 5 to cause your radio to tune to the station stored in preset memory Note If you have not previousl...

Page 30: ...tton to select the FM band 3 Press and hold the Tuning control so that TIME SET appears on the display 4 Rotate the Tuning control until the display shows SCAN ZON on the lower line Press the Select b...

Page 31: ...Press the Source button to select the desired waveband 3 To place your radio in Rewind mode simply press and release the Rewind button the sound from the speaker will be muted The display will show t...

Page 32: ...der to operate with the DCR 10 SD card slot is located at the rear of the unit next to the DC in socket Inserting and removing SD cards 1 To insert an SD card into your radio and slid the SD card into...

Page 33: ...you put the unit to standby mode without pressing the Stop button then the next time the unit is switched on it will return to the previously played file Selecting a file 1 When the SD card is playin...

Page 34: ...another folder 1 With the SD card in stop or play mode press and release the Folder Down button The first file of the next folder will be displayed Repeat Intro Random play The DCR 10 allows you to us...

Page 35: ...ust use the FAT or FAT32 file system in order to operate with the DCR 10 Such media is usually supplied already formatted or can be formatted using a PC with a suitable card reader for SD SDHC cards I...

Page 36: ...order to stop the recording press the Record button once more Recording will stop and a file will have been written to the SD card Files that have been written to the SD card are held in folders acco...

Page 37: ...adaptor into the iPod docking recess so that it is securely seated 3 Carefully place your iPod on the universal iPod dock connector then press the Standby Sleep button to switch on the radio To avoid...

Page 38: ...d 2 Use the Folder Up or Down buttons on the remote control as required to move up and down a menu screen on your iPod 3 Press the Select button to choose the highlighted on screen menu item If this i...

Page 39: ...the Pause function To play an alternative selection use the iPod menus to make the selection using the Play Pause button to stop playing the current item if needed Note iPods vary in how they respond...

Page 40: ...epeat all 2 While the iPod is playing press the Repeat button until the repeat all files symbol appears in the iPod display All files in the current album or playlist will be repeated Repeat cancel 3...

Page 41: ...40 GB Your DCR 10 works with the following models of iPod...

Page 42: ...o show on the display 3 Press and release the Select button to choose alarm setting On Off will show on the lower line of the text display 4 Rotate the Tuning control to choose whether to set the alar...

Page 43: ...Weekends will sound only on weekends 9 Press and release the Select button to select the alarm mode Alarm mode will show on the lower line of the text display 10 Rotate the Tuning control to choose t...

Page 44: ...will show on the display To view an alarm setting select VIEW instead of SETTING at steps 2 and 3 The display will show successively the alarm details Note When the alarm is set to wake by DAB or FM...

Page 45: ...the alarm for five minutes The snooze symbol will appear in the display 2 To adjust the snooze timer duration press and hold the Tuning control and rotate the Tuning control until SNOZ DUR appears on...

Page 46: ...button to enter the sleep setup SLEEP XX will appear on the display 2 Rotate the Tuning control to select the desired sleep time or repeatedly pressing the Standby Sleep button The options are 15 30...

Page 47: ...control and rotate the Tuning control until the display shows SYSTEM Press the select button and rotate the Tuning control until TIME FMT shows on the display 2 Press and release the Select button to...

Page 48: ...e Date format 8 Rotate the Tuning control to change the date format as needed and press and release the Select button to confirm the date format setting 9 Press and hold the Tuning control and rotate...

Page 49: ...ing the clock time using RDS CT 1 When tuning to a station transmitting RDS data press and hold the Tuning control 2 Rotate the Tuning control until TIME SET appears on the display Press the Select bu...

Page 50: ...refer a lower brightness level than the standard setting 1 Press and release the Snooze Dimmer button repeatedly to adjust the brightness level of the LCD display The backlight level will change with...

Page 51: ...e DCR 10 has six preset equalizer modes Alternatively you may set the treble and bass levels to your own preferences 1 Press the Volume control and rotate the Tuning control to cycle through the vario...

Page 52: ...display Then press and release the Select button 3 The current bass setting will be shown on the lower line Rotate the Tuning control until the desired level is displayed 4 If you wish also to adjust...

Page 53: ...USER SET appears on the display Press the Select button twice until TREBLE appears on the lower line of the text display 6 To adjust the treble setting rotate the Tuning control until the desired leve...

Page 54: ...ut socket is provided on the rear of your radio to permit an audio signal to be fed into the unit from an external audio device such as iPod MP3 or CD player 1 Repeatedly press and release the Source...

Page 55: ...g an audio cable into this socket will not mute the internal loudspeaker Set the volume control to a low level if desired Headphone socket A 3 5mm stereo Headphone Socket is provided on the rear of yo...

Page 56: ...t button The display will show YES or NO 4 Rotate the Tuning control to select Yes and press and release the Select button again to confirm the rest operation 5 After a system reset all radio station...

Page 57: ...nd hold the Tuning control and rotate the Tuning control until the display shows SYSTEM and press the Select button to enter the menu 2 Rotate the Tuning control until the display shows SW VER and pre...

Page 58: ...rial System If at any time in the future you should need to dispose of this product please note that Waste electrical products should not be disposed of with household waste Please recycle where facil...

Page 59: ...58...

Reviews: