background image


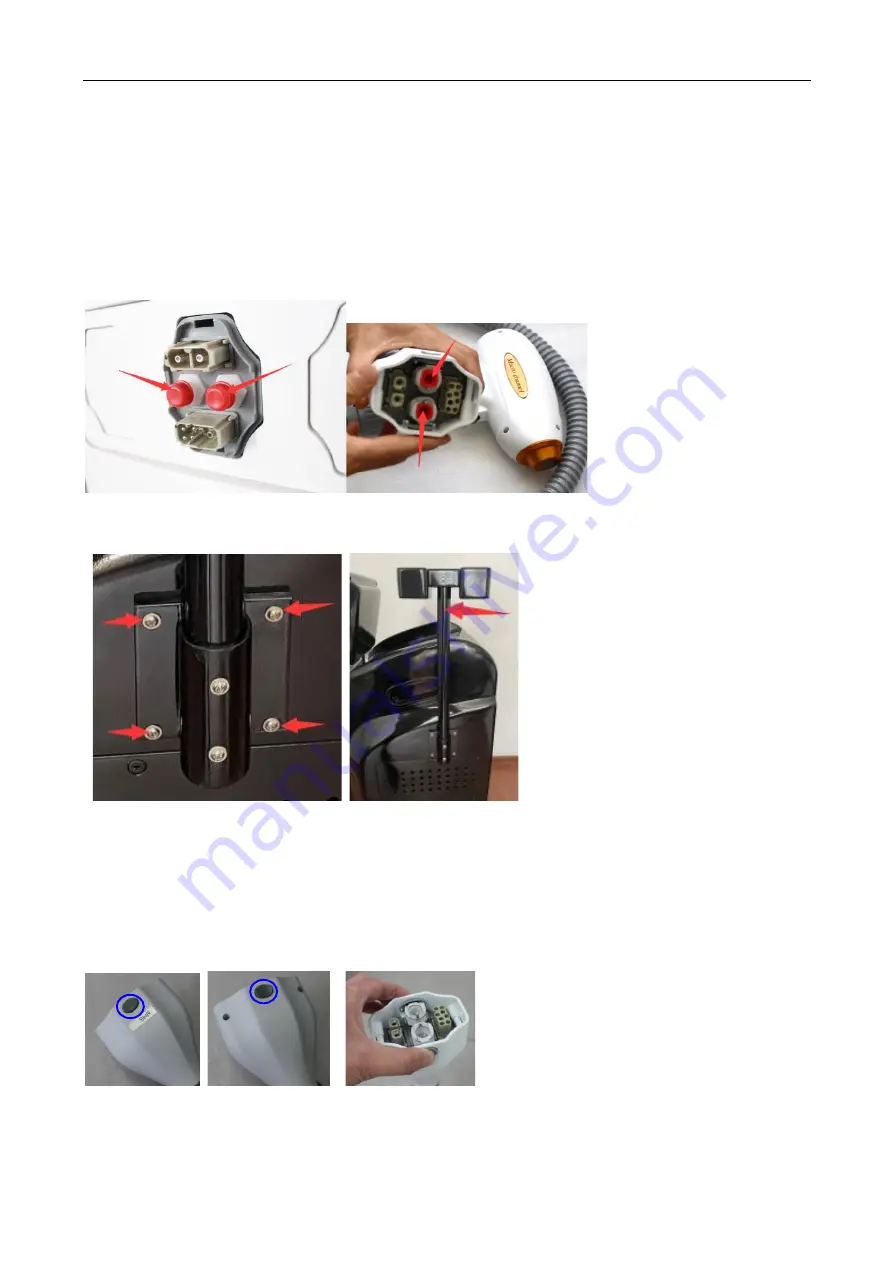
The water valves on the connectors are not auto-lock type. That means water inside will flow out when 
you unplug the handpiece. (water in machine will not run out because the connector on the machine is 
higher than the water tank inside).   

Therefore, if you need to ship the machine, please discharge water from both machine and handpiece 
and plug the water valves as below to prevent the residual water from leaking. 


2. 

Install the handpiece holder 


3. 

  Connect the handpiece onto the machine 

3.1 Press down the 2 buttons firstly. 
There  are  two  buttons  on  both  above  and  below  of  each  handpiece. The  two  buttons  may  be  in  the 
upspring or press-down state. Before connect it onto the machine, it must be in the press-down state. So 
press down the 2 buttons firstly. 


3.2 Connect it in the right direction.   
There are two parts of the connectors: machine part and handpiece part. Please look at the following 


Summary of Contents for LS10

Page 1: ...Triple Diode Laser 808nm 1064nm 755nm Hair Removal System Operation Manual Model Name LS10...

Page 2: ...1 Introduce Front View Back view Emergency Key Switch 10 4 movable touch screen Triple diode laser handpiece Electrical power port Water Overflow hole Discharge hole Interlock Water Injection hole Air...

Page 3: ...ry careful to remove the cap above to avoid a damage on water valves There is video to show you how to remove it The method to take down the overflow plugs is to 1 push in the valve as below and at th...

Page 4: ...e water valves as below to prevent the residual water from leaking 2 Install the handpiece holder 3 Connect the handpiece onto the machine 3 1 Press down the 2 buttons firstly There are two buttons on...

Page 5: ...power of your hands to plug it When you plug one well you can hear the click the button springs and it locks Then you can try to pull the handpiece connector slightly to check whether or not it locks...

Page 6: ...into the water injection hole and inject water until water runs out from overflow hole That means the water tank in the machine is full of water Then close the water overflow hole Chapter 3 Operation...

Page 7: ...3 Turn on key switch and emergency switch Turn on the screen...

Page 8: ...SR is skin rejuvenation Click HR into treatment interface Energy 1 100 adjustable Pulse Width 5 400 adjustable Frequency 1 10 adjustable You can also adjust the contact cooling on handpiece this area...

Page 9: ...How to store settings E g you have got a good settings as below for a skin type You will click the settings are stored Chapter 4 Treatment 1 Operation Steps 1 Shave the hair in the treatment area...

Page 10: ...the penetration The light pulse irradiates on the cold gel every area that need light pulse treatment should be pasted by new cold gel 4 Switch the key clockwise to start the machine and then the scre...

Page 11: ...d then turn off the key The Quick stop Button is designed to shut off the laser not shut off the VAC The Key is designed to shut off the VAC input 2 Treatment Notice 1 The treatment of the hair remova...

Page 12: ...ser pulses to eyes or watch the laser directly Chapter 5 Maintenance and Warranty This chapter descript the daily maintenance including cleaning the system cleaning the crystal Water Filter The water...

Page 13: ...The treatment head should always be kept clean clean of the treatment head is necessary after each treatment When cleaning the treatment head you can use wet soft clothes and then air it to become com...

Page 14: ...treatment head is near the limit of useful life Chapter 6 Parameters 6 1 Basic parameter Settings Dark hair Short pulse width light hair Long pulse width Thick hair Long interval low energy Thin hair...

Page 15: ...post exposure recently or sun exposure customer 10 recent days within 3 months using cosmetics containing hormones such as some freckle products customers 11 epilepsy diabetes bleeding tendency custom...

Page 16: ...phenomenon After treatments later it will go away within a few hours 7 the treatment parameters settings should be recorded for later use 8 20 minutes after the treatment finished washed cold gel do c...

Page 17: ...re the laser pulse launching after the system ready to issue a beep sound 7 4 4 photo Photographic archive for the patient before and after surgery the patient face left right and front Because many p...

Page 18: ...also be used to reduce swelling If the blisters scab available moisture ointment like Vaseline to keep it moist 7 6 2 to prevent sun exposure one month after treatment patients should used high facto...

Page 19: ...kin Add synthesis of vitamin C cream on the skin Add sunscreen on the skin Night Clean the skin Apply moisturizing cream 7 7 Advantage of the treatments 1 no damage 2 the pain is not obvious 3 fast ef...

Page 20: ...e settings base on the following chart according to different people Skin type Laser Power Pulse Width Frequency 1 50 50 3 5 2 40 45 3 5 3 15 40 3 5 4 15 35 3 5 5 15 20 3 5 6 10 10 3 5 Specifications...

Reviews: