background image

KBox C-103-NGSF  - User Guide, Rev. Proof of Concept 


www.kontron.com 


// 58 


8/


Starting Up 


  The KBox C-103-NGSF must be operated only with the nominal voltage of 

24V DC of type SELV. For details refer to the chapter 11/ “Technical 
Specifications”. 


8.1.


Connecting to DC Main Power Supply 

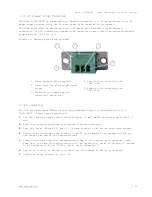
The DC input connector (Figure 9 and Figure 11 marked X101) is located on the front side 
of the KBox C-103-NGSF. The  
KBox C-103-NGSF will be connected to a DC main power supply via the supplied Phoenix 
power plug terminal (see Figure 31) and corresponding power wires (prepared as described 
in the subsection 7.3.1 “Cabling”). 


  Before using your system, become familiar with the system components 

and check that everything is properly connected. Following a proper 
cabling procedure will prevent a false power-on condition, which could 
result in unit operational failure.  
When you install/disconnect the unit, the functional earth connection 
must always be made first and disconnected last. 
Also, it is recommended that the last connections attached to the 
system should be the power wires! 


  The KBox C-103-NGSF must be connected to a DC mains power supply 

complying with the requirements of IEC 61010-1 and IEC 60950-1 
standard or better. It must be observed that wiring and short-
circuit/overcurrent protection is performed according to the 
applicable standards, regulations and respect to the electrical 
specification of the KBox C-103-NGSF. 
Even when the system is turned off via the power button (Figure 9 and 
Figure 12, marked PWR) parts of the system are still energized. 
The disconnecting device (fuse/circuit backer) rating must be in 
accordance with the wire cross-section and the rated current of the 
KBox C-103-NGSF. 


  The wires used for power connections must be clearly marked (+/-

/functional earth) to ensure that they will be proper connected to the 
DC IN connector of the KBox C-103-NGSF and to the main power source, 
corresponding to signals marked; refer to Figure 11 and Figure 31.  
In addition, the cables must have some form of support so as to 
minimize the strain on the unit’s connectors. 


  Only connect to an external power supply delivering the specified 

input rating and compling with the requirements of Safety Extra Low 
Voltage (SELV) and Limited Power Source (L.P.S.) of UL/IEC 60950-1 or 
(PS2) of UL/IEC 62368-1. 


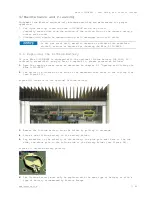
To connect the KBox C-103-NGSF to a corresponding DC main power supply, please perform 
the following steps: 

Summary of Contents for KBOX C-103-NGSF

Page 1: ... USER GUIDE www kontron com 1 KBox C 103 NGSF User Guide Rev Proof of Concept KBOX C 103 NGSF USER GUIDE ...

Page 2: ...KBox C 103 NGSF User Guide Rev Proof of Concept www kontron com 2 This page has been intentionally left blank ...

Page 3: ...uitable for the specified use without further testing or modification Kontron expressly informs the user that this user guide only contains a general description of processes and instructions which may not be applicable in every individual case In cases of doubt please contact Kontron This user guide is protected by copyright All rights are reserved by Kontron No part of this document may be repro...

Page 4: ...g safeguards You are solely responsible for compliance with all legal regulatory safety and security related requirements concerning your products You are responsible to ensure that your systems and any Kontron hardware or software components incorporated in your systems meet all applicable requirements Unless otherwise stated in the product documentation the Kontron device is not provided with er...

Page 5: ...t information refer to the corporate offices contact information on the last page of this user guide or visit our website CONTACT US Customer Support Find Kontron contacts by visiting https www kontron de support and services Customer Service As a trusted technology innovator and global solutions provider Kontron extends its embedded market strengths into a services portfolio allowing companies to...

Page 6: ...nd or prescribed by the law may endanger your life health and or result in damage to your material ESD Sensitive Device This symbol and title inform that the electronic boards and their components are sensitive to static electricity Care must therefore be taken during all handling operations and inspections of this product in order to ensure product integrity at all times HOT Surface Do NOT touch ...

Page 7: ...KBox C 103 NGSF User Guide Rev Proof of Concept www kontron com 7 ...

Page 8: ...l voltages before performing any work on this product Earth ground connection to vehicle s chassis or a central grounding point shall remain connected The earth ground cable shall be the last cable to be disconnected or the first cable to be connected when performing installation or removal procedures on this product Special Handling and Unpacking Instruction ESD Sensitive Device Electronic boards...

Page 9: ...ial for future storage or warranty shipments If it is necessary to store or ship the product then re pack it in the same manner as it was delivered Special care is necessary when handling or unpacking the product See Special Handling and Unpacking Instruction Quality and Environmental Management Kontron aims to deliver reliable high end products designed and built for quality and aims to complying...

Page 10: ...3 NGSF User Guide Rev Proof of Concept www kontron com 10 Environmental protection is a high priority with Kontron Kontron follows the WEEE directive You are encouraged to return our products for proper disposal ...

Page 11: ...ernally accessible 23 3 2 System Expansion Capabilities 23 3 2 1 M 2 Interfaces 23 3 2 2 Mini PCI Express Interface 23 3 2 3 Standard PCI Express Interfaces 23 3 2 4 SATA Interfaces 23 3 2 5 Internal USB 3 0 Interface 24 3 2 6 Internal microSD Card and microSIM Card Interface 24 3 3 KBox C 103 NGSF Variant 26 3 3 1 X101 X201 Power Input Connectors 28 3 3 2 X102 X105 X108 X111 Ethernet Connectors E...

Page 12: ... 1 Specifications of the internal M 2 Connectors 54 7 2 Control Cabinet Mounting 54 7 3 DC Power Plug Terminal 56 7 3 1 Cabling 56 7 4 Side Wall Mounting Option 57 8 Starting Up 58 8 1 Connecting to DC Main Power Supply 58 8 2 Power OFF ON Procedure 59 8 3 Operating System and Hardware Component Drivers 59 9 Maintenance and Cleaning 60 9 1 Replacing the Lithium Battery 60 9 2 Preventive Maintenanc...

Page 13: ... 1 Power Supply Protection Requirements 80 11 4 2 Power Consumption 82 11 4 3 Protective Earth Stud Bolt 82 12 Standard Interfaces Pin Assignments 83 12 1 1 X101 Power Input Connector 83 12 1 2 X102 X105 X108 X111 Ethernet Connectors 83 12 1 3 X103 X106 X109 USB 3 0 Ports 84 12 1 4 X104 X107 X110 USB 2 0 Ports 84 12 1 5 X112 X113 X203 DisplayPorts 84 12 1 6 X114 Serial Interface COM 1 RS232 RS422 ...

Page 14: ...d as dual RS485 85 Table66 X114 Serial Interface COM 1 and COM2 configured as dual RS422 86 Table 68 Serial Port RS232 RS422 configured as RS232 88 Table 69 Serial Port RS232 RS422 configured as RS422 88 Table 71 List of Acronyms Example 89 List of Figures Figure 1 Example of KBox C 103 NGSF type label 21 Figure 4 Bottom side view 25 Figure 5 Right side view 25 Figure 6 Front side view config with...

Page 15: ... Location of the optional Lithium battery 60 Figure 56 Lithium battery polarity 60 Figure 57 Fan tray extension detail shown as KBox C 103 NGSF 63 Figure 58 KBox C 103 NGSF with removed fan tray and removed air filter 64 Figure 59 Filter mat Holder without air filter 64 Figure 60 Holder shown for KBox C 103 NGSF with air filter 64 Figure 61 Air filter shown for KBox C 103 NGSF 64 Figure 76 Dimensi...

Page 16: ...ur region comes with the product only this cable should be used to supply the product Do not use an extension cable to connect the product To guarantee that sufficient air circulation is available to cool the product please ensure that the ventilation openings are not covered or blocked If an air filter is provided this should be cleaned regularly Do not place the system close to heat sources or d...

Page 17: ...KBox C 103 NGSF User Guide Rev Proof of Concept www kontron com 17 ...

Page 18: ...cessible disconnecting device is used in the application e g overcurrent protective device if the device itself is not disconnectable a disconnect device if provided in or as part of the equipment shall disconnect both poles simultaneously interconnecting power circuits of different devices cause no electrical hazards A sufficient dimensioning of the power cable wires must be selected according to...

Page 19: ...ction 3 Always handle electrostatically sensitive components by their edge or by their casing 4 Avoid contact with pins leads or circuitry 5 Turn off power and input signals before inserting and removing connectors or connecting test equipment 6 Keep work area free of non conductive materials such as ordinary plastic assembly aids and Styrofoam 7 Use only field service tools which are conductive s...

Page 20: ...ase contact Kontron for help and information 2 2 Scope of Delivery KBox C 103 NGSF Build as Proof of Concept POWER SUBCON PSC 1 5 3 F 3 pin plug Device Passport which states the status of the delivered System 2 2 1 Optional Parts System Expansion Front accessible drive bays for 2 5 SATA HDD SSDs M 2 cards PCIe cards USB Dongles 2 2 2 Optional System Extension Optional internally accessible RTC lit...

Page 21: ...C 103 NGSF type label Table 1 Product Identification Table Syste m Type Product Designation Product Identifikation KBox C KBox C 103 NGSF KBox C 103 NGSF corresponds for system configurations with two slot rows for optional removable DRIVEs and or PCIe expansion slot Space for certification KBox C 103 NGSF 24 2 A0DU 0004 ...

Page 22: ...to 2x SATA and power connector for internal or removable devices depending on the configuration 1x Mini PCIe x1 socket J20 on the lower side of the baseboard 2x M 2 J13 and J18 2x B type 1x PCIe x4 socket for expansion via riser cards 1x USB3 0 port for e g connection of USB dongles J14 MicroSIM and MicroSD card combo connector J28 CR2032 coin battery J29 Optional System Extension Optional fan tra...

Page 23: ...ter removing the side access cover There are two B type interfaces one for 2280 2260 and 2242 modules and one for 2242 3042 and 2230 3030 modules Refer also to the subsection 5 2 4 Installing Removing an M 2 Module Refer to section 7 1 Specifications of the internal M 2 Connectors and the descriptions in this manual 3 2 2 Mini PCI Express Interface The KBox C 103 NGSF is equipped with a Mini PCIe ...

Page 24: ...e This connector can be used to install an internal USB device e g a USB Dongle 3 2 6 Internal microSD Card and microSIM Card Interface The baseboard of KBox C 103 NGSF provides a microSD microSIM combo interface This allows the installation of of one microSD card and one microSIM card For installing removing a micro SD or microSIM card refer to chapter 5 2 5 Installing Removing a microSD microSIM...

Page 25: ... 2 to Figure 8 Views of a KBox C 103 NGSF Figure 2 Bottom side view Figure 3 Right side view Figure 4 Front side view config with removable drives Figure 5 Front side view config without removable drives Figure 6 Left side view Figure 7 Top side view Figure 8 Rear side view ...

Page 26: ...KBox C 103 NGSF User Guide Rev Proof of Concept www kontron com 26 3 3 KBox C 103 NGSF Variant Figure 9 KBox C 103 NGSF front view shown with removable drive bays and without mounting brackets 1 2 ...

Page 27: ...urled screws Figure 10 Block Diagram KBox C 103 NGSF x Post Code PCIe Slot 1 non functional 2 PCIe X4 Drive 1 2 SATA HDD SSD drive bays PWR Button LE D RSQ Button LE X104 X107 X110 USB 2 0 X103 X106 X109 USB 3 0 X102 X105 X108 X11 1 ETH X 101 24V DC X 206 WLAN antenna optional L E D s X114 RS232 X112 X113 Display LTE ANT1 ANT2 optional ...

Page 28: ...KBox C 103 NGSF User Guide Rev Proof of Concept www kontron com 28 3 3 1 X101 X201 Power Input Connectors ...

Page 29: ...rs X102 X105 X108 X111 Figure 9 are Gigabit Ethernet 10 100 1000 Mbit s IEEE 1588 capable interfaces X111 is connected to the COMe i225 NIC and can be operated also at 2 5GB The connectors are standard 8 pin RJ45 type connectors with status LEDs Activity link green link up green blinking activity Speed off green yellow 10 100 1000 Mbit s For pin assignment refer to subsection 12 1 2 3 3 3 X103 X10...

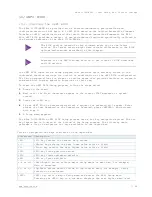
Page 30: ...R LED Rescue button and RSQ LED The power button PWR Figure 12 pos 1 Figure 9 is used to power the KBox C 103 NGSF on or off By pressing the power button for longer than four seconds a forced system shutdown will be initiated before the power to the system is turned off Caution Performing a forced shut down can lead to loss of data or other undesirable effects The power LED marked PWR Figure 12 po...

Page 31: ...IOS post code Figure 13 Detail Status and General Purpose LEDs Table 2 Status and General Purpose LEDs Status and General Purpose LEDs Designat or Function Color Description Post Code TH Thermal Green Normal operation Bit 7 MSB Red blinking The system turns off due to over temperature DR Drives SSD HDD Green SSD HDD active Bit 6 M2 M 2 2242 Card Green M 2 card active Bit 5 WD Watchdog Red blinking...

Page 32: ... 32 3 3 10 PCI PCIe Expansion Slots The KBox C 103 NGSF provides on the front side two slots see also Figure 9 for KBox C 103 NGSF for system expansion with PCIe expansion card via riser card PCIe Slot 1 is not functional Use only Slot two for PCIe expansion cards ...

Page 33: ...lowing drive speeds DRIVE 1 up to SATA 6 Gb s DRIVE 2 up to SATA 6 Gb s If the KBox C 103 NGSF configuration with internal 2 5 SATA HDDs SSDs was ordered the DRIVE 1 and DRIVE 2 for removable SATA HDDs SSDs are not available refer to Figure 5 If the KBox C 103 NGSF configuration with removable 2 5 SATA HDDs SSDs was ordered no installation of any internal SATA HDD SSD with mounting frame is possib...

Page 34: ...ease perform the following steps 1 Pull out the lever Figure 15 pos 3 of the drive cover Figure 14 pos 2 and release it If required unlock the lever with the corresponding key before 2 The drive bay cover will spring open and the removable drive will automatically slide out a bit 3 Insert remove the drive into out from the bay receptacle 4 Close the cover ...

Page 35: ...mounting bracket with M4 ground stud and key holes 6 Cooling fins of the chassis 7 Screws that secure the COMExpress module 8 Screws that secure the cooling fins to the chassis 9 Type label 10 Hole for further system fan tray extension 11 Air intake openings on the bottom cover 12 Air exhaust openings on the top cover Please do not remove the red marked screws see Figure 18 pos 7 and pos 8 3 5 Top...

Page 36: ...lease do not remove the red marked screws see Figure 21 pos 2 and pos 4 Please observe the mounting instructions included in the chapter 7 Installation Instructions Figure 21 Rear side of the KBox C 103 NGSF system 3 7 Functional Earth Stud There is an M4 functional earth terminal on the lower mounting bracket of the KBox C 103 NGSF Figure 21 pos 6 This terminal may be connected as required 1 Key ...

Page 37: ...103 NGSF User Guide Rev Proof of Concept www kontron com 37 The KBox C 103 NGSF with the stud marked with a Functional Earth symbol Figure 21 has to be grounded to an appropriate common earth connection point ...

Page 38: ...nally be extended with a third DisplayPort The DP 3 port is a DisplayPort compliant interface realized using a standard DisplayPort connector An external digital display can be connected to the DisplayPort For pin assignment refer to subsection 12 1 5 4 2 X206 WiFi 4 2 1 WiFi BT To add a WiFI BT functionality to the system the mPCIe socket on the bottom of the baseboard will be used This connectio...

Page 39: ...simplifies the installation and removal of this component even during operation The fan rotation speed is temperature controlled in dependence on the CPU temperature Thus a reliable air circulation for optimal active cooling of the KBox C 103 NGSF is ensured The temperature conditions of the system depending on the environmental temperature and the system load are detected by the CPU temperature s...

Page 40: ...NGSF system shall be mounted into a control cabinet Only personnel with appropriate qualifications trainings and authorization are permitted to install and work with the KBox C 103 NGSF system The installation removal of HDDs SSDs and or expansion cards may only be performed by a qualified person according to the description in this manual Before removing the cover of the device make sure that the...

Page 41: ... the internal components of the KBox C 103 NGSF during operation The cover will be fixed to the chassis using the centring bracket at the rear side of the cover Figure 23 pos 3 and the fixing bracket with captive knurled screws at the front side of the cover Figure 23 pos 5 When inserting the cover make sure that At the rear the centring bracket Figure 23 pos 3 is inserted properly into the corres...

Page 42: ...ser Guide Rev Proof of Concept www kontron com 42 1 Inside of the top cover 2 Rear part of the top cover 3 Centering bracket on the rear side 4 Air exhaust openings 5 Fixing bracket with knurled screws on the front side ...

Page 43: ... properly and disconnect the connection to the power source Disconnect all peripherals 2 The KBox C 103 NGSF should lay on a flat clean surface with the top side facing upwards 3 Loosen the knurled screws which secure the top cover on the front of the system see Figure 9 and Figure 24 4 Pull the cover out a little bit as shown in Figure 24 to release the cover centering and fixing brackets Figure ...

Page 44: ...he right side cover of the KBox C 103 NGSF Figure 26 Loosen the externally accessible fastening screws Figure 17 pos 2 that secure the right side cover Figure 26 and Figure 17 pos 3 Pull the right side cover out to detach it from the sideways mounted bolts Put the right side cover and the screws aside for later use Figure 27 KBox C 103 NGSF without top and right side cover shown with a PCIe riser ...

Page 45: ... 3 Internal USB 3 0 port with space for module 4 Threaded holes fixing bolts to secure the 3x M 2 modules 5 3x M 2 sockets 2x Type B 1x Type M from left to right J13 J17 J18 J17 non functional 6 4x SATA connectors SATA2 3 non functional 7 1x Mini PCIe socket for PCIe Mini card J20 not visible obstructed by riser card 8 Riser card with 2x PCIe x4 sockets ...

Page 46: ...ing on the system configuration ordered your KBox C 103 NGSF can be extended with a PCIe Mini card The KBox C 103 NGSF provides one internal Mini PCIe socket for PCIe Mini cards The Mini PCIe socket is on the lower side of the baseboard and can be only at factory equipped with an expansion card 5 2 3 Riser Cards Expansion Sockets for PCI PCIe Cards The Risercard in the system only supports the sec...

Page 47: ...x C 103 NGSF proceed in reverse order step 6 to 1 of the section 5 2 Opening and Closing the KBox C 103 NGSF To remove an M 2 module please proceed according to the steps described 1 Close all applications shut down the system properly and disconnect the connection to the power source Disconnect all peripherals 2 Open the device as described in the subsection 5 2 Opening and Closing the KBox C 103...

Page 48: ...oSIM connector or and insert a microSD card int the microSD connector by gently pushing the card into the corresponding connector card contacts facing down see 5 Figure 28 6 In order to close the KBox C 103 NGSF proceed in reverse order step 6 to 1 of the section 5 2 Opening and Closing the KBox C 103 NGSF To remove a microSD or a microSIM card please proceed according to the steps described 1 Clo...

Page 49: ...0 50 W Table 5 Current and voltage provided in the KBOX C 103 NGSF per port USB 3 0 USB 2 0 M 2 MiniPCIe Sata SSD Maximum defined Power per Port 5 W 2 5 W 5 6 W 4 W 5 W Max current Voltage per Port 1 A 5 V 0 5 A 5 V 1 7 A 3 3 V 1 A 3 3 V 1 A 5 V 375 mA 1 5 V 1 A 12 V Table 6 Maximum Power supplied on the PCIe Slot PCIe Expansioncard Slot1 Slot 2 12 Volt 3 3 Volt 2 Slot PCIe X4 Non functional 25 W ...

Page 50: ...3 NGSF User Guide Rev Proof of Concept www kontron com 50 at higher ambient temperature conditions and provides a higher air flow through the chassis providing a better cooling of the system internal components ...

Page 51: ...extension cards and drives HDD or SSD it has to be taken into account that the air temperature inside the system is higher than the ambient temperature An approximately internal temperature rise is given 6 6 Processor Thermal Monitoring The processor used with the KBox C 103 NGSF system provides internal thermal monitoring Every core of the processor comprises a temperature sensor To allow an opti...

Page 52: ...n or connected to systems that fulfill all necessary technical and specific environmental requirements The KBox C 103 NGSF system is designed to be operated in vertical position with attached mounting brackets as shown in Figure 4 and Figure 5 It is not allowed to install the KBox C 103 NGSF as a stand alone desktop device Do not remove the wall mounting brackets The unit must be placed such that ...

Page 53: ...de Rev Proof of Concept www kontron com 53 Use copper conductors only if the field wiring terminal is only for connection to copper wire Minimum temperature rating of the cables connected to the field wiring terminals is 77 C ...

Page 54: ...formed before installing the KBox C 103 NGSF into the control cabinet Please observe the General Safety Instructions for IT Equipment included and the installation instructions refer to the chapters 1 and 7 Your KBox C 103 NGSF is supplied with assembled mounting brackets The key holes of the upper and lower mounting brackets Figure 21 pos 1 and pos 3 allow you to mount the KBox C 103 NGSF to a mo...

Page 55: ...ev Proof of Concept www kontron com 55 Figure 29 Keep out area for mounting around KBox C 103 NGSF front side view without fan tray Figure 30 Keep out area for mounting around KBox C 103 NGSF front side view with optional fan tray ...

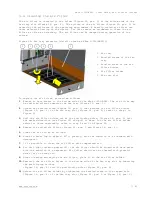
Page 56: ...ion for inserting the 0V wire 7 3 1 Cabling For the pin assignment Phoenix power plug terminal refer to the subsection 3 3 1 X101 X201 Power Input Connectors 1 Cut the required length three isolated wires 1 mm2 AWG18 and strip each end 5 7 mm 2 Twist the striped wire ends and provide them with ferrules 3 Open the cover Figure 31 pos 2 to have access to the slotted pan head screws 4 Loosen the slot...

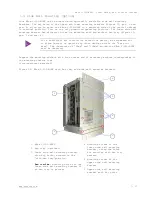
Page 57: ...t to place mount or operate any other devices within the keep out area The clearances of 50mm and 100mm around the KBox C 103 NGSF must be observed Prepare the mounting surface with four screws and if necessary anchors corresponding to the mounting surface type fire resistant material Figure 32 KBox C 103 NGSF with fan tray and side wall mounting brackets 1 KBox C 103 NGSF 2 Fan tray optional 3 Lo...

Page 58: ...o a DC mains power supply complying with the requirements of IEC 61010 1 and IEC 60950 1 standard or better It must be observed that wiring and short circuit overcurrent protection is performed according to the applicable standards regulations and respect to the electrical specification of the KBox C 103 NGSF Even when the system is turned off via the power button Figure 9 and Figure 12 marked PWR...

Page 59: ...ripherals Therefore the following procedure must be observed 1 Close your applications and perform an orderly shutdown graceful shutdown 2 Remove power from the system 3 Wait until the green power LED Figure 12 pos 2 stops blinking 4 Reapply power Refer also to the subsection 3 3 7 POWER Button and PWR LED Do not disconnect the power from your system while it is powered up Performing a forced shut...

Page 60: ...d with the optional lithium battery CR 2032 3V internally accessible and you have to replace it please proceed as follows 1 Open the topside access cover as describes in chapter 5 2 Opening and Closing the KBox C 103 NGSF 2 The battery is located on the side of the baseboard that faces to the cooling fins see Figure 33 Figure 33 Location of the optional Lithium battery 3 Remove the lithium battery...

Page 61: ...F versions with fan tray extension is permitted only with a functional fan tray Defective components may only be replaced by Kontron original spare parts Part number of the fan tray 9 5000 1095 for KBox C 103 NGSF The fan tray can be replaced during operation This should only be carried out by qualified personnel aware of the associated dangers The fan will not stop immediately when the fan tray i...

Page 62: ... Proof of Concept www kontron com 62 7 Secure the fan tray by fastening the knurled screws Figure 35 pos 2 By fastening of the knurled screws the proper insertion of the fan tray into the internal socket Figure 36 pos 10 is ensured ...

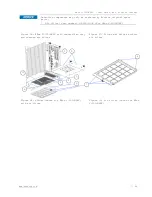
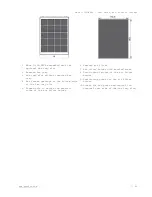
Page 63: ...the positioning holes Figure 36 pos 9 into the marked direction see Figure 35 and pull it down Put the air filter holder aside for later reassembly refer to step 2 and 3 in Figure 35 4 Remove the soiled air filter Figure 35 pos 3 and Figure 36 pos 6 5 Clean the air filter as follows 6 Rinse in water up to approx 40 C possibly with the addition of a standard mild detergent 7 It is possible to clean...

Page 64: ... original spare parts Air filter part number 9 5000 1098 for KBox C 103 NGSF Figure 36 KBox C 103 NGSF with removed fan tray and removed air filter Figure 37 Filter mat Holder without air filter Figure 38 Holder shown for KBox C 103 NGSF with air filter Figure 39 Air filter shown for KBox C 103 NGSF 1 2 3 7 9 6 5 4 10 8 ...

Page 65: ...erted fan tray 4 Air intake openings at the bottom side of the fan tray slot 5 Tapped hole to secure the knurled screw of the air filter holder 6 Removed air filter 7 Air filter holder with knurled screw 8 Positioning latches of the air filter holder 9 Positioning holes for the air filter holder 10 Socket for fan power and control on internal rear side of the fan tray slot ...

Page 66: ...heir own To start the uEFI BIOS Setup program follow the steps below 1 Power on the board 2 Wait until the first characters appear on the screen POST messages or splash screen 3 Press the DEL key 4 If the uEFI BIOS is password protected a request for password will appear Enter either the User Password or the Supervisor Password press RETURN and proceed with step 5 5 A Setup menu appears The KBox C...

Page 67: ...KBox C 103 NGSF User Guide Rev Proof of Concept www kontron com 67 RETURN RETURN key executes a command or selects a submenu ...

Page 68: ...ble 9 Main Setup Menu Sub screens and Functions Sub screen Description BIOS Information Read only field Displays information about the BIOS system Vendor Core version Compliancy Kontron BIOS Version and Access level Board Information Read only field Board ID Fab ID LAN PHY Revision Processor Information Read only field Displays information about the CPU Name Type Speed Processor ID Stepping Packag...

Page 69: ...ds are case sensitive Table 10 Security Setup Menu Functions Function Description Administrator Password Sets administrator password User Password Sets user password If only the administrator s password is set then only access to setup is limited The password is only entered when entering setup If only the user s password is set then the password is a power on password and must be entered to boot ...

Page 70: ... any of the setup options Discard Changes Discards changes made so far for any setup options Restore Defaults Restores loads standard default values for all setup options Save as User Defaults Saves changes made so far as user defaults Restore User Defaults Restores user defaults to all setup options UEFI Built in EFI shell Attempts to launch the built in EFI Shell 10 3 The uEFI Shell The Kontron ...

Page 71: ...g table FS0 Alias s HD0f0b BLK1 PciRoot 0x0 Pci 0x14 0x0 USB 0x5 0x0 HD 1 MBR 0x0008131B 0x1 0x6C7ff BLK0 Alias s PciRoot 0x0 Pci 0x14 0x0 USB 0x5 0x0 4 Press the ESC key within 5 seconds to skip startup nsh and any other key to continue 5 The output produced by the device mapping table can vary depending on the board s configuration 6 If the ESC key is pressed before the 5 second timeout elapses ...

Page 72: ... the startup script terminates then the default boot order is continued 10 4 2 Create a Startup Script Startup scripts can be created using the uEFI Shell built in editor edit or under any OS with a plain text editor of your choice To create a startup shell script simply save the script on the root of any FAT formatted drive attached to the system To copy the startup script to the flash use the kB...

Page 73: ...ndard SPI boot flash 10 5 1 Updating Procedure For the BIOS update the customer should follow the instructions in the Readme txt BIOS package 10 5 2 uEFI BIOS Recovery In case of the standard SPI boot flash being corrupted the KBOX C 103 NGSF must be returned to Kontron to repair the system There is no recovery flash available ...

Page 74: ... Ethernet 10 100 1000 Mbit s 3x USB 3 0 3x USB 2 0 2x DisplayPort 1x Serial port RS232 RS422 RS485 DC IN Connector at the front side 3 pin DC input connector Protection Class IP20 Lithium Battery Option intenally accessible CR 2032 3 V Rated Voltage tolerance 24 VDC 6 A 20 20 up to 20ms hold up depending on configuration KBox C 103 NGSF Options for Storage Media 2x 2 5 SATA HDD SSD non removable o...

Page 75: ...5 11 1 1 Mechanical Specifications of the KBox C 103 NGSF Figure 40 Dimensions right side KBox C 103 NGSF Figure 41 Dimensions front side with key holes KBox C 103 NGSF Figure 42 Dimensions detail key hole KBox C 103 NGSF Figure 43 Dimensions top side KBox C 103 NGSF ...

Page 76: ... NGSF with Fan Tray Option Figure 44 Dimensions right side KBox C 103 NGSF with fan tray option Figure 45 Dimensions front side with key holes KBox C 103 NGSF with fan tray option Figure 46 Dimensions detail key hole KBox C 103 NGSF with fan tray option Figure 47 Dimensions top side KBox C 103 NGSF with fan trayoption ...

Page 77: ...KBox C 103 NGSF User Guide Rev Proof of Concept www kontron com 77 ...

Page 78: ...Height with mounting brackets 290 mm 11 42 with mounting brackets 324 mm 12 756 Width 155 mm 6 10 155 mm 6 10 Depth with mounting brackets 210 mm 8 26 with mounting brackets 210 mm 8 26 Weight without packaging without expansions Approx 4 75 kg 10 47 lbs Approx 6 00 kg 13 22 lbs Chassis Cooling fins black Chassis steel sheet light grey RAL 7035 Side with External Interfaces trim strips traffic gre...

Page 79: ...ative Humidity Operating 93 40 C non condensing acc to IEC 60068 2 78 Max Operation Altitude 2 000 m 6 560 ft Max Storage Transit Altitude 10 000 m 32 810 ft Non Operating Shock 30 G 11 ms half sine acc to IEC 60068 2 27 Operating Shock 15 G 11 ms half sine acc to IEC 60068 2 27 Non Operating Vibration 10 Hz 150 Hz 2 G acc to IEC 60068 2 6 Operating Vibration 10 Hz 150 Hz 1 G acc to IEC 60068 2 6 ...

Page 80: ...rnal power supply delivering the specified input rating and complying with the requirements of Safety Extra Low Voltage SELV and Limited Power Source L P S of UL IEC 60950 1 or PS2 of UL IEC 62368 1 Ensure that the power supply is used according to the manufacturer s instructions Ensure the power supply has been fully tested to at least meet the minimum immunity of AC inputs requirements as stipul...

Page 81: ...NGSF User Guide Rev Proof of Concept www kontron com 81 and additional electrical factors To determine the required off state each case must be considered individually For more information contact Kontron Support ...

Page 82: ...nterfaces and system memory expansion The external power supply must supply power to all configured components 11 4 3 Protective Earth Stud Bolt The protective earth stud bolt connects to the internal chassis GND The protective earth stud bolt is located at the bottom of the System When installing cables to the product the first cable connection must be to the protective earth stud bolt and when d...

Page 83: ...t Connector 12 1 2 X102 X105 X108 X111 Ethernet Connectors Table 17 X102 X105 X108 X111 Ethernet Connectors Speed Mbps LINK ACT LINK ACTIVE 10 off on orange on blinking 100 green on orange on blinking 1000 orange on orange on blinking Pin Signal Name 3 pin POWER SUBCON male 1 24 VDC input 2 Ground 3 0V input Pin Signal Name X102 X105 X108 X111 Ethernet RJ45 1 MDI0 2 MDI0 3 MDI1 4 MDI2 5 MDI2 6 MDI...

Page 84: ... 1 4 X104 X107 X110 USB 2 0 Ports Table 19 X104 X107 X110 USB 2 0 Ports Pin Signal Name 4 pin USB Connector Typ A Version 2 0 1 VCC 2 Data 3 Data 4 GND 12 1 5 X112 X113 X203 DisplayPorts Table 20 X112 X113 X203 DisplayPorts Pi n Signal Name DisplayPort Signal Name Pi n 1 ML Lane 0 p GND ML Lane 0 2 3 ML Lane 0 n Lane 1 p 4 5 GND ML Lane 1 Lane 1 n 6 7 Lane 2 p GND ML Lane 2 8 9 Lane 2 n Lane 3 p 1...

Page 85: ... GND Signal Ground 6 DSR Data Set Ready 7 RTS Request to Send 8 CTS Clear to Send 9 RI Ring Indicator Table 22 X114 Serial Interface COM 1 configured as single RS485 Pin Signal Name 9 pin D SUB Connector male 1 TxD RxD Data 2 TxD RxD Data 3 4 5 GND Signal Ground 6 7 8 9 Table 23 X114 Serial Interface COM 1 configured as single RS422 Pin Signal Name 9 pin D SUB Connector male 1 TxD Transmit Data 2 ...

Page 86: ...al Name 9 pin D SUB Connector male 1 TxD COM1 Transmit Data 2 TxD COM1 Transmit Data 3 RxD COM1 Receive Data 4 RxD COM1 Receive Data 5 GND Signal Ground 6 TxD COM2 Transmit Data 7 TxD COM2Transmit Data 8 RxD COM2 Receive Data 9 RxD COM2 Receive Data If RS485 is needed in Echo mode the RS422 mode must be selected and the lines must be connected according below picture If dual RS422 RS485 mode is se...

Page 87: ... For pin assignment refer to 12 1 1 12 2 2 X 203 3rd DisplayPort For pin assignment refer to 12 1 5 This port must be factory installed and configured only Your KBox C 103 can either be equipped with a 3rd DisplayPort or a WideLink port Only one of these two interfaces WideLink and DP 3 can be ordered as optional extension of your KBox C 103 system ...

Page 88: ... Serial Port RS232 RS422 configured as RS232 Table 26 Serial Port RS232 RS422 configured as RS232 Pin Signal Name 9 pin D SUB Connector male 1 DCD Data Carrier Detect 2 RXD Receive Data 3 TXD Transmit Data 4 DTR Data Terminal Ready 5 GND Signal Ground 6 DSR Data Set Ready 7 RTS Request to Send 8 CTS Clear to Send 9 RI Ring Indicator 12 2 3 2 Serial Port RS232 RS422 configured as RS422 Table 27 Ser...

Page 89: ...ation family IOL IPMI Over LAN IOT Internet of Things IPMI Intelligent Platform Management Interface KCS Keyboard Controller Style KVM Keyboard Video Mouse MEI Management Engine Interface NCSI Network Communications Services Interface PCIe PCI Express PECI Platform Environment Control Interface PICMG PCI Industrial Computer Manufacturers Group RTC Real Time Clock SEL System Event Log ShMC Shelf Ma...

Page 90: ...ndustry 4 0 applications With its standard products and tailor made solutions based on highly reliable state of the art embedded technologies Kontron provides secure and innovative applications for a variety of industries As a result customers benefit from accelerated time to market reduced total cost of ownership product longevity and the best fully integrated applications overall For more inform...

Reviews: