6.3.5 NAV and ILS Page
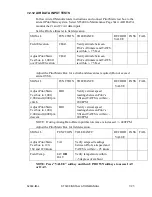
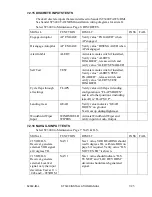
The NAV and ILS page (see Figure 6-6) selects the configuration of NAV
receiver and Glideslope receiver inputs. When the NAV input is selected to 429,
the glideslope uses the same 429 port as the NAV. When analog, these two
signals are selected separately.
The 429 data stream for NAV BRG can be selected TO VOR or FROM VOR.
Set as appropriate for the receiver in use.
Once a selection is made, the port configuration for NAV will be automatically
made based on the selection chosen and data will appear in the data VALUE area.
The data VALUE shows only a single data item. This page has an additional
softkey labeled [VALUE] which can be used to scroll through all of the NAV and
ILS data coming from the receiver. Use the [UP]/[DOWN] Soft keys to scroll
through the various data items. Press the [TYPE] Soft key to exit the "Value"
scroll function.
When the NAV input is analog composite, both the VOR bearing and the LOC
deviation are demodulated from the analog data. The LOC deviation is used to
qualify the GS data in addition to the analog GS flag.
Back Course (from the HSI) discrete input may be VALID-LOW or VALID-
HIGH. This is used to inhibit the Glideslope alert GPWS mode 5.
Figure 6-6: NAV and ILS
6-10
ST3400 INSTALLATION MANUAL
82002-IM-L
Summary of Contents for ST3400
Page 24: ...THIS PAGE INTENTIONALLY LEFT BLANK ST3400 INSTALLATION MANUAL 82002 IM L 2 6 ...
Page 44: ...THIS PAGE INTENTIONALLY LEFT BLANK 5 2 ST3400 INSTALLATION MANUAL 82002 IM L ...
Page 75: ...THIS PAGE INTENTIONALLY LEFT BLANK 82002 IM L ST3400 INSTALLATION MANUAL 7 31 ...
Page 76: ......
Page 78: ...THIS PAGE INTENTIONALLY LEFT BLANK 8 2 ST3400 INSTALLATION MANUAL 82002 IM L ...
Page 80: ...THIS PAGE INTENTIONALLY LEFT BLANK 9 2 ST3400 INSTALLATION MANUAL 82002 IM L ...
Page 86: ...THIS PAGE INTENTIONALLY LEFT BLANK 11 2 ST3400 INSTALLATION MANUAL 82002 IM L ...
Page 88: ...12 2 STC Cessna 421C Series 12 2 ST3400 INSTALLATION MANUAL 82002 IM L ...
Page 89: ...12 3 STC King Air C90 200 300 and B300 Series 82002 IM L ST3400 INSTALLATION MANUAL 12 3 ...
Page 91: ......
Page 92: ......


