background image

English - 13

How to view the e-Manual

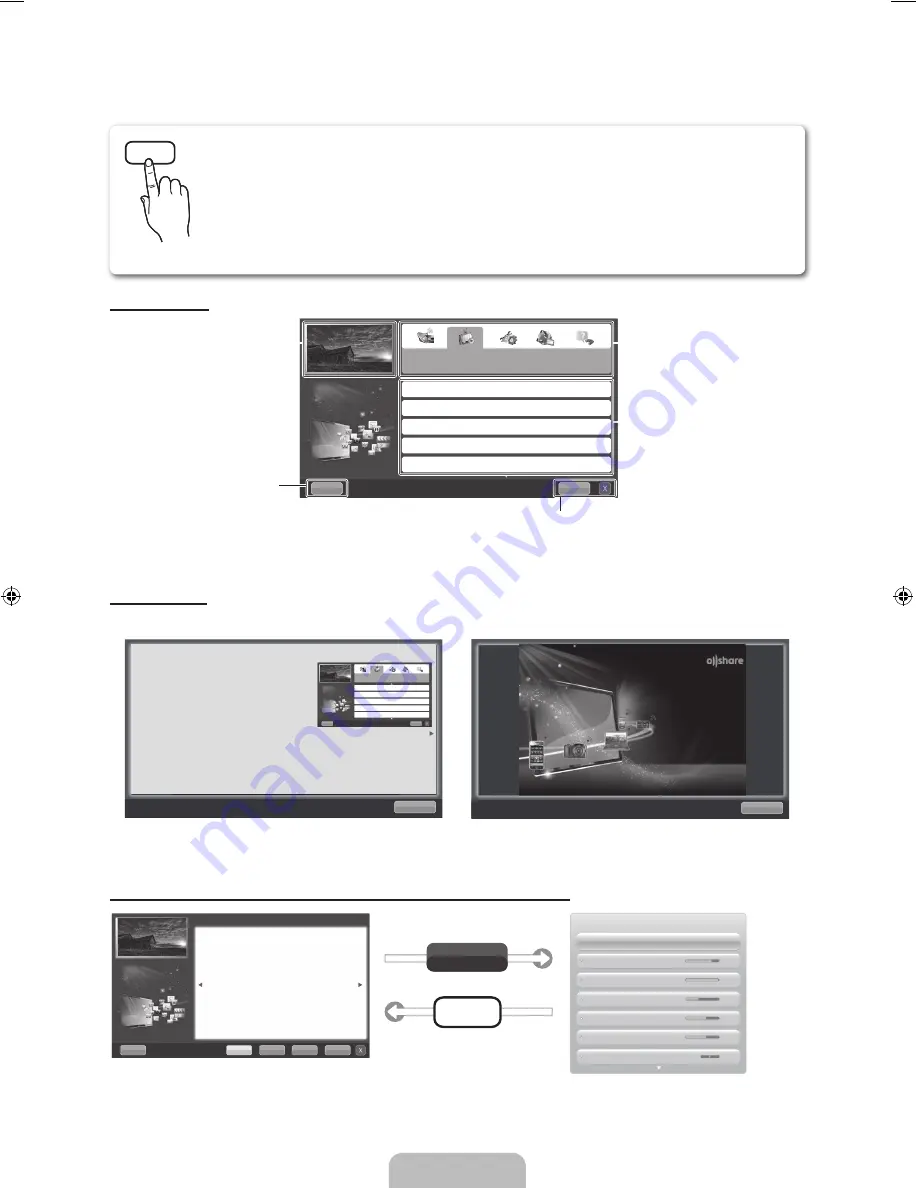
Screen Display

Using the Help

Display the Product Guide by pressing 

Help

.

<e-Manual Guide>

The e-Manual guide appears as above.

<Product Guide>

The product guide appears as above.

How to toggle between the e-Manual and the corresponding menu(s).


This function is not enabled in some menus.

E-MANUAL

You can read the introduction and instructions about the TV features stored 
in your TV.


O

MENU

m


Support


e-Manual


ENTER

E


If you want to return to 

e-Manual

, press 

E-MANUAL

 button on remote.


You cannot use 

Try Now

 directly if the TV is set to an external input source.

Basic Features

Changing the Preset Picture Mode

Adjusting Picture Settings

Changing the Picture Size

Changing the Picture Options

Setting up the TV with Your PC

Index

Help

TV Screen: Displays the current input 

source screen.

Help

: Displays the 

e-Manual 

Guide

 or 

Product Guide

. Press 

ENTER

E

 button.

Change the category. Press 

l

 or 

r


button to select category you want.

Displays the sub-menu list. Press 

ENTER

E

 button to select sub-

menu you want.

Index

: Displays index screen.

X

: Exit the e-Manual.

E-MANUAL

Try Now

Return


‰

How to view the e-Manual

You can read the introduction and instructions about 
the TV features stored in your TV.


O

MENU

m


Support


e-Manual


ENTER

E

Basic Features

Changing the Preset Picture Mode
Adjusting Picture Settings

Changing the Picture Size

Changing the Picture Options

Setting up the TV with Your PC

Index

Help

Return

Sync media from multiple devices with AllShare

AllShare™ syncs your digital devices so you can 

enjoy  music,  movies  and  photos  from  your  PC, 

camera  and  mobile  devices,  on  your  larger  TV 

screen. Connects you to multiple PCs, as well.

Help

Try Now

Home

Zoom

Index

Basic Features > Changing the Preset Picture Mode (1/1)


‰

Changing the Preset Picture Mode


Picture Mode 

t

Select your preferred picture type. 


N

In 

PC

 mode, you can only select 

Entertain

 and 

Standard

.

• 

Dynamic

: Suitable for a bright room.

• 

Standard

: Suitable for a normal environment.

• 

Natural

: Suitable for reducing eye strain.

• 

Movie

: Suitable for watching movies in a dark room.

• 

Entertain

: Suitable for watching movies and games.

Picture

Picture Mode 

  Standard

Tint (G/R) 

G 50 

R 50

Colour 


50

Sharpness 


50

Brightness 


45

Contrast 


100

Backlight 


14

[UD6400-XY]BN68-03480A-00Eng.indb   13

2011-04-04   오후 4:03:56

Summary of Contents for UA32D6000

Page 1: ...g com NEW ZEALAND 0800 SAMSUNG 0800 726 786 www samsung com CHINA 400 810 5858 010 6475 1880 www samsung com HONG KONG 852 3698 4698 www samsung com hk www samsung com hk_en INDIA 3030 8282 1800 110011 1800 3000 8282 1800 266 8282 www samsung com INDONESIA 0800 112 8888 021 5699 7777 www samsung com JAPAN 0120 327 527 www samsung com MALAYSIA 1800 88 9999 www samsung com PHILIPPINES 1 800 10 SAMSU...

Page 2: ...atch Reduce brightness and contrast values to minimum required to achieve desired picture quality exceeded values may speed up the burnout process Frequently use all TV features designed to reduce image retention and screen burnout refer to e Manual for details Securing the Installation Space Keep the required distances between the product and other objects e g walls to ensure proper ventilation F...

Page 3: ...models Check that there is no accessory hidden behind packing materials when you open the box CAUTION INSERT SECURELY LEST SHOULD BE DETACHED IN SET Remote Control Batteries AAA x 2 Owner s Instructions Power Cord Warranty Card Not available in some locations Safety Guide Cleaning Cloth Holder Ring 4EA Holder Wire stand AV Component Adapter AV Adapter Assembling the Holder Wire stand ...

Page 4: ...ces In the on screen menu use this button as you would use the ENTERE button on the remote control MENU Displays an on screen menu the OSD on screen display of your TV s features o Volume Adjusts the volume In the OSD use the w and v buttons as you would use the and buttons on the remote control k Channel Changes the channels In the OSD use the and buttons as you would use the and buttons on the r...

Page 5: ...ts on the screen Displays the EPG Electronic Programme Guide Displays information on the TV screen u d l r Move the cursor on screen menu item ENTERE Selects the menu and changes the corresponding item value Exits the menu Have direct access to channels Adjusts the volume Alternately select Teletext ON Double Mix or OFF Opens the OSD Quickly select frequently used functions Link to various applica...

Page 6: ... STB AV Receiver Game Camcorder PC DVI PC DVI Devices TV IPTV Blu ray HD DVD DMA Name the device connected to the input jacks to make your input source selection easier When connecting a PC to the HDMI IN 1 DVI port with HDMI cable you should set the TV to PC mode under Edit Name When connecting a PC to the HDMI IN 1 DVI port with HDMI to DVI cable you should set the TV to DVI PC mode under Edit N...

Page 7: ...you see the volume OSD press and hold MENU for 5 sec Store Demo is only for shop display If you select it several functions are not able to use Please select Home Use when you watch at home 5 Selecting an country Press the or button then press the ENTERE button Select the appropriate country 6 Selecting an area Press the or button then press the ENTERE button Select the appropriate area Not availa...

Page 8: ...e TV If such a problem occurs ask the manufacturer of the external device about the HDMI version and if out of date request an upgrade x x Be sure to use an HDMI cable with a thickness of 14 mm or less x x Be sure to purchase a certified HDMI cable Otherwise the picture may not display or a connection error may occur x x A basic high speed HDMI cable or one with ethernet is recommended This produc...

Page 9: ...ck green will not match the video cable yellow To obtain the best picture quality the Component connection is recommended over the A V connection AUDIO OUT R AUDIO L VIDEO OUT AUDIO OUT R AUDIO L VIDEO OUT AUDIO OUT R AUDIO L PR PB Y COMPONENT OUT G G B B R R R R W W R R Y Y W W Component connection AV connection AV connection ...

Page 10: ...5 1 CH sound to the home theatre receiver When the source is a digital component such as a DVD Blu ray player cable box STB Set Top Box satellite receiver and is connected to the TV via HDMI only 2 CH audio will be heard from the home theatre receiver If you want to hear 5 1 CH audio connect the digital audio out jack from your DVD Blu ray player cable box STB satellite receiver directly to an amp...

Page 11: ...x 800 1280 x 960 1360 x 768 1440 x 900 1440 x 900 1680 x 1050 31 469 37 861 37 500 37 879 48 077 46 875 48 363 56 476 60 023 67 500 63 981 79 976 49 702 62 795 60 000 47 712 55 935 70 635 65 290 59 940 72 809 75 000 60 317 72 188 75 000 60 004 70 069 75 029 75 000 60 020 75 025 59 810 74 934 60 000 60 015 59 887 74 984 59 954 25 175 31 500 31 500 40 000 50 000 49 500 65 000 75 000 78 750 108 000 1...

Page 12: ... connection the video may not play smoothly Most wireless network systems incorporate a security system that requires devices that access the network through an access point or wireless router typically a wireless IP Sharer to transmit an encrypted security code called an access key If Pure High throughput Greenfield 802 11n mode is selected and the Encryption type is set to WEP TKIP or TKIP AES W...

Page 13: ...to select sub menu you want Index Displays index screen X Exit the e Manual E MANUAL Try Now Return How to view the e Manual You can read the introduction and instructions about the TV features stored in your TV O MENUm Support e Manual ENTERE Basic Features Changing the Preset Picture Mode Adjusting Picture Settings Changing the Picture Size Changing the Picture Options Setting up the TV with You...

Page 14: ...truction screen To close the Index screen press the RETURN button Try Now Displays the corresponding menu s Home Moves to the e Manual home screen Zoom Magnifies a screen Index Displays index screen Contents Area You can view the corresponding contents if you selected a sub menu To move previous or next page press the l or r button Return Changing the Preset Picture Mode O O MENUm Picture Picture ...

Page 15: ...s HDMI it should be connected to an HDMI input on the TV Make sure your connected devices are powered on Be sure to select the TV s correct source by pressing the SOURCE button on the remote control Reboot the connected device by reconnecting the device s power cable The remote control does not work Replace the remote control batteries with the poles in the right direction Clean the sensor s trans...

Page 16: ...ntent integrated in one place It s all integrated to guide you to easier and diverse entertainment choices Control your entertainment life with easy and simple user friendly UI Access to diverse Apps that are adding up every day Customize your TV by App grouping sorting to your taste AllShare AllShare connects your TV and compatible Samsung mobile phones devices through a network Anynet HDMI CEC A...

Page 17: ...ovided Do not use screws that do not comply with the VESA standard screw specifications Do not use screws that are longer than the standard dimension or do not comply with the VESA standard screw specifications Screws that are too long may cause damage to the inside of the TV set For wall mounts that do not comply with the VESA standard screw specifications the length of the screws may differ depe...

Page 18: ...ith the product In this case please purchase the screws of the following specifications Screw Specifications x x For a 19 27 inch M4 x x For a 32 65 inch M8 3 Connect the clamps fixed onto the TV and the clamps fixed onto the wall with a strong cable and then tie the string tightly NOTE x x Install the TV near to the wall so that it does not fall backwards x x It is safe to connect the string so t...

Page 19: ...9 9 x 439 8 mm 742 2 x 240 0 x 501 9 mm 929 5 x 29 9 x 545 3 mm 929 5 x 255 0 x 606 4 mm Weight Without Stand With Stand 7 1 kg 8 9 kg 10 7 kg 13 2 kg Model Name UA46D6400 UA55D6400 Screen Size 46 inches 55 inches Sound Output 10 W X 2 15 W X 2 Dimensions WxDxH Body With stand 1064 9 x 29 9 x 621 7 mm 1064 9 x 275 0 x 682 8 mm 1255 3 x 29 9 x 728 3 mm 1255 3 x 305 0 x 808 4 mm Weight Without Stand...

Page 20: ...This page is intentionally left blank ...

Reviews: