background image

Installation and Connection 

SVR-1630 


Samsung Techwin 

2004. 07. 2001 (v 1.0) 

47 

10.3  Registering and Formatting an HDD 

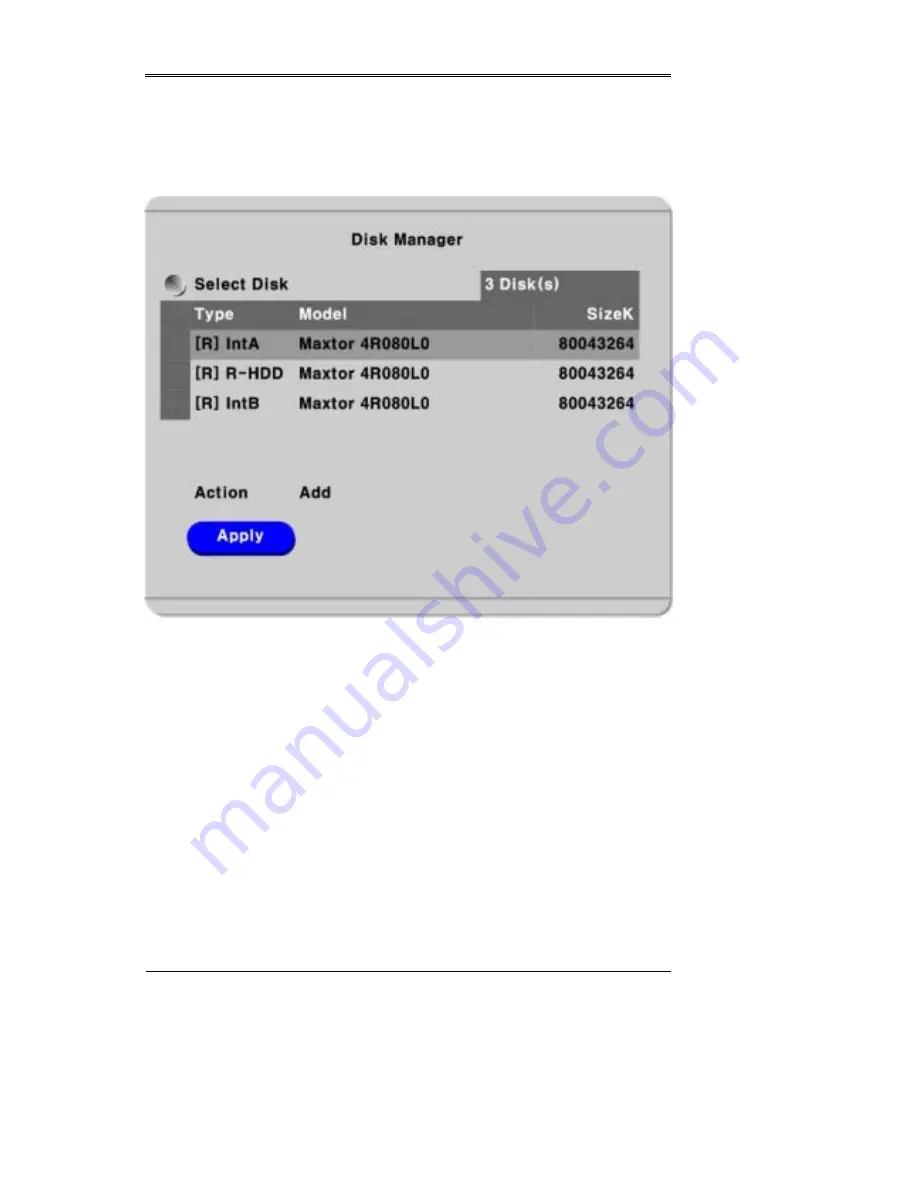
  The “Disk Manager” will automatically run on start-up after installing a HDD. 

If the “Disk Manager” doesn’t run automatically on start-up, make sure the HDD is properly installed.


(1) Press the [ENTER] button at “Select Disk”. 

(2) Select the newly-added HDD (indicated as “[F]”) using the [

/

] buttons and press the [ESC] button 

(3) Select “Action” using the [

/

] buttons and press the [ESC] button. 

(4) Select “Add” using the [

/

] buttons and press the [ESC] button. 

(5) Select “Apply” using the [

/

] buttons and press the [ESC] button. The HDD status is changed to “[*]”. 

And the new HDD is successfully registered.   

(6) Select “Action” using the [

/

] buttons and press the [ESC] button. 

(7) Select “Format” using the [

/

] buttons and press the [ESC] button. 

(8) Select “Apply” using the [

/

] buttons and press the [ESC] button. The HDD status is changed to “[R]” 

after formatting. 

(9) Shut down the “Disk Manager” by pressing the [ESC] button.


Summary of Contents for SVR-1630

Page 1: ...SVR 1630 Installation Manual ...

Page 2: ...ncy energy and if not installed and used in accordance with the instruction manual may cause harmful interference to radio communications Operation of this equipment in a residential area is likely to cause harmful interference in which case the user will be required to correct the interference at their own expense Warning This is a class A product In a domestic environment this product may cause ...

Page 3: ...R 1630 can be damaged by physical shock because it contains an HDD Therefore do not throw or drop the device 5 The SVR 1630 is made of metal If it is thrown at anybody it may cause harm Install the device in a safe place out of the reach of children 6 If the SVR 1630 does not operate correctly do not disassemble it without authorization Contact your local agency for after sales service The warrant...

Page 4: ... Power and Running 16 5 OSD Menu Configuration and Control 17 5 1 Menu Configuration 17 5 2 Word Input 18 6 Remote Controller Setup and Basic Control 19 6 1 Setting ID of SVR 1630 19 6 2 Selecting SVR 1630 20 6 3 Operable Range of the Remote Controller 20 6 4 Loading batteries into the remote controller 20 7 SVR 1630 Installation Example 22 7 1 Basic Configuration 22 7 2 Advanced Configuration 22 ...

Page 5: ... Output 32 9 2 1 Specification 32 9 2 2 Connecting to Relay Output Terminal 32 9 2 3 Configuring Relay Out 33 9 3 Connecting and Configuring Serial Communication Ports 34 9 3 1 Connecting Serial Communication Ports for Pan Tilt Zoom 34 9 3 2 Serial Communication Port Connection Layout 35 9 3 3 Serial Communication Port Figure 36 9 3 4 Configuring a Serial Port 37 9 4 Connecting an External Device ...

Page 6: ...alling the SVR Manager 50 12 3 Uninstalling the SVR Manager 52 12 4 Configstation 52 12 5 Monitor 53 12 6 Playback 54 Appendix 55 1 HDD 56 1 1 Fundamental Notions Terms 56 1 1 1 SVR 1630 Storing Structure VFS2 56 1 1 2 Backup 56 1 1 3 Disk Manager 57 1 2 Replacing HDDs 58 1 2 1 Checking HDDs 58 1 2 2 When the primary disk fails 58 1 2 3 When an auxiliary disk fails 58 1 3 Keeping Data 59 1 3 1 Bac...

Page 7: ... monitoring 30fps per channel Built in software multiplexer for 16 Channel split monitoring 1 2x2 3x3 4x4 Screen Mode Support Up to 4TB Storage Capacity Expansion using IEEE 1394 Port Text data recording by interlocking with ATM POS devices 16 Sensor Inputs and 4 Interlocked Relay Outputs Hardware Motion Detection 64 Section Backup using IEEE1394 and Network PTZ control Easy to use Color Graphic O...

Page 8: ...ease check the package to make sure that you receive all the accessories including the components shown below 1 SVR 1630 1EA 2 AC Power Cord 1EA 3 CD ROM Including SVR Manager 1EA 4 Remote Controller 1EA 5 Guide 2EA 6 HDD Fixing KIT 1SET 7 19 RACK FIXING KIT 1SET 8 HDD EARTH CABLE 1EA ...

Page 9: ...Executive Summary SVR 1630 Samsung Techwin 2004 07 2001 v 1 0 9 9 HDD Removable Rack KIT 1SET ...

Page 10: ...0 Front View 1 Power Switch 2 HDD Removable Rack 3 Function Buttons 4 Channel Buttons 5 Status LED 6 Jog Shuttle for Search and Playback 7 Function Switch 8 Play and Search Button 9 Search Preset Switch 10 Remote Controller Receiver 11 USB Connector 12 IEEE 1394 Connector 13 Bracket fixing hole for rack mount ...

Page 11: ...r Monitor A output 17 BNC connector for Monitor A input 18 Ethernet connector 19 GND 20 Input output terminal for RS232 RS422 485 21 IEEE 1394 connector 22 S VHS connector for Monitor A output 23 Input output terminals for sensor relay and serial 24 RS232 connector 9Pin D Sub 25 Connector for VGAmonitor 26 RCA connector for audio input output 27 AC power input connector ...

Page 12: ... 1 0 Samsung Techwin Installation and Connection 4 Basic Connection and Start up 4 1 Overall Layout 1 The devices that can be connected to the SVR 1630 are described below See each relevant section in the installation manual for the contents on the figure ...

Page 13: ...ted A terminal resistance of 75Ω exists when only one terminal is connected Hi z exists when both terminals are connected See 9 6 Connecting Video In Out on the page 42 3 The Input Video Type NTSC PAL is automatically recognized when the device runs For the recognition sequence camera number 1 is recognized first and then the sequence is decided according to the camera signal type that is first de...

Page 14: ...e figure below 4 3 2 Connecting a VGA Monitor 1 Monitor Outuput A can output to VGA For better definition quality connect Monitor A to the VGA Monitor as shown in the figure below Note 1 The SVR 1630 monitor outputs are divided into A Normal and B Spot If only one monitor is connected connect Monitor A 2 For Monitor Output A the same video output is transferred to two BNC connectors and an S VHS c...

Page 15: ...Installation and Connection SVR 1630 Samsung Techwin 2004 07 2001 v 1 0 15 4 4 Connecting Audio 1 Connect an audio signal to the SVR 1630 using the RCA cable as shown in the figure below ...

Page 16: ...release the power switch while SVR 1630 is ON the following windows are displayed according to the system setting after 4 seconds When there is Admin password in System Setup The dialogue box asking to enter the admin password is appeared Enter the password and the power is off When there is no Admin password in System Setup The dialogue box asking Yes or No is appeared Select Yes and the power is...

Page 17: ... Control 5 1 Menu Configuration Press the MENU button on the keypad on the front panel and the system changes to the SVR 1630 Setup mode The OSD Menu is displayed as shown in the figure below The Jog Shuttle on the menu is controlled as described in the figure below Main Menu Sub menu Setup Dialogue Box ...

Page 18: ...TER button To go to the Main Menu press the ESC button 3 Setting Page The selected item is shown with a circle to the left of its name The field to set values is shown in gray To move within each page use the or arrow buttons Press the ENTER button to change the value of a setting The setting values of items are divided into text including letters and numbers and numbers When the setting value is ...

Page 19: ... multiple DVRs can be set by one remote controller Set the remote controller ID as described below 1 Press the MENU button 2 Select System by using the button and press the ENTER or button 3 Select Etc using the button and press the ENTER button 4 Select Remote Control ID and press the ENTER button 5 Select a value using the buttons and press the ESC button 6 Press the ESC button to return to Moni...

Page 20: ...ote Up to 16 Remote Controller IDs are supported which consist of two digits from 1 to 4 ID Key Sets ID Key Sets ID Key Sets ID Key Sets ID1 1 1 1 ID2 1 2 1 ID3 1 3 1 ID4 1 4 1 ID1 2 1 2 ID2 2 2 2 ID3 2 3 2 ID4 2 4 2 ID1 3 1 3 ID2 3 2 3 ID3 3 3 3 ID4 3 4 3 ID1 4 1 4 ID2 4 2 4 ID3 4 3 4 ID4 4 4 4 6 3 Operable Range of the Remote Controller 6 4 Loading batteries into the remote controller The remote...

Page 21: ...Installation and Connection SVR 1630 Samsung Techwin 2004 07 2001 v 1 0 21 3 Replace the battery cover ...

Page 22: ...SVR 1630 Installation and Connection 22 2004 07 2004 v 1 0 Samsung Techwin 7 SVR 1630 Installation Example 7 1 Basic Configuration 7 2 Advanced Configuration ...

Page 23: ...Installation and Connection SVR 1630 Samsung Techwin 2004 07 2001 v 1 0 23 7 3 External Storage Backup Configuration 7 4 Internet Intranet Configuration ...

Page 24: ... Viewing Images After initial start up images are displayed in a split screen corresponding to the number of channels connected to the monitor Note If the user password is set a prompt for entering the password will appear The keypad on the front panel won t work A user password is not set in the factory ...

Page 25: ... a value using the buttons and press the ESC button when finished 8 2 2 Daylight Saving 1 Daylight Saving Time is only activated when the time zone is selected 2 Select Daylight Saving using the or arrow buttons and press the ENTER button 3 Select Yes No using the buttons and press the ESC button 8 2 3 Sync with NTP In order to synchronize time with the NTP Network Time Protocol server select On 1...

Page 26: ...d select the value using the buttons 3 Press the ESC button when finished 8 2 7 Apply Date Time Most setting values are applied automatically when exiting from the related menu page But Date Time settings are not applied automatically because they may critically affect the file system of the recorded HDD To apply Date Time settings confirm the settings with the Apply Date Time button 1 Select Appl...

Page 27: ...ecording configuration status Indicates where the final setting is done When setting up through the Quick Setup menu Macro Setup will be shown When setting up through Schedule Rec or Event Rec Custom Setup will be shown Note Macro Setup is only shown when the schedule recording conditions for all 16 channels are the same 8 3 2 Channel Status 1 Select Channel Status using the buttons and press the ...

Page 28: ...omer values can be set manually 1 Select Speed using the buttons and press the ENTER button 2 Select a value using the buttons Press the ESC button when finished 8 3 5 Quality When Recording Speed Quality is set as Customer values can be set manually 1 Select Quality using the buttons and press the ENTER button 2 Select a value using the buttons Press the ESC button when finished 8 3 6 Audio Recor...

Page 29: ...d and stranded wires are used be careful because the thickness of usable wires varies Stranded Wire Strip the outer covering to the defined length 8 10mm and solder it Suitable wires are AWG 22 26 Solid Wire Strip the outer covering to the defined length 8 10mm Suitable wires are AWG 20 26 Inserting removing wires For inserting into or removing wires from the TERMINAL BLOCK push the lever as shown...

Page 30: ...sor Specification Connection Connect the stripped wires to the Terminal Block Valid Input Pulse Duration Minimum 500ms Electrical Performance Output Currents Typical DC 12mA 9 1 2 Connecting Sensor Input For connection of sensor inputs S1 S16 see the figure below The figure below is an example of dry contact sensor connection For connecting or removing wires see Preparing and Connecting Wires on p...

Page 31: ...C type 1 Select All Ch and set the type 2 Press the Apply button to confirm the setting 9 1 3 2 Configuration Used for individually setting 16 sensors Select and set each sensor 1 Select Configuration and press the Enter button 2 Select the sensor S1 S16 to set and set the type 3 After setting press the ESC key to return to the ODS menu Note 1 Sensor setting is for deciding whether to use sensors ...

Page 32: ...of Output Circuits Automatic output of 4 Relays Output Method Dry Contact Spec Connection Connect the stripped wires to the Terminal Block 24V DC 1 25A 30W DC 125V DC 0 24A 30W 125V AC 0 5A 62 5VA Rated Values AC 250V AC 0 25A 62 5VA 9 2 2 Connecting to Relay Output Terminal For connection of R1 R4 outputs see the figure below The figure below is an example for connecting the warning lamp For conn...

Page 33: ... a sensor input or with motion detection and its operation condition can be set differently according to the schedule Relays can also be controlled locally by pressing the RELAY button followed by the relay number Relays can also be controlled remotely through the SVR Manager software Note See the SVR 1630 User Manual for setting details ...

Page 34: ...nnected and controlled provided that the SVR 1630 supports a through COM port Check the models available in the SVR 1630OSD Menu The figure below is an example for connecting an RS485 COM2 communication terminal to a PTZ camera Connect other serial communication ports to other devices by referring to the connection layout in the figure below For connecting or removing wires see Preparing and Conne...

Page 35: ...tion and Connection SVR 1630 Samsung Techwin 2004 07 2001 v 1 0 35 9 3 2 Serial Communication Port Connection Layout 9 3 2 1 COM1 Connection Layout 9 3 2 2 COM2 Connection Layout 9 3 2 3 COM3 Connection Layout ...

Page 36: ...SVR 1630 Installation and Connection 36 2004 07 2004 v 1 0 Samsung Techwin 9 3 2 4 COM4 Connection Layout 9 3 3 Serial Communication Port Figure 9 3 3 1 COM1 Figure 9 3 3 2 COM3 COM 4 Figure ...

Page 37: ... Serial Port Configure the COM port for PTZ and available models in the SVR 1630 System Serial Setup After completing the serial setup configure the base address or port for each channel under the Camera menu tab When connecting PTZ devices to several cameras be sure of the base address setting ...

Page 38: ... 4 1 Connecting Text Input Devices ATM POS Access Control In addition to images the SVR 1630 can record text data received from a POS ATM through the RS232 serial port COM1 Connect RS232 COM1 by referring to the 9 3 3 1 COM1 Figure on page 36 Set the text data in the Event Source menu and Serial data in the SVR 1630 System menu ...

Page 39: ... 07 2001 v 1 0 39 9 4 2 Configuring Serial Setup COM1 1 Select System from the OSD Menu and go to the Sub menu 2 Select COM1 RS232 in Serial Setup and set the Device to Text 3 Set the Baud Rate Parity Stop bit Data bits to the same values as the input device ...

Page 40: ...9 4 3 Configuring Text 1 Select Event Source from the OSD Menu and go to the sub menu 2 Select Text and set the text related data Note Some external devices may not be recognized depending on their characteristics Before installing any external device consult your local vendor ...

Page 41: ...efined below USB Spec Ver 1 1 Max 12M bps Available Devices USB Memory Output Voltage Current DC 5V Max 200mA Note The disk should be formatted to the FAT32 type If properly connected the disk is recognized automatically as in the following picture To copy images the process is as follows Set copy range up to 1 minute Æ Select Disk Æ Copy press Start Copy Images Type Start Model Size KB F Ext Sony...

Page 42: ...unctions 9 6 Connecting Video In Out For the SVR 1630 the loop through Video In and Out automatically detects the connection status and sets the terminal resistance For example if only Video In is connected the terminal resistance is internally set to 75Ω If both Video In and Out are connected the terminal resistance is changed to Hi z Therefore for connecting both Video In and Out the terminal re...

Page 43: ... models with the SVR 1630 If a non recommended HDD is used Samsung Techwin s warranty will not cover any failures Maker MAXTOR Series Model No Capacity 6Y120L P 0 120GB DiamondMax Plus 9 7200rpm 6Y250P0 250GB Note The buffer for DiamondMax Plus 9 s model L is 2MB for model P the buffer is 8MB 10 1 2 Mounting an HDD 1 Check if the HDD is currently set as Master 2 Turn off the SVR 1630 s power ...

Page 44: ...004 v 1 0 Samsung Techwin 3 Unlock the rack by turning the key anti clockwise 4 Pull the handle of the HDD RACK to completely remove the rack from the SVR 1630 main unit 5 Remove the cover by pulling the hook on the cover as shown in the figure below ...

Page 45: ...onnector inside the rack to the HDD Fix the HDD using the screws included in the package s accessories and close the cover Fix the HDD with care avoiding giving it any knocks 7 Drop the handle and push the rack until it reaches the back of the SVR 1630 s main unit 8 Lock the rack using a key ...

Page 46: ...endor to confirm compatibility 10 2 2 Connecting IEEE1394 Device When using a FireWire supported external HDD hard drive bays can be connected to a port in the front panel or a port in the rear panel The SVR 1630 does not supply power to the hard drive bay therefore only bays that use external power can be used Note When an external HDD is connected while the SVR 1630 is running the SVR 1630 shoul...

Page 47: ... F using the buttons and press the ESC button 3 Select Action using the buttons and press the ESC button 4 Select Add using the buttons and press the ESC button 5 Select Apply using the buttons and press the ESC button The HDD status is changed to And the new HDD is successfully registered 6 Select Action using the buttons and press the ESC button 7 Select Format using the buttons and press the ES...

Page 48: ...emote sites via the Internet Intranet 11 1 Connecting via Ethernet 1 Turn off the SVR 1630 s power switch 2 Connect the SVR 1630 to the hub with an Ethernet cable 3 Turn on the SVR 1630 s power switch Note 1 Supply power to the SVR 1630 only after connecting the Ethernet cable to avoid electrical damage to the SVR 1630 2 Firmly connect the Ethernet cable by fully pushing it into the hub 3 Check th...

Page 49: ...Network using the buttons and press ENTER 4 Select IP Addr using the buttons and press ENTER 5 Press the ESC button after entering the IP address in the dialogue box 6 Select Net Mask using the buttons and press ENTER 7 Press the ESC button after entering the Net Mask in the dialogue box 8 Select Gateway using the buttons and press ENTER 9 Press the ESC button after entering the Gateway in the dia...

Page 50: ...MB or above VGA 16 MB or above 32 MB or above OS Windows 2000 XP Windows 2000 XP Resolution 1024 X 768 pixels or above 1024 X 768 pixels or above Network 100 Base TX Fast Ethernet 100 Base TX Fast Ethernet 12 2 Installing the SVR Manager 1 Insert the Setup CD ROM into the CD ROM drive of the administrator s PC 2 Double click the SVR Manager setup file The Install Shield Wizard will be automaticall...

Page 51: ... 2001 v 1 0 51 1 Press the Next button 2 Browse and choose a directory if the default directory is not preferred Click the Install button after selecting a directory to install into 3 Click the Close button after the SVR Manager program is installed successfully ...

Page 52: ...stalling the SVR Manager 1 Click the Windows Start Button 2 Select and Click the Uninstall icon to run the Uninstall Shield 3 Uninstall the program according to the instructions in the window 12 4 Configstation Click the icon on the desktop to run the SVR Manager Configstation program ...

Page 53: ...Installation and Connection SVR 1630 Samsung Techwin 2004 07 2001 v 1 0 53 12 5 Monitor Click the related icon and run the SVR Manager Monitor program ...

Page 54: ...SVR 1630 Installation and Connection 54 2004 07 2004 v 1 0 Samsung Techwin 12 6 Playback Click the related icon and run the SVR Manager Playback program ...

Page 55: ...Appendix SVR 1630 Samsung Techwin 2004 07 2001 v 1 0 55 Appendix ...

Page 56: ...firstly connected becomes the primary disk and other HDDs are classified to auxiliary disks Note ATA or EIDE supports two channel interfaces Primary Secondary Each channel can be connected to two devices Master Slave HDD CD ROM The Primary Interface connects a total of two HDDs and the Secondary Interface connects the HDD Rack and CD RW In order to prevent confusion with the VFS2 s Primary Disk we...

Page 57: ...sing the Add used command it will be changed to R There is no need to reformat F Connected but not available file system After using Add you need to format to make it like R Otherwise indicates the FAT 32 file system connected for backup C Built in or external CD Recorder X The HDD cable is not connected or has some problem In this case the HDD should be removed using the Confirm Removed menu IntA...

Page 58: ... system VFS2 automatically detects bad sectors and bad sectors detected are not used The cases below are for when an HDD fails or has some connection problems 1 When replaying is stopped or the DVR is rebooted in a specific sector during playback or when it is not possible to search images by event 2 When recording is stopped and the Disk Manager shows the HDD type as X 1 2 2 When the primary disk...

Page 59: ...the backup range and press the Start button after selecting the backup HDD Note 1 Backup HDDs should be formatted to the FAT32 type 2 Backup data can be played on a PC with dedicated players such as SVR Manager or MiniPlayer 3 Backup data is made as one re3 file If the file size is over 2GB it may not be recognized normally because of the PC file system structure 4 In the course of backup the Auto...

Page 60: ... RAID It is recommended to use an external HDD rather than an internal HDD In other words only connect one external HDD and then keep it when it is full of data Note Data on preserved HDDs can only be played when the HDD is connected to the DVR 1 3 3 Cautions For HDD handling or guarantees apply to the after sales service of the HDD manufacturer Any data losses caused by user error shall not be su...

Page 61: ...ly detecting the video signals If there are no video signals the SVR 1630 refers to the internal jumper status and indicates the type Jumper Setting Video Type 1 2 NTSC Video 2 3 PAL Video Note For changing the video type contact your local vendor If any problems occur due to unauthorized changes the warranty is invalidated ...

Page 62: ... Program Acrobat Reader Version 5 1 3 2 Preparation To read the User Manual in the CD ROM Disc Adobe Acrobat 5 0 should be installed in the client PC Note If Adobe Acrobat Reader is not installed in the client PC use the CDROM s Acrobat Reader program 3 3 Reading the User Manual in CD ROM Follow the steps below to read the User Manual in CD ROM 1 Insert the CD ROM supplied into the PC s CD ROM dri...

Page 63: ...x480 60 800x600 60 1024x768 60 Monitor A Output Monitor B 30fps NTSC 25fps PAL 1 Channel Fixed User Defined Sequence Menu setting not available except for playback and channel information Recording and Playback Compression Method WISE Differential Wavelet Recording Speed Up to 30ips per channel total 240ips NTSC Up to 25ips per channel total 200ips PAL Resolution 720x243 NTSC 720x288 PAL Image Qua...

Page 64: ... 80 free of condensation Storage Humidity 93 below free of condensation Data Backup Expansion Copy Data Backup Internal HDD Rack or external IEEE 1394 SBP2 compatible HDD FAT32 formatted Internal CD R or External IEEE 1394 CD R 700MB CD R Data Copy USB 1 1 1 Channel Data Miniplayer Analogue VCR VHS Video output for VCR Backup Reminder Daily Weekly Monthly PTZ Control Available Serial Ports RS232 2...

Page 65: ...Sensor Input 16 Sensor inputs Supports Dry contact Serial Port Terminal 1 RS 485 422 PTZ control Max 384Kbps RJ 45 1 RS 485 422 Keyboard interface 1 RS 232C PTZ or DVR chain 9Pin D SUB 1 RS 232C Text input Max 230Kbps H W Flow control Additional Functions Digital Zoom 2x Live PlayBack Mode Alarm Notice MD Vloss Sensor Text Alarm Data Preservation Event triggered Video Data Preservation Alarm Log L...

Page 66: ...7 2004 v 1 0 Samsung Techwin Others Power Supply AC 100V 240V 50 60Hz Max 2A Power Consumption Typical 75W with 1 internal HDD External Dimensions Size WⅹDⅹH 420 0 x 440 10 x 92 5 Weight 8 3 Kg with one HDD one HDD Removable Rack ...

Reviews: