background image

English

_57

 A subject can be recorded under various types of lighting conditions indoors (natural, fl uorescent, candlelight, etc.). 

Because the colour temperature is different depending on the light source, the subject tint will differ depending on 

the white balance settings. Use this function for a more natural result.

Reset the white balance if lighting conditions change.

During normal outdoor recording, setting to auto may provide better results.

Do not use a coloured object when setting white balance: The appropriate tint cannot be set.


Aperture


The camcorder adjusts the aperture automatically depending on the subject and recording conditions. 

You can also manually adjust the Aperture to your preference.

item

contents

on-screen


display

"Auto"

Sets the aperture value automatically.

None

"Manual"

Sets the aperture value manually.

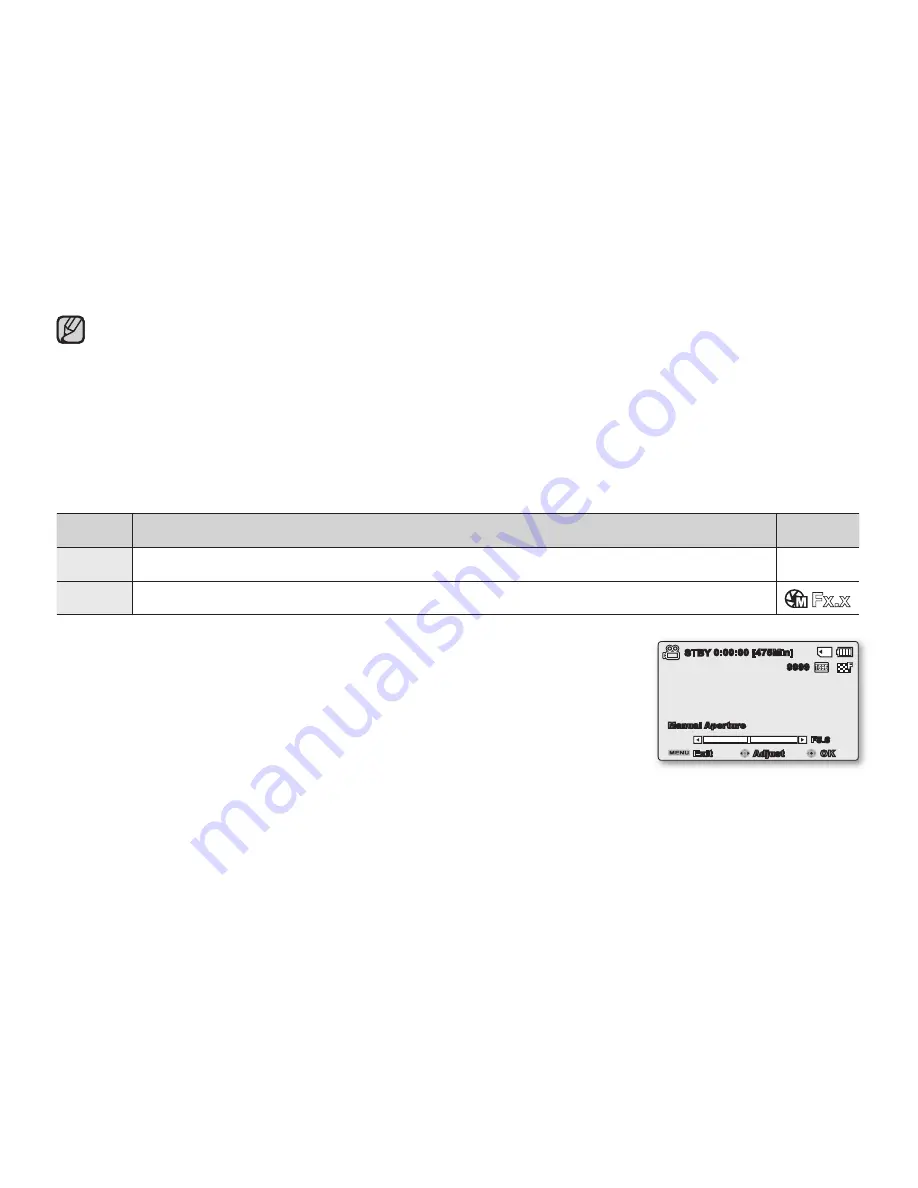
Setting the aperture manually:

 Press the 

Control

 button (

 / 

) to adjust the aperture while viewing the image 

on the LCD screen.

-   Confi rm your selection by pressing the 

OK

 button.

-   Exposure value can be set between 

"F1.8"

 and 

"F22."

-     If you set aperture to manual, the higher the aperture, the brighter the recorded 

picture will be.

Understanding Aperture

The aperture stop of a photographic lens can be adjusted to control the amount of light reaching the fi lm or image 

sensor. The aperture value needs to be adjusted in the following cases:

When shooting against the light or when the background is too bright.

When shooting on a refl ective natural background such as at the beach or when skiing.

When the background is overly dark (for example, night scenery).


0:00:00 [475Min]

OK

Adjust

Exit

STBY

Manual Aperture

F5.6

9999

Summary of Contents for SMX-K40BP

Page 1: ...purchasing this Samsung product To receive more complete service please register your product at www samsung com register SMX K40BP SMX K40SP SMX K40LP SMX K44BP SMX K44SP SMX K44LP SMX K45BP SMX K45S...

Page 2: ...is very stable durable and makes less noise while in operation It is environment friendly because low electric power is required User friendly functions User friendly EASY Q optimises your memory cam...

Page 3: ...and the overall topic Make all your recordings with a simple VIEW button This function provides the preview of storyboard to be printed which gives you digest of the recorded video without viewing the...

Page 4: ...s are here to prevent injury to you and others Please follow them explicitly After reading this section keep it in a safe place for future reference precautions Warning This camcorder should always be...

Page 5: ...cannot compensate for any damages Make a backup of important recorded data Protect your important recorded data by copying the files to a PC We recommend copying the data to your PC or other recording...

Page 6: ...order or AC power adaptor could cause malfunctions or defects No water or oil Water or oil entering the camcorder or AC power adaptor could cause electric shock malfunctions or defects Heat on surface...

Page 7: ...all be readily operable ABOUT THIS USER MANUAL Thank you for purchasing this Samsung Camcorder Please read this user manual carefully before you use the camcorder and keep it handy for future referenc...

Page 8: ...ntrolled waste disposal please separate these items from other types of waste and recycle them responsibly to promote the sustainable reuse of material resources Household users should contact either...

Page 9: ...ial damage Heed all instructions carefully Unplug from power supply Do not touch product Prohibited action WARNING Death or risk of serious personal injury This precaution must be kept Do not disassem...

Page 10: ...as damaged split or broken cords or wires Doing so may cause fire or electric shock Do not connect the AC adaptor unless the plug can be fully inserted with no part of the blades exposed Keep the used...

Page 11: ...ust gas generated by gasoline or diesel engines or corrosive gas such as hydrogen sulphide Doing so may corrode the external or internal terminals disabling normal operation Do not leave the camcorder...

Page 12: ...for data loss Do not wipe the camcorder body with benzene or thinner The exterior coating could peel off or the case surface could deteriorate W 4 4 W Do not expose the camcorder to sudden changes in...

Page 13: ...your camcorder 24 Switching to the power saving mode 25 LCD screen indicators 30 Turning the screen indicators on off 30 Using the LCD enhancer function 31 Setting the Anti Shake OIS Optical Image St...

Page 14: ...ion 55 Photo Resolution 56 16 9 Wide 56 White Balance 57 Aperture 58 Shutter Speed 59 EV Exposure Value 60 C Nite 60 Back Light 61 Focus 63 Digital Effect 64 Fader 64 Wind Cut 65 Zoom Type 66 Time Lap...

Page 15: ...ings menu items 84 Storage Type SMX K44 K45 only 84 Storage Info 85 Format 85 File No 86 Time Zone 88 Date Time Set 88 Date Type 88 Time Type 89 Date Time Display 89 LCD Brightness 89 LCD Colour 90 Au...

Page 16: ...ng the Intelli studio programme 108 Transferring videos photos from the camcorder to your computer 110 Maintenance 111 Additional information 113 Using your camcorder abroad 114 Troubleshooting 126 Sp...

Page 17: ...available SDHC SD High Capacity cards with this camcorder Set the appropriate storage media page 36 SMX K44 K45 only 2 Insert the battery into the battery slot page 16 You can record videos in H 264...

Page 18: ...on by pressing the Power button 2 Press the PHOTO button fully when you are ready RECORDING VIDEOS WITH H 264 FORMAT RECORDING PHOTOS Your camcorder is compatible with H 264 recording format which ac...

Page 19: ...switch between video and photo thumbnail view using the zoom lever 3 Use the Control button to select a desired video or photo and then press the Control button OK Step 3 Play back videos or photos S...

Page 20: ...Play mode Press the MENU button Control button OK to select Delete page 72 If the storage media is full you cannot record new videos or photos Delete videos or photos data that have been Step 5 Delet...

Page 21: ...region Parts and accessories are available for purchase at your local Samsung dealer SAMSUNG is not responsible for reduced battery life time or malfunctions caused by any unauthorised use of accesso...

Page 22: ...lish MENU button Anti Shake OIS button Control button OK Zoom W T button LCD Enhancer button Recording start stop button EASY Q button LCD screen Display VIEW button Power button HD OUTPUT switch ON O...

Page 23: ...k Memory card cover PHOTO button Battery pack slot Grip belt Memory card slot Grip belt hook OPEN Built in speaker Tripod receptacle Internal microphone 4 1 2 3 6 7 8 5 9 English_13 1 2 3 4 5 6 8 7 9...

Page 24: ...know your camcorder REAR VIEW Mode indicator Jack cover Record mode Video Photo HDMI jack Play mode USB jack MODE button AV jack AV Recording start stop button DC IN jack DC IN CHG charging indicator...

Page 25: ...r dust on the screen with a soft cloth WARNING Excessive rotation may damage the connective hinge between the screen and the camcorder ATTACHING THE GRIP BELT Adjust the length of grip belt so that th...

Page 26: ...wn in the diagram 2 Insert the battery pack into the battery slot until it locks Make sure that the SAMSUNG logo is facing up while the battery pack is placed as shown in the diagram 3 Slide and close...

Page 27: ...hen you connect the AC power supply to the camcorder Fully charge the battery pack before use When using the AC power supply place it close to the wall outlet If you experience a malfunction while usi...

Page 28: ...The colour of the charging indicator shows the charging state Battery Level Indicator State Message Fully charged 20 40 used 40 60 used 60 80 used 80 99 used Exhausted flickers The device will soon t...

Page 29: ...ronment and may differ according to user and condition We recommend using the AC power adaptor when using the Time Lapse REC function Continuous Recording without zoom The continuous recording time of...

Page 30: ...ve battery power you can set the Auto Power Off function which turns off the camcorder if there is no operation for 5 minutes To disable this option change the setting of Auto Power Off to Off page 91...

Page 31: ...ed It may cause leakage heat generation induce overheating or fire Do not expose the battery pack to water The battery pack is not water resistant When fully discharged a battery pack damages the inte...

Page 32: ...the camcorder s power is turned off Failure to do so can result in camcorder malfunction Use a nearby wall outlet when using the AC power adaptor Disconnect the AC power adaptor from the wall outlet...

Page 33: ...play videos or photos or edit them English_23 BASIC OPERATION OF YOUR CAMCORDER This section explains the basic techniques of recording videos or photos and also basic settings on your camcorder Set t...

Page 34: ...r the extended time the following functions enable you to prevent unnecessary energy consumption In STBY mode The camcorder switches to Quick On STBY mode when the LCD screen is closed page 92 In Play...

Page 35: ...e OSD is a maximum of 9 999 Video and Photo record mode Time Lapse REC Operating mode STBY Standby Recording Time counter Video recording time remaining recordable time Photo image counter Total numbe...

Page 36: ...just down Value adjust up 1 2 3 4 5 The illustration to the left shows the EV Exposure Value screen Functions marked with will not be kept when the camcorder restarts The shortcut menu OK guide repres...

Page 37: ...t in memory SMX K44 K45 only Battery info Remaining battery level Video Resolution Protection LCD Enhancer File Name File number Date Time Display Play Option 1 2 3 4 5 6 7 8 9 10 11 Video Play mode T...

Page 38: ...0001 0 00 00 0 00 55 Multi View 3 4 5 2 1 0 00 00 0 00 55 100 0001 01 JAN 2009 00 00 1 2 Reverse playback search page 33 Skip Search Slow motion Frame by frame Volume Down Play Pause Forward playback...

Page 39: ...me File number 1 2 3 4 5 6 7 8 9 10 Photo Play mode Slide Show Image counter Current image total number of recorded images Storage media Memory card or built in memory SMX K44 K45 only Battery info Re...

Page 40: ...ecorded When LCD enhancer works at the low illumination some stripes may occur on the LCD screen It is not a malfunction Using the LCD Enhancer function may cause colour looks different on the display...

Page 41: ...mode between On and Off The EASY Q mode automatically sets the Anti Shake OIS to On When Anti Shake OIS On is set there will be a slight difference between the actual movement and the movement on scr...

Page 42: ...utton to adjust the exposure while viewing the image on the LCD screen 3 Press the OK button to confirm your selection Press the OK button to exit the shortcut menu Exposure value setting will be appl...

Page 43: ...cursor up DOWN Focus Zoom tele Decreases the volume Decreases the volume Moves the cursor down LEFT EV Search playback RPS Reverse Playback Search rate x2 x4 x8 x16 Frame by frame playback Slow motio...

Page 44: ...ress the OK button The year can be set up to 2037 using the Home menu Activating the icon forwards the time by 1 hour Charging the built in rechargeable battery The built in battery is always recharge...

Page 45: ...ish Fran ais Deutsch Italiano Espa ol Portugu s Nederlands Svenska Suomi Norsk Dansk Polski e tina Slovensky Magyar limba rom n Hrvatski T rk e IsiZulu 5 Press the MENU button to exit the menu The OSD...

Page 46: ...memory card not supplied This camcorder has a card slot for access to SDHC Secure Digital High Capacity You can use SDHC cards on your camcorder Some cards are not compatible depending on a memory car...

Page 47: ...lose the cover Never format the built in memory or memory card using a PC If you insert a memory card when the camcorder is on the pop up message will prompt you automatically to select the storage ty...

Page 48: ...2MB sec SDHC Secure Digital High Capacity Memory Card The SDHC card is a higher version Ver 2 00 SD card and supports capacity above 2GB An SDHC card has a mechanical write protection switch Setting...

Page 49: ...on Be careful to keep a memory card out of the reach of children who might swallow it The camcorder supports SDHC memory card for data storage The data storage speed may differ depending on the manufa...

Page 50: ...0min 240min 480min 960min TV Normal 720x576 50i 620min 1 240min 38min 77min 155min 310min 620min 1 240min Web Fine 640x480 25p 480min 960min 30min 60min 120min 240min 480min 960min Web Normal 640x480...

Page 51: ...rds that are not formatted by this camcorder Perform the formatting directly on the camcorder To facilitate video recording it is recommended to use a memory card that supports faster write speed Writ...

Page 52: ...a damaged recorded data Do not disconnect the power source battery pack AC adaptor during a recording Otherwise it may cause damage to the storage media or data corruption quick View Using the Quick V...

Page 53: ...ode Sound is recorded from the internal stereo microphone on the front of the camcorder Take care that this microphone is not blocked Before recording an important video make sure to test the recordin...

Page 54: ...ghtness or colour of the LCD screen does not affect the image to be recorded page 89 Do not turn off the camcorder or remove a memory card when taking photos as it may damage the storage media or data...

Page 55: ...intaining sharp focus is about 1cm about 0 39 inch for wide angle and 1m about 39 4 inches for telephoto Optical zoom preserves image quality but during digital zoom the image quality may suffer Fast...

Page 56: ...respectively When switching to Play mode after recording a video the videos thumbnail index view appears When switching to Play mode after recording a photo the photos thumbnail index view appears pl...

Page 57: ...the video playback will appear on the screen 3 Select the Video thumbnail index view screen You can simply switch between video and photo thumbnail view using the zoom lever 4 Use the Control button t...

Page 58: ...les on a TV or a PC pages 95 100 You can upload recorded videos or photos to YouTube or Flickr using Intelli studio page 105 For various functions available during playback see playback options pages...

Page 59: ...s the Control button to locate the start point of the current file Pressing the Control button repeatedly skips files in the reverse direction Press the Control button within 3 seconds from the start...

Page 60: ...the desired photos and then press the OK button Shortcut menu for playback will be displayed for a while To view the previous next photo press the Control button To return to the thumbnail index view...

Page 61: ...screen appears 3 Select the desired submenu and menu item with the Control buttons and the OK button To return to the normal screen press the MENU button Depending on the mode selected some menu items...

Page 62: ...rs 3 Press the Control button to select iSCENE 4 Select the desired submenu item with the Control button and then press the OK button 5 Press the MENU button to exit the menu The selected item is appl...

Page 63: ...lt value Page iSCENE Auto 54 Video Resolution TV Fine 55 Photo Resolution 1696x960 16 9 Wide 55 16 9 Wide On 56 White Balance Auto 56 Aperture Auto 57 Shutter Speed Auto 58 EV 0 59 C Nite Off 60 Back...

Page 64: ...ackground The portrait mode is most effective when used outdoors EV value is automatically adjusted to the optimal Spotlight Prevents overexposure of subject s face etc when strong light strikes the s...

Page 65: ...he more memory is used The recording times depend on the resolution of a video to be recorded page 40 Video resolution settings of Web Fine and Web Normal record movie in 4 3 aspect ratio even when yo...

Page 66: ...lance automatically None Daylight Controls the white balance according to the outdoor lighting Cloudy Adjusts for a cloudy sky or shady location Fluorescent Adjusts for white fluorescent lighting Tung...

Page 67: ...tents on screen display Auto Sets the aperture value automatically None Manual Sets the aperture value manually Setting the aperture manually Press the Control button to adjust the aperture while view...

Page 68: ...e motion of a fast moving subject and a slow shutter speed can blur the subject to give the impression of motion The adjusted value is applied right after moving the Control button to adjust the shutt...

Page 69: ...posure value can be set between 2 0 and 2 0 If you set exposure to manual the higher the exposure the brighter the recorded picture will be Exposure value setting will be applied and indicator and set...

Page 70: ...nd is placed against a bright background The person s face is too dark to distinguish his her features Backlight off Backlight on C Nite You can adjust the shutter speed when recording a slow moving o...

Page 71: ...is set will adjust focus and exposure to optimal values automatically The Face Detection may not operate depending on the recording conditions For example the Face Detection frame may appear when fra...

Page 72: ...ndicator is displayed Manual focus is recommended in the following situations Dark shooting subject When the background is too bright Subject through a window that is stained or wet Subject with dense...

Page 73: ...ite 2 Sepia This mode gives the images a reddish brown pigment 3 Negative Reverses the colours and the brightness creating the look of a negative 4 Art Adds artistic effects to an image 5 Emboss This...

Page 74: ...mage and sound are faded out Fade in out Press the Recording start stop button when Fader is set to In Out Recording starts with a dark screen and then the image and sound are faded in and recording s...

Page 75: ...tically to the digital zoom when you zoom in beyond the optical or intelligent zoom range With the digital zoom the image is processed digitally so image quality will deteriorate the more you zoom in...

Page 76: ...ng interval Sec with the Control button 5 Move to the next setting with the Control button and set a desired total recording time Hr in the same way While you set the preparatory settings recording in...

Page 77: ...ecorded during Time Lapse Recording When a video recording fills up 1 8GB of storage media a new recording file is automatically started at that point When the battery is discharged exhausted during T...

Page 78: ...d Records the subject on the horizontal or vertical composition or close up Safety Zone Records the subject within safety zone which prevents them from being cut when editing in 4 3 for left and right...

Page 79: ...tion Thumbnail index view only Normal View 70 Play Option Play All 71 Delete 72 Protect 73 Copy 74 Story Board Print 76 Edit Divide 77 Combine Thumbnail index view only 79 Slide Show 80 Slide Show Opt...

Page 80: ...tton to select Multi View Option 5 Select an option by pressing the Control button and then press the OK button item contents Normal View The thumbnails of video files are displayed sequentially in th...

Page 81: ...ption by pressing the Control button and then press the OK button item contents on screen display Play All Plays back from the selected video to the last video Play One The selected video will be play...

Page 82: ...ayed on the selected videos or photos Pressing the OK button toggles the selection and release All Files Deletes all videos or photos 6 The pop up selection menu will appear depending on the selected...

Page 83: ...s Protects selected videos or photos from deletion To protect individual videos or photos select the desired videos or photos by pressing the OK button then press the MENU button to confirm The indica...

Page 84: ...tween selecting and releasing the copy function All Files Copies all the videos or photos 6 The pop up selection menu will appear depending on the selected menu item In this case select the desired it...

Page 85: ...IEW button Sampling 16 i Frame images appears on the LCD screen The images from the selected video are selected arbitrarily and compose the preview of storyboard to be printed If you want to save the...

Page 86: ...ct Yes The printed storyboard image files appear on the LCD screen for about 3 seconds Images to be captured are selected arbitrarily and compose a storyboard of 16 images The saved storyboard can be...

Page 87: ...on Control button OK to select Edit Divide 5 Select a desired video clip using the Control button OK The selected video clip will be paused 6 Search the point of division by pressing the Control butto...

Page 88: ...nsferred to this camcorder by using Samsung Intelli studio You can not delete a protected image You must first release the protect function to delete it page 73 The division point may drift before or...

Page 89: ...Move Play The combine function is not available in the following conditions Videos in different resolution formats TV Super Fine TV Fine TV Normal vs Web Fine Web Normal cannot be combined Videos in d...

Page 90: ...video and photo thumbnail view using the zoom lever 4 Press the MENU button Control button to select Slide Show Start 5 Press the OK button The indicator is displayed The Slide Show will start from t...

Page 91: ...d randomly from 5 sample music files stored 3 The Slide Show will start with selected item To end the slide show press the OK button again FILE INFO You can see the image information for all images 1...

Page 92: ...s the MENU button Depending on the mode selected not all items are selectable for changing If there is no storage media inserted it cannot be selected and will be dimmed on the menu Storage Type SMX K...

Page 93: ...olour 0 89 Auto LCD Off On 90 Menu Design Misty White 90 Transparency 0 90 Beep Sound On 91 Shutter Sound On 91 Auto Power Off 5 Min 91 Quick On STBY 5 Min 92 PC Software On 93 TV Display On 93 Defaul...

Page 94: ...using the Control button Storage Type SMX K44 K45 only You can record videos or photos on the built in memory or a memory card so you should select the desired storage media before starting recording...

Page 95: ...the storage media settings contents on screen display Memory SMX K44 K45 only Formats the built in memory None Card Formats a memory card None Do not format the storage media on a PC or other device M...

Page 96: ...an easily set the clock to the local time zone when travelling 1 Press the Control button to select the Time Zone in Settings mode and then press the OK button The Time Zone screen will be displayed 2...

Page 97: ...Midway 11 00 Abu Dhabi Muscat 04 00 Honolulu Hawaii Tahiti 10 00 Kabul 04 30 Alaska 09 00 Tashkent Karachi 05 00 LA San Francisco Vancouver Seattle 08 00 Calcutta New Delhi 05 30 Denver Phoenix Salt L...

Page 98: ...onth day and year JAN 01 2009 01 JAN 2009 Displays the date in the order of day month and year 01 JAN 2009 01 01 2009 Displays the date in the order of day month two digit and year 01 01 2009 This fun...

Page 99: ...5 using the Control button OK You can manipulate the colour displayed on the LCD screen by adjusting the colour ratio of red and blue Adjusting the colour display of LCD screen does not affect the ima...

Page 100: ...LCD brightness to normal Auto LCD Off will be disabled in the following cases If the DC power cable AC power adaptor USB cable is connected Menu Design You can select the desired menu design Misty Wh...

Page 101: ...eriod of time settings contents on screen display Off The camcorder does not turn off automatically None 5 Min For power saving purpose the camcorder will automatically turn power off if there is no o...

Page 102: ...the LCD screen will soon execute the Quick On STBY mode and then the camcorder turns off after 10 minutes None 20 Min In the standby mode closing the LCD screen will soon execute the Quick On STBY mod...

Page 103: ...rsion information may be changed without notice for improvement Language You can select a desired language to display the menu and messages page 35 TV Display You can select the output path of the OSD...

Page 104: ...Demo function does not operate in the following cases If Auto Power Off is set to 5 Min uses the battery as main power the Auto Power Off function will turn the camcorder off before Demo can run Anyn...

Page 105: ...eo transfer CONNECTING TO A TV You can view the recorded videos and photos on a large screen by connecting the camcorder to an HDTV or normal TV Select the HDMI jack on your TV For more information ab...

Page 106: ...What is Anynet function You can use the same remote control for devices that support the Anynet function You can use the Anynet function if the camcorder is connected with an HDMI cable to an Anynet...

Page 107: ...on the TV is turned down forgetting this may cause feedback from the TV speakers Carefully connect the input and output cables to the corresponding connections on the device the camcorder is being use...

Page 108: ...the TV Display is set Off the TV screen does not include the OSD On Screen Display menus page 93 You will only hear audio from the camcorder on your TV in Video playback mode Refer to page 56 for the...

Page 109: ...yback on your camcorder and record it on the recording device Refer to the instruction manuals supplied with your recording device for details 5 When dubbing is finished stop the recording device and...

Page 110: ...Macintosh Connect your camcorder to the computer using the USB cable The built in editing software Intelli studio runs on the PC automatically once the camcorder is connected to a Windows computer Wh...

Page 111: ...ments must be met for using the built in editing software Intelli studio Items System Requirements OS Operating System Microsoft windows Vista or XP CPU Intel Pentium 4 3 0 GHz or higher AMD Athlon FX...

Page 112: ...e device window appears click OK 4 Disconnect the USB cable from the camcorder and PC Use the provided USB cable Supplied by Samsung Don t apply excessive force when inserting or extracting the USB ca...

Page 113: ...es the size of thumbnails Displays all files videos and photos Displays video files only Displays photo files only Sorts the files 8 Imports folders from PC 9 Selects the connected camcorder or storag...

Page 114: ...ing to the selected source 3 Select the video or photo that you want to play and then double click to play back Playback starts and the playback controls appear Step 4 Editing videos or photos With In...

Page 115: ...ears in the sharing window 3 Click on the website you would like to upload files to You can choose YouTube Flickr or the specified website you want to set for your uploading management 4 Click Upload...

Page 116: ...io Video formats MP4 Video H 264 Audio AAC WMV WMV 7 8 9 Photo formats JPG GIF BMP PNG TIFF Other functions with the Intelli Studio Importing and viewing the video photos from your PC While transferri...

Page 117: ...dows computer it will run faster after connecting the camcorder to your computer Moreover the application can be updated automatically and run directly on the Windows computer The Intelli studio appli...

Page 118: ...the PC s screen after a moment The removable disk appears when connecting a USB Select Open folders to view files using Windows Explorer and click OK 4 The folders in the storage media appear Differen...

Page 119: ...a PC If you modify it this camcorder may not recognise the modified files You can use your camcorder as a storage device SDV_0001 MP4 DCIM VIDEO 100PHOTO WEB_0002 MP4 SDV_0003 MP4 SDE_0004 MP4 WEB_00...

Page 120: ...st level is high Dust entering the camcorder could cause a malfunction If humidity is high the lens could become mouldy and the camcorder could become inoperative It is recommended that you put the ca...

Page 121: ...g the storage media Do not bring the storage media near objects that have a strong magnetic field or that emit strong electromagnetic waves Do not store the storage media in locations with high temper...

Page 122: ...emical reaction while warmer temperatures can prevent complete charging Store in a cool dry place Extended exposure to high temperatures will increase natural discharge and shorten service life Fully...

Page 123: ...orld USING YOUR camcorder ABROAD Each country or region has its own electric and colour systems Before using your camcorder abroad check the following items Power sources The provided AC adaptor enabl...

Page 124: ...ia Message Icon Informs that Action Memory Full SMX K44 K45 only There is not enough space to record on the built in memory Delete unnecessary files on the built in memory Use a memory card Back up fi...

Page 125: ...d cannot be recognised Format the memory card or replace it with a new one Card Locked The write protection tab on an memory card has been set to lock Release the write protection tab Not Supported Ca...

Page 126: ...e dew on the external or internal lenses of the camcorder and on the reflection lens When this happens you temporarily may not use the record or play functions of the camcorder Also it may cause a mal...

Page 127: ...AC power adaptor and reconnect the power supply to the camcorder before turning it on The power automatically turns off Is Auto Power Off set to 5 Min If no button is pressed for about 5 minutes the...

Page 128: ...reen The camcorder is in Demo mode If you do not want to see Demo images change the setting of Demo to Off page 94 Unknown indicator appears on the screen A warning indicator or message appears on the...

Page 129: ...y card Release the lock on the write protect tab of the memory card SDHC memory card etc if any page 38 Copy all important recorded files to your PC before formatting Samsung shall not be responsible...

Page 130: ...ures used Recording a fast moving subject increases the bit rate and consequently the amount of storage space required for the recording which can lead to a shorter available recording time The record...

Page 131: ...p button and the point where the recorded video starts stops On your camcorder there may be a slight time delay between the point when you press Recording start stop button and the actual point where...

Page 132: ...ight White colour left The Audio Video cable jack is not connected properly Make sure that the Audio Video cable jack is connected to the proper jack page 95 Playback on your camcorder Symptom Explana...

Page 133: ...s computer Intelli studio is not Macintosh compliant Set PC Software to On in the Settings menu According to your computer type the Intelli studio programme may not run auto matically In this case ope...

Page 134: ...ve the battery pack or unplug the AC power adaptor and reconnect the power supply to the camcorder before turning it on Connecting Dubbing with other devices TV DVD recorder etc Symptom Explanation So...

Page 135: ...desired functions do not set the following items first Menu English_125 Cannot Use Because of the following setting Back Light C Nite C Nite iSCENE Focus Face Detection C Nite iSCENE Aperture Manual S...

Page 136: ...7 inches wide 230k LCD screen method 1 6 interlaced scan LCD panel TFT active matrix system Connectors Composite video out 1 0V p_p 75 analogue HDMI output C type Audio output 7 5dBm 47K analogue ster...

Page 137: ...r consult your dealer for assistance However if there is no alternative to cutting off the plug remove the fuse and then safely dispose of the plug Do NOT connect the plug to a mains socket as there i...

Page 138: ...7864 0 10 Min www samsung com nl NORWAY 3 SAMSUNG 7267864 www samsung com no POLAND 0 801 1SAMSUNG 172678 022 607 93 33 www samsung com pl PORTUGAL 80820 SAMSUNG 726 7864 www samsung com pt SLOVAKIA 0...

Page 139: ...he use of certain Hazardous Substances in electrical and electronic equipment and we do not use the 6 hazardous materials Cadmium Cd Lead Pb Mercury Hg Hexavalent Chromium Cr 6 Poly Brominated Bipheny...

Reviews: