background image

English-2

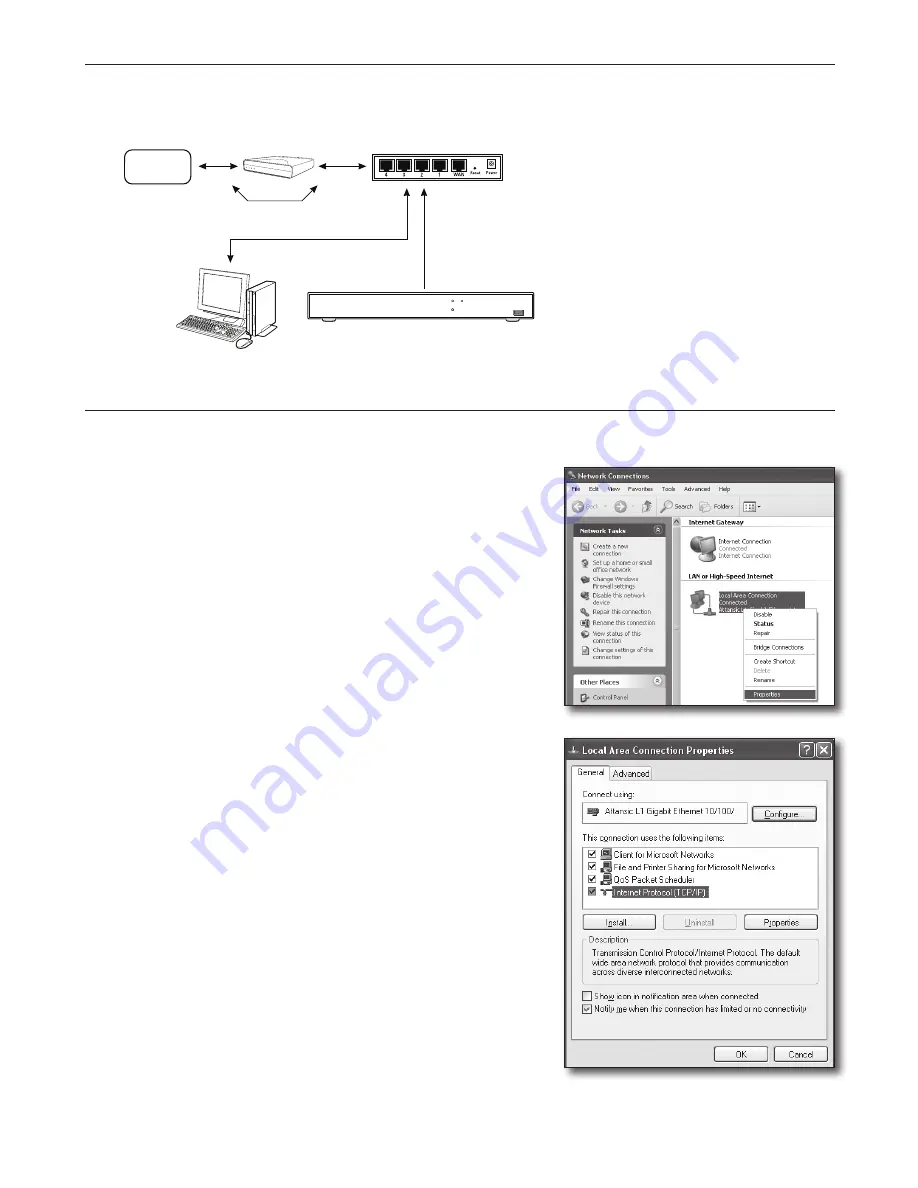
Step 1. Connect the cable

1. 

Connect the Internet service line (XDSL/cable TV Modem) to the Internet (WAN) port on the router.

2. 

Connect the computer and DVR to the LAN port (1-4) on the router by using an Ethernet cable.

Step 2. Connect local computer to the router

Step 2.1 Connection Settings

1. 

Click [Start] on your computer.

2. 

Access <Control Panel> - <Network Connection>. 

The Network Connection Window is as shown in the figure.

3. 

Select <Local Connection>.

4. 

Right click on the mouse and select <Properties>.

5. 

The <Local Connection Properties> Window is as shown in the figure.

6. 

Select <Internet Protocol (TCP/IP)>, and then click on [Properties].

PWR

HDD

USB

Broadband Router

Cable TV/ADSL/VDSL

Directly Connected 

(Dynamic/Static IP)

INTERNET

or

DDNS Server

Local PC

DVR

Summary of Contents for SDH-C85100BF

Page 1: ...closely follow Steps 1 6 Configure router PC and DVR device in accordance with the following steps Step 1 Connect the cable Step 2 Connect your local computer to the router Step 3 Connect the DVR to the router Step 4 Connect the router to Internet service line Step 5 Configure Port Forwarding for Router Step 6 Use the DDNS to access the DVR in dynamic IP environment PWR HDD USB PWR HDD USB DVR DVR...

Page 2: ... Connection Settings 1 Click Start on your computer 2 Access Control Panel Network Connection The Network Connection Window is as shown in the figure 3 Select Local Connection 4 Right click on the mouse and select Properties 5 The Local Connection Properties Window is as shown in the figure 6 Select Internet Protocol TCP IP and then click on Properties PWR HDD USB Broadband Router Cable TV ADSL VD...

Page 3: ... your computer 2 Click on Run 3 Enter cmd in Open text box found within the Run dialog box and then click on OK 4 Enter ipconfig in DOS command line window cmd exe and press ENTER 5 Run Internet Explorer and enter the IP address of Default Gateway in the address bar found in cmd exe window and then press ENTER 6 If all connections have been set up properly a router login page will be displayed ...

Page 4: ...Port and HTTP Port Refer to the next page for setting up the Client port and HTTP port What s a Port Port 80 is generally used for HTTP Port in the HTTP protocol If no port is set it will be automatically set to 80 in the HTTP protocol For example http www yahoo com and http www yahoo com 80 will be deemed as equal Therefore if HTTP Port has been set to any port other than 80 then you have to spec...

Page 5: ... connection type before you proceed DHCP Dynamic IP environment allocate IP address automatically Static fixed IP IP environment where public IP address is used PPPoE commonly used in DSL environment requiring ADSL access ID and password For your user ID and password consult your ISP Name of each type stated above may vary depending on router manufacturer Step 4 1 Connection guide by router Step 4...

Page 6: ...on Save Settings Static IP Address Environment 8 Select Static IP 9 Enter the IP Address Subnet Mask and ISP Gateway Address allocated by your ISP 10 Click on Save Settings ADSL Environment 11 Select PPPoE Username Password 12 Enter your User name and Password For your User name and Password consult your ISP ...

Page 7: ...and Password For your User name and Password refer to the user manual for the router 3 Click on Setup Basic Settings from the menu on the left side Click Setup Wizard for automatic setup Dynamic IP Address Environment 4 Select Get Dynamically From ISP 5 Click on Apply Static IP Address Environment 6 Select Use Static IP Address 7 Enter IP Address IP Subnet Mask and Gateway IP Address 8 Click on Ap...

Page 8: ...nternet Explorer and enter the Default Gateway found in Step 2 into the address bar and then press ENTER 2 When the router login screen is displayed enter your User name and Password For your ID and password refer to the user manual for the router 3 Click on Internet Setup 4 The setup screen to be displayed varies depending on your Internet Connection type ...

Page 9: ...7 Select Static IP 8 Enter the Internet IP Address Subnet Mask and Gateway allocated by your ISP 9 Click on Save Settings at the bottom ADSL Environment 10 Select PPPoE 11 Enter your User name and Password For your User name and Password consult your ISP 12 Click on Save Settings at the bottom 13 Upon completion a completion page will be displayed ...

Page 10: ...Dynamic IP Address Environment 3 Select Dynamic as the connection type and click on Next 4 Enter Host Name and click on Apply Changes If your ISP provided you with a specific DNS address please click on WAN DNS and enter the DNS address Static IP Address Environment 5 Select Static as the connection type and click on Next 6 Enter the IP Address allocated by your ISP 7 Enter Subnet Mask and ISP Gat...

Page 11: ...tor Connection will be displayed at the top of the interface Step 4 1 Case 5 TRENDNET TEW 652BRP 1 Run Internet Explorer and enter the IP address of Default Gateway found in Step 2 into the address bar and then press ENTER 2 When the router login window is displayed enter your User name and Password For your ID and password refer to the user manual for the router 3 Click on WAN from the menu at th...

Page 12: ...onment 8 Select DHCP Client or Fixed IP 9 Select Specify IP 10 Enter IP Address Subnet Mask and Default Gateway 11 Enter DNS1 and DNS2 If your ISP provided you with a specific DNS address please click on WAN DNS and enter the DNS address 12 Upon completion click on Apply button at the bottom ADSL Environment 13 Select PPPoE 14 Select appropriate method of obtaining WAN IP address 15 Enter Service ...

Page 13: ...found in Step 2 into the address bar and then press ENTER 3 Click on Status tab on router menu 4 Check the WAN Internet connection status and WAN Internet IP address 5 When the connection is set up successfully a message DHCP Client Connected will be displayed and an address will be displayed for the WAN Internet IP 6 Use Internet Explorer to access Yahoo Google and other Web servers 7 If the conn...

Page 14: ...ype of router is described below For other routers not guided herein refer to the user manual for the router Step 5 1 Port Forwarding Guide by router Run Internet Explorer and enter the IP address of Default Gateway found in Step 2 into the address bar and then press ENTER Step 5 1 Case 1 D LINK DIR 330 1 Select Advanced 2 Set port forwarding for HTTP Port 2 1 Find the Check box and check it 2 2 E...

Page 15: ...button 4 2 In Service Name field enter a name for Client Port of DVR For example DVR 2 4 3 Enter Start Port and End Port matching the Client Port defined in Step 3 For example 4520 4524 4 4 In Server IP Address enter the IP address defined for DVR in Step 3 For example 192 168 1 200 4 5 Click Apply to finish setting Step 5 1 Case 3 LINKSYS WRT54G 1 Click on Application Gaming 2 Set port forwarding...

Page 16: ...t 2 2 In Description field enter a name for DVR port For example DVR 1 2 3 In Inbound Port enter the HTTP Port defined in Step 3 For example 80 2 4 Select Any for Type 2 5 In Private IP Address enter the IP address defined for DVR in Step 3 For example 192 168 1 200 2 6 In Private Port enter the HTTP Port defined in Step 3 For example 80 3 Set port forwarding for Client Port 3 1 Select Enable chec...

Page 17: ... Step 3 For example 192 168 1 200 3 6 Click on ADD button 4 Finish setting Step 5 2 Check Port Forwarding on Computer 1 Re verify the WAN Internet IP selected in Step 4 2 2 Re verify the HTTP Port selected for DVR in Step 3 1 3 Run Internet Explorer and enter http WAN Internet IP HTTP Port into the address bar and then press ENTER 4 If the port forwarding configuration has been set up correctly th...

Page 18: ...ha security com snb5000 User name dvr2016 Password 123456 3 Upon completion of DDNS setting press OK Step 6 2 Access DVR by Using DDNS Address 1 Run Internet Explorer and enter the DDNS address found in Step 6 1 into the address bar and then press ENTER 2 The Live screen for DVR will be displayed 3 If failed with accessing return to Step 6 1 and check the setting again M M It may take 10 minutes t...

Reviews: