background image

Product Specifications

2-3

SAMSUNG ELECTRONICS

Service Manual

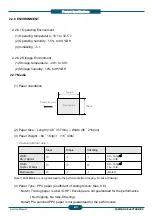
2.2.7 Media

(1) Paper orientation 

(2) Paper Size :  Length (148

357mm) 

×

Width (98

216mm)

(3) Paper Weight  : 60

163g/

㎡(

16

43lb

(4) Paper Type : PPC paper (Coefficient of sliding friction: Max. 0.6)

Note1) Tracing paper / Label / OHP / Envelope are not guaranteed for the performance

(No dropping, No miss-Ordering)

Note2) Pre punched PPC paper is not guaranteed for the performance 

Length

Feed direction

Width

Face down

< Operating Mode Table >

(Note1)

×

×

Multi media

60

163g/

16

43

lb

Width
182m

216mm

60

163g/

16

43

lb

×

×

Width
98

182mm

Offsetting

Staple

Stack

Note1) Multi-Media are not guaranteed for the performance(No dropping, No miss-Ordering)

2.2.6 ENVIRONMENT 

2.2.6.1 Operating Environment 

(1) Operating temperature : 10

to 32.5

(2) Operating humidity : 15 % to 80 %RH

(3) Initializing : -5

2.2.6.2 Storage Environment 

(1) Storage temperature : -20

to 60

(2) Storage humidity : 10% to 95%RH
Summary of Contents for SCX-FIN20S

Page 1: ...SCX 6345N 6555N 6545N CLX 8380ND 8385ND 8540ND Finisher 500 sheets Stacker 125 sheets Top Tray 50 sheets stapling 1 000K Life Mailbox 4Bin 500 sheets stacking 125sheets bin 1 000K Life Paper Spec Length 148 357mm Width 98 216mm 60 163gsm Staple Cartridge 5 000 staples cartridge ...

Page 2: ...mary 2 2 Specification 2 3 Product Configuration 3 Disassembly and Reassembly 4 Troubleshooting 4 1 Removing paper jam in the finisher 4 2 Removing paper jam in the mailbox 4 3 Replacing a stapler cartridge 4 4 Problems and solutions Finsher parts catalog Mailbox parts catalog ...

Page 3: ...ed cable Some chemicals can attack the coating on the power cable weakening the cover or exposing cables causing fire and shock risks 8 Use caution during thunder or lightening storms Samsung recommend that this machine be disconnected from the power source when such weather conditions are expected Do not touch the machine or the power cord if it is still connected to the wall socket in these weat...

Page 4: ...eed System 35 60ppm with minimized skip pitches 2 Heavy Duty Design Finisher 500 sheets Stacker 125 sheets Top Tray 50 sheets stapling 1 000K Life Mailbox 4Bin 500 sheets stacking 125sheets bin 1 000K Life 3 Paper Spec Length 148 357mm Width 98 216mm 60 163gsm 4 Staple Cartridge 5 000 staples cartridge 5 Configuration Embed type ...

Page 5: ...Finisher Stacker Tray 500 sheet Top Tray 125 Sheets Mailbox 500 sheet with 20lb sheet 125sheets bin 2 Stapling Finisher 50 sheet stapling with 20lb sheet 5 000 staples per a stapler cartridge 3 Offset at Non Staple job Available Finisher Only 4 Offset at Stapled job Available Finisher Only 2 2 4 Machine Life 1 000 000 sheets or 5 years Excluding Periodical replacement part 2 2 5 Acoustic Noise Mea...

Page 6: ...2 Pre punched PPC paper is not guaranteed for the performance Length Feed direction Width Face down Operating Mode Table Note1 〇 Multi media 60 163g 16 43lb 〇 〇 〇 Width 182m 216mm 60 163g 16 43lb 〇 Width 98 182mm Offsetting Staple Stack Note1 Multi Media are not guaranteed for the performance No dropping No miss Ordering 2 2 6 ENVIRONMENT 2 2 6 1 Operating Environment 1 Operating temperature 10 to...

Page 7: ... 5X8 5 140X216 Statement X X O O SEF 4 5 6 4 114 162 C6 Env X X O O SEF 4 3 8 7 110 220 DL Env X X O O SEF 4 1 9 5 105 241 No 10 Env X X O O SEF 4 1X5 8 105X148 A6 X X O O SEF 4 0 6 0 101 6 152 4 PostCard 4x6 X X O O SEF 3 9 7 5 98 4 190 5 Monarch Env X X O O SEF 3 9X8 9 98X225 No 9 Env O O O O LEF 8 5X5 5 216X140 Statement O O O O LEF 8 3X5 8 210X148 A5 60 163 g 60 220g Top tray Main tray Directi...

Page 8: ...Product Specifications 2 5 SAMSUNG ELECTRONICS Service Manual 2 3 Product Configuration Mail box Finisher ...

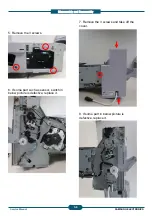
Page 9: ...ce Manual 1 Lift up Mail box Unit 2 Remove the Stacker 4 ea 3 Remove 2 screws to separate front rear cover 4 Remove the front cover Separate the rear cover after remove the harness 5 Remove the jam cover 3 Disassembly and Reassembly 3 1 Mail box disassembly ...

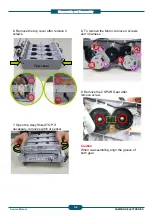
Page 10: ...Remove the top cover after remove 4 screws Top cover 7 Open the Assy Shiled TOP If necessary remove switch or sensor 8 To remove the Motor remove 4 screws and 4 harness 9 Remove the 2 SPUR Gear after remove screw Caution When re assembling align the groove of both gear ...

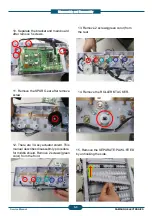
Page 11: ... screws 11 Remove the SPUR Gear after remove screw 14 Remove the ROLLER STACKER 12 There are 3 Assy actuator shield This manual describes disassebmly procedure for middle shield Remove 2 screws green color from the front 13 Remove 2 screws green color from the rear 15 Remove the SEPARATE PAWL FEED by unhooking the side ...

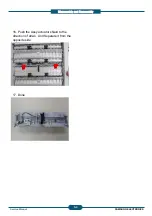
Page 12: ...Disassembly and Reassembly 3 4 SAMSUNG ELECTRONICS Service Manual 16 Push the Assy actuator shield to the direction of arrwo And Separate it from the opposite side 17 Done ...

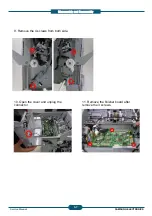
Page 13: ...G ELECTRONICS Service Manual 3 2 Finisher disassembly Top view Bottom view 1 Unplug the connector 3 Remove the staple cartridge 4 To remove the cover remove the 2 screws 2 Keep the 1c lever pull up and remove the finisher unit from the SET ...

Page 14: ...AMSUNG ELECTRONICS Service Manual 5 Remove the 3 screws 6 If some part such as sensor switch in below picture is defective replace it 7 Remove the 3 screws and take off the cover 8 If some part in below picture is defective replace it ...

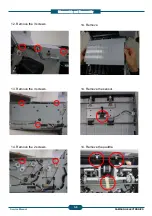
Page 15: ...Disassembly and Reassembly 3 7 SAMSUNG ELECTRONICS Service Manual 9 Remove the 4 screws from both side 10 Open the cover and unplug the connector 11 Remove the finisher board after remove the 3 screws ...

Page 16: ...Disassembly and Reassembly 3 8 SAMSUNG ELECTRONICS Service Manual 12 Remove the 3 screws 13 Remove the 3 screws 14 Remove the 2 screws 14 Remove 14 Remove the sensor 14 Remove the paddle ...

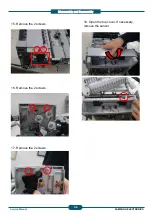
Page 17: ...Disassembly and Reassembly 3 9 SAMSUNG ELECTRONICS Service Manual 15 Remove the 2 screws 16 Remove the 2 screws 17 Remove the 2 screws 18 Open the top cover If necessary remove the sensor ...

Page 18: ...n options or models Note See Replacing a stapler cartridge on page 4 5 Staple cartridge is not installed Install it in finisher See Replacing a stapler cartridge on page 4 5 Staple cartridge is empty Replace it See Removing paper jam in the finisher on page 4 1 Paper jam inside of finisher See Removing paper jam in the mailbox on page 4 3 Paper jam inside mailbox See Removing paper jam in the fini...

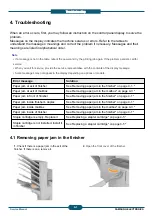
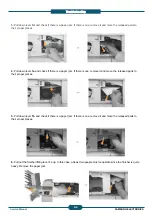
Page 19: ... lever 1a and check if there is a paper jam If there is one remove it and move the released parts to their proper places 5 Pull down lever 1b and check if there is a paper jam If there is one remove it and move the released parts to their proper places 6 Pull out the finisher lifting lever 1c up In this case at least two people must cooperate since the finisher is quite heavy Remove the paper jam ...

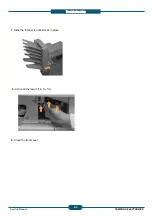
Page 20: ...Troubleshooting 4 3 SAMSUNG ELECTRONICS Service Manual 7 Slide the finisher in until it locks in place 8 Lift up all the levers 1b 1a 1d 9 Close the front cover ...

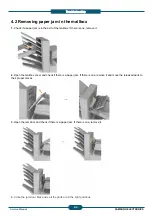
Page 21: ...t of the mailbox If there is one remove it 2 Open the mailbox cover and check if there is a paper jam If there is one remove it and move the released parts to their proper places 3 Open the jam door and check if there is a paper jam If there is one remove it 4 Close the jam door Make usre all the parts are in the right positions ...

Page 22: ...ridge 1 Open the finisher cover 2 Pull the stapler unit out 3 Lift the empty staple cartridge from the stapler unit 4 Unpack the new staple cartridge 5 Place the staple cartridge back into the stapler unit 6 Slide the stapler unit in until it locks in place 7 Close the finisher cover ...

Page 23: ... the print job and disregard of this error message go to Admin Setting to adjust the option Staple Cartridge not installed Install Staple Cartridge 07 005 Error Remove printed material from Finisher Stack Check empty full Sensor Finisher Stack full Finisher Bin Full 07 004 Error Open Front Cover in Finiser lower Guide1a or 1b and remove jammed paper Paper jammed in Finisher Finisher Duplex Jam 07 ...

Page 24: ... shows on the screen again cycle power Stapler is not operational Stapler Fault 07 013 Fault Remove paper from the output tray finisher If this error message shows on the screen again cycle power Ejector unit s not operational Ejector Fault 07 012 Fault Remove paper from the output tray finisher If this error message shows on the screen again cycle power Rear Jogger unit s not operational Support ...

Page 25: ...efective Replace the Feed Motor Feed Motor is defective Connect the Connector Connector is not connected properly Reconnect or replace the Interface Cable Interface Cable disconnection Feed Roller does not work Replace the defective Roller Exit force is decreased by environment Replace the defective Roller Exit force is decreased by Roller deformation Replace the Idle Roller pressure Spring Idle R...

Page 26: ... Cam is defective Paper has jammed and does not stack to the selected Bin Replace the Flapper Actuator Flapper Actuator of Empty Feed Sensor is defective Replace the Empty Feed Sensor Empty Feed Sensor is defective Paper has not jammed and does not stack to the selected Bin Paper does not stack to the selected Bin Solutions Cause Conditions Replace the Actuator Actuator is defective Replace the Pa...

Page 27: ...2 Mail Box Samsung Electronics Service Manual Mail Box Samsung Electronics Service Manual 1 MAIN 0 1 3 2 4 5 6 7 ...

Page 28: ...n QT y Service Remark 0 JC96 00942A SCX FIN20S 1 SNA 1 FRAME UNIT 1 SNA KRDC JR10 1000 2 FEED UNIT 1 SNA KRDC JR10 2000 3 COMPILE UNIT 1 SNA KRDC JR10 3000 Drawing SEC_Code Description QT y Service Remark 4 JC81 03773B EJECT UNIT 1 SA 5 EXTENTION TRAY UNIT 1 SNA KRDC JR10 5000 6 STACKER UNIT 1 SNA KRDC JR10 6000 7 TOP TRAY UNIT 1 SNA KRDC JR10 7000 MAIN Parts List ...

Page 29: ... 6 1 6 1 1 6 2 1 6 3 1 8 1 1 8 1 8 2 1 8 3 1 8 4 3 1 3 3 3 2 3 2 2 1 2 3 2 2 2 3 1 2 3 2 2 3 3 2 4 2 5 2 6 1 2 6 2 2 6 2 7 6 6 1 6 2 4 4 1 4 2 5 1 5 5 2 5 3 5 4 7 1 7 3 7 7 2 1 7 2 2 7 2 5 7 2 8 7 2 4 7 2 3 7 2 6 7 2 7 8 2 8 1 8 9 9 2 9 1 9 3 9 2 1 9 2 3 9 2 2 9 2 4 9 2 5 9 3 1 9 3 2 10 1 10 7 10 2 10 3 10 4 10 5 10 6 10 11 11 1 11 2 11 3 1 11 3 2 11 3 3 11 5 11 3 11 4 11 7 11 6 11 8 11 9 0 12 13 ...

Page 30: ... KRDC 0451 3006N 1 8 3 BKT INTERLOCK DOOR OPEN 1 SNA KRDC SJ10 1298A 1 8 4 JC81 03469A MICRO SWITCH VP333A 0D 1 SA 2 FRAME REAR SUB ASSY 1 SNA KRDC JR10 1130 2 1 FRAME REAR 1 SNA KRDC JR10 1218A Drawing SEC_Code Description QT y Service Remark 2 2 BKT ROLL GUIDE TRAY MOVE 1 SNA KRDC SJ10 1281A 2 3 JOINT BKT REAR SET 1 SNA KRDC JR10 1136 2 3 1 HEXAGON HEADED SCREW M3 6 T3 3 SNA KRDC 0451 3006N 2 3 ...

Page 31: ...SSY 1 SA 9 EXTERIOR ASSY 1 SNA KRDC JR10 1150 9 1 JC81 07243A AS COVER TOP 1 SA 9 2 JC81 07245A AS DUPLEX GUIDE SUB ASSY 1 SA Drawing SEC_Code Description QT y Service Remark 9 2 1 HEXAGON HEADED SCREW M4 10 T2 4 SNA KRDC 0450 4010N 9 2 2 0604 001095 PI SENSOR GP1S73P2 1 SA 9 2 3 COVER DUPLEX FRAME 1 SNA KRDC JR10 1302A 9 2 4 ACTUATOR JAM DETECT TOP TRAY 1 SNA KRDC JR10 8350A 9 2 5 ASSY MH GATE JA...

Page 32: ...NET SIDE DOOR 2 SNA KRDC JR10 1224A 11 6 JC81 07272A AS T_SPRING GUIDE M B 2 SA 11 7 JC81 07268A AS ROLLER IDLE FEED ASSY 2 SA 11 7 1 PARALLEL PIN Φ2 14 2 SNA KRDC P632 0140G 11 7 2 ROLLER IDLE FEED 2 SNA KRDC SJMB 2306A Drawing SEC_Code Description QT y Service Remark 11 8 PAN WASHER HEADED SCREW M3 6 T2 2 SNA KRDC 0965 3006N 11 9 BIND HEADED SCREW M3 8 T2 4 SNA KRDC 0452 3008N0 11 10 BKT MAGNET ...

Page 33: ... 1 1 4 1 1 5 1 1 6 1 1 7 3 3 1 3 1 1 3 1 2 3 1 3 3 1 4 3 2 3 2 3 3 2 1 3 2 2 3 2 4 3 3 3 3 4 3 3 2 3 3 1 3 3 3 3 4 1 3 4 2 3 4 3 3 4 4 3 4 5 3 4 3 4 3 4 4 4 2 4 3 4 4 4 5 4 5 6 1 6 6 2 6 3 6 4 6 5 6 6 5 1 5 2 1 5 2 2 5 2 4 5 2 5 5 2 5 3 5 4 5 5 5 5 1 5 5 2 5 5 3 5 5 4 5 5 5 5 5 6 5 6 1 5 6 2 5 6 3 5 7 2 5 7 1 5 7 3 5 7 2 5 7 3 5 7 4 5 7 1 5 7 5 7 5 8 1 5 8 2 5 8 3 5 8 4 5 8 2 2 1 2 2 2 2 1 1 2 2 2...

Page 34: ... SNA KRDC 0451 3006N 1 4 BKT HINGE GUIDE 1 SNA KRDC SJ10 2204A 1 5 SHAFT HINGE GUIDE 1 SNA KRDC SJ10 2404A 1 6 E RING Φ4 2 SNA KRDC 1720 0040G Drawing SEC_Code Description QT y Service Remark 2 EXIT GUIDE SET ASSY 1 SNA KRDC JR10 2150 2 1 UPPER EXIT GUIDE SET 1 SNA KRDC JR10 2152 2 1 1 GUIDE PLATE EXIT FEED 1 SNA KRDC JR10 2204A 2 1 2 HEXAGON HEADED SCREW M3 6 T3 4 SNA KRDC 0451 3006N 2 1 3 IDLE R...

Page 35: ...LE Z18 M05 2 SA 5 2 4 JC61 00424A BUSH 4_D 4 SA 5 3 BKT PADDLE SUB 1 SNA KRDC SJ10 2232A 5 4 HEXAGON HEADED SCREW M4 10 T2 6 SNA KRDC 0450 4010N Drawing SEC_Code Description QT y Service Remark 5 5 SUB PADDLE GEARING 2nd STEP 1 SNA KRDC SJ10 2115 5 5 1 E RING Φ4 2 SNA KRDC 1720 0040G 5 5 2 E RING Φ3 1 SNA KRDC 1720 0030G 5 5 3 JC61 00424A BUSH 4_D 1 SA 5 5 4 JC81 03518A GEAR SUB PADDLE Z18 M08 1 S...

Page 36: ... GUIDE ENTRANCE UPPER 1 SNA KRDC SJ10 2340 7 2 ENTRANCE LOWER GUIDE SET 1 SNA KRDC SJ10 2122 7 2 1 HEXAGON HEADED SCREW M4 10 T2 4 SNA KRDC 0450 4010N Drawing SEC_Code Description QT y Service Remark 7 2 2 GUIDE ENTRANCE LOWER 1 SNA KRDC SJ10 2350 8 BELT TIGHTNER TOP TRAY SET 1 SNA KRDC JR10 2175 8 1 STUD TOP TIGHTNER FEED 1 SNA KRDC JR10 2404A 8 2 ROLLER TIGHTNER 1 SNA KRDC SJ10 2312 9 ENT BELT T...

Page 37: ... 0 1 1 1 1 1 2 1 1 1 1 2 1 3 1 4 1 5 1 6 1 5 1 9 1 8 1 7 1 10 1 10 1 1 10 2 1 10 2 1 10 4 5 5 5 5 3 3 15 3 1 3 3 1 2 3 1 1 3 1 3 12 3 11 3 10 3 13 3 9 3 8 3 5 3 7 3 6 3 14 3 4 3 3 3 2 4 1 1 4 1 3 4 14 4 1 2 4 1 4 5 4 4 4 3 4 7 4 6 4 13 4 2 4 15 4 8 4 10 4 11 4 12 4 9 2 2 2 2 1 4 Compile Unit ...

Page 38: ...FT TAMPER 1 SNA KRDC SJ10 3404A 3 5 0604 001095 PI SENSOR GP1S73P2 1 SA 3 6 PAN WASHER HEADED SCREW M3 8 T2 4 SNA KRDC 0965 3008N 3 7 LM BUSH TAMPER 1 SNA KRDC SJ10 3318 Drawing SEC_Code Description QT y Service Remark 3 8 FRAME COMPILE REAR JR 1 SNA KRDC JR10 3306A 3 9 JC81 03509A B40S2M290 TAMPER 1 SA 3 10 JC81 03508A TIMING PULLEY T20 TAMPER 2 SA 3 11 HOLLOW SHAFT D_6 4 SNA KRDC SJ10 3402B 3 12...

Page 39: ...ronics Service Manual 5 EjectorUnit 0 1 2 3 39 4 5 6 39 5 5 5 5 5 7 8 9 10 12 13 14 16 15 16 8 11 17 18 19 20 19 21 39 22 23 24 25 BERO FRAME Refer to chapter 6 4 27 39 18 28 29 30 31 32 33 34 35 36 37 38 40 23 27 1 27 3 27 2 27 4 27 5 27 5 27 6 27 6 27 7 27 10 27 9 27 8 ...

Page 40: ...Φ2 10 1 SNA KRDC P632 0100G 22 JC81 03498A PULLEY S2M20T EJECT 1 SA 23 JC81 03497A PULLEY DRIVE S2M34T EJECT 2 SA 24 JC81 03496A PULLEY S2M25T EJECT 1 SA Drawing SEC_Code Description QT y Service Remark 25 JC81 03513A B30S2M144 EJECT LINK 1 SA 27 JC81 03772A EJECT BELT SUB ASSY 1 SA 27 1 JC81 03512A ASSY BELT EJECT 1 SA 27 2 HOLDER BELT EJECT 1 SNA KRDC SJ10 4214A 27 3 SHAFT D CUT GRIP HINGE EJECT...

Page 41: ...Box Samsung Electronics Service Manual 6 Extension Tray Unit 0 3 6 8 4 5 9 8 9 4 7 1 1 2 1 1 2 1 3 1 4 1 5 1 12 1 13 1 6 1 12 1 13 1 7 1 8 1 9 1 8 1 10 2 2 2 3 2 4 2 5 2 12 2 13 2 7 2 16 2 8 2 9 2 10 2 8 2 12 2 13 1 11 1 7 2 7 2 11 2 11 2 7 1 11 1 7 1 2 ...

Page 42: ...NA KRDC 1720 0030G 1 12 JC61 00423A BUSH 6_D 2 SA 1 13 E RING Φ4 4 SNA KRDC 1720 0040G 2 JC81 03770B SPT FINGER ASSY REAR 1 SA 2 1 JC81 03483B TRAY BERO 1 SA 2 2 BKT TRAY BERO ASSY 1 SNA KRDC SJ10 5202A Drawing SEC_Code Description QT y Service Remark 2 3 JC81 03494A RACK PINION Z18 1 SA 2 4 SHAFT RACK PINION 1 SNA KRDC SJ10 5412A 2 5 PARALLEL PIN Φ2 10 1 SNA KRDC P632 0100G 2 6 JC81 03521A GEAR Z...

Page 43: ...ker Unit 0 2 6 2 2 2 2 1 2 3 2 4 2 5 2 2 2 7 2 8 1 3 2 4 3 2 5 3 2 1 3 2 2 3 2 3 3 2 3 1 3 3 3 4 3 4 1 4 4 2 4 3 4 4 4 2 1 4 2 2 4 3 1 4 2 3 4 2 4 4 2 5 4 2 6 4 4 1 4 4 2 4 4 3 4 3 9 4 3 2 4 3 3 4 3 4 4 3 9 4 3 5 4 3 6 4 3 7 4 3 8 5 1 5 2 5 3 5 2 5 4 5 5 5 4 5 5 5 6 5 6 5 5 5 6 7 8 6 1 6 2 7 1 7 2 ...

Page 44: ...KRDC SJ10 6110 4 1 JC81 03484A DC MOTOR 2738 S2M12T 1 SA 4 2 MOTOR BKT SUB ASSY 1 SNA KRDC SJ10 6111 4 2 1 BKT MOTOR STACKER 1 SNA KRDC SJ10 6206B 4 2 2 BKT SUPPORT MORTOR 1 SNA KRDC SJ10 6212B Drawing SEC_Code Description QT y Service Remark 4 2 3 DAMPER WASHER 2 SNA KRDC SJ10 6602A 4 2 4 HEXAGON HEADED SCREW M3 8 T3 2 SNA KRDC 0451 3008N 4 2 5 HEXAGON HEADED SCREW M3 6 T3 1 SNA KRDC 0451 3006N 4...

Page 45: ...GON HEADED SCREW M3 6 T3 1 SNA KRDC 0451 3006N 7 LOWER LIMIT SWITCH SET 1 SNA KRDC JR10 6150 7 1 JC81 03469A MICRO SWITCH VP333A 0D 1 SA Drawing SEC_Code Description QT y Service Remark 7 2 HEXAGON HEADED SCREW M3 14 PC 2 SNA KRDC 0360 3014N 8 0604 001095 PI SENSOR GP1S73P2 1 SA Stacker Unit Parts List SA SERVICE AVAILABLE SNA SERVICE not AVAILABLE ...

Page 46: ...lectronics Service Manual Finisher Samsung Electronics Service Manual 8 Top tray unit 3 7 1 3 7 2 0 3 2 1 3 2 3 4 3 3 3 3 3 5 3 5 1 3 5 2 3 6 3 4 3 1 3 7 3 8 3 10 3 9 3 11 3 12 3 13 3 14 4 5 6 7 4 1 4 2 4 3 4 4 4 5 4 6 3 15 ...

Page 47: ... IDLE FEED 2 SNA KRDC SJMB 2306A 3 8 JC81 07272A AS T_SPRING GUIDE M B 2 SA 3 9 BKT HARNESS TOP TRAY 1 SNA KRDC JR10 7202A 3 10 SHAFT ACTUATOR STACKER 1 SNA KRDC SJMB 2402A 3 11 TORSION SPRING TRAY EMPTY 1 SNA KRDC SJMB 2502A Drawing SEC_Code Description QT y Service Remark 3 12 ACTUATOR EMPTY STACKER 1 SNA KRDC SJMB 2310A 3 13 ACTUATOR EXIT FEED 1 SNA KRDC SJMB 2312A 3 14 TORSION SPRING PAPER PAT...

Page 48: ... Samsung Electronics Service Manual Mail Box Samsung Electronics Service Manual Mail Box 1 MAIN 2 2 AS SHIELD TOP STKR ASSY 4 3 AS ACTUATOR SHIELD ASSY 6 4 AS BASE SUB ASSY 8 5 AS COVER JAM FRAME ASSY 10 Contents ...

Page 49: ...ng Electronics Service Manual Mail Box Samsung Electronics Service Manual 1 MAIN 12 2 12 1 0 11 28 29 12 16 15 14 17 3 17 2 17 1 17 18 19 14 2 20 21 22 5 3 4 6 22 23 20 32 24 31 14 25 27 27 14 14 13 26 30 1 7 10 9 8 33 ...

Page 50: ...N HEADED SCREW M4 10 T2 47 SNA KRDC 0450 4010N 15 JC81 07279A JOINT BKT FRONT FRAME SUB ASSY 1 SA KRDC SJMB 1142 16 JC81 07281A HB MOTOR FEED SUB ASSY 1 SA KRDC SJMB 1146 17 MAIN BOARD FRAME SUB ASSY 1 SNA KRDC SJMB 1134 17 1 BKT MAIN BOARD FRAME 1 SNA KRDC SJMB 1206 Drawing SEC_Code Description QT y Service Remark 17 2 JC81 07277A AS PCB ASSY MAIN 1 SA KRDC SJMB 8200B 17 3 HEXAGON HEADED SCREW M3...

Page 51: ...4 Mail Box Samsung Electronics Service Manual Mail Box Samsung Electronics Service Manual 0 1 1 8 7 2 7 1 1 2 1 3 6 5 1 5 2 4 4 3 1 5 2 7 2 AS SHIELD TOP STKR ASSY ...

Page 52: ...33A 0D 1 SA 2 JC81 07269A AS SHIELD TOP STACKER 1 SA KRDC SJMB 2320A 3 JC81 07266A AS ANTI_STATIC BRUSH 1 SA KRDC SJMB 2802A 4 JC81 07253A AS ACTUATOR FULL STACKER 2 SA KRDC SJMB 2314A 5 JC81 07268A AS ROLLER IDLE FEED ASSY 2 SA KRDC SJMB 1116 Drawing SEC_Code Description QT y Service Remark 5 1 ROLLER IDLE FEED 2 SNA KRDC SJMB 2306 5 2 PARALLEL PIN Φ2 14 2 SNA KRDC P632 0140G 6 JC81 07272A AS T_S...

Page 53: ...6 Mail Box Samsung Electronics Service Manual Mail Box Samsung Electronics Service Manual 0 13 14 14 1 2 2 8 1 9 11 10 1 10 2 3 4 5 6 12 8 10 15 7 3 AS ACTUATOR SHIELD ASSY ...

Page 54: ...N SPRING TRAY EMPTY 1 SNA KRDC SJMB 2502 8 BKT SENSOR STACKER SUB ASSY 1 SNA KRDC SJMB 1114 8 1 JC81 07270A AS BKT SENSOR STACKER 1 SA KRDC SJMB 2202A Drawing SEC_Code Description QT y Service Remark 9 PAN WASHER HEADED SCREW M3 8 T2 1 SNA KRDC 0965 3008N 10 JC81 07268A AS ROLLER IDLE FEED ASSY 2 SA KRDC SJMB 1116 10 1 PARALLEL PIN Φ2 14 2 SNA KRDC P632 0140G 10 2 ROLLER IDLE FEED 2 SNA KRDC SJMB ...

Page 55: ...8 Mail Box Samsung Electronics Service Manual Mail Box Samsung Electronics Service Manual 0 2 9 1 2 3 3 1 3 2 3 3 3 4 4 7 5 6 8 4 AS BASE SUB ASSY ...

Page 56: ...01095 3 ACTUATOR ENTRANCE SUB ASSY 1 SNA KRDC SJMB 1112 3 1 SHAFT ACTUATOR FEED 1 SNA KRDC SJMB 2404 3 2 ACTUATOR ENTRANCE FEED 1 SNA KRDC SJMB 2326 3 3 E RING Φ3 4 SNA KRDC 1720 0030G Drawing SEC_Code Description QT y Service Remark 3 4 T SPRING ACTUATOR STACK 1 SNA KRDC SJ10 6682 4 SHAFT ACTUATOR STACKER 1 SNA KRDC SJMB 2402 5 ACTUATOR EMPTY STACKER 1 SNA KRDC SJMB 2310 6 ACTUATOR EXIT FEED 1 SN...

Page 57: ...10 Mail Box Samsung Electronics Service Manual Mail Box Samsung Electronics Service Manual 5 AS COVER JAM FRAME ASSY 4 2 4 1 0 5 1 3 2 4 ...

Page 58: ... 0 JC81 07282A AS COVER JAM FRAME ASSY 1 SA KRDC SJMB 1150 1 COVER JAM FRAME 1 SNA KRDC SJMB 1308 2 MAGNET CATCH PLATE TB 1 SNA KRDC CF10 T209 3 COUNTERSINK SCREW M3 10 T2 1 SNA KRDC 0323 0102N 4 IDLE ROLLER ASSY 8 SNA KRDC SJMB 1152 Drawing SEC_Code Description QT y Service Remark 4 1 LEAF SPRING FEED 8 SNA KRDC SJ10 2202 4 2 ROLLER IDLE FEED 8 SNA KRDC SJ10 2302 5 PAN WASHER HEADED SCREW M3 8 T2...

Reviews:

Related manuals for SCX-FIN20S