background image

43

English

O

ther I

nf

orma

tion

Troubleshooting

Before contacting the Samsung after-sales service, perform the following simple checks.

If you cannot solve the problem using the instructions below, note the model and serial number of the television and contact your local 

dealer.

No sound or picture

Check that the mains lead has been connected to a wall socket.


Check that you have pressed the button on your set.


Check the picture contrast and brightness settings.


Check the volume.


Check if 


Speaker Select 

is set to 

External Speaker

.

Normal picture but no sound

Check the volume.


Check whether the 


M


MUTE

 button has been pressed on the remote control.

No picture or black and white 

picture

Adjust the colour settings.


Check that the broadcast system selected is correct.


Sound and picture interference

Try to identify the electrical appliance that is affecting the television, then move it further 


away.

Plug the television into a different main socket.


Blurred or snowy picture, 

distorted sound

Check the direction, location and connections of your aerial.


This interference often occurs due to the use of an indoor aerial.


Remote control malfunctions

Replace the remote control batteries.


Clean the upper edge of the remote control (transmission window).


Check that the + and – ends of the batteries are inserted correctly.


Check that the batteries are drained.


Screen is black and power 

indicator light blinks steadily

On your computer check; Power, Signal Cable.


Move the computer’s mouse or press any key on the keyboard.


On your equipment check (STB, DVD, etc) ; Power, Signal Cable.


The TV is using its power management system.


Press the Source button on the panel or remote control.


Turn the TV off and on.


The damaged picture appears in 

the corner of the screen.

If 


Screen Fit 

is selected in some external devices, the damaged picture may appear in the 

corner of the screen. This symptom is caused by external devices, not TV.

The "Resets all settings to the 

default values" message appears.

This appears when you press and hold the 


EXIT

 button for a while. The product settings are 

reset to the factory defaults.

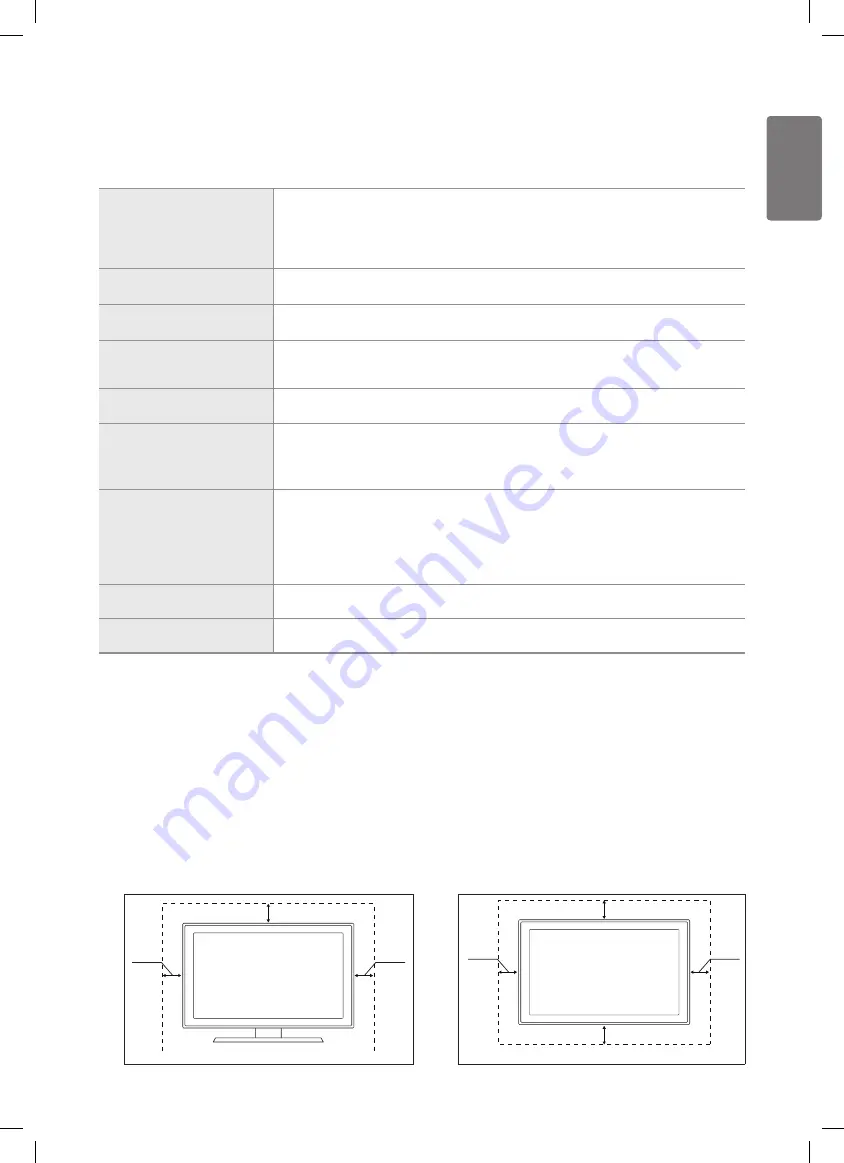
Securing the Installation Space

Keep the required distances between the product and other objects (e.g. walls) to ensure proper ventilation. Failing to do so may result 

in fire or a problem with the product due to an increase in the internal temperature of the product. Install the product so the required 

distances shown in the figure are kept.

When using a stand or wall-mount, use parts provided by Samsung Electronics only.


If you use parts provided by another manufacturer, it may result in a problem with the product or an injury due to the product 


•

falling.

If you use parts provided by another manufacturer, it may result in a problem with the product or fire due to an increase in 


•

the internal temperature of the product due to poor ventilation.

The appearance may differ depending on the product.


When installing the product with a stand

When installing the product with a wall-mount

10 cm

10 cm

10 cm

10 cm

10 cm

10 cm

10 cm

10 cm

10 cm

10 cm

10 cm

10 cm

10 cm

10 cm

BN68-02355D.indb   43

2009-06-30   �� 10:34:28

Summary of Contents for PS50B530S2W

Page 1: ...ster Model Serial No BN68 02355D 01 Plasma TV user manual Contact SAMSUNG WORLD WIDE If you have any questions or comments relating to Samsung products please contact the SAMSUNG customer care centre...

Page 2: ...en Displaying still images from Video games and PC for longer than a certain period of time may produce partial afterimages To prevent this effect reduce the brightness and contrast when displaying st...

Page 3: ...HD technology is incorporated under license from SRS Labs Inc Manufactured under license from Dolby Laboratories Dolby and the double D symbol are trademarks of Dolby Laboratories Symbol Press Note O...

Page 4: ...htness Sharpness Colour Tint G R 22 Advanced Settings 23 Picture Options 24 Picture Reset 25 Auto Adjustment Screen 26 PC Display 27 Sound Menu 27 Mode Equalizer SRS TruSurround HD Audio Language Audi...

Page 5: ...om Holder Ring 4ea Ferrite Core for Power Cord 1ea Holder Wire Cable The ferrite core is used to shield the cable from interference When connecting a cable open the ferrite core and clip it around the...

Page 6: ...when the power is on and lights up in stand by mode How to assemble the Stand Base depending on the model Using the 4 screws for securing the stand base and the monitor firmly attach the monitor to th...

Page 7: ...ction to an extended device with the appropriate cable not supplied The difference between HDMI and DVI is that the HDMI device is smaller in size has the HDCP High Bandwidth Digital Copy Protection c...

Page 8: ...C IN PC AUDIO Connect to the video and audio output jack on your PC 9 COMMON INTERFACE Slot Insert CI Common Interface card into the slot When not inserting CI CARD in some channels Scramble Signal is...

Page 9: ...n DVD Blu Ray player HD Cable Box HD Satellite receiver STB Using an HDMI Cable HDMI OUT Audio Video connection VCR Using an Audio Video Cable AUDIO OUT VIDEO OUT Component connection DVD Blu Ray play...

Page 10: ...g Audio connection Amplifier DVD Home Theater Using a Audio Cable AUDIO IN HD connection Using a D Sub Cable Using an HDMI Cable HDMI OUT OPTICAL Digital AUDIO Analog Best Normal Using a D Sub Cable U...

Page 11: ...he favourites channel list p 19 Temporary sound switch off Volume increase Volume decrease Available source selection p 33 Use to see information on the current broadcast p 29 Use to quickly select fr...

Page 12: ...s the POWERP button or the TV button on the remote control to turn the TV on The programme that you were watching last is reselected automatically 3 Press the numeric button 0 9 or channel up down but...

Page 13: ...page 15 The channel search will start and end automatically After all the available channels are stored the message Set the Clock Mode is displayed 6 Press the ENTERE button Press the or button to sel...

Page 14: ...ription of each function refer to the corresponding page Viewing the Display The display identifies the current channel and the status of certain audio video settings Press the INFO button on the remo...

Page 15: ...frequency for the channel Modulation Displays available modulation values Symbol Rate Displays available symbol rates Search Mode Full Network Frequency Start Stop Displays the frequency for the chann...

Page 16: ...el or S Cable channel Press the button then press the or number 0 9 buttons to select the required number You can also select the channel number directly by pressing the number 0 9 buttons If there is...

Page 17: ...le Now Next Guide For the six channels indicated in the left hand column displays the Current programme and the Next programme information Full Guide Displays the programme information as time ordered...

Page 18: ...sing the A programme currently being broadcast A reserved programme Channel List Tools Menu in All Channels Added Channels Favourites Press the TOOLS button to use the Tools menu Tools menu items may...

Page 19: ...channel is selected The names of digital broadcasting channels are automatically assigned and cannot be labeled Edit Channel Number only digital channel You can also edit the channel number by pressi...

Page 20: ...the TOOLS button to use the tools menu Change Info Select to change a viewing reservation Cancel Schedules Select to cancel a viewing reservation Information Select to view a viewing reservation You...

Page 21: ...closer to Red 100 the more saturated the red colour becomes Select a picture mode to be adjusted first The adjusted values are saved for each picture mode When you make changes to Cell Light Contrast...

Page 22: ...rs Select your favourite Colour Space to experience the most natural colour Auto Automatically sets the colour range depending on the input video source Native Sets a colour range wider than that of t...

Page 23: ...input 1 line will be cut at the top bottom left and right as in the overscan function Screen Mode When setting the picture size to Auto Wide in a 16 9 wide TV you can determine the picture size you w...

Page 24: ...r button then press the ENTERE button Select the required option by pressing the or button then press the ENTERE button Available options Horizontal Vertical Time Optimum condition for pixel shift Ite...

Page 25: ...of fine coarse and position are adjusted automatically Screen Coarse Adjusts the frequency when vertical noise appears on the screen Fine Adjusts the screen to be clearer PC Position Adjust the PC s s...

Page 26: ...rizontal Frequency kHz Vertical Frequency Hz Pixel Clock Frequency MHz Sync Polarity H V IBM 640 x 350 720 x 400 31 469 31 469 70 086 70 087 25 175 28 322 MAC 640 x 480 832 x 624 1152 x 870 35 000 49...

Page 27: ...ng speed difference between the main speaker and the audio receiver In this case use the TV Speaker function You can only select the language among the actual languages being broadcast Audio Descripti...

Page 28: ...faults Auto Volume Off Speaker Select TV Speaker Sound Reset Sound Selecting the Sound Mode When you set to Dual l ll the current sound mode is displayed on the screen Type of broadcast On screen indi...

Page 29: ...manually Set up this item when you have set Clock Mode to Manual You can set the Day Month Year Hour Minute directly by pressing the number buttons on the remote control Sleep Timer The sleep timer au...

Page 30: ...l as multimedia data MHEG is user runtime interaction technology and is being applied to various fields including VOD Video On Demand ITV Interactive TV EC Electronic Commerce tele education tele conf...

Page 31: ...urity Child Lock This feature allows you to prevent unauthorized users such as children from watching unsuitable programmes by muting out video and audio Before the setup screen appears the PIN number...

Page 32: ...o TV check if Game Mode is On If you display the TV menu in Game mode the screen shakes slightly The mark appears on the screen which means that Game Mode is on with the selected source This function...

Page 33: ...Source list Red Refresh Refreshes the connecting external devices T TOOLS Tools Displays the Edit Name and Information menus Edit Name You can name the device connected to the input jacks to make your...

Page 34: ...not disconnect the power or remove the USB drive while upgrades are being applied The TV will turn off and turn on automatically after completing the firmware upgrade Please check the firmware version...

Page 35: ...the DIGITAL AUDIO OUT OPTICAL jack on your TV and the Digital Audio Input on the Home Theater When following the connection above the Optical jack only outputs 2 channel audio You will only hear soun...

Page 36: ...appears 3 Press the or button to select to a particular device and press the ENTERE button It is switched to the selected device Switching to the selected devices may take up to 2 minutes You cannot c...

Page 37: ...ating Status Available Buttons Anynet Device After switching to the device when the menu of the corresponding device is displayed on the screen Numeric buttons ENTERE buttons Colour buttons EXIT butto...

Page 38: ...e Theatre You can listen to sound through a receiver instead of the TV speaker 1 Press the TOOLS button Press the ENTERE button to select Anynet HDMI CEC 2 Press the or button to select Receiver Press...

Page 39: ...nynet menu Press the SOURCE button on the TV remote control and select a device other than Anynet devices Note that the channel button operates only when a tuner embedded Anynet device is not connecte...

Page 40: ...ub page Used to display the available sub page 8 2 page up Used to display the next teletext page 9 3 page down Used to display the previous teletext page 0 0 mode Press to select the teletext mode LI...

Page 41: ...of the TV set For wall mounts that do not comply with the VESA standard screw specifications the length of the screws may differ depending on their specifications Do not use screws that do not comply...

Page 42: ...1 Put the screws into the clamps and firmly fasten them onto the wall Confirm that the screws have been firmly installed onto the wall You may need additional material such as an anchor depending on...

Page 43: ...ve the computer s mouse or press any key on the keyboard On your equipment check STB DVD etc Power Signal Cable The TV is using its power management system Press the Source button on the panel or remo...

Page 44: ...nd 1230 x 770 x 73 mm 1230 x 822 x 290 mm Weight Body With stand 33 kg 38 kg Environmental Considerations Operating Temperature Operating Humidity Storage Temperature Storage Humidity 50 F to 104 F 10...

Page 45: ...hock never touch the inside of this apparatus Only a qualified technician should open this apparatus Make sure to plug the power cord in until it is firmly inserted When removing the power cord make s...

Page 46: ...om This Samsung product is warranted for a period of twelve 12 months from the original date of purchase against defective materials and workmanship In the event that warranty service is required you...

Page 47: ...uman health from uncontrolled waste disposal please separate these items from other types of waste and recycle them responsibly to promote the sustainable reuse of material resources Household users s...

Reviews: