background image

English - 17

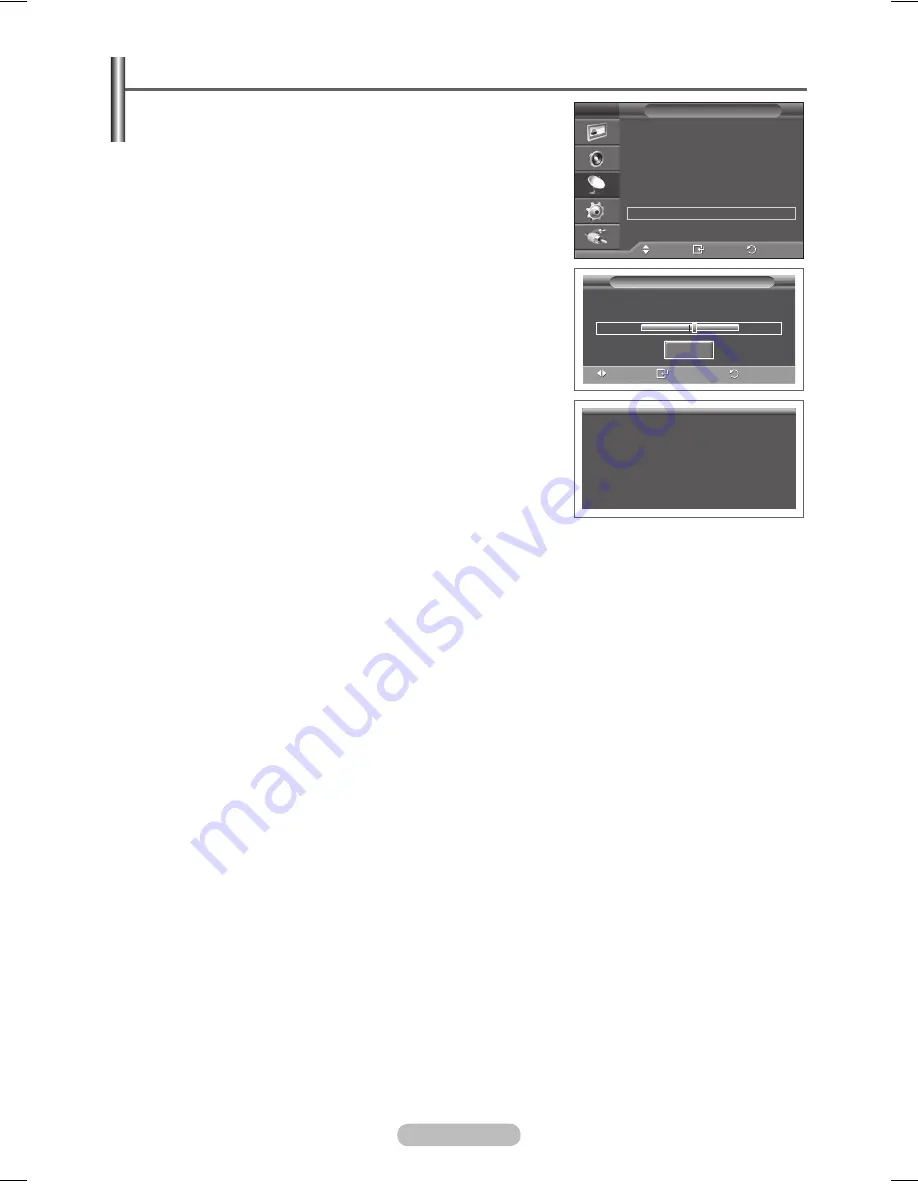
Fine Tuning Channel Reception

If the reception is clear, you do not have to fine tune the 

channel, as this is done automatically during the search and 

store operation.

If the signal is weak or distorted, you may have to fine tune the 

channel manually.

1

  Press the 

MENU

 button to display the menu.

2

  Press the ▲ or ▼ button to select 

Channel

, then press the 

ENTER

 button.

3

  Press the ▲ or ▼ button to select 

Fine Tune

, then press the 

ENTER

 button.

4

  To obtain a sharp, and clear picture and good sound quality, 

press the ◄ or ► button until you reach the optimal setting. 

Press the 

ENTER

 button.

➢ 

To reset the fine tuning to 

0

, select 

Reset

 by pressing the 

▲ or ▼ button. Press the 

ENTER

 button.

5

  Press the 

EXIT

 button to exit.

➢ 

Fine Tune Store will change the colour of the Channel 

OSD (On Screen Display) from White to Red and add the 

“*” mark.

Fine Tune

P   1

                                                               +3


Adjust   

 Save   

 Return

Reset

P   1 *

Mono

Picture 


: Dynamic

Sound 


: Custom

SRS TS XT  

: Off

−− : −−


Move 

 Enter 

 Return

Country   

:


Belgium 

Auto Store  


Manual Store 


Channel Manager     

Sort 


Name 


Fine Tune   


Channel

T V

BN68-01294E-00Eng(´Üº»).indd   17

2007-07-19   ¿ÀÀü 10:04:58

Summary of Contents for PS-42E92H

Page 1: ...______ Serial No _______________ PDP TELEVISION PLASMA DISPLAY PANEL Owner s Instructions Before operating the unit please read this manual thoroughly and retain it for future reference ON SCREEN MENUS Picture In Picture PIP Energy Saving TELETEXT Option SRS TruSurround XT Digital Natural Image engine 01294E 01_ _Cover indd 1 2007 08 06 ÀÈÄ 6 08 58 ...

Page 2: ...l Defects The PDP uses a panel consisting of 1 230 000 SD level to 3 150 000 HD level pixels which require sophisticated technology to produce However there may be few bright or dark pixels on the screen These pixels will have no impact on the performance of the product Avoid operating the TV at temperatures below 5 C 41 F A still image displayed too long may cause permanent damage to the PDP Pane...

Page 3: ...andard 18 Customizing the Picture Settings 18 Configuring Detailed Settings on the Picture 19 Selecting the Picture Size 20 Selecting the Screen Mode 20 Digital NR Active Colour DNIe 21 Sound Control Sound Features 22 Selecting the Sound Mode depending on the model 23 Function Description Time Features 24 Language Blue Screen Melody Light Effect Energy Saving HDMI Black Level 25 Using the Game Mode...

Page 4: ...Component Cables Audio Cables PC Cable Scart Cable PC Audio Cable HDMI Cable HDMI DVI Cable Ferrite Core Power Cord The ferrite core is used to shield the cable from interference When connecting a cable open the ferrite core and clip it around the cable Using the Stand Base Two or more people should carry the PDP Never lay the PDP on the floor because of possible damage to the screen Always keep t...

Page 5: ...ttons on the remote control 4 C P Press to change channels In the on screen menu use the C P buttons as you use the and buttons on the remote control 5 ENTER Press to confirm a selection 6 Power button Press to turn the TV on and off Power Indicator Blinks and turns off when the power is on and lights up in stand by mode Remote Control Sensor Aim the remote control towards this spot on the TV 7 Sp...

Page 6: ...quipment 3 EXT 1 EXT 2 Inputs or outputs for external devices such as VCR DVD video game device or video disc players Input Output Specification Connector Input Output Video Audio L R RGB Video Audio L R EXT 1 Only TV output is available EXT 2 Output you can choose 4 COMPONENT IN Audio AUDIO L R and video Y PB PR inputs for Component 5 SERVICE Connector for service Connect the serial jack between ...

Page 7: ...via HDMI or DVI to a Set Top Box DVD Player or Games Console etc make sure that it has been set to a compatible video output mode as shown in the table below Failure to observe this may result in picture distortion image breakup or no picture Do not attempt to connect the HDMI DVI connector to a PC or Laptop Graphics Card This will result in a blank screen being displayed DVI IN AUDIO L R DVI audi...

Page 8: ...en brightness to save energy Sound mode selection Picture In Picture Off On TruSurround XT mode button Available source selection Previous channel Automatic Power off Selects the HDMI mode directly a Next channel Previous channel b Exit the on screen menu c Change confirmation d Move to the required menu option Adjust an option value respectively f Picture freeze g Picture size selection i Sub pic...

Page 9: ...light or a neon sign nearby Switching Your Television On and Off The main lead is attached to the rear of the television 1 Plug the main lead into an appropriate socket The main voltage is indicated on the rear of the television and the frequency is 50 or 60Hz 2 Press the Power button On Off on the front of the television or press the POWER button on the remote control to switch the television on ...

Page 10: ...on to enter items in the menu 4 Press the button to change the selected items Press the RETURN button to return to the previous menu 5 Press the EXIT button to exit from the menu Freezing the Current Picture You can freeze the picture when watching a television programme simply by pressing the STILL button To return to normal viewing press it again This function will automatically cancel five minu...

Page 11: ...e sure that the antenna is connected to the TV Press the ENTER button The Country menu is displayed 6 Select your country or area by pressing the or button Press the ENTER button The menu to select channels is displayed 7 To start channel store press the ENTER button The search will end automatically The TV will begin memorizing all of the available channels Press the ENTER button to set the clock...

Page 12: ...ponent PC HDMI You can select these options simply by pressing the SOURCE button on the remote control To watch television programme again press the TV button and select the channel number required If you want to reset this feature 1 Press the MENU button to display the menu 2 Press the or button to select Setup then press the ENTER button 3 Press the ENTER button again to select Plug Play The mes...

Page 13: ...ou can sort numbers manually and clear any channels you do not wish to watch 1 Press the MENU button to display the menu 2 Press the or button to select Channel then press the ENTER button 3 Press the ENTER button again The available countries are listed 4 Select your country by pressing the or button then press the ENTER button 5 Press the or button to select Auto Store then press the ENTER butto...

Page 14: ...Press the or button to select C Air channel or S Cable channel Press the button then press the or button to select the required number You can also select the channel number directly by pressing the numeric buttons 0 9 If there is abnormal sound or no sound re select the sound standard required Search When you do not know the channel numbers Press the or button to start the search The tuner scans ...

Page 15: ... programmes by muting out video and audio 6 Press the or button to select Child Lock then press the ENTER button 7 Select On by pressing the or button then press the ENTER button 8 Press the or button to select Channel List then press the ENTER button 9 Move to the field by pressing the buttons select a channel to be locked and press the ENTER button If you press the ENTER button again the symbol ...

Page 16: ...e assigned automatically when channel information is broadcast These names can be changed allowing you to assign new names 1 Press the MENU button to display the menu 2 Press the or button to select Channel then press the ENTER button 3 Press the or button to select Name then press the ENTER button 4 Press the or button to select the channel to be assigned to a new name then press the ENTER button...

Page 17: ... Tune then press the ENTER button 4 To obtain a sharp and clear picture and good sound quality press the or button until you reach the optimal setting Press the ENTER button To reset the fine tuning to 0 select Reset by pressing the or button Press the ENTER button 5 Press the EXIT button to exit Fine Tune Store will change the colour of the Channel OSD On Screen Display from White to Red and add ...

Page 18: ...s the ENTER button Available modes Dynamic Standard Movie 5 Select the required option by pressing the or button then press the ENTER button 6 When you are satisfied with your setting press the ENTER button 7 Press the EXIT button to exit Contrast Brightness Sharpness Colour Tint In TV mode of the PAL system you cannot use the Tint Function Contrast Brightness Colour Tone PC Mode Press the or butt...

Page 19: ...ou can set the colour reproduction space for the input signal to Auto or Wide White Balance R Offset G Offset B Offset R Gain G Gain B Gain Reset You can adjust the colour temperature for more natural picture colours R Offset G Offset B Offset R Gain G Gain B Gain Changing the adjustment value will refresh the adjusted screen Select the required option by pressing the or button then press the ENTE...

Page 20: ...ing the Zoom enables the positioning and sizing of the screen to up down direction using the or button as well as the screen size Move the screen up down using the or button after selecting the by pressing the or button Resize the screen vertically using the or button after selecting the by pressing the or button Selecting the Screen Mode When setting the picture size to Auto Wide in a 16 9 wide T...

Page 21: ...le in PC mode This function is not available in Movie and Standard mode DNIe Off Demo On This TV includes the DNIe function so as to provide a high visual quality If you set DNIe to on you can view the screen with the DNIe feature activated If you set the DNIe to Demo you can view the applied DNIe and normal pictures on the screen for demonstration purposes Using this function you can view the dif...

Page 22: ...l are trademarks of SRS Labs Inc TruSurround XT technology is incorporated under license from SRS Labs Inc Auto Volume Off On Each broadcasting station has its own signal conditions and so it is not easy to adjust the volume every time the channel is changed This feature lets you automatically adjust the volume of the desired channel by lowering the sound output when the modulation signal is high ...

Page 23: ... indication NICAM Stereo Regular broadcast Standard audio Mono Normal use Regular NICAM Mono NICAM Mono Normal NICAM Stereo NICAM stereo Mono Normal NICAM DUAL I II NICAM dual 1 NICAM dual 2 Mono Normal A2 Stereo Regular broadcast Standard audio Mono Normal use Bilingual or DUAL I II Dual I Dual II Stereo Stereo Mono Forced mono If the receiving conditions deteriorate listening will be easier if t...

Page 24: ... the sleep timer is not yet set Off is displayed If it is already set the remaining time before which the television switches to standby mode is displayed Timer 1 Timer 2 Timer 3 You can set the On Off timers so that the television will switch on or off automatically at the time you select You must set the clock first Press the or button to select the required item below Press the or button to adj...

Page 25: ...ays off Standby Mode On The blue LED lights while in Standby mode and it turns off when your TV is turned on Watching Mode On The blue LED lights when watching TV and it turns off when your TV is turned off On The blue LED always lights Set the Light Effect to Off to reduce the power consumption Energy Saving Off Low Medium High This feature adjusts the screen brightness depending on the surroundi...

Page 26: ...ff If you display the TV menu in Game Mode the screen shakes slightly The mark appears on the screen which means that Game Mode is On with the selected source If Game Mode is On Picture Mode is automatically changed to Standard and users cannot change the mode Sound Mode in the Sound menu is deactivated Adjust the sound using the equalizer The Reset Sound function is activated Selecting the Reset ...

Page 27: ...ount angle adjustment Tilt Up Tilt Down Move right Move left Reset Moves to the initial installation position Remembering the position and moving to the remembered position Remembers 3 positions with the Red Green and Yellow buttons Moves to the remembered position using these 3 colour buttons For installation refer to the Installation Manual provided For product installation and the installation ...

Page 28: ...r deactivate the PIP function You can select these options simply by pressing the PIP button on the remote control Source TV Ext 1 Ext 2 You can select a source of the sub picture You can select these options simply by pressing the SOURCE button on the remote control Size You can select a size of the sub picture If main picture is in PC and Component mode Size is not available Position You can sel...

Page 29: ...pixels to white Use this function when there are remaining after images or symbols on the screen especially when you displayed a still image on the screen for a long time Signal Pattern This function helps remove after images on the screen by moving all the pixels on the PDP according to a pattern Use this function when there are remaining after images or symbols on the screen especially when you ...

Page 30: ...use on the Windows Desktop then click on Properties The Display Properties will be displayed 2 Click on Settings tab then set the Display Mode with reference to the Display Modes Table You do not need to change the Colours settings 3 Click on Advanced A new settings dialog box will be displayed 4 Click on the Monitor tab then set the Screen refresh rate with reference to the Display Modes Table Se...

Page 31: ... N P N P 72 188 48 077 P P 75 000 46 875 P P 1024 x 768 60 004 48 363 N N 70 069 56 476 N N 72 000 57 672 N P N P 75 029 60 023 P P 1360 x 768 60 015 47 712 P P N Negative P Positive The interlace mode is not supported The television might operate abnormally if a non standard video format is selected 480i p 576i p 720p or 1080i is not available in PC mode For the PS 42E92H PC text quality is optim...

Page 32: ...so that it is aligned on the center of screen 1 Press the or button to select Coarse or Fine then press the ENTER button 2 Press the or button to adjust the screen quality vertical stripes may appear or the picture may be blurry Press the ENTER button Position Adjust the PC s screen positioning if it does not fit the TV screen 1 Adjust the position by pressing the button 2 Press the ENTER button A...

Page 33: ...button to display the menu 2 Press the or button to select Setup then press the ENTER button 3 Press the or button to select Home Theatre PC then press the ENTER button 4 Select Off or On by pressing the or button then press the ENTER button 5 Press the EXIT button to exit This function is available only in PC mode Move Enter Return More Home Theatre PC Off Light Effect Standby Mode On Energy Savi...

Page 34: ...mode In the List save mode you can save teletext page into list using the store button 6 sub page Used to display the available sub page 7 page up Used to display the next teletext page 8 page down Used to display the previous teletext page 9 cancel Used to display the broadcast when searching for a page 0 teletext on mix Press to activate teletext mode after selecting the channel providing the te...

Page 35: ...rent page number or search indications Date and time Text Status information FASTEXT information Teletext information is often divided between several pages displayed in sequence which can be accessed by Entering the page number Selecting a title in a list Selecting a coloured heading FASTEXT system Press the TV button to exit from the teletext display ...

Page 36: ...ard dimension as they may cause damage to the inside of the TV set For wall mounts that do not comply with the VESA standard screw specifications the length of the screws may differ depending on their specifications Do not use screws that do not comply with the VESA standard screw specifications Do not use fasten the screws too strongly this may damage the product or cause the product to fall lead...

Page 37: ...e the remote control batteries Clean the upper edge of the remote control transmission window Check that the and ends of the batteries are inserted correctly Check that the batteries are drained Screen is black and power indicator light blinks steadily On your computer check Power Signal Cable The TV is using its power management system Move the computer s mouse or press any key on the keyboard On...

Page 38: ...ith stand 1055 x 700 x 95 mm 1055 x 759 x 316 mm 1231 x 789 x 95 mm 1231 x 849 x 316 mm Weight Body With stand 31 kg 34 kg 41 kg 44 kg Environmental Considerations Operating Temperature Operating Humidity Storage Temperature Storage Humidity 10 C to 40 C 50 F to 104 F 10 to 80 non condensing 20 C to 45 C 4 F to 113 F 5 to 95 non condensing This device is a Class B digital apparatus Design and spec...

Page 39: ...or human health from uncontrolled waste disposal please separate this from other types of wastes and recycle it responsibly to promote the sustainable reuse of material resources Household users should contact either the retailer where they purchased this product or their local government office for details of where and how they can take this item for environmentally safe recycling Business users ...

Page 40: ...rodotti Samsung contattate il Servizio Clienti Samsung Contact Samsung wereldwijd Wanneer u suggesties of vragen heeft met betrekking tot Samsung producten gelieve contact op te nemen met de consumenten dienst van Samsung Kontakt do SAMSUNG WORLD WIDE Jeżeli masz jakieś uwagi lub pytania w sprawie produktów marki Samsung skontaktuj się z naszą infolinią Contacte SAMSUNG GLOBAL Se tem algumas dúvid...

Page 41: ...ng com it KAZAKHSTAN 8 800 080 11 88 www samsung kz LATVIA 800 7267 www samsung com lv LITHUANIA 8 800 77777 www samsung lt LUXEMBURG 0032 0 2 201 24 18 www samsung lu NETHERLANDS 0900 20 200 88 0 10 Min www samsung com nl NORWAY 815 56 480 www samsung com no POLAND 0 801 801 881 www samsung com pl PORTUGAL 80 8 200 128 www samsung com pt REPUBLIC OF IRELAND 0818 717 100 www samsung com uk RUSSIA ...

Reviews: