Samsung NP-M50 User Manual Download Page 75

56  Users Manual

Playing a Music File

1. Double-click a category from the left category window

2. Double-click a music file in the right library window. The music will be 
played.

Playing an Audio CD

1. Insert an audio CD into the CD-ROM drive. Audio CD will be displayed in 
the library window.

To play an audio CD in the CD-ROM drive, double-click on CD in the category.

2. Double-click Audio CD in the library window. The tracks of the CD will be 
displayed.

3. Double-click a track to play it.

To Listen to All Tracks

Select Play All Tracks from the Media Play Control button.

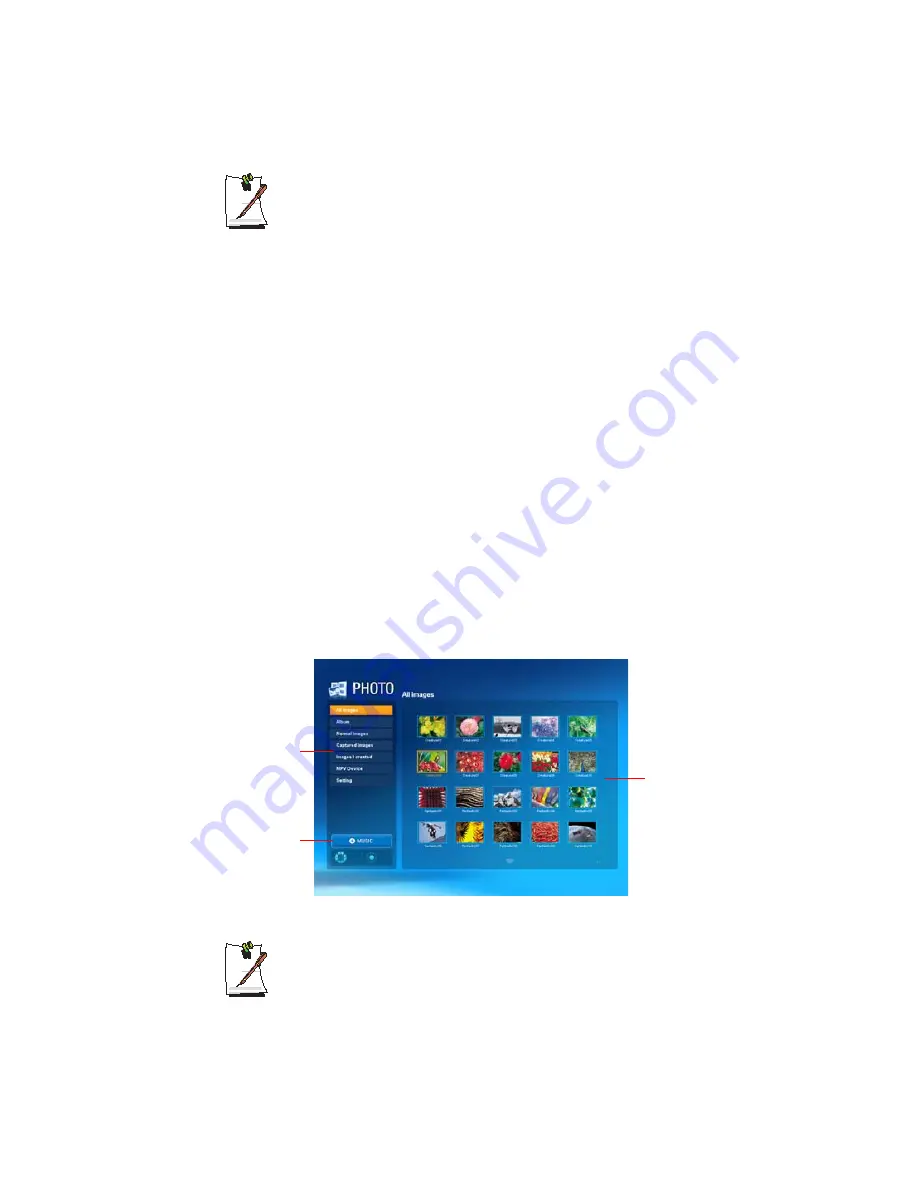
PHOTO (Viewing a Picture)

The procedures for viewing pictures (images) and for viewing pictures through the 
Slide Show will be described.

1.

Double-click

 on 

PHOTO

 in the initial screen of Play Mode. 

2.

Double-click on 

All Images

 in the 

left category pane, and double-click on an image 

file in the library window to zoom-in on the image.

Viewing an Image through the Slide Show or Full Screen

Select 

Slide Show

 or 

Full Screen

 from the menu at the bottom of the zoomed 

image screen.

Library Window

Category Window

 MUSIC

You can listen to the

music files in My Playlist

or All musics while

working.

Summary of Contents for NP-M50

Page 1: ...rosoft Corporation Product names mentioned herein are for identification purposes only and may be trademarks and or registered trademarks of their respective companies Macrovision Statement If your computer has a DVD drive and an analog TV Out port the following paragraph applies This product incorporates copyright protection technology that is protected by method claims of certain U S patents and...

Page 2: ... be operated only with the type of power source indicated on the rating label Ensure that the electrical outlet you are using to power your equipment is easily accessible in case of fire or short circuit If your computer has a voltage selector switch make sure that the switch is in the proper position for your area Openings in the computer case are provided for ventilation Do not block or cover th...

Page 3: ...from the wall outlet and refer servicing to qualified personnel if The power cord or plug is damaged Liquid has been spilled into the system The system does not operate properly when the operating instructions are followed The system was dropped or the casing is damaged The system performance changes The Instruction On Safety Operation of NotePC 1 At installation and operation of devices it is nec...

Page 4: ...s Laser Safety All systems equipped with CD or DVD drives comply with the appropriate safety standards including IEC 825 The laser devices in these components are classified as Class 1 Laser Products under a US Department of Health and Human Services DHHS Radiation Performance Standard Should the unit ever need servicing contact an authorized service location Laser Safety Note Use of controls or a...

Page 5: ...the power cord set must be at least 6 00 feet 1 8m and a maximum of 9 75 feet 3 0m All power cord sets must be approved by an acceptable accredited agency responsible for evaluation in the country where the power cord set will be used The power cord set must have a minimum current capacity of 7 A and a nominal voltage rating of 125 or 250 volts AC as required by each country s power system The app...

Page 6: ...Because the wireless devices which may be embedded into your notebook emit less energy than is allowed in radio frequency safety standards and recommendations manufacturer believes these devices are safe for use Regardless of the power levels care should be taken to minimize human contact during normal operation As a general guideline a separation of 20 cm 8 inches between the wireless device and ...

Page 7: ...es Since your system is equipped with a wireless device when traveling between countries with your system check with the local Radio Approval authorities prior to any move or trip for any restrictions on the use of a wireless device in the destination country If your system came equipped with an internal embedded wireless device do not operate the wireless device unless all covers and shields are ...

Page 8: ... integrated antennas should be located at a minimum distance of 20 cm 8 inches or more from the body of all persons High gain wall mount or mast mount antennas are designed to be professionally installed and should be located at a minimum distance of 30 cm 12 inches or more from the body of all persons Please contact your professional installer VAR or antenna manufacturer for proper installation r...

Page 9: ...rmful interference and 2 this device must accept any interference received including interference that may cause undesired operation Written by Daryl L Osden This equipment has been tested and found to comply with the limits for a Class B digital device pursuant to Part 15 of the FCC Rules These limits are designed to provide reasonable protection against harmful interference in a residential inst...

Page 10: ... guideline of 20 cm 8 inches separation between the device and the body for use of a wireless device near the body this does not include extremities This device should be used more than 20 cm 8 inches from the body when wireless devices are on The power output of the wireless device or devices which may be embedded in your notebook is well below the RF exposure limits as set by the FCC This transm...

Page 11: ... service may be required But if advance notice is not practical the telephone company will notify the customer as soon as possible Also you will be advised of your right to file a complaint with the FCC if you believe it is necessary The telephone company may make changes in its facilities equipment operations or procedures that could affect the operation of the equipment If this happens the telep...

Page 12: ...e telephone number of the sending machine or such business other entity or individual The telephone number provided may not be any number for which charges exceed local or long distance transmission charges In order to program this information into your fax machine refer to your communications software user manual ...

Page 13: ... a separation of 20 cm 8 inches between the wireless device and the body for use of a wireless device near the body this does not include extremities is typical This device should be used more than 20 cm 8 inches from the body when wireless devices are on The power output of the wireless device or devices which may be embedded in your notebook is well below the RF exposure limits as set by Industr...

Page 14: ...quipment should be made by an authorized Canadian maintenance facility designated by the supplier Any repairs or alterations made by the user to this equipment or equipment malfunctions may give the telecommunications company cause to request the user to disconnect the equipment Users should make sure for their own protection that the electrical ground connections of the power utility telephone li...

Page 15: ...lass B EN 61000 3 2 EN 61000 3 3 EN 55024 Low Voltage Directive Safety 73 23 EEC as per EN 60950 A1 A2 A3 A4 A11 Radio and Telecom Terminal Equipment Directive 199 5 EC as per CTR21 if fitted with a modem device ETS 300 328 if fitted with a 2 4 GHz band embedded wireless device ETS 301 489 1 if fitted with a 2 4 GHz band embedded wireless device ETS 301 489 17 if fitted with a 2 4 GHz band embedde...

Page 16: ...ireless 2200BG Network Connection product Due to the fact that the frequencies used by 802 11b 802 11g wireless LAN devices may not yet be harmonized in all countries 802 11b 802 11g products are designed for use only in specific countries or regions and are not allowed to be operated in countries or regions other than those of designated use As a user of these products you are responsible for ens...

Page 17: ...0 2 4835 GHz for indoor and outdoor use For Reunion Guyane 2 400 2 4835 GHz for indoor use 2 420 2 4835 GHz for outdoor use channels 5 to 13 European Telecommunication Information for products fitted with EU approved modems Marking by the symbol indicates compliance of this equipment to the Radio and Telecom Terminal Equipment Directive 1999 5 EC Such marking is indicative that this equipment meet...

Page 18: ...1 for Pan European single terminal connection to the Public Switched Telephone Network PSTN However due to differences between the individual PSTNs provided in different countries the approval does not of itself give an unconditional assurance of successful operation on every PSTN termination point In the event of problems you should contact manufacturer Technical Support ...

Page 19: ...e harm to the environment or human health from uncontrolled waste disposal please separate this from other types of wastes and recycle it responsibly to promote the sustainable reuse of material resources Household users should contact either the retailer where they purchased this product or their local government office for details of where and how they can take this item for environmentally safe...

Page 20: ... step information they apply to Warning Indicates the possibility of personal injury Caution Warns you of possible damage to equipment or data Note Informs you of special circumstances Technical Information Informs you of special requirements or limitations for use of item s Keyboard Conventions Keys that you need to press to perform certain functions are displayed in the manual in brackets For ex...

Page 21: ... or shown in a small figure such as the Start Button shown on the right Table 1 Touchpad Click Conventions Windows Conventions Almost all Windows programs will display the name function of a button or icon if you place the touchpad pointer on the item you want information about Software User Documentation Your computer is shipped from the factory with several software programs installed The softwa...

Page 22: ...is turned off or in Hibernation AVStation now is launched p58 When the computer is turned on AVStation premium is launched p43 Touchpad Button Keyboard p8 LCD Panel LCD Latch Touchpad p12 Speaker R Speaker L Multi Card Slot p33 Power Button AVStation Button p 43 p 58 Status Indicators p15 Status Indicators p15 Volume Contorl Button Wireless LAN Button Etiquette Mode Button Remote Control Sensor ...

Page 23: ...ual Right View Left View CD Drive option p25 Microphone Jack Headphone Jack S PDIF Jack USB Port 2 0 Line In Jack Monitor Port 1394 Port 6 Pin PCMCIA Card Slot p36 Modem Port p66 LAN Port p67 Fan Vent USB Port 2 0 ...

Page 24: ...rd disk drive will void your warranty To replace the hard disk drive please contact your nearest Samsung Service Centre Battery p112 DC Jack USB Port 2 0 TV Output Port S Video Security Lock Port p119 Battery Latches Memory Compartment p117 HDD Compartment Docking Connector ...

Page 25: ... Insert the battery and connect the AC adapter according to the Installation Guide 2 Slide the LCD latch to the right and open the LCD panel 3 Press the power button To turn off the computer 1 Click the start button on the taskbar 2 Click Turn Off Computer 3 Click Turn Off ...

Page 26: ...pears click Shut Down Turn Off to turn off the computer Your unsaved work may be lost damaged If Ctrl Alt Delete keys do not operate either press the power button for more than 4 seconds to turn off the computer Your unsaved work may be lost damaged The next time you turn on your computer a hard disk check will be performed before Windows starts ...

Page 27: ... corresponding country Refer to the keyboard figure for the corresponding country Although the layout of the keys on your computer s keyboard is different from that on a desktop computer s keyboard the keyboard feels like a full sized keyboard when you use it Embedded Numeric Keypad Screen Brightness and Volume Adjustment Direction Keys Windows Key Function Key Function Special Purpose Keys Applic...

Page 28: ...s when pressed together with the Fn key enable special functions Cursor and Screen control keys move the cursor They may perform other functions depending on your software To clean the computer keyboard use slightly damp cotton swabs Scrub the keys and the surface around the keys Do not allow liquid to drip into the keyboard or you may damage the keyboard Embedded Numeric Keypad Screen Brightness ...

Page 29: ...on the embedded numeric keypad The numeric functions of the keypad are enabled and the Num Lock LED turns on Reading the Status Indicators on page 15 for the location of the Num Lock LED While the numeric functions are enabled you can temporarily return a key to its normal function by pressing the key and the Fn key For example to type the letter m press Fn M this operation displays the letter m T...

Page 30: ...c sound You can select one of the following modes by pressing the button Note WOW XT ON Mode Select to listen to music TruSurround XT ON Mode Select to watch a movie SRS OFF Mode Switches off the SRS function The SRS function is only supported through the built in speaker of the computer and the headphones It is not supported through the S PDIF port F8 Wireless LAN On Off Turns the wireless LAN se...

Page 31: ...pe or I shape The touchpad on your computer allows you to move the pointer on the LCD screen just like a mouse that is used with a desktop computer The touchpad buttons allow you to take actions with the pointer such as selecting an item or executing a command Locking the touchpad You can lock the touchpad and use only the keyboard and mouse To lock the touchpad function press the Fn F9 key combin...

Page 32: ...chpad button once Or place the pointer over an object then tap the touchpad once with your finger Double Click Launch a program or open a file Place the pointer over an object then quickly press left touchpad button twice Or place the pointer over an object then quickly tap the touchpad twice with your finger Right Click Display a short cut menu Place the pointer over an object then press right to...

Page 33: ... touchpad button while starting your system may increase the time required for starting Windows Scroll Display upper lower left right part of the content within a window Applicable to certain programs only Place your finger on the right edge or bottom edge of the touchpad and move vertically or horizontally Action Function Process ...

Page 34: ...o scroll the screen up and down while the cursor position does not change in some applications Hard Disk Drive CD ROM Drive Blinks when the hard disk drive or CD ROM drive is in operation Battery Turned blue when the battery is fully charged or when the battery is not installed Turns amber when the battery is being charged Blinks when the battery is not properly installed Power Turned On when the ...

Page 35: ...battery power Brightness Level 1 Adjusting the brightness using the Battery Manager You can adjust the screen brightness using the Battery Manager p114 Maintaining your LCD brightness settings after turning the system off and on 1 Turn the system on When the Samsung Logo appears press the F2 key to enter Setup 2 In the Boot menu change the Brightness Control Mode option to User Control 3 Save the ...

Page 36: ...um of 10 abnormal or bad pixels which do not affect system performance This system may have the same level of abnormal or bad pixels as any other company s products Maintenance Instructions When cleaning the LCD panel use only computer specific cleaners on a soft cloth and lightly wipe in one direction ...

Page 37: ...st using keyboard Press Fn or Fn from the keyboard To adjust using volume adjustment program Click the Volume icon on the taskbar and move the Volume slider to a desired level For advanced volume control options double click the Volume icon and adjust the volume level in the volume control program When you turn the system on a booting noise may occur ...

Page 38: ...ote control first Installing Battery Move the groove on the cover to the position by using a coin and open the battery cover by turning it clockwise Move the groove on the cover to the position by using a coin and open the battery cover To open the cover turn it counterclockwise Insert the battery so that the positive pole of the battery is towards the inside of the cover ...

Page 39: ...the PCMCIA slot To keep the remote control in the slot insert the remote control into the slot so that the Remote Control Signal Transmitter faces outward Remote Control Signal Transmitter Power Button Press to turn the computer on or to enter Hibernation Playback Control Button Direction Button Press to move to an item BACK Button Press to return to the previous step MUTE Button Press to mute the...

Page 40: ...pace and a taskbar at the bottom Start Button Opens the Start menu Taskbar Displays programs that are currently running Frequently used icons can be placed here Recycle Bin Deleted files or folders are sent here Language Bar Switches text input language Start Button Taskbar Shortcut Icons Start Menu Recycle Bin Language Bar System Tray with Clock ...

Page 41: ...clicking Search My Computer Displays the contents of the hard disk the CD ROM drive the network drive s and floppy disks It can also be used to search and open files and folders Control Panel Enables users to configure settings on the computer Help and Support Provides on line help information on Windows and troubleshooting Search Enables users to search for information in files or the Internet Ru...

Page 42: ... which files and folders are saved in and read from What is a folder A folder is used to group and manage files systematically and may include files in sub folders It is similar to a bookshelf What is a file A file is a document or various kinds of material that is generated as a result of program operation It is also called data To view the entire structure of the drive Click the Folder icon in t...

Page 43: ...use Click Start Help and Support Please refer to help and support centre before calling the Samsung helpline Windows XP Tour You can tour elementary functions provided by Windows XP Click Start Tour Windows XP Or click Start All Programs Accessories Tour Windows XP Click on the topics to find out about important functions of Windows XP ...

Page 44: ... 1 Press the eject button on right side of the CD drive 2 When the tray slides out place a CD onto the tray with the label facing up and push the CD down until it clicks 3 Push the tray in gently until it clicks CD RW DVD ROM Combo drive Reads a CD DVD and writes a CD DVD Super Multi Drive Reads CD DVDs and writes data to CD DVDs Supported DVD types include DVD R DVD RW and DVD RAM Emergency Eject...

Page 45: ...ess LED is on the disk and the data in it may be damaged Emergency Eject Hole To eject a CD when the CD drive is not working or the computer is turned off unfold a paperclip and insert the unfolded end of the clip into the emergency eject hole located next to the eject button and press until the CD tray opens To clean a CD or DVD title Clean the disc with a soft clean cloth by wiping from the cent...

Page 46: ...g screen appears To view detailed information on how to use Windows Media Player Run Windows Media Player and right click over the Function Taskbar and select Help Windows Media Player Help To play a video CD If a video CD does not run automatically follow these steps 1 Insert a video CD into the CD drive 2 When the CD drive window appears double click the MPEGAV folder 3 Double click the dat file...

Page 47: ...CD Option If your computer has CD RW functionality you can copy data to a blank CD or create an audio CD An additional CD writing program is supplied in an additional CD You cannot write to a CD that already has data in it 1 Insert a blank CD into the CD drive 2 On the CD Drive dialog select Open Writable CD Folder and click OK The CD drive window appears 3 Click Start My Computer ...

Page 48: ...s and the CD drive window opens automatically For more information on writing CDs Click Start Help and Support Type CD copy in the search field and click the Search icon To Burn an Audio CD Run Windows Media Player and right click over the Function Taskbar and select Help Windows Media Player Help Select Using the Player Using CDs DVDs and VCDs Using CDs Burning your own CDs To burn your own CD to...

Page 49: ...r DTS With a home theater system you can enjoy a vivid screen and sound in your home as if you are in a movie theater The following devices are required to enjoy a home theater system To use home theater system complete the following procedures Step 1 Connect 5 1 channel speaker system to your computer Step 2 Configure digital sound output on the computer Step 3 Enable S PDIF output on the DVD pro...

Page 50: ...omputer Since the sound of the computer is set to Digital Output by default when purchasing the computer additional settings are not required You can confirm the setting as follows 1 Double click the Volume Control icon in the notification area of the Taskbar and select Options Advanced Controls 2 Click the Advanced button below the Master Volume and check if the 1 Disable Digital Output item is u...

Page 51: ...CD provided with your computer then change the settings as per the following 1 Run Power DVD program and click the Settings icon 2 On the Audio tab set the Audio Output setting to Use SPDIF and click OK Now you can enjoy home theater using DVD titles To control volume for your 5 1 channel speaker use the control on the digital amp Please refer to the speaker manual ...

Page 52: ...ns when Using Memory Cards You can use memory cards for storing data only Copyright protection function is not supported To insert and use a memory card Remove the Slot Protector first before using the Multi Card Slot Press the end of the Slot Protector lightly and remove the Slot Protector when it pops up You should insert the memory card with the writing on the card facing downwards Inserting wr...

Page 53: ...n write data to the memory card If the memory card is not formatted yet format the memory card before use Since the memory card may be easily mislaid when moving your computer keep the memory card separately To remove a memory card 1 Press the end of the memory card softly to pop it outward 2 Remove the memory card Example Memory Stick ...

Page 54: ...protection tab of the Memory Stick or SD memory card to the Lock position 1 Click Start My computer 2 Press the right touchpad button on the memory card drive and select Format from the pop up menu 3 Click Start to start the format operation To use a memory card in both the computer and other digital device such as digital camera it is recommended to format the memory card in the digital device If...

Page 55: ...the slot protector Push the eject button of the PCMCIA card slot once to pop it out Push the button again to eject the slot protector 1 Insert a PCMCIA card into the PCMCIA card slot on the side of the computer Ensure that the PCMCIA card is inserted the correct way as incorrect insertion will damage the PCMCIA card slot 2 Windows automatically installs the necessary driver for the card If there i...

Page 56: ...y Remove Hardware dialog box select the appropriate PCMCIA card and click Stop 3 When Stop a Hardware Device dialog box appears click OK 4 Click Close to close the Safely Remove Hardware dialog box 5 Push eject button of the PCMCIA card slot once and the button pops out 6 Push the button again to eject the PCMCIA card ...

Page 57: ...d change the boot sequence Desktop Desktop management features include changing the font size executing a magnifier function the start menu settings and managing the quick launch icons on the taskbar Security Here you can configure the security settings supported by Windows XP SP2 You can also change the configuration of the firewall settings Windows automatic updates and blocking pop ups when con...

Page 58: ...vents unauthorized users from gaining access to your system via the network or the Internet 1 Click Start All Programs Samsung EasyBox EasyBox 2 Click Security from the top menu bar 3 Select Windows Firewall Settings from the Security menu on the left 4 Select a firewall level 5 Click Apply Click the User Setting button for advanced features including exceptions and permissions ...

Page 59: ...e desktop Or select Start All Programs Samsung Samsung Theme Samsung Theme Samsung Theme Switches to Samsung Theme desktop logon screen and sound effects on booting Windows XP Theme Switches to the Windows XP default Theme Back Restores the theme to its previous status Close button Help button Move the mouse pointer over Samsung Theme item then the Samsung Theme will be displayed below ...

Page 60: ...sung Update Plus Samsung Update Plus If this is the first time you are running the program a window will appear asking you if you agree to the agreement in the window Click Agree to use this software 2 Click Search for and Install Updates and click the Search for New Updates button 3 If there are available software or driver updates for your computer the available updates will be listed Select the...

Page 61: ...fault your computer is configured to automatically search for updates If there is a new update available this is notified in the notification area Click the balloon help icon in the notification area Here you will be able to find the latest available updates To change the automatic update settings click the Configuration button in Figure 2 and change the settings Samsung Update Plus does not provi...

Page 62: ...o and movies and listen to music You can start AVStation premium as follows Select Start All Programs Samsung AVStation premium AVStation premium Double click the AVStation premium icon on the Desktop or Taskbar Click the AVStation button Click the AVS button on the remote control p 19 The function button on the remote control only works in AVStation premium Play Mode p 54 AVStation Button ...

Page 63: ... this mode the Edit Create function and the MOVIE EDITOR menu are not supported p 54 This Manual mainly describes the procedures for using the Standard mode of AVStation premium The captured program screen shots in this manual may differ slightly from the actual software depending on the version of the program For more detailed use procedures refer to the on line Help Standard mode Screen Play Mod...

Page 64: ...ly play a DVD title after installing Power DVD or a DVD player program MOVIE EDITOR Using this menu you can edit a movie file To handle multimedia files conveniently register the multimedia files to the library Registering a File p54 To access a file not registered to the library select File Open File and select the file Selecting the AVStation premium Menus To select a menu select the required me...

Page 65: ...e played in the added order Playing an Audio CD 1 Insert an audio CD into the CD ROM drive 2 When the Audio CD window appears select using Samsung AVStation premium and click OK Then the audio CD is played To play an audio CD in the CD ROM drive double click CD from the Category and double click on Audio CD when Audio CD appears in the bottom screen MUSIC Menu Repeat Button Track All Tracks Random...

Page 66: ... to the library and then select Tools Copy from CD To select multiple tracks select the tracks while pressing the Shift or Ctrl key on the keyboard 4 The selected tracks are copied from the audio CD When the copy operation is completed the Copy Completed message will appear The copied tracks are saved in the My Documents AVStation premium Music Music From CD folder Select Copy from CD Select the t...

Page 67: ...e Burn CD window appears click OK to create the audio CD Creating a Playlist A Playlist is a list of selected music files that has been created by a user so that the selected files can be played later 1 Select the music files to be included in the Playlist from the music category and click on Add 2 When you have added all the music files you want click on Save As Playlist 3 Register a new playlist...

Page 68: ...an image double click the image file Viewing the Image List Select View Image List from the menu at the bottom of the zoomed image screen Viewing an Image through the Slide Show or Full Screen Select Slide Show or Full Screen from the menu at the bottom of the zoomed in on image screen To exit SlideShow or Full Screen press the Esc key or right click and then select Exit SlideShow or Exit Full Scr...

Page 69: ...he album 5 When creating an album is complete click on Save to create the album The created album is saved in the My Documents AVStation premium Photo Photo Album folder and will be displayed in the Album category To view an album double click on Image in the left category pane and double click on Album Click on Slide Show in the Image window to view the images within the album through the Slide S...

Page 70: ...le click a movie file to play it You can adjust the screen size in the View menu Playing a DVD Title You can only play a DVD title after installing a DVD player program such as Power DVD 1 Insert a DVD title into the DVD drive 2 When the Select Work window appears select using Samsung AVStation premium and click OK to play the DVD title If the DVD does not automatically play or the DVD title is in...

Page 71: ...o movie files and for inserting transition effects between movies are described below 1 Click on MOVIE EDITOR A new project will open 2 Double click Movie in the left category pane and double click All movies 3 Drag and drop a movie file to the Storyboard When a Storyboard appears in the right pane drag and drop another movie file to the Storyboard MOVIE EDITOR Menu Work Tab Movie Category MUSIC Y...

Page 72: ...tion tab and drag and drop the selected effect onto the movie in the Storyboard to apply the transition effect Background Music Click on Music and select a music file to apply the background music to the movie file 4 When finishing editing a movie click on Create Movie and click OK to create the edited movie as a movie file The edited movie is saved in the My Documents AVStation premium Movie Edit...

Page 73: ...Click on Add by folder and select the folder to be registered and then click OK 3 When the registration is completed click OK The registered multimedia folder will be displayed in the music image or video categories of the library To play a file not registered to a category select File Open File and select the file Using Play Mode This section describes how to use the Play Mode of AVStation premiu...

Page 74: ... of the window MUSIC The procedures to play a music file or an audio CD will be described below Double click MUSIC in the initial screen of Play Mode Exit Program Minimize Screen Move Bar This appears only when the mouse pointer is over it Menu Move to the Initial Screen of Play Mode Switch to Standard Mode Library Window Media Play Control Button Operation Display Window Category Window Repeat Bu...

Page 75: ...play it To Listen to All Tracks Select Play All Tracks from the Media Play Control button PHOTO Viewing a Picture The procedures for viewing pictures images and for viewing pictures through the Slide Show will be described 1 Double click on PHOTO in the initial screen of Play Mode 2 Double click on All Images in the left category pane and double click on an image file in the library window to zoom...

Page 76: ...Title 1 Insert a DVD title into the DVD drive 2 When the Select Work window appears select using Samsung AVStation premium and click OK to play the DVD title If the DVD is not automatically played or the DVD title was in the DVD drive double click the Title of the DVD in the DVD VCD category Playing a VCD Title 1 Insert a VCD title into the CD drive 2 Double click the Title of the VCD in the DVD V...

Page 77: ...w are similar to those of Play Mode of AVStation premium AVStation now only supports the player and view functions To register files to the library use the registration function of AVStation premium Launching AVStation now You can only use AVStation now when your computer is turned off or it is in Hibernation State Using Power Management Options on page 107 To launch AVStation now click the AVStat...

Page 78: ...ting and using the computer when using AVStation now Select Go Window from the Exit window Your computer will start AVStation now Menus AVStation now consists of the following 3 menus MUSIC Using this menu you can play a music file or an audio CD PHOTO Using this menu you can view a picture image and view a picture through the Slide Show MOVIE Using this menu you can play a video movie file or a D...

Page 79: ...Item After you move to a menu or item press the Enter key on the keyboard or double click it Or press the Enter button on the remote control Returning to the Previous Screen Press the Esc or Backspace key on the keyboard or right click it Or press the BACK button on the remote control MUSIC The procedures for playing a music file or an audio CD will be described below 1 Select the MUSIC menu and s...

Page 80: ...elect a track to be played PHOTO The procedures for viewing pictures images and for viewing pictures through the Slide Show will be described below 1 Select the PHOTO menu and move to the All Photo category 2 In the Library window select an image to view The selected image will be zoomed in on Viewing an Image through the Slide Show or Full Screen In the lower menu of the zoomed in image select Sl...

Page 81: ...aying a DVD VCD title Insert a DVD VCD title into the DVD ROM drive and select DVD VCD from the Category pane After a short while the DVD VCD title will be played Using the DVD VCD Play Control Button To use the Play Control button while playing a DVD VCD title press a key or move the mouse To play a DVD title for the first time using AVStation now launch the DVD player in Windows once before star...

Page 82: ... remove the program You cannot use an additionally created Playlist You cannot use an additionally created Playlist other than the Playlist provided with AVStation premium in AVStation now A movie file or a movie title not supported by AVStation Now To play a movie file or a movie title not supported by AVStation Now please use AVStation premium after booting your computer For Cases where you cann...

Page 83: ...ists of the following 4 areas S W Group Area You can classify programs into 5 groups these being System Utility Network Support and Entertainment and manage them You can add a file that can be launched directly from the Desktop or Explorer Files that have the extension of cmd bat pif scf exe com lnk or scr by dragging and dropping them S W List Area Shows software included in the S W group You can...

Page 84: ...ic movie or album player of the AV Station program Drag and drop a media file from the Desktop or Explorer over any of the buttons to launch the corresponding player Samsung Update Plus Area When there is new software or a new driver the Samsung Update Plus notification window appears If you click on the notification window Samsung update Plus is launched and an update is performed with a percenta...

Page 85: ...ct an internet service provider ISP for instructions on how to connect to and disconnect from the Internet 1 Connect a telephone line to the computer s modem port 2 Connect to the Internet according to the instructions provided by your ISP If the Internet connection is not disconnected properly additional telephone charges may be imposed ...

Page 86: ...LAN cable to the computer s LAN port 2 Click Start Control Panel 3 Click Network and Internet Connections in the Control Panel window 4 Click Network Connections in the Network and Internet Connections window 5 Right click the Local Area Connection icon and click Properties ...

Page 87: ...ain DNS server address automatically Click OK To use a static IP On the General tab select Use the following IP address and fill in the IP address Subnet mask Default gateway Preferred DNS server and Alternative DNS server fields Click OK To use both DHCP and static IP simultaneously On the Alternate Configuration tab click User configured and fill in the fields Click OK ...

Page 88: ...erred to as an 802 11ABG card device A wireless LAN card is optional The model of the wireless LAN card is determined by the relevant product To view the installed wireless LAN card click Start Control Panel Performance and Maintenance System Hardware tab Device Manager The wireless LAN connection settings will be described on the basis of the Windows XP Service Pack 2 installed computer It is rec...

Page 89: ...s networks you can wirelessly connect 2 or more computers that have wireless LAN modules For details see Connecting to computer to computer networks peer to peer or ad hoc on page 72 Connecting to an Access Point AP This section describes how to connect to an AP You can use the network when you are connected to an AP For more detailed information such as the network key encryption key ask your net...

Page 90: ...ey in the window and then click the Connect button When a network key is not defined for a selected AP click on Link to display the warning message box Then click Connect again in the box Now when Connected in AP is displayed and you can access the network Checking the connection status Move the mouse pointer over the Wireless Network Connection icon on the taskbar and the connection status is dis...

Page 91: ...nternet can share the Internet by accessing another computer connected to the Internet Refer to Sharing Internet Access on page 86 You can connect by completing the following steps Step 1 Set up a computer to computer network on a computer Step 2 Connect to the configured computer from other computers Step 1 Setting up a computer to computer network 1 Right click on the Wireless Network Connection...

Page 92: ...r of Preferred Networks 3 On the Wireless Network tab click Advanced 4 Clear Automatically connect to non default network check box if it is selected Select Computer to computer ad hoc networks only and click Close 5 In the Wireless Networks tab click Add ...

Page 93: ...key in the Network key field and click OK To prevent a network connection from an unauthorized user it would be better to configure a network key encryption key A network key consists of 5 13 alphanumeric characters e g magic or of 10 26 hexadecimal numbers a hexadecimal number is represented by numbers 0 to 9 or letters a to f ...

Page 94: ...me e g samsung is in the Preferred networks item and click OK Now your wireless network setup has been completed Step 2 Connecting to the configured computer 1 Right click on the Wireless Network Connection icon on the taskbar and select View Available Wireless Networks ...

Page 95: ...k Connect 3 Enter a cryptographic key in the network key box and click Connect If the network key is not configured in Connecting to computer to computer networks peer to peer or ad hoc on page 72 just click Connect without any keystrokes When connected to the wireless network the system displays Connected in the selected network of the Network Connection window ...

Page 96: ...Connecting to the Internet 77 Checking the connection status Move the mouse pointer over the Wireless Network Connection icon on the taskbar and the connection status is displayed ...

Page 97: ...ROSet You can install the wireless LAN client administrator program following the instruction displayed automatically when you insert the system software Media Insert the system software Media into the CD ROM drive and install the wireless LAN configuration program Step 2 Using the wireless LAN configuration program PROSet Double click the wireless LAN program icon on the taskbar Or click Start Al...

Page 98: ...4 In the Search Security Settings window the wireless network security search message will appear Click Next 5 Enter the network authentication data encryption WEP encryption level key index and wireless security password configured for the target access point or computer to computer network in the Security Settings window and click Next The network authentication data encryption WEP key index and...

Page 99: ...ew computer to computer Ad Hoc network or to connect to a hidden access point Stealth Closed Mode refer to the following procedures A hidden access point is an access point that exists but is configured not to be detected by the scan operation to prevent access attempts from unauthorized users 1 In Profiles click on Add 2 Enter Profile Name and Network name SSID select Operating Mode then click Ne...

Page 100: ...n creating a computer to computer network connection profile For more information on security settings refer to the security settings in Connecting to AP or Help When you are creating a computer to computer network connection profile the network authentication setting is disabled 4 When a profile creation is completed the new created profile appears in the profiles list Select corresponding profil...

Page 101: ...th 2 LAN interfaces wired and wireless or 2 wired LAN as the sharing server Then you can access the Internet on a sharing client by connecting to the sharing server You can diagnose the network status You can diagnose the network status when the network is not properly connected Using the Network This section describes the procedures to connect to the Internet by setting up a network The setting u...

Page 102: ...e Desktop 3 Click the Add button 4 Select a network location icon and enter the name of the location e g Home Click the Next button 5 Select Internet direct connection and click the Next button 6 Select the LAN device setup the IP address and click the Next button Select Device Select a device to be connected to the Internet Select either Wired LAN or Wireless LAN Select Device Setup IP Address ...

Page 103: ... the newly added printer and then click the Finish button To not add a printer select No Default Printer and then click the Finish button When the network setting is complete the Do you want to move to newly added location now message appears If you select Yes the network settings for the added location are applied When the network settings for the added location are applied the added place and th...

Page 104: ...twork administrator 3 The network key security key input window appears If a network key has been set for the wireless LAN AP enter the network key and click the Connect button For the network key information ask your network administrator If no network key has been set for the wireless LAN AP click the Connect button without entering the network key 4 When the computer is connected to the wireles...

Page 105: ...without itself having a direct connection to the Internet You can connect a sharing server and a sharing client as follows See Figure 5 on page p83 To connect a sharing server and a sharing client using a wired LAN connect the computers with a crossover LAN cable or network hub first To connect through a wireless LAN press the Fn and F8 key combination simultaneously to enable the wireless LAN Whe...

Page 106: ...the external Internet Determine whether to use a firewall and select a network device to be connected to the external Internet e g Wired LAN Set the IP address and then click the Next button To protect against external intrusion attempts using a firewall is recommended For more information on selecting a device and setting the IP address refer to the description of item 6 of Setting Up a Network o...

Page 107: ...Manager on the computer to be used as a sharing client 2 Click the Add button 3 Select a network location icon and enter the name of the location Click the Next button 4 Select Internet Sharing and click the Next button To connect through a wireless LAN select Internet Sharing Wireless To connect through a wired LAN select Internet Sharing Wired 5 Confirm the network device to be connected to the ...

Page 108: ...menu to reestablish the connection Network Status Diagnosis You can diagnose the network status when the network is not properly connected 1 Run Samsung Network Manager 2 Select Auto Diagnosis from the Manage menu 3 The Network Connections figure window appears Click the Start button to start the network diagnosis 4 When the diagnosis is complete out of order devices are marked by the exclamation ...

Page 109: ...ting Through a Wireless LAN Option on page 69 Sharing files or folders This section describes how to share files and folders between computers connected to the network To share files complete the following procedures Step 1 Configuring the sharing of files and folders on a computer Step 2 Accessing shared files and folders from another computer When a file or folder is shared anyone connected to t...

Page 110: ...rk Setup Wizard This screen does not appear if Internet Sharing Network Wizard has been installed in the computer to computer wireless network environment 3 Select Just enable file sharing and click OK 4 In the Network sharing and security field select Share this folder on the network enter the share name and click OK Be cautious when selecting Allow network users to change my files since other ne...

Page 111: ...hared file If your computer is a member of another workgroup 1 Click Other Places Microsoft Windows Network 2 Click the desired workgroup 3 Click the desired computer to display the shared files or folders Sharing Printers This section describes how to share a printer between computers connected to a network To share a printer complete the following procedures Step 1 Configure printer sharing in t...

Page 112: ...a share name for the shared printer and click OK 4 In the Printers and Faxes window you will find the printer icon has been changed to another icon on a hand Step 2 Adding and Using a Shared Printer 1 From a different computer that wants to use the shared printer click Start Printers and Faxes 2 Click Add a printer 3 In the Add Printer Wizard click Next 4 Select A network printer or a printer atta...

Page 113: ...ad the warning about a shared printer and click Yes to install the shared printer 8 Select Yes for Do you want to use this printer as a default printer and click Next 9 Click Finish 10 When the printer sharing configuration has been completed the shared printer appears in the Printers and Faxes window Now you can print using the shared printer even if your computer is not directly connected to a p...

Page 114: ...ters mobile phones PDAs Personal Digital Assistant etc For more detailed procedures on transferring files refer to Send and Receive files to from a Bluetooth device of the Bluetooth On line help Using the Internet via a mobile phone You can connect to the Internet through your mobile phone after connecting it to a computer which is connected to the Internet For more detailed procedures on using th...

Page 115: ...Hand held PC or Pocket PC For more detailed procedures on sharing data refer to Installing a Palm handheld computer using Bluetooth technology and Installing a Pocket PC using Bluetooth technology of the Bluetooth On line help Precautions Please do not send files larger than 60MB when transferring files through a File Transfer Function or Personal Area Network Sending a file larger than 60MB may f...

Page 116: ...ge prompting you to run the program You may also want to run System Setup particularly the first time you use your computer to set the time and date use security or power management features or alter the settings of other features BIOS Caution If you are not familiar with BIOS setup and what the parameters mean seek help from a person who is knowledgeable Incorrect settings may cause your system t...

Page 117: ...ncluding passwords Boot Specifies the order of boot devices and configures boot features Exit Specifies how to exit System Setup Navigation Key Function F1 Displays the General Help window Esc Exits the current menu or Moves the cursor up and down between fields or Selects different menus Pressing the Esc key at the Main menu brings you to the Exit menu F5 Scrolls backwards through the options for...

Page 118: ...as the first booting device when the CD ROM drive is configured as the first booting device by default 1 Select the Boot menu in System Setup 2 Press Enter on Boot Device Priority item 3 Use key to move to the Hard Drive item and press F6 until it is at the very top 4 Press F10 to save the changed configuration and exit System Setup Now you can boot the system with the hard disk drive as the first...

Page 119: ...Enter a password press Enter re enter the password for confirmation and press Enter again 4 When a message confirming the password configuration appears in the Setup Notice window press Enter Setting the User Password You can configure user passwords so that other users can use the system Before configuring a user password a supervisor password must have been configured Users can start the system ...

Page 120: ...e Password on boot option to Enabled From now on system booting will not proceed without the password Deactivating the Password 1 On the password to delete press Enter e g supervisor password 2 Enter the current configured password and press Enter 3 Leave the Enter New Password and Confirm New Password field empty and press Enter to deactivate the password ...

Page 121: ...ore number of colours on your screen 1 Select Start Control Panel Appearance and Themes Change the screen resolution 2 Make changes on the Settings tab of the Display Properties dialog box Graphics Chipset Information You can view the installed graphics chipset in the Display Properties window Nvidia Geforce Go 6600 NV43M To change the number of colors displayed on a monitor select an appropriate ...

Page 122: ...ration click Apply The following resolution and color quality settings are recommended depending on the LCD screen of the system WXGA 17 Screen resolution 1440 x 900 Color quality Very high 32bit WSXGA 17 Screen resolution 1680 x 1050 Color quality Very high 32bit ...

Page 123: ...rough both the LCD and an external display device simultaneously 1 Connect the external display device e g a monitor or a projector to the corresponding port of the system To connect a TV connect the TV to the TV output port of the system 2 Press the Fn F4 keys Provided that an external display device is connected the display option changes in LCD CRT LCD CRT order whenever the Fn F4 keys are pres...

Page 124: ...t the external display device e g a monitor or a projector to the corresponding port of the system To connect a TV connect the TV to the TV output port of the system 2 Press touchpad right button on the desktop click Properties and then click the Settings tab 3 Click the monitor 2 icon select the Extend my Windows desktop onto this monitor check box and then click Apply 4 When the configuration is...

Page 125: ...the settings to the desired screen resolution and colour quality in the Display Properties dialog box Deactivating Dual View Mode Click the monitor 2 icon clear the Extend my Windows desktop onto this monitor check box and then click Apply To move a window between display devices in Dual View mode Click the title bar of the window in the primary display device 1 the LCD and drag it to the secondar...

Page 126: ...sic Power Management Schemes This section discusses the basic schemes of power management when the computer is operating on battery power or using AC power Standby vs Hibernation Hibernation is a state where the contents of memory are stored in a special file on the hard disk and Standby simply keeps a small holding current through the memory to keep the data You are more likely to sustain loss of...

Page 127: ...ttery Manager program using the system software Media 4 Select the time that you wish each of the following actions to occur in Battery and AC power mode Turn off monitor Turn off hard disks System standby System hibernates Turning off the monitor and HDDs will save a substantial amount of battery power therefore when in battery only mode select the shortest time practical You can also reserve Tur...

Page 128: ...you experience frequent interruptions you might also consider putting your computer into automatic hibernation after a specified number of minutes using the power management options Standby Mode Power Management or Manual Method Standby is used mainly for conserving battery power in your notebook computer It also gives you the benefit of getting right back to your work without waiting for the comp...

Page 129: ... conserve power To enter the power management window complete the following 1 Click Start Control Panel Performance and Maintenance 2 Click icon to display the Power Options Properties window 3 Click the Advanced tab to display the advanced power management options 4 Select the mode Do nothing Ask me what to do Standby Hibernate Shut down assigned to the Power button and or Rest Esc key Also selec...

Page 130: ...gement Schemes on page 107 for a better understanding of Standby and Hibernate modes 5 Click OK to set your power management options and close the window You can return to normal operation after you have used one of the Power Management buttons by quickly pushing and releasing the Power button ...

Page 131: ...the system operation environment p152 of this manual and operate and store the battery at room temperature Ejecting and Attaching Battery 1 Shutdown the system and close LCD 2 Put the computer upside down on a flat surface 3 Pull the two battery latches outward then remove the battery 4 To install the battery again slide the battery into the system as below The battery latches move inward and fix ...

Page 132: ... the current remaining battery charge are displayed at the top left of the screen To view on the battery Click the PUSH button on the battery The remaining battery charge will be displayed To view through the Control Panel Select Start Control Panel Performance and Maintenance Power Option Power Measure tab Then you can view the current power source and the current remaining battery charge Push bu...

Page 133: ...ifferent according to the settings in Control Panel Performance and Maintenance Power Options Alarms tab Extending the battery use time Decreasing the LCD Brightness Decreasing the LCD brightness by pressing the Fn key combination on the keyboard or adjusting the brightness in the Battery Manager program extends the battery use time Decreasing the LCD brightness by one level extends the battery us...

Page 134: ...time may be reduced in this mode Custom Mode In this mode a user can configure a detailed configuration to save the battery usage time You can adjust the LCD brightness the system standby time the screen color quality and the graphic mode values Power Saving Effect This shows the relative battery use time for each power mode The more effective the power saving the longer the graph will appear When...

Page 135: ... and the remaining charge display In this case the actual battery charge and the remaining charge display will be same by discharging the battery completely using the Battery Calibration function and then recharging it again 1 Disconnect the AC power adapter after turning off the system 2 Restart your computer and press F2 to enter BIOS setup 3 Using the arrow keys highlight Smart Battery Calibrat...

Page 136: ...g the memory module Before removing replacing the memory module turn the system off completely and remove the battery Do not replace the memory module when the system is in Standby Hibernate mode 1 Using a screwdriver open the memory module compartment cover on the bottom of the computer 2 Push the memory module tabs outward to pop the memory module upwards Carefully pull the module out at an angl...

Page 137: ...e Ensure the notch on the memory module corresponds with the notch on the socket 2 Push the memory module in until the module clicks into place If the memory module is not fixed completely gently push the memory down while pressing the memory module tabs outward 3 Close and fix the memory module compartment cover using a screwdriver ...

Page 138: ...ely The shape and methods of use may differ depending on the manufacturer Please refer to the manual provided with the security lock for proper use 1 Connect a security lock cable to a fixed object 2 While holding the security lock port lever to the left connect the cable to the security lock port Any damage to the machine caused by using a locking security device is not covered under warranty ...

Page 139: ...nts and remove any accumulated dust on the outside Avoid using or storing the computer in extremely hot or cold areas such as a car on a hot day Keep the computer away from heaters and out of direct sunlight Exposure to excessive heat may damage computer components If you have left your computer in a hot place let it cool down slowly to room temperature with the LCD panel open before using it Do n...

Page 140: ...wing If you spill liquid on the keyboard drain as much of the liquid from the keyboard as possible Be careful not to let the liquid drip onto the LCD panel Allow the system to dry for several days before trying to use it If you spill liquid on an external keyboard or keypad unplug it and drain as much of the liquid as possible Allow the keyboard to sit at room temperature for a full day before try...

Page 141: ... Computer for Long Periods If you will not be using the computer for a long period of time a month or more you should discharge the battery completely then remove the battery from the computer This extends the life of the battery ...

Page 142: ...ceed as follows Click Start All Programs Norton AntiVirus Norton AntiVirus 2005 Windows Help and Support Run Windows Help and Support to find problem that may be affecting your computer To run Windows Help and Support proceed as follows Click Start Help and Support Frequently Asked Questions To view FAQ s on your computer please visit www samsungpc com Reinstalling Software If for some reason your...

Page 143: ...on after such manual shutdown Scandisk will run to check errors in the system Q2 The system freezes during program operation A1 There is an error with the program currently being used Press the Ctrl Alt and Delete keys simultaneously and click End Task in the Windows Task Manager window A2 There is an error with the Windows OS Reboot the system by using the Power button Display Related Q1 The LCD ...

Page 144: ...mage on both the LCD and the projector by pressing Fn F4 keys screen is not displayed properly A Press Fn F4 keys once again Q6 The desktop momentarily appears as a broken image when zooming in or out of the Media Player screen when Media Player is running A Since zooming in or out of the Media Player screen changes the screen resolution the desktop may momentarily appear as a broken image during ...

Page 145: ... and WSXGA LCD support 1440x900 and 1680x1050 modes respectively the projector does not support these modes In this case change the resolution to 1024x768 recommended on your computer Q11 Switching the MS DOS command prompt to full screen mode or Windows mode by pressing the Alt Enter keys does not operate properly A Pressing the Alt Enter keys using an USB keyboard may cause the key input to be r...

Page 146: ...odem again after restarting the system or reinstalling the driver You have to exit all programs using modem in the advance of diagnostics of the modem A3 Although I can make a connection with the modem I cannot hear the dial tone and modem connection sound In this case check the following list 1 Click Start All Programs Accessories Entertainment Volume Control 2 Clear the Mute check box in the Tel...

Page 147: ...n incorrect modem configuration 1 Click Start Control Panel Network and Internet Connections 2 Under See Also click Phone and Modem Options 3 In the Dialing Rules tab click Edit 4 In the General tab in the Edit Location window select the current country from the Country region radio box specify the Area code and click OK A2 Because the shape of the telephone plug may differ according to the countr...

Page 148: ...operties 3 Click Configure and select Power Management tab Select Allow this device to bring the computer out of standby then click OK Restart the system If the system in rest mode is activated when there is no received signal use the system after disabling Wake On LAN function Connecting wired LAN while using wireless LAN may not execute Wake On LAN function Configure wireless LAN to Disable to u...

Page 149: ...mance and Maintenance System Hardware tab Device Manager Network adapters Wireless LAN adapter If there is a yellow exclamation mark please reinstall the device driver with the system software Media A4 Referring to A2 of Q3 Check that the network bridge configuration is correct Q2 The signal strength is excellent but I cannot connect to the network Even if the signal strength is excellent the netw...

Page 150: ...llowing If the wireless LAN function is off turn it on For Windows XP verify that the wireless network connection has been set to Enable in Start Control Panel Network Connections If there is a Wireless LAN On Off button check if the wireless LAN button is pressed A2 Verify whether the same network key encryption key has been entered in both the AP and the computer The network key is an encryption...

Page 151: ...en several APs are present simultaneously check the channel setting for each AP When different APs are using nearby channels interference may occur between electronic waves Set the APs channels further apart from each other Ex Ch1 Ch5 Ch9 Ch13 When an AP s SSID Service Set ID option is set to Hide you cannot search for that AP on the computer We recommend canceling the Hide option for an AP The SS...

Page 152: ...ect the Standard tab in the right pane double click Wireless Zero Configuration and check that Startup Type is configured to Automatic and the Service status is Started A5 In the case of Windows XP click Advanced in the Wireless Network Connection dialog box see Connecting to an Access Point AP p70 and make sure that Use Windows to configure my wireless network settings is selected This may happen...

Page 153: ...the program operation Q9 The network does not operate properly when both the wireless and the wired network connections are simultaneously configured with the same IP address A You cannot use the wireless and the wired network connections using the same IP address simultaneously To use either the wireless or the wired network in turn with the same IP address you have to Disable whichever network d...

Page 154: ... wireless network settings Select Start Control Panel Network and Internet Connections Network Connections right click the Wireless Network Connection icon and then select View Available Wireless Networks Select Change Advanced Settings from the left menu select an AP from Preferred networks window in the Wireless Networks tab and click the Properties button Select Shared Mode in the Network Authe...

Page 155: ...ms Related Q1 3D game is not executed or some functions are not working A Change the graphic setting of the game to 2D or Software Renderer then execute the program again Q2 I launched a game right after installing it and the game is not executed A This problem may occur when the game is not compatible with Windows XP Launch the game again and it will be executed properly Q3 While playing a 3D gam...

Page 156: ...ration of the system A Do not press Fn F2 keys while a game is running because it may cause a system error Q8 Some part of a game image is not displayed or is displayed in black A This may happen when running a game designed for DirectX 8 1 such as NHL 2003 MVP Baseball 2003 etc Q9 The game screen is displayed small A This may happen when the display settings are set to zoom out mode Use center ou...

Page 157: ...n to 1024x768 and the color quality to 16 bit Q12 Game play is not displayed smoothly on the screen A For 3D games the texture data for the 3D screen display is saved to the system memory If there is insufficient system memory the data is saved to the hard disk drive and loaded to memory when required This operation may temporarily stop displaying the picture on the screen In this case lower the g...

Page 158: ...k on Remove Q2 When you connect to a Web site you see the message To help protect your security Internet Explorer stopped this site from installing an ActiveX control on your computer or This site might require the following ActiveX control below the address bar A Windows XP SP2 blocks unsigned ActiveX controls from being installed when connected to certain Web sites for security reasons On some W...

Page 159: ...omputer up to date 1 Click on Automatic Updates in Start Control Panel Security Center Manage security settings for 2 From general tab of Automatic Updates window select Automatic recommended A3 Keep your computer current with the latest virus updates ex Norton Antivirus Even when you have installed Norton AntiVirus on your computer Windows cannot recognize the program until you configure the sett...

Page 160: ...install an anti virus program that your computer is able to identify Check the following programs which Windows can detect and select one from the list A list of anti virus programs that Windows can detect Symantec Norton Anti Virus NetworkAssociates McAfee TrendMicro ComputerAssociates Panda Kaspersky Ahnlabs AhnLab Visit the Microsoft Web site www microsoft com regularly to check the latest list...

Page 161: ...files such as the registry A problem occurs after installing a new program Creating a Restore Point Restore points are created at predetermined times and at times of significant system events such as when a program or a driver is installed You can also decide when to create your own restore points There has to more than 200MB of free space on the hard disk drive If the disk space is insufficient a...

Page 162: ...performing system recovery 3 In the Restore point description box type a name to identify the restore point and than click Create A restore point has been created Returning your computer to an earlier restore point The procedures to return your computer to an earlier restore point when a problem has occurred are described below 1 Click Start All Programs Accessories System Tools System Restore ...

Page 163: ...desired restore date from the calendar restoration and select the desired restore point from the list and then click Next The date of the restore point is displayed in bold font 4 Confirm the selected restore point and click Next System Restore shuts down Windows and starts the restoration processes ...

Page 164: ...ribed below 1 Click Start All Programs Accessories System Tools System Restore 2 Select Undo my last restoration and then click Next 3 Confirm the restoration information to undo and than click Next System Restore shuts down Windows and starts undoing the restoration 4 After the undo restoration is complete Windows restarts In the Undo the last restoration completed dialog click OK Your computer h...

Page 165: ...Media Insert the system software Media into the CD ROM drive The initial screen appears automatically Standard Installation This displays a list of drivers or programs that are not currently installed on your computer from the system software Media provided All necessary components are installed using the factory defaults Minimum Installation This displays the components driver Windows programs et...

Page 166: ...n the main window of the System Software Media Standard Installation is recommended 2 The system is scanned to display the drivers and programs that need to be installed 3 Click OK The drivers and programs are automatically installed as factory defaults 4 When done restart the system ...

Page 167: ... Reinstalling Window may delete the data on the hard disk drive such as files programs etc In order to minimize damage from data loss please remember to always back up data Samsung Electronics is not liable in the case of data loss please consult your warranty statement for clarification When you have set a booting password You are asked to enter your booting password after restarting the system d...

Page 168: ...ers or applications do not need to be reinstalled 4 After the system has restarted the message Press any key to boot from CD appears Do not press any key at this time After a while the partition configuration screen appears To not change the partition press Enter What is partition configuration Partition configuration is a function that devides the hard disk drive into one or several partitions No...

Page 169: ...uter name and the administrator password appears Enter the computer name and the administrator password and click Next 9 When the Date and Time Settings window appears click Next Setup will continue 10 When the system restarts to display Press any key to boot from CD do not press any key When you see the Windows desktop this means that the installation process is completed Remove the system recove...

Page 170: ...rent file system press Enter 5 Select the folder to install the Windows operating system To delete the previous version of Windows and install in the current folder press L on the keyboard 6 After the installation process copies the necessary folders for the Windows installation restart the system and the message Press any key to boot from CD is displayed You do not need to enter anything In a mom...

Page 171: ...Rom Combo DVD Super Multi Optional Graphics Nvidia Geforce Go 6600 NV43M 64M 128M Optional Sound High Definition Audio Codec AD1986A Network Interface Modem V 92 Wired LAN Broadcom BCM5788 1G Ethernet UTP Wireless LAN 802 11BG or 802 11ABG Bluetooth 1 2 Optional Optional Memory Card Slot Memory Stick Memory Stick Pro SD Card MMC xD card Supported PCMCIA Slot Type I and II Compatible Ports IEEE 139...

Page 172: ... device is connected with an IEEE802 11g device e g IEEE802 11g compatible Access Point Item Detailed Specifications Physical Specifications Dimensions Width X Height 59 75 X 44 45 mm operation temperature and humidity Same as system operation Temperature 0 C 70 C Humidity less than 85 Power Specification Power Saving Mode 135 mW Receiving Mode 0 85W Transmission Mode 1 45W Power 3 3V Network Spec...

Page 173: ...s supported only when you are connected to an IEEE 802 11g device e g An Access Point supporting IEEE 802 11g Item Detailed Specifications Physical Specifications Dimensions Width X Height 59 75 X 44 45 mm operation temperature and humidity Same as system operation Temperature 0 C 70 C Humidity less than 85 Power Specification Power Saving Mode 135 mW Receiving Mode 0 85 W Transmission Mode 1 45 W...

Page 174: ...utput system C Centigrade CD Compact disc CD ROM Compact disc read only memory cm Centimeters COM Communication as in communication port CMOS Complementary metal oxide semiconductor DC Direct current DMA Direct memory access DPMS Display power management signaling DRAM Dynamic random access memory DSTN Double layer super twist nematic ECP Extended capabilities port EPP Enhanced parallel port g gra...

Page 175: ...processor unit ms Millisecond PDF Portable document format PC Personal computer PCI Peripheral component interconnect PCMCIA Personal Computer Memory Card International Association POST Power on self test PNP Plug and play PS 2 Personal System 2 RAM Random access memory ROM Read only memory SVGA Super video graphics array TFT Thin film transistor USB Universal serial bus V Volt VAC Voltage alterna...

Page 176: ... disk The BIOS on your computer is flash BIOS which means that it has been recorded on a flash memory chip that can be updated if needed Boot To start your computer A cold boot resets the entire computer and runs through all computer self tests A warm boot clears out computer memory only Boot disk A disk containing operating system programs required to start your computer A boot disk can be a flop...

Page 177: ...tems and application programs can directly access this memory without using memory management software Disk The device used by the computer to store and retrieve information Disk can refer to a floppy disk hard disk or RAM disk Disk cache A software device that accumulates copies of recently used disk sectors in RAM The application program can then read these copies without accessing the disk This...

Page 178: ... uses to signal the microprocessor when the device needs the microprocessor s services The number of IRQs is limited by industry standards LCD liquid crystal display The LCD screen on your computer differs from the display screen of a desktop monitor Most desktop monitors use CRT cathode ray tube displays which work by moving an electron beam across phosphor dots on the back of the screen The phos...

Page 179: ... including conventional and extended memory You can write to and read from RAM Information stored in RAM is temporary and is erased when the system is turned off Refresh rate The refresh rate is the rate at which the image on the LCD screen is rewritten to the screen A fast refresh rate helps keep the image from flickering Resolution The resolution is the sharpness or clarity of the image on your ...

Page 180: ...tion in ROM to RAM The BIOS can be executed much faster in RAM than in ROM The BIOS remains in shadow RAM until you turn off the computer TFT thin film transistor LCD A TFT LCD uses a separate transistor circuit to control each pixel This technology provides the best resolution for an LCD screen A TFT LCD is also sometimes called an active matrix LCD ...

Reviews: