background image

12


English

Connections

English


13

Before moving or installing the product, be sure to 

turn off the power and disconnect the power cord.

Connecting the Speakers

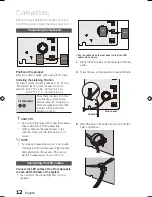
Position of the product

Place it on a stand or cabinet shelf, or under the TV stand.

Selecting the Listening Position

The listening position should be located about 2.5 to 3 times 

the distance of the TV's screen size away from the TV.  

Example :  For 32" TV's 6.56 ~ 7.87 feet (2~2.4 m)   

For 55" TV's 11.5 ~ 13.1 feet (3.5~4 m)   

Front Speakers 

ei

Place these speakers in front of 

your listening position, facing 

inwards (about 45°) toward you. 
Place the speakers so that their 

tweeters will be at the same 

height as your ear. 

CAUTION


!

Do not let children play with or near the speakers. 


`

They could get hurt if the speaker falls.
When connecting the speaker wires to the 


`

speakers, make sure that the polarity (+/ –) is 
correct.

NOTE


If you place a speaker near your TV set, screen 


`

color may be distorted because of the magnetic 
field generated by the speaker. If this occurs, 
place the speaker away from your TV set.

Connecting the LeD cables

Connect the LED cables of the Front Speakers 
to each LED Terminals of the system.

You can enjoy the special light effect on your 


`

speakers.

Use the cable tie on the rear panel so that the LED   

   cables are not loose.

Place the LED cables on the cable tie of the rear 

1. 

panel. 

Press the cap on the cable tie to reveal the hole.

2. 

Bend the end of the cable tie and put it into the 

3. 

hole to tighten up.

R

L

SPEAKERS OUT
(IMPEDANCE3Ω

)

RADIO ANT

FM

AM

FRONT

LED

Speaker (R)

Speaker (L)

R

L

SPEAKERS OUT
(IMPEDANCE3Ω

)

RADIO ANT

FM

AM

FRONT

LED

Speaker 

Speaker

R

L

SPEAKERS OUT

(IMPEDANCE3Ω

)

RADIO ANT

FM

AM

FRONT

LED

Rear panel

Cable tie

MX-C830D-XER-ENG-NO AM.indd   12

2010-3-16   8:34:59

Summary of Contents for MX-C830D

Page 1: ... MINI COMPONENT SYSTEM user manual Imagine the possibilities Thank you for purchasing this Samsung product To receive more complete service please register your product at www samsung com register MX C830D ...

Page 2: ...RNING To reduce the risk of fire or electric shock do not expose this appliance to rain or moisture CAUTION Apparatus shall not be exposed to dripping or splashing and no objects filled with liquids such as vases shall be placed on the apparatus The Mains plug is used as a disconnect device and shall stay readily operable at any time This apparatus shall always be connected to a AC outlet with a p...

Page 3: ...ack in its case Store your cassettes in a clean place out of direct sunlight where they will not be exposed to high temperatures Avoid using 120 minute cassettes as they place unnecessary strain on the tape mechanism License ABOUT DIVXVIDEO DivX is a digital video format created by DivX Inc This is an official DivX Certified device that plays DivX video Visit www divx com for more information and ...

Page 4: ...Connecting the FM Antenna Setup 16 16 Before Starting Initial Setting 16 Setting the Setup menu 17 Display 17 TV Aspect 17 Audio 17 DRC Dynamic Range Compression 17 AV SYNC 18 System 18 Initial Setting 18 DivX R Registration 18 Language 18 Security 18 Parental Rating 18 Change Password 18 Support 18 Product Information Basic Functions 19 19 Disc Playback 19 Audio CD CD DA MP3 WMA Playback 20 JPEG ...

Page 5: ... 5 10cm Do not place the product on amplifiers or other equipment which may become hot Make sure the ventilation slots are not covered Do not stack anything on top of the product Before moving the product ensure the Disc Insert Hole is empty In order to disconnect the product completely from the power supply remove the AC plug from the wall outlet especially when left unused for a long period of t...

Page 6: ...0 min single sided Approx 160 min double sided AUDIO CD AUDIO 12 cm 74 min 8 cm 20 min DivX AUDIO VIDEO 12 cm 8 cm Do not use the following types of disc LD CD G CD I CD ROM DVD ROM and DVD RAM discs cannot be played on this product If such discs are played a WRONG DISC FORMAT message appears on the TV screen DVD discs purchased abroad may not play on this product If such discs are played a Wrong ...

Page 7: ...icture CD only the JPEG files in the picture folder can be played Picture discs other than Kodak Fuji Picture CDs may take longer to start playing or may not play at all DVD R RW CD R RW Discs Software updates for incompatible formats are not supported Example QPEL GMC resolution higher than 800 x 600 pixels etc If a DVD R RW disc has not been recorded properly in DVD Video format it will not be p...

Page 8: ... to insufficient power supply you can use a separate power cable to supply power so that it can work properly The connector of the USB cable may differ depending on the manufacturer of the USB device USB card Reader One slot USB card reader and Multi slot USB card reader The USB card reader may not be supported depending on the manufacturer If you install multiple memory devices into a multi card ...

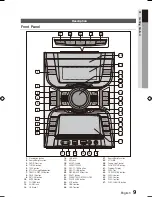
Page 9: ... jack 1 13 USB jack 2 14 MIC jack 15 MIC VOL knob 16 CASSETTE DECK 17 REC TO TAPE button 18 REC TO USB button 19 RIPPING SPEED button 20 PARTY button 21 CASSETTE DOOR OPEN CLOSE 22 PLAY PAUSE button 23 AUX button 24 USB 2 button 25 USB 1 button 26 Search Skip Function 27 VOLUME 28 Tuning Jog Control 29 GIGA SOUND button 30 Window Display 31 DISC Tray 32 OPEN CLOSE button 33 DISC 3 button 34 DISC 2...

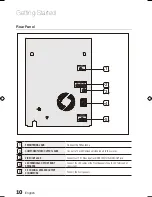
Page 10: ...NT VIDEO OUTPUT JACKS Connect a TV with Component video inputs to these jacks 3 VIDEO OUT JACK Connect your TV s Video Input jack VIDEO IN to the VIDEO OUT jack 4 LED TERMINALS OF THE FRONT SPEAKERS Connect the LED cables of the Front Speakers to each LED Terminals of the system 5 2 0 CHANNEL SPEAKER OUTPUT CONNECTORS Connect the front speakers ...

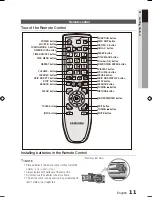
Page 11: ...LS button MUTE button TUNING button PLAY button SKIP RDS DISPLAY button PAUSE button VOLUME button RETURN button SEARCH button TUNING button EXIT button CURSOR ENTER button VOLUME button TAPE REC button STOP button SKIP RDS PTY button SEARCH button Installing batteries in the Remote Control NOTE Place batteries in the remote control so they match the polarity to and to Always replace both batterie...

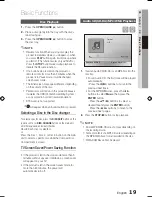
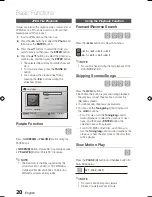
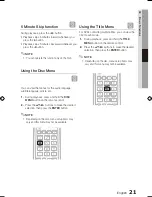
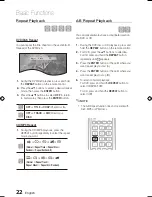
Page 12: ... the speaker falls When connecting the speaker wires to the speakers make sure that the polarity is correct NOTE If you place a speaker near your TV set screen color may be distorted because of the magnetic field generated by the speaker If this occurs place the speaker away from your TV set Connecting the LED cables Connect the LED cables of the Front Speakers to each LED Terminals of the system ...

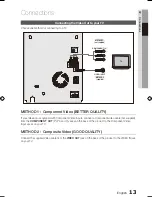
Page 13: ...nt video cable not supplied from the COMPONENT OUT Pr Pb and Y Jacks on the back of the product to the Component Video Input Jacks on your TV METHOD 2 Composite Video GOOD QUALITY Connect the supplied Video cable from the VIDEO OUT jack on the back of the product to the VIDEO IN jack on your TV Connections R L SPEAKERS OUT IMPEDANCE3Ω FRONT LED FM ANT COMPONENT IN VIDEO INPUT TV METHOD 2 supplied ...

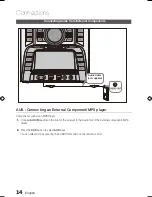
Page 14: ...as an MP3 Player Connect 1 AUX IN Audio on the front of the product to the Audio Out of the external component MP3 player Press the 2 AUX button to select AUX input You can select AUX by pressing the FUNCTION button on the remote control E A S Y S E A RCHING JOG MASTER VOL U M E VIVID LED LIGHTING SYSTEM Audio Cable not supplied ...

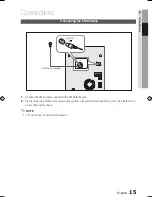
Page 15: ...o the FM Antenna jack 1 Slowly move the antenna wire around until you find a location where reception is good then fasten it to a 2 wall or other rigid surface NOTE This product does not receive AM broadcasts R L SPEAKERS OUT IMPEDANCE3Ω FRONT LED FM ANT FM Antenna supplied Connections ...

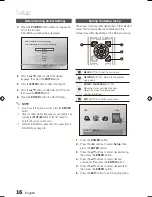
Page 16: ...r more than 5 seconds with no disc When the Initial Setting screen does not appear refer to Initial Setting see page18 Setting the Setup menu The access step may differ depending on the selected menu The GUI Graphical User Interface in this manual may differ depending on the firmware version 2 1 4 3 1 MENU Button Display the home menu 2 RETURN Button Return to the previous setup menu 3 ENTER DIREC...

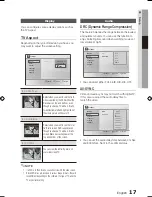
Page 17: ... Wide You can view the full 16 9 picture on your widescreen TV NOTE If a DVD is in the 4 3 ratio you cannot view it in the wide screen Since DVD discs are recorded in various image formats they will look different depending on the software the type of TV and the TV aspect ratio setting Audio DRC Dynamic Range Compression This feature balances the range between the loudest and quietest sounds You c...

Page 18: ...try see page 35 You cannot select OTHERS in the OSD Language a a menu NOTE The selected language will only appear if it is supported on the disc Security The Parental Lock function works in conjunction with DVDs that have been assigned a rating which helps you control the types of DVDs that your family watches There are up to 8 rating levels on a disc Parental Rating Select the rating level you wa...

Page 19: ...ere you left off This function works only with DVDs Press the STOP button twice during playback to disable the Resume function If no buttons are pressed on the product or remote control for more than 5 minutes when the product is in Pause mode it will be changed screen saver mode The initial screen may appear different depending on the content of the disc Pirated discs will not run in this product...

Page 20: ...se NOTE The maximum resolutions supported by this product are 5120 x 3480 or 19 0 MPixel for standard JPEG files and 2048 x 1536 or 3 0 MPixel for progressive image files Using the Playback Function Forward Reverse Search dBAD Press the buttons for Search Function 1 2 3 4 1 2 3 4 NOTE No sound is heard during the fast playback of the DVD MP3 DivX CD Skipping Scenes Songs dBAD Press the buttons Eac...

Page 21: ...playback press and hold the 1 DISC MENU button on the remote control Press the 2 _ buttons to make the desired selection then press the ENTER button NOTE Depending on the disc menu setup items may vary and this menu may not be available Using the Title Menu d For DVDs containing multiple titles you can view the title of each movie During playback press and hold the 1 TITLE MENU button on the remot...

Page 22: ...t B Normal Repeat Track Repeat Disc Random Repeat Section A B A Normal Repeat Track Repeat Album Repeat All Random A B Repeat Playback dB You can repeatedly play back a designated section of a DVD or CD During the DVD disc or CD playback press and 1 hold the REPEAT button on the remote control For DVD press the 2 buttons to select A For CD press and hold the REPEAT button repeatedly until appears ...

Page 23: ...ach movie will be identified as a Title Chapter Most DVD discs are recorded in chapters so that you can quickly find a specific chapter Playing time Allows playback of the film from a desired time You must enter the starting time as a reference The time search function does not operate on some discs Audio Refers to the film s soundtrack language A DVD Disc can contain up to 8 audio languages Subti...

Page 24: ...h video extraction and editing in order to use this feature properly To use the caption function save the caption file smi in the same file name as that of the DivX media file avi within the same folder Example Root Samsung_007CD1 avi Samsung_007CD1 smi Up to 60 alphanumeric characters or 30 East Asian characters 2 byte characters such as Korean and Chinese for the file name The subtitle of DivX f...

Page 25: ...uitable for cinema MATRIX You will hear multi channel surround sound NOTE When CD Recording the DSP EQ function can t work and the DSP EQ automatically covery to PASS mode This function is not available during playback of an DVD disc GIGA SOUND The product is equipped with the GIGA SOUND function The GIGA SOUND function amplifies bass and improves high key or bass twice as much for you to apprecia...

Page 26: ...NOTE This applies only when listening to an FM station Presetting Stations Example Presetting FM 89 10 in the memory Press the 1 FUNCTION button to select FM Press the 2 STOP button on the front panel to select MANUAL mode Press the 3 TUNING button to select 89 10 Press the 4 ENTER button Number flashes on the display Press the 5 buttons on the front panle to select preset number You can select be...

Page 27: ...als the following characters are used The display window cannot differentiate upper case and lower case letters and always uses upper case letters The display window cannot show accented letters A for instance may stands for accented A s like À Â Ä Á Å and à PTY Program Type indication and PTY SEARCH function One of the advantages of the RDS service is that you can locate a particular kind of prog...

Page 28: ...tion Press the OPEN CLOSE button to open the Compact Disc tray Insert a CD and press the OPEN CLOSE button to close the Compact Disc tray Use the CD selection or buttons to select the desired song Tuner See page 26 Select TUNER by pressing the TUNER button on the main unit Adjust the Radio frequency you want to record USB Device See page 32 Connect the external USB storage device to the USB jack 1...

Page 29: ...or off automatically you must cancel the timer Example You wish to wake up to music every morning Switch the system on by pressing the 1 STANDBY ON button Press and hold the 2 TIMER CLOCK button and then press _ or buttons until TIMER is displayed Press the 3 ENTER button Result ON TIME is displayed for a few seconds followed by any switch on time already set you can set the timer switch on time S...

Page 30: ...s and hold TIMER ON 2 OFF again Result is displayed again Party Function PARTY The product has a special effect light When you select PARTY mode the light will changed with the music playback Press the 1 PARTY button Each time you press the PARTY button on the main unit the party mode will change as follows PARTY 1 PARTY 2 PARTY 3 OFF Sleep Timer Function You can set the time that the DVD player w...

Page 31: ...onnecting the Headphones You can connect a set of headphones to your mini compact system so that you can listen to music or radio programme without disturbing other people in the room The headphones must have a 3 5ø jack or an appro priate adapter Connect the headphones to the PHONES jack 1 on the main unit Result The speakers are no longer used to output the sound NOTE Prolonged use of headphones...

Page 32: ...device Switch the system on by pressing the 1 STANDBY ON button Connect the external USB storage device you 2 want to record to the USB jack 2 of the main unit Play a Disc or a Casette Tape adjust the Radio 3 frequency or connect the external source to the main unit CD See page 19 Press the CD button on the main unit to select the CD function Press the OPEN CLOSE button to open the Compact Disc Co...

Page 33: ...n the FAT file system The NTFS file system is not supported When you use CD high speed search function the CD recording can t work Sometimes the recording time may be longer with some USB devices See page 8 When the CD recording the DSP EQ and GIGA SOUND functions can not work and automatically change to PASS When the CD recording the REPEAT function can not work and automatically changes to OFF E...

Page 34: ...rely damaged The remote control does not work Is the remote control being operated within its operation range of angle and distance Are the batteries drained Disc is rotating but no picture is produced Picture quality is poor and picture is shaking Is the TV power on Are the video cables connected properly Is the disc dirty or damaged A poorly manufactured disc may not be playable Audio language a...

Page 35: ...acedonian 1489 Russian 1529 Tigrinya 1039 Amharic 1149 Spanish 1253 Icelandic 1350 Malayalam 1491 Kinyarwanda 1531 Turkmen 1044 Arabic 1150 Estonian 1254 Italian 1352 Mongolian 1495 Sanskrit 1532 Tagalog 1045 Assamese 1151 Basque 1257 Hebrew 1353 Moldavian 1498 Sindhi 1534 Setswana 1051 Aymara 1157 Persian 1261 Japanese 1356 Marathi 1501 Sangro 1535 Tonga 1052 Azerbaijani 1165 Finnish 1269 Yiddish...

Page 36: ...e Sided Single Layer Disc 135 min CD 12 cm COMPACT DISC Reading Speed 4 8 5 6 m sec Maximum Play Time 74 min CD 8 cm COMPACT DISC Reading Speed 4 8 5 6 m sec Maximum Play Time 20 min Video Audio Component Video Y 1 0 Vp p 75 Ω load Pr 0 70 Vp p 75 Ω load Pb 0 70 Vp p 75 Ω load Amplifier Front speaker output GIGA Sound off GIGA Sound on 60 W 3 Ω 280 W 3 Ω 100Hz Frequency range 20Hz 20KHz S N Ratio ...

Page 37: ... 10 Min www samsung com nl NORWAY 3 SAMSUNG 7267864 www samsung com no POLAND 0 801 1SAMSUNG 172678 022 607 93 33 www samsung com pl PORTUGAL 80820 SAMSUNG 726 7864 www samsung com pt SLOVAKIA 0800 SAMSUNG 726 7864 www samsung com sk SPAIN 902 1 SAMSUNG 902 172 678 www samsung com es SWEDEN 0771 726 7864 SAMSUNG www samsung com se U K 0845 SAMSUNG 7267864 www samsung com uk EIRE 0818 717 100 www s...

Page 38: ...Code No AH68 02264P ...
Reviews: