background image

english - 

if you make a scheduled viewing list of programs you may 

like to see, the channel will be automatically switched to the 

scheduled program at the scheduled time even if you are 

watching another program.

Press the 

d.menu 

button to display the DTV menu.

Press the 

enter/oK

 button, to select "Guide".

Press the 

▲ or ▼

 button to select "Scheduled List", then  


press the 

enter/oK

 button.

Press the red button. 


The channel will be switched to the scheduled program.

Press the 

enter/oK

 button to select an item and adjust with  


the ◄ or ► button .


 You can also set hour and minute by pressing the number  


  buttons on the remote control.


• 

Channel: 

Set the channel.


• 

time: 

Set the time.


• 

date: 

Set Year, Month and Day.


• 

Frequency: 

Set the frequency.  


("Once", "Daily", or "Weekly")

After setting the schedule, Press the red button.

Press the 

exit

 button to exit.

  The Scheduled list may be displayed in the EPG menu. 

  •

 Save

: Save the adjusted schedule. 


• 

Cancel

: Cancel the adjusted schedule. 


• 

add Programme

: Add a new schedule. 


• 

edit

: Re-adjust the selected schedule. 


• 

delete

: Delete the selected schedule.

You can preset the default guide style.

Press the 

d.menu 

button to display the DTV menu.

Press the 

enter/oK

 button, to select "Guide".

Press the 

▲ or ▼

 button to select "Default Guide", then press  


the 

enter/oK

 button.

Select "Now/Next" or "Full Guide" using the 

▲ or ▼

 button,  


and press the 

enter/oK

 button.

Press the 

exit

 button to exit.

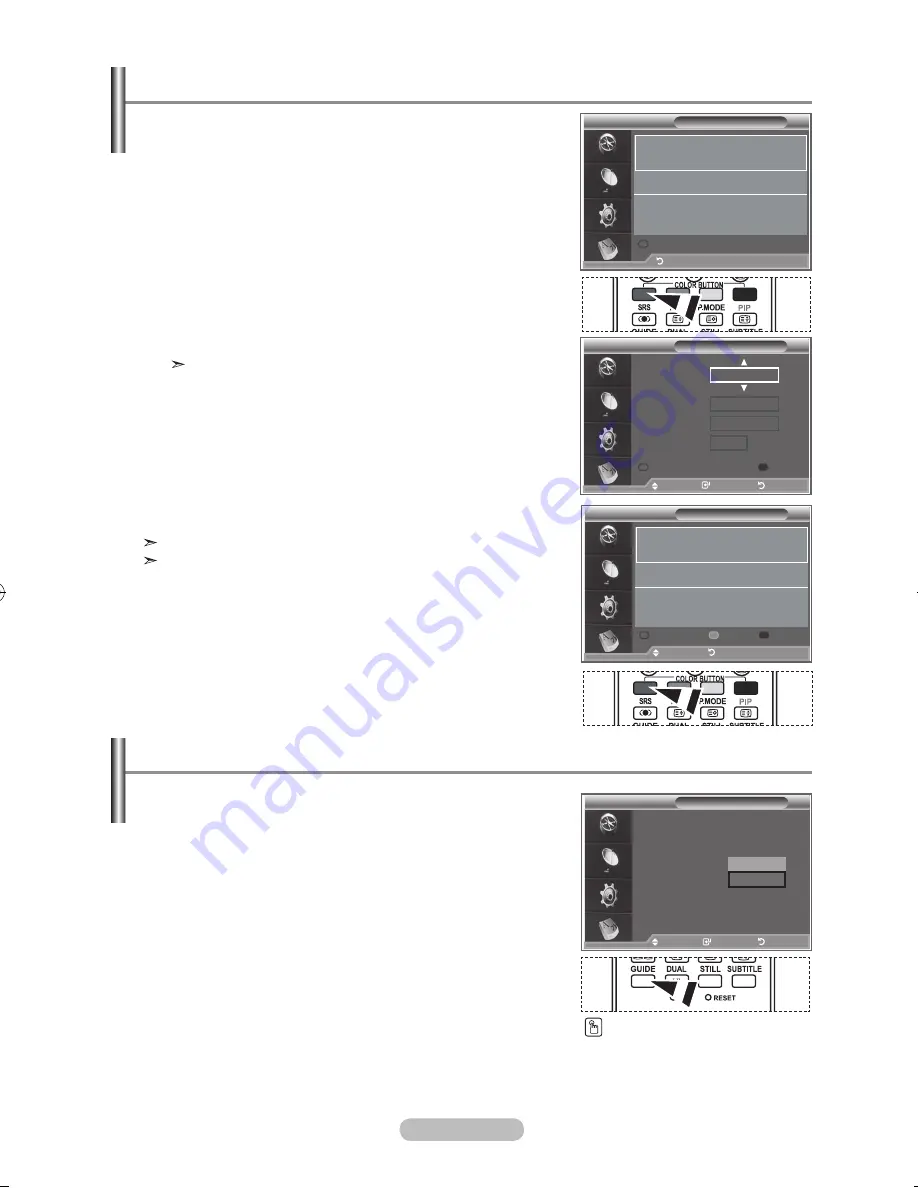
using the Scheduled list

Scheduled list

(no programmes)

return

Add Programme

Scheduled list

tuesday    apr        :0 ~ :00        once 
0  raitre

move 

return

Add Programme

Edit

Delete

Scheduled list

Channel

adjust 

 move 

return

Save

Cancel

time

date

Frequency

0 raiuno

 : 0 to -- : --

tue  apr 00

once

Setting the default guide

move 

enter 

 return

guide

now & next guide

Full guide 


Scheduled list     


default guide 

: Full guide  

now/next

Full guide

move 

enter 

return

  You can select these options 

  by simply pressing the 

guide


button on the remote control.

BN68-01180A-01Eng-0320.indd   38

2007-03-20   �� 6:15:32

Summary of Contents for LA32S81BD

Page 1: ...____ Country AUSTRALIA CHINA HONG KONG INDIA INDONESIA JAPAN MALAYSIA PHILIPPINES SINGAPORE THAILAND TAIWAN VIETNAM SOUTH AFRICA U A E Customer Care Centre 1300 362 603 800 810 5858 010 6475 1880 3698 4698 3030 8282 1800 1100 11 0800 112 8888 0120 327 527 1800 88 9999 1800 10 SAMSUNG 7267864 1800 SAMSUNG 7267864 1800 29 3232 02 689 3232 0800 329 999 1 800 588 889 0860 7267864 SAMSUNG 800SAMSUNG 72...

Page 2: ...he LCD TV in 4 3 format for a long period of time may leave traces of borders displayed on the left right and center of the screen caused by the difference of light emission on the screen Playing a DVD or a game console may cause a similar effect to the screen Damages caused by the above effect are not covered by the Warranty Displaying still images from Video games and PC for longer than a certai...

Page 3: ...SRS TS XT 24 Adjusting the Volume Automatically 24 Selecting the Internal Mute 25 Listening to the Sound of the Sub Picture 25 Resetting the Sound Settings to the Factory Defaults 26 Connecting Headphones 26 Selecting the Sound Mode 26 Setting the Time Setting and Displaying the Current Time 27 Selecting the Sleep Timer 27 Switching the Television On and Off Automatically 28 Function Description U...

Page 4: ...ng Up Your Remote Control 48 Remote Control Codes 50 Setting the PC Setting up Your PC Software Based on Windows XP 53 Display Modes 53 Setting the PC 54 Wall Mount Adjustment LA40S81BD LA46S81BD Sold separately 55 Recommendations For Use Using the Anti Theft Kensington Lock 56 Troubleshooting Before Contacting Service Personnel 56 Technical and Environmental Specifications 57 Symbol Press Importa...

Page 5: ... card Safety Guide Registration Cards Not available in all locations The stand and stand screw may not be included depending on the model Wall mount items sold separately allow you to mount the TV on the wall For detailed information on installing the wall mount see the instructions provided with the Wall Mount items Contact a technician for assistance when installing the wall mounted bracket Sams...

Page 6: ...menu use the buttons as you use the and buttons on the remote control 4 Press to change channels In the on screen menu use the buttons as you use the 5 and 6 buttons on the remote control Without the Remote Control you can turn on the TV by using the Channel buttons 5 Speakers 6 Power Press to turn the TV on and off Power Indicator Blinks and turns off when the power is on and lights up in stand b...

Page 7: ...able 1 Connecting External A V Devices AV IN 1 Connect RCA cable to an appropriate external A V device such as VCR DVD or Camcorder Connect RCA audio cables to R AUDIO L on the rear of your set and the other ends to corresponding audio out connectors on the A V device 2 Connecting AUDIO Connect RCA audio cables to R AUDIO L on the rear of your set and the other ends to corresponding audio out conn...

Page 8: ...for sound output Supported modes for HDMI DVI and Component This will result in a blank screen being displayed 4 Connecting an Aerial or Cable Television Network To view television channels correctly a signal must be received by the set from one of the following sources An outdoor aerial A cable television network A satellite network 6 Connecting External A V Devices Connect RCA or S VIDEO cable t...

Page 9: ...omponent devices DVD are sometimes labeled Y B Y and R Y or Y Cb and Cr Connect RCA audio cables optional to R AUDIO L on the rear of your set and the other ends to corresponding audio out connectors on the DVD This LCD TV displays its optimum picture resolution in 720p mode This LCD TV displays its maximum picture resolution in 1080i mode Kensington Lock The Kensington lock optional is a device u...

Page 10: ...ber of buttons on the remote control e g Selects a target device volume channel buttons light up for a few seconds and then turn off to save power This function is to conveniently use the remote control at night or when dark Available source selection Previous channel DTV menu display a Selects the HDMI mode directly b P Next channel P Previous channel c Exit the OSD d Control the cursor in the me...

Page 11: ...switch your set back on simply press the POWER numeric buttons 0 9 TV DTV button or channel up down button again Do not leave your set in standby mode for long periods of time when you are away on holiday for example It is best to unplug the set from the mains and aerial Placing Your Television in Standby Mode 1 Lift the cover at the back of the remote control upward as shown in the figure 2 Insta...

Page 12: ...n Please check that the area cable is connected correctly 4 The message Some DTV functions may not be available Digital Scan is displayde with Yes or No selected Press the or buttons to select Yes or No then the ENTER OK button 5 The Auto Store menu is displayed with the Start selected Press the ENTER OK button The channel search will start and end automatically After all the available channels ar...

Page 13: ...ranges available to you and availability depends on your country Automatically allocated programme numbers may not correspond to actual or desired programme numbers However you can sort numbers manually and clear any channels you do not wish to watch 1 Press the MENU button to display the menu Press the or button to select Channel then press the ENTER OK button 2 Press the or button to select Auto...

Page 14: ... Select the sound standard required by pressing the or button then press the ENTER OK button If there is an abnormal sound or no sound re select the sound system required 9 If you know the number of the channel to be stored press the or button to select Channel Press the ENTER OK button Select C Air channel or S Cable channel by pressing the or button Press the button to select channel Select the ...

Page 15: ...te control can release the Child Lock setting so keep the remote control away from children 1 Press the MENU button to display the menu Press the or button to select Channel then press the ENTER OK button 2 Press the or button to select Channel Manager then press the ENTER OK button 3 Press the or button to select Child Lock then press the ENTER OK button 4 Press the or button to select On or Off ...

Page 16: ...when channel information is broadcast These names can be changed allowing you to assign new names 1 Press the MENU button to display the menu Press the or button to select Channel then press the ENTER OK button 2 Press the or button to select Name then press the ENTER OK button 3 If necessary select the channel to be assigned to a new name by pressing the or button Press the ENTER OK button The se...

Page 17: ...sing the or button and then press the ENTER OK button Fine Tuning Channel Reception Fine Tune P 1 Adjust Save Return 0 Reset TV Channel Auto Store Manual Store Channel Manager Sort Name Fine Tune LNA Off Move Enter Return If the TV is operating in a weak signal area sometimes the LNA function can improve the reception a low noise preamplifier boosts the incoming signal 1 Press the MENU button to d...

Page 18: ...DTV only Adjusts the colour of objects making them more red or green for a more natural look Your set has several settings which allow you to control picture quality 1 To select the desired picture effect follow the Changing the Picture Standard instructions number 1 to 3 2 Press the or button to select a particular item Press the ENTER OK button 3 Press the or button to decrease or increase the v...

Page 19: ...Cool1 menu Cool1 Makes whites bluish Normal Keeps whites white Warm1 Makes whites reddish Warm2 Makes the colour temperature redder than Warm1 menu The adjusted values are stored according to the selected Picture mode When the picture mode is set to Dynamic or Standard Warm1 and Warm2 cannot be selected Picture Mode Dynamic Contrast 100 Brightness 45 Sharpness 75 Colour 55 Tint G50 R50 Colour Tone...

Page 20: ...al setting White Balance R Offset G Offset B Offset R Gain G Gain B Gain Reset You can adjust the color temperature for more natural picture colors R Offset G Offset B Offset R Gain G Gain B Gain Changing the adjustment value will refresh the adjusted screen Select the required option by pressing the or button then press the ENTER OK button Press the or button until you reach the optimal setting R...

Page 21: ...ponent1 component2 HDMI mode In PC Mode only 16 9 and 4 3 mode can be adjusted Just Scan Mode is available only HDMI mode With the HDMI Just Scan picture size depending on the AV devices the screen may be cut off or a specific appears on the screen Zoom Select by pressing the or buttons Use the or button to move the picture up and down After selecting use the or button to magnify or reduce the pic...

Page 22: ...he colors of the sky and grass will be stronger and clearer for a more vivid on screen picture This function is not available in PC mode This function is available in Dynamic mode DNIe Off Demo On This TV includes the DNIe function so as to provide a high visual quality If you set DNIe to on you can view the screen with the DNIe feature activated If you set the DNIe to Demo you can view the applie...

Page 23: ...s the MENU button to display the menu Press the ENTER OK button to select Setup 2 Press the or button to select PIP then press the ENTER OK button 3 Press the ENTER OK button again Press the or button to select On then press ENTER OK button 4 Press the or button to select Source then press ENTER OK button Select a source of the sub picture by pressing the or button and press the ENTER OK button Th...

Page 24: ... button The Programme can be active when the sub picture is set to TV 8 Press the EXIT button to exit You may notice that the picture in the PIP window becomes slightly unnatural when you use the main screen to view a game or karaoke Source Used to select a source of the sub picture Size Used to select a size of the sub picture Position Used to move the sub picture Programme Used to Change the sub...

Page 25: ... select Mode 3 Select the required sound effect by pressing the or button repeatedly and then press the ENTER OK button 4 Press the EXIT button to exit Standard Selects the normal sound mode Music Emphasizes music over voices Movie Provides live and full sound for movies Speech Emphasizes voices over other sounds Custom Selects your custom sound settings Refer to Adjusting the Sound Settings Chang...

Page 26: ...nel is changed This feature allows you to automatically adjust the volume of the desired channel by lowering the sound output when the modulation signal is high or by raising the sound output when the modulation signal is low 1 Press the MENU button to display the menu Press the or button to select Sound then press the ENTER OK button 2 Press the or button to select Auto Volume then press the ENTE...

Page 27: ...e Off Internal Mute Off Sound Select Main Reset Move Enter Return Off On During the PIP features activation you can listen to the sound of the sub picture 1 Press the MENU button to display the menu Press the or button to select Sound then press the ENTER OK button 2 Press the or button to select Sound Select then press the ENTER OK button 3 Press the or button to select Sub Press the ENTER OK but...

Page 28: ... sound mode is displayed on the screen Audio Type Mono Stereo Dual Mono Stereo Dual DUAL 1 2 MONO STEREO MONO DUAL 1 DUAL 2 MONO MONO STEREO MONO DUAL 1 DUAL 2 Default DUAL 1 DUAL 1 Automatic change Automatic change FM Stereo NICAM Stereo If the stereo signal is weak and an automatic switching occurs then switch to the Mono You can connect a set of headphones to your set if you wish to watch a TV ...

Page 29: ...es after which the television automatically switches to standby mode 1 Press the MENU button to display the menu Press the or button to select Setup then press the ENTER OK button 2 Press the or button to select Time then press the ENTER OK button 3 Press the or button to select Sleep Timer then press the ENTER OK button 4 Press the or button until the desired time appears Off 30 60 90 120 150 180...

Page 30: ...n 3 Press the or buttons to adjust On Timer then press the button to move to the next step Set other items using the same method as above Repeat Select a Once Everyday Mon Fri Mon Sat Sat Sun Press the or button Volume Adjust a 0 100 Press the or button Programme Adjust a 00 99 Press the or button When finished press the RETURN button to return The current time will appear every time you press the...

Page 31: ...f Melody Off PC Home Theatre PC Off sMore Move Enter Return TV Setup Plug Play Language English Time Game Mode Off Blue Screen O Melody Off PC Home Theatre PC Off sM Move Enter Return Off On Blue Screen If no signal is being received or the signal is very weak a blue screen automatically replaces the noisy picture background If you wish to continue viewing the poor picture you must set the Blue Sc...

Page 32: ...ENTER OK button 2 Press the or button to select Home Theatre PC Press the ENTER OK button 3 Press the or button to select On or Off Press the ENTER OK button 4 Press the EXIT button to exit This function is available only in PC mode Setting the Home Theatre PC TV Setup Plug Play Language English Time Game Mode Off Blue Screen Off Melody Off PC Home Theatre PC Off sMore Move Enter Return TV Setup P...

Page 33: ...he TV screen in accord with the scenes Using the Energy Saving Feature 1 Press the MENU button to display the menu Press the or buttons toselect Setup then press the ENTER OK button 2 Press the or buttons to select HDMI Black Level then press the ENTER OK button 3 Press the or buttons to select Normal or Low then press the ENTER OK button Press the EXIT button to exit This function is active only ...

Page 34: ...g illustration Press the D MENU button Now Next Full Guide Guide Now Next Guide Full Guide Scheduled List Default Guide You can select these options by simply pressing the D MENU button on the remote control Channel Auto Store Manual Store Edit Favourite Channels Channel List Setup Time Zone Menu Transparency Parental Lock Subtitle Audio Format System Product Information Signal Information Softwar...

Page 35: ...l for a fast channel search 1 Press the D MENU button to display the DTV menu 2 Press the or button to select Channel then press the ENTER OK button 3 Press the or button to select Manual Store then press the ENTER OK button 4 To Then Move to Channel Frequency or Bandwidth or button Set the Channel or Bandwidth or button Set the Frequency Numeric button 0 9 Channel Channel 6 12 to 27 69 in sequenc...

Page 36: ...e DTV menu 2 Press the or button to select Channel then press the ENTER OK button 3 Press the or button to select Edit Favourite Channels then press the ENTER OK button 4 Press the red button in the Edit Favourite Channels menu To add more channels refer to the step 5 on the previous description 5 If you want to check the channel to be stored press Return button Press the EXIT button to exit To ad...

Page 37: ...select the channel to be previewed by pressing the or button 2 Press the yellow button The selected channel is displayed on the screen Delete 1 In the Edit Favourite Channels menu select the channel to be deleted from the favourite channels list by pressing the or button 2 Press the blue button The selected channel and number will be deleted To add a deleted channel back into the favourite channel...

Page 38: ... the top left corner while changing the channel The channel number and name are displayed if the channel is one of the all channels and a icon if the channel is one of the favourite channels 8 Press the exit or CH LIST button to exit from the channel List Selecting Channel List While viewing a channel additional information about the current programme may be displayed 1 While viewing a programme p...

Page 39: ...details about scheduling programmes refer to the next page View programme information Select a programme of your choice by pressing the button Press the INFO button when the programme of your choice is highlighted Toggle between the Now Next Guide or Full Guide Press the red button repeatedly Display the Favourites and the All Channels list Press the green button repeatedly Scrolls backwards quick...

Page 40: ...displayed in the EPG menu Save Save the adjusted schedule Cancel Cancel the adjusted schedule Add Programme Add a new schedule Edit Re adjust the selected schedule Delete Delete the selected schedule You can preset the default guide style 1 Press the D MENU button to display the DTV menu 2 Press the ENTER OK button to select Guide 3 Press the or button to select Default Guide then press the ENTER ...

Page 41: ...he channel list update All channels are displayed in the all channel mode Favourites favourite channels is the list of channels that has been set in the Edit Favourite Channels menu refer to page 34 Viewing All Channels and Favourite Channels All Channels Now Next Guide 13 28 Wed 16 Feb INFO Watch Exit Full Guide Favourites Now Next Extreme Machines Armoured Cars 27 Discovery 18 00 22 00 Full Guid...

Page 42: ...Parental Lock group are displayed with the Parental Rating selected The default PIN code for a new TV set is 0000 If you enter an invalid PIN code the Invalid PIN code Please try again message is displayed 6 Press the ENTER OK button 7 Press the or button to select the age rating you want to lock out Press the ENTER OK button 8 If you want to change the PIN code select Change PIN by pressing the o...

Page 43: ...unction 1 Press the D MENU button to display the DTV menu 2 Press the or button to select Setup then press the ENTER OK button 3 Press the or button to select Audio Format then press the ENTER OK button 4 Press the EXIT button to exit The Audio Format appears according to the broadcasting signal Dolby digital sound is only available when the TV is connected with an external speaker using an optica...

Page 44: ...u select Upgrade Now the iDTV immediately installs the new upgrade and then restarts Upgrade Later If you select Upgrade Later the upgrade is postponed until the next restart or channel change some 90 minutes later when the upgrade dialog appears again Don t Upgrade If you select Don t Upgrade the iDTV does not perform the upgrade and the software upgrade banner is not displayed again The upgrade ...

Page 45: ...until the software upgrade is completed 6 To switch to an alternative version press the red button Press the blue button to reset activate the upgrade and restart 7 Press the EXIT button to exit Software Upgrade Software Information Manual Upgrade Standby Mode upgrade On Move Enter Return Software Upgrade Software Information Manual Upgrade Standby Mode upgrade On Move Enter Return Mode Custom Equ...

Page 46: ... and user preferences will be lost and returned to the factory defaults It is recommended that a reset is performed only when serious problems are experienced Return Selecting the Preferred Language Subtitle Audio You can change the default value for subtitle audio languages Displays the language information for the incoming stream 1 Press the D MENU button to display the DTV menu 2 Press the or b...

Page 47: ... Move Enter Return Mode Custom Equalizer SRS TSXT Off Auto Volume Off If Reset Move Enter Return TV Input Source List TV Edit Name Move Enter Return Mode Custom Equalizer SRS TSXT Off Auto Volume Off Internal Mute Off Reset Move Enter Return TV Source List TV AV1 AV2 S Video Component1 Component2 PC HDMI1 HDMI2 dtV Move Enter Return Mode Custom Equalizer SRS TSXT Off Auto Volume Off Internal Mute ...

Page 48: ...n 4 Press the TV DTV button to exit from the Text display If any broken character appears while Text is being viewed make sure that the Text language is identical with the language in the Setup menu mode If both languages are different select the same language with the Text language on the Setup menu Teletext Decoder Most set channels carry teletext pages of written information that provide inform...

Page 49: ...n A secondary page by entering its 4 digit number The next page The previous page Double size letters in the Upper half of the screen Lower half of the screen Normal screen Press the TEXT MIX INFO INFO PRE CH P P P SIZE Once Twice Three times Using Fastext to Select a Teletext Page The various topics included in the teletext pages are colour coded and can be selected by pressing the coloured butto...

Page 50: ...e to Operate Your Cable Box 1 Turn off your cable box 2 Press the CABLE button on your TV s remote control 3 Press the SET button on your TV s remote control 4 Using the number buttons on your remote control enter three digits of the cable box code listed on page 51 of this manual for your brand of cable box Make sure you enter three digits of the code even if the first digit is a 0 If there is mo...

Page 51: ...Control Modes DVD When your remote control is in DVD mode the volume buttons still control your TV s volume Setting Up the Remote to Operate Your STB 1 Turn off your STB 2 Press the STB button on your TV s remote control 3 Press the SET button on your TV s remote control 4 Using the number buttons on your remote control enter three digits of the STB code listed on page 52 of this manual for your b...

Page 52: ... 021 026 037 062 MARTA 006 MEI 021 MEMOREX 006 021 024 025 MGA 034 MIDLAND 005 MINOLTA 019 041 075 MITSUBISHI 019 034 041 046 Brand Code MONTGOMERY WARD 020 MTC 002 025 MULTITECH 002 005 025 038 NEC 007 008 018 026 037 062 064 OPTIMUS 020 ORION 073 074 075 076 PANASONIC 021 056 071 072 PENTAX 019 041 075 PENTEX RESEARCH 008 PHILCO 021 056 059 PHILIPS 021 080 PIONEER 019 026 039 053 PORTLAND 015 04...

Page 53: ...018 STB DVD COMBO 019 DVD Receiver 020 AV Receiver 021 DVD Brand Code ANAM 030 AUDIOVOX 075 AUDIOLOGIC 085 ANABA 072 APEX DIGITAL 070 071 074 086 083 084 088 111 112 AIWA 114 BROKSONIC 062 BLAUPUNKT 074 B K 122 123 CURTIS MATHES 027 CYBER HOME 077 078 079 082 CLARION 080 125 CIRRUS 081 CYBER HOME 065 CINEVISION 095 DAEWOO 066 DENON 146 FARENHEIT 067 068 FISHER 090 GPX 060 GO VIDEO 061 089 133 135 ...

Page 54: ...ite STB HDD COMBO Standard 009 SET TOP BOX Brand Code ALPHASTAR 023 ANAM 043 CHANNEL MASTER 018 034 CROSSDIGITAL 019 CHAPARRAL 035 DIRECT TV 015 016 017 019 022 045 060 061 062 065 066 067 068 DAEWOO 074 DISH NETWORK SYSTEM 069 070 DISHPRO 069 DRAKE 018 024 032 DX ANTENNA 027 ECHOSTAR 025 069 070 071 EXPRESSVU 069 GOI 069 GE 065 GENERALINSTRUMENT 046 047 048 063 064 HTS 069 HOME CABLE 056 HITACHI ...

Page 55: ...ommended All resolutions between the supported limits are supported Mode Resolution Horizontal Frequency kHz Vertical Frequency Hz Pixel Clock Frequency MHz Sync Polarity H V IBM 640 x 350 640 x 480 720 x 400 31 469 31 469 31 469 70 086 59 940 70 087 25 175 25 175 28 322 VESA 640 x 480 640 x 480 640 x 480 800 x 600 800 x 600 800 x 600 800 x 600 1024 x 768 1024 x 768 1024 x 768 1024 x 768 1360 x 76...

Page 56: ...ER OK button 3 Press the or button to adjusting the Vertical Position Press the or button to adjust the Horizontal Position Press the ENTER OK button 4 Press the EXIT button to exit Adjusting the PC Screen Automatically Auto Adjustment Auto adjustment allows the PC screen of set to self adjust to the incoming PC video signal The values of fine coarse and position are adjusted automatically 1 Follo...

Page 57: ...d For product installation and the installation and moving of the wall mount make sure to consult a specialized installation company This installation manual is to be used when attaching the wall mount to a wall When attaching to other building materials please contact your nearest dealer Button Operations Wall mount angle adjustment Tilt Up Tilt Down Move right Move left Reset Moves to the initia...

Page 58: ... move it further away Plug your set into a different mains socket Check the direction location and connections of your aerial This interference is often due to the use of an indoor aerial Replace the remote control batteries Clean the upper edge of the remote control transmission window Check the battery terminals Check that the signal cable is firmly connected to the PC or video sources Check tha...

Page 59: ...th stand 15 kg 22 kg 30 kg Environmental Considerations Operating Temperature Operating Humidity Storage Temperature Storage Humidity 10 C to 40 C 50 F to 104 F 10 to 80 non condensing 20 C to 45 C 4 F to 113 F 5 to 95 non condensing 10 C to 40 C 50 F to 104 F 10 to 80 non condensing 20 C to 45 C 4 F to 113 F 5 to 95 non condensing 10 C to 40 C 50 F to 104 F 10 to 80 non condensing 20 C to 45 C 4 ...

Page 60: ...This page is intentionally left blank ...

Reviews: