background image

58

system setup

59

ENG

  RADIO

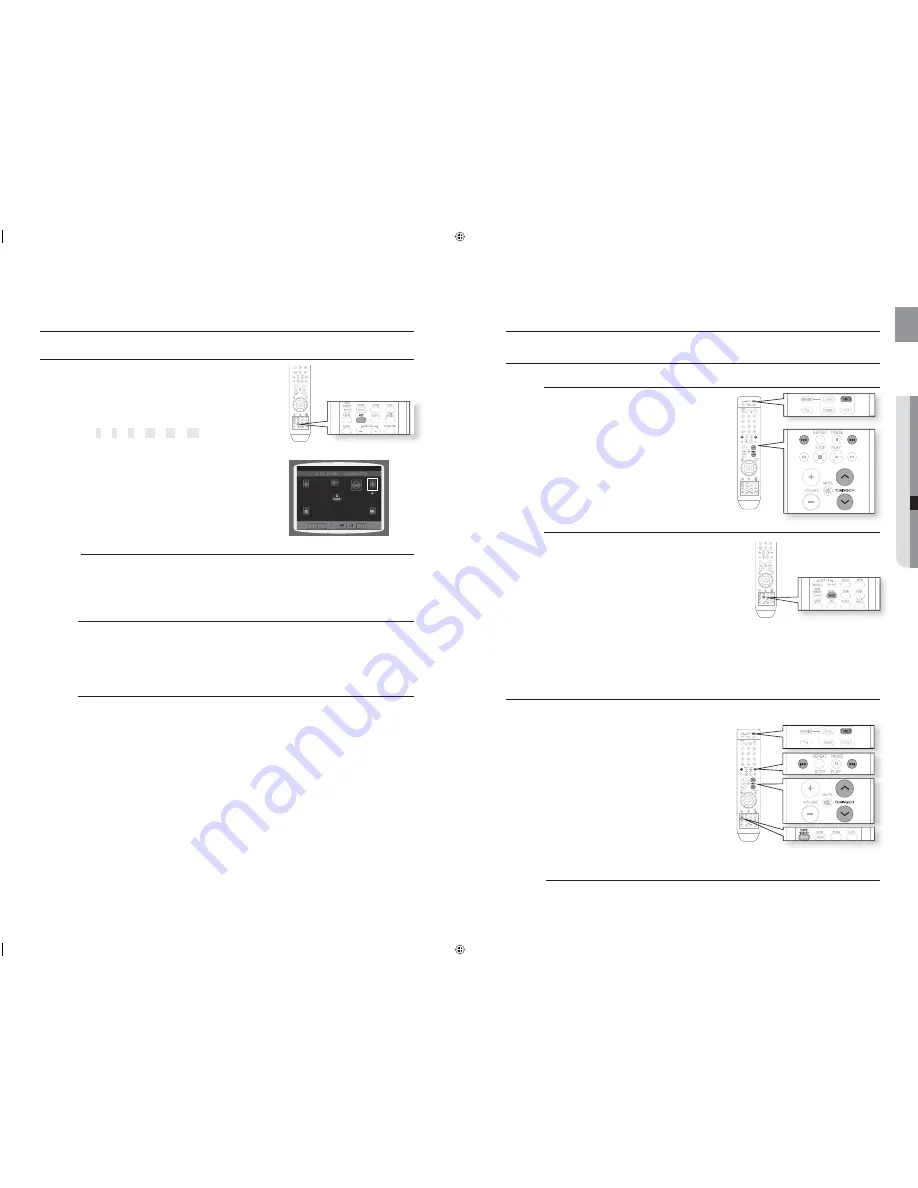
ASC (Auto Sound Calibration) SETUP 

Plug the ASC microphone into the ASC input jack.

Place the ASC microphone at the listening position.

Press 

ASC

 button.

To create the optimal 5.1 channel sound fi eld, the 
selections are in the following sequence: 

 C 

➞ 

 SR 

➞ 

SL 

 SW 

When the message "REMOVE MIC" appears in the display, 
unplug the ASC microphone.

    Setting the ASC function takes about 3 minutes.

To cancel the ASC (Auto Sound Calibration) setup, press ASC 
button.

The tone output stops, "CANCEL ASC" appears in the display followed by "REMOVE MIC", and the 
setup is cancelled.

To listen in the ASC (Auto Sound Calibration) mode, briefl y press 
ASC button.

The selection alternates between ASC ON and ASC OFF in the display.

If you select "ASC ON", you will hear sound in the ASC mode.
If you select "ASC OFF", you will hear sound in the mode set in the audio setting of the setup screen.

1.

2.

3.

4.

M

radio

LISTENING TO RADIO

Remote Control 

Press the

 TUNER

 button to select the FM band.

Tune in to the desired station.

Automatic Tuning 1

 : When the 

#

$

 button is 

pressed, a preset broadcast station is selected.

Automatic Tuning 2

 : Press and hold the 

,

.


button to automatically search for active 
broadcasting stations.

Manual Tuning

 : Briefl y press the 

,

.

 button to 

increase or decrease the frequency incrementally.

Main Unit 

Press the 

FUNCTION

 button to select the FM band.

Select a broadcast station.

Automatic Tuning 1

 : Press the 

STOP

 (

) button to 

select 

PRESET

 and then press the 

#

$

 button to 

select the preset station.

Automatic Tuning 2

 : Press the 

STOP

 (

) button to 

select 

MANUAL

 and then press and hold  the 

#

$


button to automatically search the band.

Manual Tuning

 : Press the 

STOP

 (

) button to select 

MANUAL

 and then briefl y press the 

#

$

 button to 

tune in to a lower or higher frequency.

Press the 

MO/ST

 button to listen in Mono/Stereo.

Each time the button is pressed, the sound switches between STEREO and MONO.

In a poor reception area, select MONO for a clear, interference-free broadcast.

PRESETTING STATIONS

Example : Presetting FM 89.10 in the memory 

Press the 

TUNER

 button to select the FM band.

Press the 

,

.

 button to select 

89.10

.

Press the 

TUNER MEMORY

 button.

01

 fl ashes in the display.

Press the 

#

$

 button to select preset number.

You can select between 1 and 15 presets.

Press the 

TUNER  MEMORY

 button again.

Press the 

TUNER MEMORY

 button before 

Number

 disappears from the display.

Number

 disappears from the display and the 

station is stored in memory.

To preset another station, repeat s 2 to 5.

To tune in to a preset station, press the 

#

$


button on the remote control to select a channel.

This unit does not receive AM broadcasts.

1.

2.

1.

2.


1.

2.

3.

4.

5.

6.

M

HT-X715K_NO EUR_ENG.indd   58-59

HT-X715K_NO EUR_ENG.indd   58-59

2008-7-14   13:00:41

2008-7-14   13:00:41

Summary of Contents for HT-TX715K

Page 1: ...Cinema System user manual imagine the possibilities Thank you for purchasing this Samsung product To receive a more complete service please register your product at www samsung com global register HT X715K HT TX715K ...

Page 2: ... by connecting the Home Cinema to a SAMSUNG TV using an HDMI Cable This is only available with SAMSUNG TVs that support Anynet Bluetooth Function You can use a Bluetooth device to enjoy music with high quality stereo sound all without wires WHAT S INCLUDED Check for the supplied accessories below Video Cable FM Antenna User s Manual Remote Control Batteries AAA size ASC microphone safety informati...

Page 3: ...our player or disc has been stored in cold temperatures If transporting the player during the winter wait approximately 2 hours until the unit has reached room temperature before using Do not expose the unit to direct sunlight or other heat sources This could lead to overheating and malfunction of the unit The batteries used with this product contain chemicals that are harmful to the environment D...

Page 4: ...on available with DVD or DVD R DVD RW discs that have been recorded and finalized in Video Mode B CD This involves a function available with a data CD CD R or CD RW A MP3 This involves a function available with CD R RW discs including USB G JPEG This involves a function available with CD R RW discs including USB D DivX This involves a function available with MPEG4 discs DVD R RW CD R or CD RW Caut...

Page 5: ... only provides encoding formats authorized by DivX Networks Inc a DivX file created by the user might not play Software updates for incompatible formats are not supported Example QPEL GMC resolution higher than 800 x 600 pixels etc Sections with a high frame rate might not be played while playing a DivX file For more information about the formats authorized by DivX Networks Inc please visit www di...

Page 6: ... TV s Video Input jack VIDEO IN to the VIDEO OUT jack EXTERNAL DIGITAL OPTICAL INPUT JACK Use this to connect external equipment capable of digital output TX CARD CONNECTION WIRELESS The TX card enables communication between the main unit and the optional wireless receiver amplifier FM 75Ω COAXIAL JACK Connect the FM antenna COOLING FAN The fan always revolves when the power is on Ensure a minimum...

Page 7: ...LAY button STOP button SEARCH buttons 26 TUNING CH button 27 MUTE button 28 RETURN button 29 CURSOR ENTER button 30 SUBTITLE button 31 EXIT button 32 INFO button 33 LOGO button 34 AUDIO UPSCALE button 35 SOUND EDIT button 36 DSP EQ button 37 ZOOM button 38 S VOL button 39 MIC button Insert Remote Batteries 1 Remove the battery cover in the direction of the arrow 2 Insert two 1 5V AAA batteries pay...

Page 8: ...XI Sears Magnavox Marantz Matsui MGA Mitsubishi MGA 1 2 3 4 5 6 7 8 9 10 11 12 13 14 15 16 17 18 19 20 21 22 23 24 25 26 27 28 29 30 31 32 33 34 35 36 37 38 39 40 41 42 43 56 57 58 01 15 01 02 03 04 05 06 07 08 09 10 11 12 13 14 01 18 40 48 57 58 81 59 60 18 03 03 18 25 97 03 18 46 15 03 05 61 82 83 84 62 03 59 61 63 03 02 03 04 15 16 17 18 19 20 21 22 23 24 25 26 27 28 29 30 32 34 35 36 48 59 90 ...

Page 9: ...speakers You can also install it directly over or under the TV Rear Speakers hj Place these speakers behind your listening position If there isn t enough room place these speakers such that they face each other Place them about 60 to 90cm from your ear facing slightly downward Unlike the front and center speakers the rear speakers are used to handle mainly sound effects and sound will not come fro...

Page 10: ...er R Rear Speaker L Front Speaker L Do not let children play with or near the speakers They could get hurt if a speaker falls When connecting the speaker wires to the speakers make sure that the polarity is correct Keep the subwoofer speaker out of reach of children so as to prevent children from inserting their hands or other objects into the duct hole of the subwoofer speaker Do not hang the sub...

Page 11: ...is about 10m but may vary depending on your operating environment If a steel concrete wall or metallic wall is between the main unit and the wireless receiver module the system may not operate at all because the radio wave cannot penetrate metal This product HT X715K HT TX715K is compatible with the wireless receiver module SWA 3000 Do not insert any other card except the TX card dedicated to the ...

Page 12: ... connection description HDMI connector Supports video and digital audio data HDMI outputs only a pure digital signal to the TV If your TV does not support HDCP High bandwidth Digital Content Protection random noise appears on the screen Why does Samsung use HDMI Analog TVs require an analog video audio signal However when playing a DVD the data transmitted to a TV is digital Therefore either a dig...

Page 13: ...ou can listen to audio through the TV If you select the Theater Select THEATER to connect and set the option of each item below View TV If Anynet HDMI CEC is set to on and you select View TV the Home Cinema will automatically switch to DIGITAL IN mode THEATER Menu You can access and control the Home Cinema menu THEATER Operation The Home Cinema disc playback information will be displayed You can c...

Page 14: ...e FM antenna supplied to the FM 75Ω COAXIAL Jack Slowly move the antenna wire around until you find a location where reception is good then fasten it to a wall or other rigid surface This unit does not receive AM broadcasts Cooling Fan The cooling fan supplies cool air to the unit to prevent overheating Please observe the following cautions for your safety Make sure the unit is well ventilated If ...

Page 15: ...ad a disc vertically into the Disc Insert Hole Place a disc gently into the tray with the disc s label facing up Close the compartment by pressing the PLAY button Playback starts automatically To stop playback press the STOP button during playback If pressed once PRESS PLAY is displayed and the stop position will be stored in memory If the PLAY button or ENTER button is pressed playback resumes fr...

Page 16: ...of the menu Music File Icon To play music files only select the Icon Image File Icon To view image files only select the Icon Movie File Icon To view movie files only select the Icon All File Icon To view all files select the Icon 1 2 3 4 M To play a file icon in the screen JPEG FILE PLAYBACK Images captured with a digital camera or camcorder or JPEG files on a PC can be stored on a CD and then pl...

Page 17: ...ursor button select the desired subtitle from the TV screen and then press the ENTER button When you select the desired DivX file from the TV screen the movie will be played normally DivX Digital internet video express DivX is a video file format developed by Microsoft and is based on MPEG4 compression technology to provide audio and video data over the Internet in real time MPEG4 is used for vide...

Page 18: ...AIN TRACK ELAPSED TRACK REMAIN B TRACK ELAPSED TRACK REMAIN TOTAL ELAPSED TOTAL REMAIN A TRACK REMAIN TRACK ELAPSED M Fast Playback BAD Press the button Each time the button is pressed during playback the playback speed changes as follows 2X 4X 8X 32X X PLAY 2X 4X 8X 32X X PLAY During fast playback of a CD or MP3 CD sound is heard only at 2x speed and not at 4x 8x and 32x speeds Slow Playback D Pr...

Page 19: ...the disc Information Screen B Press the INFO button twice Press the Cursor button to move to REPEAT PLAYBACK display Press the Cursor button to select the desired Repeat Playback mode To select another album and track repeat s 2 and 3 above Press the ENTER button OFF A CHAP TITLE OFF B OFF A TRACK DISC OFF For DivX MP3 and JPEG discs you cannot select Repeat Play from the information display scree...

Page 20: ...er to access See the disc packaging for details and the key number When you play a DVD Audio disc that has a bonus group the key number input screen appears automatically If you eject the disc switch the power off or unplug the player you will need to re enter the key number Navigating Pages DVD AUDIO During playback press the button on the remote control You can select the desired image from a DV...

Page 21: ...s the button on the remote control to move directly to the desired title chapter or track Depending on the disc you may not be able to move to the selected title or time 1 2 3 M 1 2 3 4 5 6 M Using the Disc Menu You can use the menus for the audio language subtitle language profile etc DVD menu contents differ from disc to disc In Stop mode press the MENU button Press the Cursor button or numeric ...

Page 22: ...e s user manual Select the Stereo headset menu on the Bluetooth device You will see a list of scanned devices Select Samsung Home Theater from the searched list When the Home Cinema System is connected to the Bluetooth device the Home Cinema System will display Connect on the front display followed by the device name of the connected Bluetooth device The Home Cinema System connection is complete P...

Page 23: ...port USB Mass Storage v1 0 Cameras that operate as a removable disc in Windows 2000 or later without additional driver installation USB HDD and USB Flash Drive Devices that support USB2 0 or USB1 1 You may experience a difference in playback quality when you connect a USB1 1 device For a USB HDD make sure to connect an auxiliary power cord to the USB HDD for proper operation USB card Reader One sl...

Page 24: ...o move to Setup and then press the ENTER or button Press the Cursor button to move to TV DISPLAY and then press the ENTER or button Press the Cursor button to select the desired item and then press the ENTER button Once the setup is complete you will be taken to the previous screen d Press the RETURN button to return to the previous level d Press the EXIT button to exit the setup screen Adjusting ...

Page 25: ... in No DIsc mode hold the DVD Players STOP button for longer than 5 seconds INITIAL appears on the display and all settings will return to the default values Press the POWER button Using the RESET function will erase all stored settings Do not use this unless necessary 1 2 3 4 5 M 1 2 3 4 5 M MOVE ENTER EXIT RETURN MOVE SELECT EXIT RETURN MOVE SELECT EXIT RETURN MOVE ENTER EXIT RETURN SETTING THE ...

Page 26: ...ING THE DELAY TIME If the speakers cannot be placed at equal distances from the listening position you can adjust the delay time of the audio signals from the center and rear speakers In Stop mode press the MENU button Press the Cursor button to move to Audio and then press the ENTER or button Press the Cursor button to move to DELAY TIME and then press the ENTER or button Press the ENTER button P...

Page 27: ...D EDIT button and then press the Cursor button Each time you press the SOUND EDIT button you can see the balance and level for each speaker Adjusting Front Rear Speaker Balance You can select between 0 dB 6 dB and OFF The volume decreases as you move closer to 6 dB Adjusting Center Rear Subwoofer Speaker Level The volume level can be adjusted in s from 6dB to 6dB The sound gets louder as you move ...

Page 28: ... level d Press the EXIT button to exit the setup screen The default setting of this function is HDMI AUDIO OFF HDMI AUDIO is automatically down mixed to 2ch for TV speakers 1 2 3 4 1 2 3 4 M MOVE ENTER EXIT RETURN MOVE SELECT EXIT RETURN MOVE ENTER EXIT RETURN MOVE SELECT EXIT RETURN SOUND FIELD DSP EQ FUNCTION DSP Digital Signal Processor DSP modes have been designed to simulate different acousti...

Page 29: ...s for an exciting wraparound effect with side wall imaging You can select either 0 or 1 C WIDTH Sound is output to the center speaker only The front left and right speakers produce phantom sound You can select between 0 and 7 DIMENS Incrementally adjusts the sound field DSP from the front or rear You can select between 0 and 6 M 1 2 3 ASC Auto Sound Calibration SETUP By setting the ASC function ju...

Page 30: ...r decrease the frequency incrementally Main Unit Press the FUNCTION button to select the FM band Select a broadcast station Automatic Tuning 1 Press the STOP button to select PRESET and then press the button to select the preset station Automatic Tuning 2 Press the STOP button to select MANUAL and then press and hold the button to automatically search the band Manual Tuning Press the STOP button t...

Page 31: ...drastic volume change in case of a channel change or scene transition Press the S VOL button Each time the button is pressed the selection changes as follows S VOL ON S VOL OFF P BASS P BASS function stresses low tones providing thudding sound effects Press the P BASS button to select P BASS mode PBAS ON PBAS OFF The P BASS function is only available with 2 channel LPCM sources such as mp3 Divx cd...

Page 32: ...nguage correctly set to DOLBY DIGITAL 5 1 CH in the information display The remote control does not work Is the remote control being operated within its operation range of angle and distance Are the batteries exhausted Have you selected the mode TV DVD functions of the remote control TV or DVD correctly SYMPTOM Check Remedy Disc is rotating but no picture is produced Picture quality is poor and pi...

Page 33: ...amera Finepix f450 Fuji Digital Camera C 5060 Olympus Digital Camera Finepix S7000 Fuji Digital Camera X1 Olympus Digital Camera Finepix A310 Fuji Digital Camera U mini Olympus Digital Camera KD 310Z Konica Digital Camera Lumix FZ20 Panasonic Digital Camera Finecam SL300R Kyocera Digital Camera DMC FX7GD Panasonic Digital Camera Finecam SL400R Kyocera Digital Camera Lumix LC33 Panasonic Digital Ca...

Page 34: ...player When condensation forms inside the player the player may not operate correctly If this occurs remove the disc and let the player stand for 1 or 2 hours with the power on M M SPECIFICATIONS General Power Consumption 90 W Weight 4 2 kg Dimensions 449 6 W x 251 5 H x 99 1 D mm Operating Temperature Range 5 C 35 C Operating Humidity Range 10 to 75 Disc DVD Digital Versatile Disc Reading Speed 3...

Page 35: ...om at SWITZERLAND 0800 SAMSUNG 726 7864 www samsung com ch CIS RUSSIA 8 800 555 55 55 www samsung com KAZAHSTAN 8 10 800 500 55 500 www samsung kz UZBEKISTAN 8 10 800 500 55 500 www samsung uz KYRGYZSTAN 00 800 500 55 500 TADJIKISTAN 8 10 800 500 55 500 UKRAINE 8 800 502 0000 www samsung com LITHUANIA 8 800 77777 www samsung lt LATVIA 800 7267 www samsung com lv ESTONIA 800 7267 www samsung ee Asi...

Page 36: ...AH68 02145A ...

Reviews: