background image

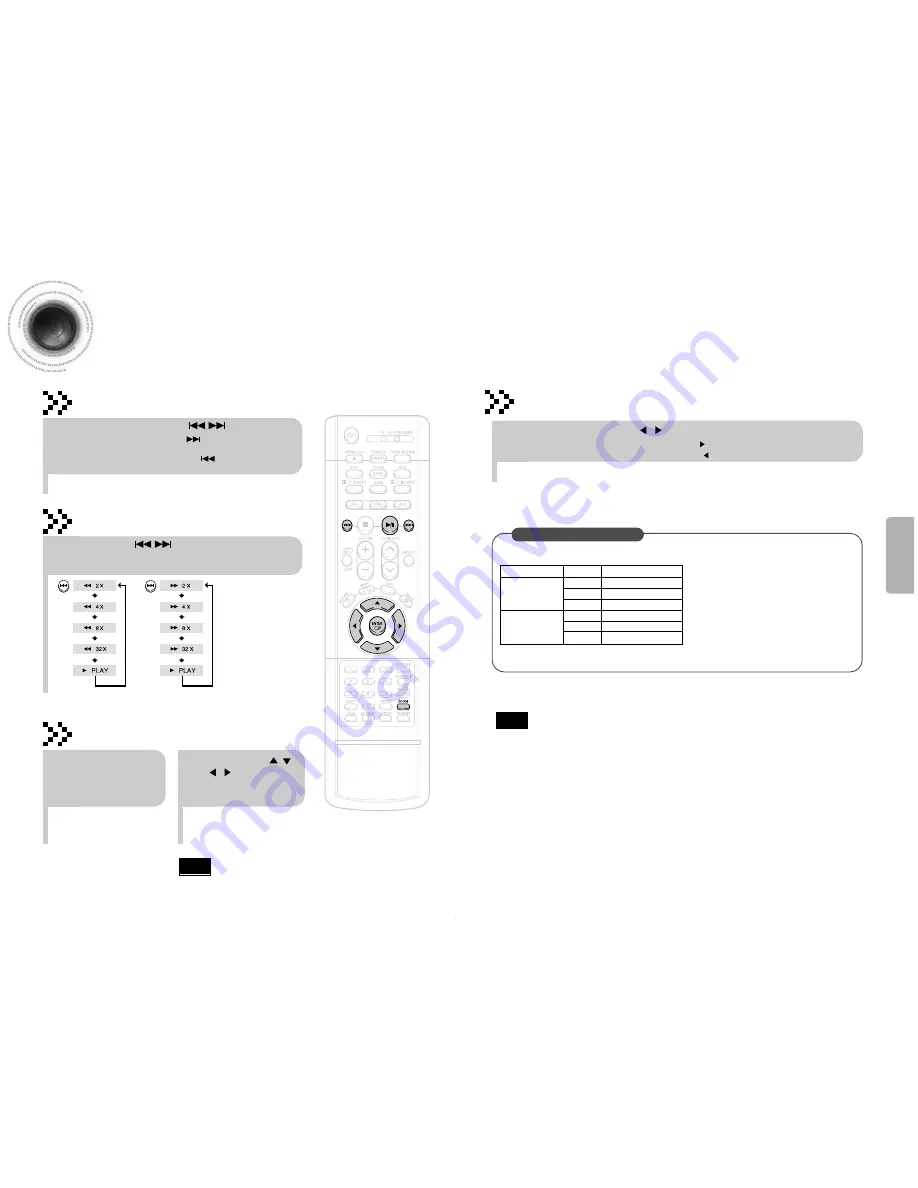
Fast playback

30

DivX Playback

Skip Forward/Back

During playback, press the              button.

Go to the next file whenever you press           button, if there are over 
2 files in the disk. 

Go to the previous file whenever you press           button, if there are over 
2 files in the disk. 

Press and hold                button. 

Each time the button is held down during playback, 
the playback speed changes as follows:

29

OPERA

TION

DIVX file can be zoomed
only in ZOOM X2 mode. 

Note

Zoom Function

2

Press Cursor    ,    ,    

,    buttons to

move to the area
you want to enlarge.

1

Press ZOOM
button.

Each time you press the button,
your selection will toggle between

ZOOM X2

” and “

ZOOM OFF

”.

5 Minute Skip function

When playing the DivX disk, you can play the file with extension of AVI only. 

Among the available DivX audio formats, DTS Audio is not supported.

WMV V8 is not supported for WMV files.

When burning a subtitle file to a CD-ROM with your PC, be sure to burn it as an SMI file.

"DivX will not play when its sampling frequency is lower than 32KHz".

Depending on the encoding conditions, some discs recorded in DivX or XviD may not
play correctly or not play back at all.

During playback, press the     ,     button. 

Go to the screen about 5 minutes after whenever you press       button. 

Go to the screen about 5 minutes earlier whenever you press      button.

Note

DivX Feature Table

DivX Supported
Avi 
files are used to contain the audio and video data; these must be stored on CD in the ISO 9660 format.

MPEGs containing DivX can be divided into Video 
and Audio.

Video compatibility : All versions of DivX later than 3.11
(including the latest 5.1) are supported. In addition, XviD
is supported. 
For WMV, V1, V2, V3, and V7 formats are possible.

Audio compatibility : MP3s encoded at bitrates from
80kbps to 320kbps, AC3s from 128kbps to 384kbps, and
WMAs from 56kbps to 160kbps are supported.

In addition, for subtitles, this unit will support Text for-
mat (SMI).

SPEC

DivX3.11

Up to the latest VERSION

VIDEO Compatibility WMV

WMV V1/V2/V3/V7

Screen Size

720~576

MP3

CBR : 80kbps~320kbps

AUDIO Compatibility AC3

CBR : 128kbps~384kbps

WMA

CBR : 56kbps~160kbps

Summary of Contents for HT-DS960

Page 1: ...DIGITAL HOME CINEMA SYSTEM HT DS960 COMPACT DIGITAL VIDEO Instruction Manual AH68 01641K THIS APPLIANCE IS MANUFACTURED BY COMPACT DIGITAL AUDIO ...

Page 2: ... the unit has reached room temperature before using Phones During thunderstorms disconnect AC main plug from the wall outlet Voltage peaks due to lightning could damage the unit Do not expose the unit to direct sunlight or other heat sources This could lead to overheating and malfunction of the unit The battery used with this product contain chemicals that are harmful to the environment Do not dis...

Page 3: ...PARATION Contents PREPARATION Safety Warnings 1 Precautions 2 Features 3 Notes on Discs 5 Description 7 CONNECTIONS Speaker Assembly Method 11 Connecting the Speakers 17 Connecting the Video Out to TV 19 P SCAN Progressive Scan Function 20 Connecting External Components 21 Connecting the FM and AM Antennas 22 Before Using Your DVD Player 23 OPERATION Disc Playback 25 MP3 CD Playback 27 JPEG Disc P...

Page 4: ...ibited Copy Protection CD R Discs Some CD R discs may not be playable depending on the disc recording device CD Recorder or PC and the condition of the disc Use a 650MB 74 minute CD R disc Do not use CD R disk over 700MB 80 minute as much as possible since it may not be played back Some CD RW Rewritable media may not be playable Only CD Rs that are properly closed can be fully played If the sessio...

Page 5: ...tor GROUP indicator PREPARATION AM Antenna Connector COMPONENT VIDEO OUTPUT Connectors Connect a TV with component video inputs to these jacks External Digital Optical Input Connector Use this to connect external equipment capable of digital output External Video Component Input Connector Front Panel Power button Function button Auto Sound Calibration button RRSS SDSM button SURROUND PLUS button V...

Page 6: ...e batteries to heat or flame TV DVD RECEIVER OPEN CLOSE DVD TUNER AUX SLOW LSM PL II MODE PL II EFFECT R E T U R N MENU INFO M U T E ENTER SOUND EDIT TEST TONE SLEEP LOGO REPEAT EZ VIEW NTSC PAL CANCEL ZOOM REMAIN TUNER MEMORY SURR PLUS V H P SUPER 5 1 VOLUME LSM ASC BAND MO ST TV VIDEO TV DVD RECEIVER DIMMER TUNING CH P SCAN PL II MODE button VOLUME button MENU button TV DVD POWER button OPEN CLO...

Page 7: ...eaker s angle by rotat ing it 30 to the right or left Note 12 11 CONNECTIONS It is recommended to connect the speaker line at the rear of front stand when you install it in stand type The sound is output same if you connect to the rear of front speaker Note Installing speakers in the RRSS Rear Reflecting Surround System Configuration using stands Installing speakers on Front stands Follow the inst...

Page 8: ...n the RRSS Rear Reflecting Surround System Configuration using wall mounts Installing the Front Rear speakers togeth er on the wall Follow the instruction and install the speakers as shown below Install the rear speak er on the front speak er 1 Rear Speaker Front Speaker Connect the rear and front speaker wires to the rear of front speaker 2 Fasten 2 screws separated on the wall 3 Hang the front r...

Page 9: ...ews separately sold on the wall 3 Hang the front speaker on the wall 4 CONNECTIONS Front Speaker Cover Front Speaker 28cm Install the rear speaker on the rear stand 7 Connect the rear speaker wire on the bottom of rear stand 8 Fasten 2 screws separated on the wall 9 Hang the rear speaker on the wall 10 Unfasten and disconnect the screw on the bot tom of rear stand 5 Assemble rear stand and bracket...

Page 10: ...er speakers Center Speaker It is best to install it at the same height as the front speakers You can also install it directly over or under the TV Position of the DVD Player Place it on a stand cabinet shelf or under the TV stand Selecting the Listening Position The listening position should be located about 2 5 to 3 times the distance of the TV s screen size away from the TV Example For 32 TVs 2 ...

Page 11: ...ning method scans one full frame of video consecutively down the screen line by line An entire image is drawn at one time as opposed to the interlaced scanning process by which a video image is drawn in a series of passes The progressive scanning method is desirable for dealing with moving objects Progressive Scan FULL FRAME What is Progressive or Non Interlaced Scanning METHOD 1 METHOD 3 METHOD 2...

Page 12: ... wire to the AM ter minal Keep the AM loop antenna con nected Snap the tabs on the loop into the slots of the base to assemble the AM loop antenna FM Antenna supplied AM Loop Antenna supplied If AM reception is poor connect an out door AM antenna not supplied 21 Connect Audio In on the DVD player to Audio Out on the external analog component Be sure to match connector colors 2 Analog signal compon...

Page 13: ...til the DVD indi cator lights TV DVDRECEIVER TV DVDRECEIVER Press POWER button to turn on the main unit and then press DVD button to select DVD CD function of the remote control 5 6 Press POWER button to turn on the main unit and then press TV VIDEO button to select External Input mode Press DVD button to select DVD CD mode 23 CONNECTIONS Before Using Your DVD Player Your DVD player is capable of ...

Page 14: ... with DVD are applicable to DVD VIDEO DVD AUDIO and DVD R RW discs Where a particular DVD type is mentioned it is indicated separately Depending on the content of the disc the initial screen may appear different DVD Note Groups and tracks DVD AUDIO DVD audios is divided into several large sections called groups and smaller sections called tracks Numbers are allotted to these sections These numbers...

Page 15: ...pen the disc tray and then load the MP3 disc 4 Press the STOP button to stop playback To select another album and track repeat Steps 2 and 3 above 3 To change the album use to select another album in Stop mode and then press the ENTER button 27 OPERATION JPEG Disc Playback Images captured with a digital camera or camcorder or JPG files on a PC can be stored on a CD and then played back with this u...

Page 16: ... not play when its sampling frequency is lower than 32KHz Depending on the encoding conditions some discs recorded in DivX or XviD may not play correctly or not play back at all During playback press the button Go to the screen about 5 minutes after whenever you press button Go to the screen about 5 minutes earlier whenever you press button Note DivX Feature Table DivX Supported Avi files are used...

Page 17: ...TS DOLBY DIGITAL or PRO LOGIC Note What is a Group A movie contained in a DVD AUDIO disc What is a Title A movie contained in a DVD VIDEO disc What is a Chapter Each title on a DVD disc is divided into several smaller sections called chapters What is a Track File A section of video or a music file recorded on a DVD AUDIO CD or MP3 CD appears on the TV screen If this symbol appears on the TV screen...

Page 18: ...yed During fast playback of a CD or MP3 CD sound is heard only at 2x speed and not at 4x 8x and 32x speeds No sound is heard during slow playback and step motion playback When watching a VCD with a track longer than 15 minutes each time is pressed playback will skip back or forward 5 minutes TITLE 01 05 CHAPTER 002 040 TITLE 01 05 CHAPTER 004 040 Note Something like you Back for good Love of my li...

Page 19: ...ck Mode in the Disc Information Screen Press INFO button twice 1 Press Cursor button to move to REPEAT PLAYBACK display 2 Press Cursor button to select the desired Repeat Playback mode 3 DVD VCD CD For MP3 and JPEG discs you cannot select Repeat Play from the information display screen Press ENTER button 4 CHAPTER Repeatedly plays the selected chapter TITLE Repeatedly plays the selected title GROU...

Page 20: ...buttons to select A and then press ENTER but ton at the beginning of the desired segment To return to normal playback press Cursor buttons to select OFF DVD VCD CD 37 Note OPERATION Angle Function This function allows you to view the same scene in different angles You can repetitively play back a designated section of a DVD DVD 2 Press Cursor button to move to ANGLE display 1Press INFO button 1 3 ...

Page 21: ...lack bars may not disappear because some DVD discs have a built in horizontal to vertical ratio 39 Note OPERATION EZ VIEW OFF EZ VIEW SELECT ZOOM POSITION Bonus Group Navigating Pages Some DVD Audio discs have an extra bonus group that requires a 4 digit key number to access See the disc packaging for details and the key number Bonus Group When you play a DVD Audio disc that has a bonus group the ...

Page 22: ... Chapter dis play Moving to a Chapter 01 05 025 040 1 17 30 1 1 5 Press Cursor buttons to move to time display Moving to a Specific Time Press the numeric buttons You can press on the remote control to move directly to the desired title chapter or track Depending on the disc you may not be able to move to the selected title or time 41 Selecting Audio Subtitle Language Depending on the number of la...

Page 23: ... disc menu that is not sup ported by the disc the This menu is not sup ported message appears on the screen 1 In Stop mode press MENU button Press Cursor buttons to move to DISC MENU and then press ENTER button 4 Press ENTER but ton 3 Press Cursor buttons to select the desired item PBC Playback Control Function Press the MENU button while VCD 2 0 version disk is played Each time you press the butt...

Page 24: ... set to English OSD will be displayed in English 3 Selecting the Subtitle Language recorded on the disc Selecting the Menu Language recorded on the disc Select Language and then press ENTER button 5 Press Cursor button to select OSD Language and then press ENTER button Press Cursor button to select the desired language and then press ENTER button Press RETURN button to return to the previous level...

Page 25: ...V select either 4 3LB or 4 3PS option according to personal preference Select 16 9 if you have a wide screen TV Select this to view a 16 9 picture in the full screen mode on your wide screen TV You can enjoy the wide screen aspect Select this to play a 16 9 picture in the letter box mode on a conventional TV Black bars will appear at the top and bottom of the screen Select this to play a 16 9 pict...

Page 26: ...on Press Cursor button to move to Setup and then press ENTER button 4 The password is set to 7890 by default Once the setup is complete you will be taken to the previous screen If you have selected Level 6 you cannot view DVDs with Level 7 or higher The higher the level the closer the content is to violent or adult material 3 5 Press Cursor button to move to PARENTAL and then press ENTER button Pr...

Page 27: ...ress ENTER button Enter the password and then press ENTER button SETUP Setting the Password You can set the password for the Parental rating level setting The password is set to 7890 by default Note If you have forgotten the rating level password do the following While the player is in the stop mode hold the main unit s button for longer than 5 seconds INITIALIZE appears on the display and all set...

Page 28: ...hen back on PAUSE COPY LOGO DATA Setting the Wallpaper 2 1 3 In Stop mode press MENU button Press Cursor button to move to Setup and then press ENTER button Press Cursor button to move to LOGO and then press ENTER button To Change the Wallpaper 5 4 Press MENU button to exit the setup screen Press to select the desired USER and then press ENTER Select this to set the Samsung Logo image as your wall...

Page 29: ... button to move to DVD VIDEO and then press ENTER button SETUP DVD Playback Mode DVD Play mode is set to DVD Audio as factory default setting Note Some DVD Audio discs contain DVD Video as well as DVD Audio To play back the DVD Video portion of the DVD Audio disc set the unit to DVD Video mode Set steps 1 4 again if you want to switch to DVD AUDIO Play mode When Selecting DVD Play Mode DVD VIDEO s...

Page 30: ...and R the mode is set to SMALL Press RETURN button to return to the previous level Press MENU button to exit the setup screen 57 58 SETUP SMALL Select this when using the speakers NONE Select this when no speakers are installed 2 1 In Stop mode press MENU button Press Cursor button to move to Audio and then press ENTER button 3 Press Cursor button to move to TEST TONE and then press ENTER button T...

Page 31: ...and then press ENTER button You can set the delay time for C between 00 and 05mSEC and for LS and RS between 00 and 15mSEC 4 3 5 Press Cursor button to move to DELAY TIME and then press ENTER button Press Cursor buttons to move to the desired speaker and then press ENTER button Press Cursor to set the Delay time 0 ms 3 ms 6 ms 9 ms 12 ms 15 ms Setting REAR SURROUND SPEAKERS If the distance of Df i...

Page 32: ...thesetupscreen Method 2 When manually adjusting with the SOUND EDIT button 2 1 Adjusting Front Speaker Balance Adjusting Rear Speaker Balance Press SOUND EDIT button and then press Cursor 3 Adjusting Center Speaker Level 4 5 Adjusting Rear Speaker Level Adjusting Subwoofer Speaker Level Press RETURN button to return to the previous level Press MENU button to exit the setup screen 62 Press SOUND ED...

Page 33: ...level Press MENU button to exit the setup screen AV SYNC Setup Press RETURN button to return to the previous level Press MENU button to exit the setup screen Audio menu appears 2 1 Setup menu appears AV SYNC screen appears 3 Press Cursor buttons to move to Audio and then press ENTER button Press Cursor buttons to move to AV SYNC and then press ENTER button Press the MENU button 4 You can set the a...

Page 34: ...t left and right speakers produce phantom sound DIMENSION Incrementally adjusts the sound field DSP from the front or rear When playing a DVD disc encoded with two or more channels multi channel mode will be selected automatically and Dolby Pro Logic II button does not work You can select either 0 or 1 Press PL II MODE button to select MUSIC mode Press PL II EFFECT button and then press Cursor but...

Page 35: ...s will be toggled Select S LOGO ON to output the sound logo and select S LOGO OFF to disable the sound logo To check ASC that you have set 1 Press and hold the ASC button twice ASC CHECK appears on the display 2 Next briefly press the ASC button The speaker distance setting and level value for each channel will be displayed To cancel the ASC setup Press the ASC button The tone output stops CANCEL ...

Page 36: ... additional speaker wires You can install the speakers on stands or a wall Make sure to angle the rear speakers so that sound is reflected against the side walls The Rear speakers can turned to the right and left RRSS Rear Reflecting Surround System Speaker Configuration With introduction of new concept of digital audio developed in Samsung to DVD home theater you can enjoy more lively high sensit...

Page 37: ...S S RS RDS RT REP 1 TA L C R SW LS RS L C R SW LS RS DSP P SCAN TITLE GRP CHAP PRGM TRK ST TUNED kHz LINEAR PCM DVD AUDIO MPEG L C R SW LS RS RDS RT REP 1 TA L C R SW LS RS MHz DSP P SCAN TITLE GRP CHAP PRGM TRK ST TUNED LINEAR PCM DVD AUDIO MPEG L C R SW RR RL LS S RS RDS RT REP 1 TA kHz MHz DSP L C R SW LS RS L C R SW LS RS P SCAN TITLE GRP CHAP PRGM TRK ST TUNED LINEAR PCM DVD AUDIO MPEG RDS RT...

Page 38: ... ST TUNED LINEAR PCM DVD AUDIO MPEG RR RL S RDS RT REP 1 TA L C R SW LS RS kHz MHz LS RS C S P SCAN TITLE GRP CHAP PRGM TRK ST TUNED LINEAR PCM DVD AUDIO MPEG RR RL RDS RT REP 1 TA L R SW kHz MHz Virtual Headphone You can enjoy a realistic sound very similar to that of a 5 1 channel sound system using regular stereo headphones 1 2 Press the V H P button to select VIRTUAL ON To cancel this function...

Page 39: ...ne in to a preset station press on the remote control to select a channel Refer to Step 2 on page 75 to automatically or manually tune in to a station 2 1 Each time the button is pressed the band switches between FM AM PRGM flashes in the display Tune in to a station 3 Example Presetting FM 89 1 in the memory Press to select 89 10 Press the TUNER BAND button and select the FM band Press the TUNER ...

Page 40: ...ess SLEEP button until OFF appears on the display MISCELLANEOUS Each time the button is pressed the brightness changes as follows SLIGHTLY DARK DARK BRIGHT TITLE CHAP PRGM RDS RT ST TUNED kHz MHz Adjusting Display Brightness You can adjust brightness of the display on the main unit Press DIMMER button Using Headphones Use headphones not supplied for private listening pleasure MUTE flash in the dis...

Page 41: ...TV and press POWER If the TV turns off or on the setting is complete TV DVDRECEIVER Note MISCELLANEOUS 1 2 3 4 5 6 7 8 9 10 11 12 13 14 15 16 17 18 19 20 21 22 23 24 25 26 27 28 29 SAMSUNG ANAM DAEWOO LG HITACHI JVC SHARP SONY TOSHIBA SANYO MITSUBISHI MATSUSHITA TELEFUNKEN RCA PANASONIC SABA PHILIPS GRUNDIG ZENITH MIVAL NOBLEX EMERSON MAGNAVOX LOEWE THOMSON NORDMENDE LOEWE OPTA BLAUPUNKT SIEMENS T...

Page 42: ...if the disc is recorded with 5 1 channel sound Check to see if the audio language is correctly set to DOLBY DIGITAL 5 1 CH in the information display Dolby Digital 5 1 CH Surround Sound is not produced Symptom Check Remedy Check to see if the TV power is on Check to see if the video cables are connected properly Check for damage deformities or dirt on the disc Disc is rotating but no picture is pr...

Page 43: ...se 1203 Gujarati 1352 Mongolian 1512 Serbian 1051 Aymara 1209 Hausa 1353 Moldavian 1513 Siswati 1052 Azerbaijani 1217 Hindi 1356 Marathi 1514 Sesotho 1053 Bashkir 1226 Croatian 1357 Malay 1515 Sundanese 1057 Byelorussian 1229 Hungarian 1358 Maltese 1516 Swedish 1059 Bulgarian 1233 Armenian 1363 Burmese 1517 Swahili 1060 Bihari 1235 Interlingua 1365 Nauru 1521 Tamil 1069 Bislama 1239 Interlingue 13...

Page 44: ...al input sources such as DVD CD etc DTS provides a realistic clear surround sound that has not previously been available from conventional surround sound 5 1 or 6 Channel Digital Surround sound reproduced from DVDs and LDs recorded as a digital signals with disc marking With better sound quality dynamic range and directionality than traditional Dolby surround technology you can enjoy dynamic reali...

Reviews: