background image

2


2

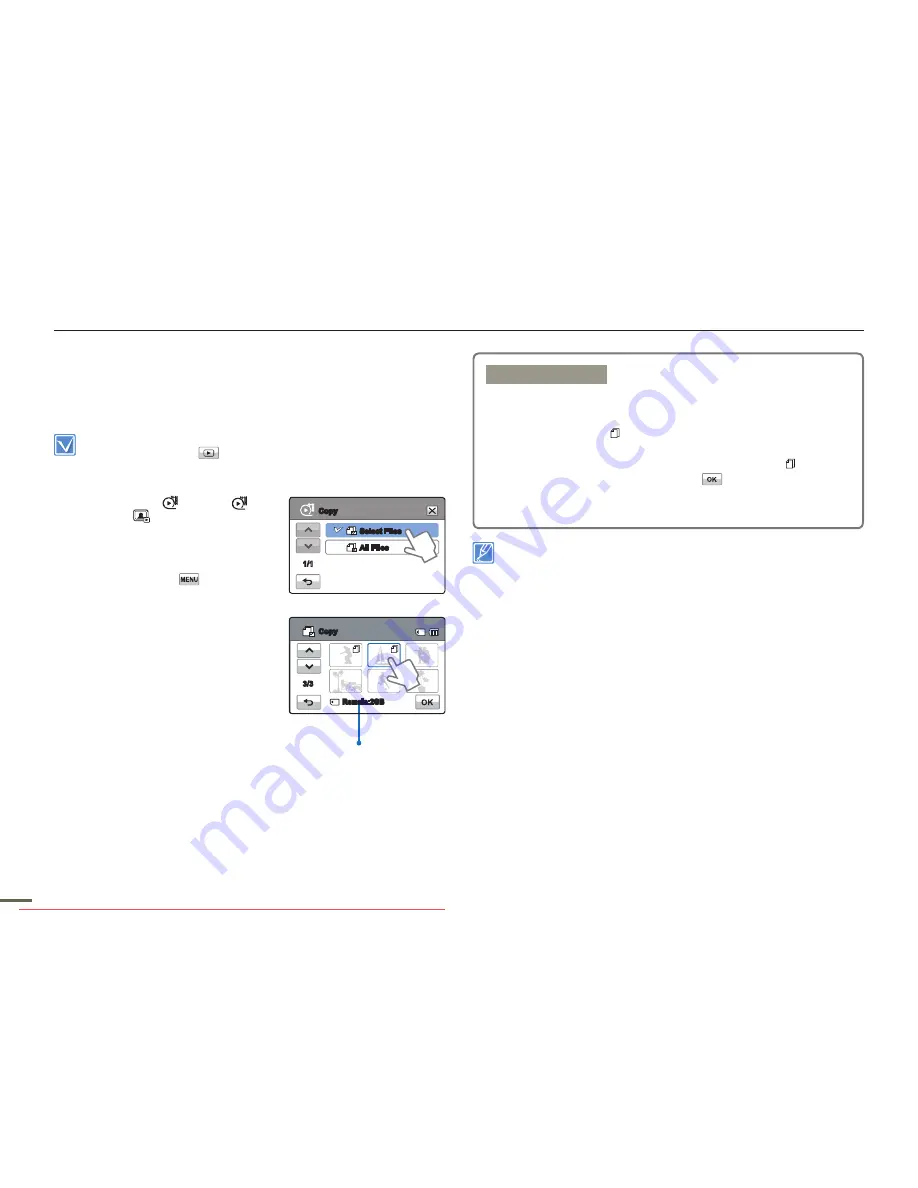
Copy (HMX-H303/H304/H305 only)

Videos and photos stored in the internal memory can be copied to 

the external flash memory card. Copying to the memory card does 

not delete the originals in the internal memory.

Insert a memory card. 

page 34

Touch the Play tab (

) on the LCD screen to select the play 

mode. 

page 45


1. 

Touch the HD (

HD

), SD (

SD

or Photo (

) tab.

•  Videos or photos appear as 

thumbnails.

2.


Touch the Menu (

) tab


Copy.”

3.


Touch the desired submenu item. 

4.


The message that correpsponds to 

the selected option appears. Touch 

Yes

.”

•  The selected images are 

copied.

Submenu items

• 

Select Files

:  Copy individual images. 

Touch the images you want to copy. 

The ( ) indicator is displayed on the selected 

images. Touching the thumbnail image toggles 

the image between being selected ( ) or not 

selected. Touch the (

) tab. The selected 

images are copied.

• 

All Files

: Copy all images.

•  You can also operate this function in the full and single image display 

mode.

•  If the write protection tab on the memory card is set to lock, you 

cannot copy the images. 

page 35

•  You cannot copy a file if the memory card has insufficient free space. 

Remove unnecessary files before proceeding. 

page 101

•  The copy function does not work if the battery charge is insufficient. 

We recommend you use the AC adaptor to ensure the camera has 

continuous power when copying.

Editing files

Remaining free space in the 

destination memory card

Select Files

All Files

Copy

1/1

Copy

3/3

Remain:2GB

Downloaded From VideoCamera-Manual.com Manuals

Summary of Contents for HMX-H300BP

Page 1: ...aster write speeds Memory Card A Class 6 SDHC card or above HMX H300BP HMX H300SP HMX H300RP HMX H300UP HMX H303BP HMX H303SP HMX H303RP HMX H303UP HMX H304BP HMX H304SP HMX H304RP HMX H304UP HMX H305BP HMX H305SP HMX H305RP HMX H305UP HMX H320BP HMX H320SP HMX H320RP HMX H320UP Downloaded From VideoCamera Manual com Manuals ...

Page 2: ...refore the mains plug shall be readily operable IMPORTANT INFORMATION ON USE About this user manual Thank you for purchasing this Samsung Camcorder Please read this user manual carefully before you use the camcorder and keep it handy for future reference Should your camcorder fail to operate correctly refer to Troubleshooting This User Manual covers HMX H 00 HMX H 0 HMX H 04 HMX H 0 HMX H 20 model...

Page 3: ... recommend that you obtain permission beforehand For Open Source licences information refer to the Opensource H300 pdf in the provided CD ROM Notes regarding trademarks All the trade names and registered trademarks mentioned in this manual or other documentation provided with your Samsung product are trademarks or registered trademarks of their respective holders Furthermore and are not mentioned ...

Page 4: ...cause an explosion Do not allow water or metal and inflammable matter to enter the camcorder or AC power adaptor Doing so may pose a fire hazard No sand or dust Fine sand or dust entering the camcorder or AC power adaptor could cause malfunctions or defects W 4 4 W No oil Oil entering the camcorder or AC power adaptor could cause electric shock malfunctions or defects Do not aim the camcorder dire...

Page 5: ...wed by children consult physician immediately Do not plug or unplug the power cord with wet hands There is a risk of electric shock Keep the power cord unplugged when not in use or during lightning storms There is a risk of fire W 4 4 W W 4 4 W When cleaning the AC adaptor unplug the power cord There is a risk of malfunction or electric shock If the camcorder makes an abnormal sound or smell or sm...

Page 6: ...malfunction Do not use the camcorder near dense exhaust gas generated by gasoline or diesel engines or corrosive gas such as hydrogen sulphide Doing so may corrode the external or internal terminals disabling normal operation Do not expose the camcorder to insecticide Insecticide entering the camcorder could cause the product to fail to operate normally Turn the camcorder off and cover it with vin...

Page 7: ... accessories only Using products from other manufacturers may cause overheating fire explosion electric shock or personal injuries caused by abnormal operation W 4 4 W W 4 4 W Place the camcorder on a stable surface and a place with ventilation openings Keep important data separately Samsung is not responsible for data loss Use the mains plug where it can be readily operable If any problem occurs ...

Page 8: ...corder 27 Turning your camcorder on off 27 Adjusting the LCD screen 28 Setting the operation modes 29 Using the display button 29 Using the touch panel 30 First time settings 31 Setting the time zone and date time for the first time 31 Selecting the languages 32 About the storage media 33 Selecting the storage media HMX H303 H304 H305 H320 only 33 Inserting ejecting a memory card not supplied 34 S...

Page 9: ...Sharpness 55 White Balance 55 Aperture 56 Shutter 57 EV 58 Super C Nite 58 Focus 59 Digital Effect 60 Fader 61 Tele Macro 62 Cont Shot 62 Wind Cut 63 Digital Zoom 63 Self Timer 64 Time Lapse Rec 64 Quick View 66 Guideline 67 Advanced playback 67 Play Option 67 Highlight 68 Slide Show Option 69 File Info 69 Editing files 70 Delete 70 Protect 71 Copy HMX H303 H304 H305 only 72 Divide 73 Combine 74 D...

Page 10: ...HDMI CEC 87 Connecting to a TV 88 Connecting to a high definition TV with HDMI 88 Connecting to a regular TV 89 Viewing on a TV screen 90 Dubbing videos 91 Dubbing to a VCR or DVD HDD recorder 91 Printing photos 92 Direct printing with a pictbridge printer 92 Using with a Windows computer 94 What you can do with a windows computer 94 Using the intelli studio programme 95 Using as a removable stora...

Page 11: ...he indicator on the battery compartment and then push the battery in the direction of the arrow 2 Charge the battery fully page 23 The battery is fully charged when the CHG charging indicator light turns green 3 Insert a memory card page 34 You can use commercially available SDHC SD High Capacity or SD memory cards with this camcorder Set the appropriate storage media HMX H303 H304 H305 only page ...

Page 12: ...us 3 Fully press the PHOTO button when the subject is in focus Using Quick On STBY by opening closing the LCD screen When you close the LCD screen during standby your camcorder goes to Quick On STBY mode power saving mode You can start recording quickly when you open the LCD screen page 82 The default video resolution setting is 10 0 0i You can also record videos in SD standard definition video qu...

Page 13: ...njoy HD high definition videos on an HDTV page 88 You can also play back videos on an SD standard definition image quality TV page 89 STEP4 Save recorded videos or photos Simple and fun Enjoy the various features of the internal Intelli studio programme on your Windows computer Using the Intelli studio programme built in your camcorder you can import video photos into your computer edit or share t...

Page 14: ...ook Share your contents with the world by uploading videos and photos directly to a web site with one click Click Share Upload tab on the browser page 98 The Intelli studio runs automatically once the camcorder is connected to a Windows computer when you specify PC Software On page 83 STEP Delete videos or photos If the camcorder s storage media is full you cannot record new videos or photos Delet...

Page 15: ... type Audio Video cable USB cable User manual CD Quick start guide Mini HDMI cable Memory card Carrying case IA CC1U27B Ferrite Core Optional accessories The exact appearance of each item may vary by model The contents may vary depending on the sales region Parts and accessories can be purchased after consulting with your local Samsung dealer SAMSUNG is not responsible for reduced battery life tim...

Page 16: ...een Touch screen 5 Power button 6 Display button 7 MODE button 8 Anti shake OIS button 9 SMART AUTO button 10 AV Audio Video jack 11 USB jack 12 HDMI jack 13 Jack cover HDMI USB AV During a recording be careful not to block the internal microphone and lens HD 1 2 4 3 8 9 6 13 12 5 7 10 11 Downloaded From VideoCamera Manual com Manuals ...

Page 17: ... Internal speaker 5 Charging CHG indicator 6 Jack cover DC IN 7 DC IN jack 8 Recording start stop button 9 Grip belt 1 Memory card slot 2 Memory card cover 3 Grip belt hook 4 Tripod receptacle 5 Battery release switch Right Top Bottom 4 3 5 6 7 8 3 2 4 5 9 1 CHG DC IN 1 2 Downloaded From VideoCamera Manual com Manuals ...

Page 18: ...corder provides one record mode which combines the video and photo record modes You can easily record videos or photos in the same mode without having to change it Left of the LCD screen Indicator Meaning Record mode Video Photo Smart Auto STBY Operating status standby recording Pause Self Timer SCENE Digital Effect White Balance Fader Manual focus Touch Point F2 S 1 50 Manual aperture Manual shut...

Page 19: ...ages see pages 101 105 Top of the LCD screen Indicator Meaning Video play mode Operating status play pause 00 00 05 00 00 50 Playback time recorded time Storage media Memory card or internal memory HMX H303 H304 H305 only Battery info remaining charge level Play Option 100_0001 File name file number Video Quality Video Resolution Protect 01 JAN 2011 00 00 Date Time Bottom of the LCD screen Indicat...

Page 20: ...1 Slide show Playback zoom X1 1 X8 0 100_0001 File name file number 1 10 Photo image counter current image total number of recorded images Storage media Memory card or internal memory HMX H303 H304 H305 only Battery info Erase protection Photo resolution 01 JAN 2011 00 00 Date Time Bottom of the LCD screen Indicator Meaning Volume tab when activating slide show Return tab Previous image Next image...

Page 21: ... to insert your hand the grip belt hook of the camcorder may be damaged ATTACHING THE FERRITE CORE To reduce electrical interference attach the core filter to the AC power adaptor Ferrite Core Stopper Wind the cable so that it is not slack To attach the core filter to power adaptor roll the cable over core filter once Be careful not to damage the cable when attaching the core filter Downloaded Fro...

Page 22: ... the Battery release switch and pull out the battery Gently slide Battery release switch in the direction as shown in the figure Samsung is not responsible for problems that are caused by using unapproved batteries If you use batteries from other manufacturers there is a danger of overheating fire or explosion Detach the battery from the camcorder with care to prevent it from falling Getting start...

Page 23: ...n plug the AC Power adaptor in the wall outlet Using the USB cable Connect the USB cable to the camcorder properly and then connect the other end to a USB port of a PC Please make sure that there are no foreign substances in the plug and socket when you connect the AC power supply to the camcorder When charging if both the USB cable and AC power adaptor are connected the AC power adaptor will over...

Page 24: ...e Fully charged 25 50 used 50 75 used 75 95 used 95 98 used Exhausted flickers The device will soon turn off Change the battery as soon as possible The device will be forced to turn off after 3 seconds Low battery The figures above are based on a fully charged battery at a normal temperature Low ambient temperature may affect the use time Battery capacity decreases over time and through repeated u...

Page 25: ...dly the batteries may discharge faster The recording and playback times will be shorter when you use your camcorder in low temperatures We recommend using AC power adaptor when you use Time Lapse REC Continuous Recording without zoom The continuous recording time above shows the available recording time when you record without using any other function after recording starts The battery may dischar...

Page 26: ...battery in a stable cool and dry place Recommended temperature 59ºF 77ºF 15ºC 25ºC recommended humidity 40 60 Temperatures that are too high or too low shorten the battery lifetime The battery terminals can become rusty or malfunction if the battery is stored in a smoky or dusty location Recycle or dispose of your dead batteries properly The battery lifetime is limited Battery capacity decreases o...

Page 27: ...105 and take corrective actions If you close the LCD screen when the power is on the power saving mode activates page 28 The camcorder turns on automatically if connecting the AC power adaptor or inserting the battery to the camcorder with the LCD screen open When using this camcorder for the first time When you use your camcorder for the first time or reset it the time zone screen appears at star...

Page 28: ...n 90 rotate it forwards towards the lens or backwards You can rotate it up to 180 towards the lens and up to 90 backward To view recordings more conveniently rotate the screen by 180 towards the lens and then fold it back to the body Excessive rotation may damage the connective hinge between the screen and the camcorder Clean fingerprints or dust on the screen with a soft cloth Downloaded From Vid...

Page 29: ... record videos or photos in the same mode without having to change modes USING THE DISPLAY BUTTON Switching the information display mode Press the Display button The full and minimum display modes alternate Minimum display mode STBY Full display mode STBY 00 00 00 307Min 9999 OFF OFF SUPER SUPER Warning indicators and messages may appear depending on the recording conditions The Display button doe...

Page 30: ...sing the touch panel The tabs and indicators that appear on the LCD screen depend on the current recording playback status of your camcorder The camcorder does not recognise touches if you touch more than two points on the screen at the same time Touch one point at a time Do not use a sharp tipped item such as pen or pencil when using a tool to touch the screen The touch panel lets you playback an...

Page 31: ...ues are reset to the default values If this occurs you need to recharge the internal rechargeable battery see below and then re set the current date and time Charging the internal rechargeable battery The internal battery is always recharged while your camcorder is connected to the AC power or while the battery is attached If you have not used the camcorder for about 2 weeks and you have not conne...

Page 32: ...sages in the language you selected Language options may be changed without a prior notice The camcorder retains the language you select even when not connected to the battery or AC power The date and time format may change depending on the language you selected Language Demo Anynet HDMI CEC 6 6 1 8 English 한국어 Français Deutsch Language Supported languages English Norsk Hrvatski 한국어 Dansk Українськ...

Page 33: ...ired storage media Submenu items Internal Memory When using the internal memory Card When using the memory card SD or SDHC card Do not format the internal memory or any memory card you intend to use in the camcorder on a PC When you insert a memory card the storage media setup screen appears Touch Yes if you want to use a memory card or No if not Do not remove the power battery or AC power adaptor...

Page 34: ...city cards Card compatibility may vary depending on the manufacturer and the type of memory card To insert a memory card 1 Turn the camcorder off 2 Open the memory card cover 3 Insert the memory card into the card slot until it softly clicks Make sure that the camcorder is placed as shown above and the terminal portion of the card is facing up 4 Close the memory card cover To eject a memory card 1...

Page 35: ...recorded on the card To enable writing move the switch up in the direction of the terminals To set write protection move the switch down SDHC Secure Digital High Capacity cards An SDHC card is a higher version Ver 2 00 of the SD card and supports capacities above 2GB SDHC cards cannot be used with current SD enabled host devices Common cautions for memory cards Damaged data may not be recoverable ...

Page 36: ...each of children who might swallow it Samsung is not responsible for data loss due to misuse including loss caused by any PC virus We recommend using a memory card case to avoid data loss that can be caused by moving the card or by static electricity After a period of use the memory card may get warm This is normal and is not a malfunction The camcorder supports SD and SDHC memory cards giving you...

Page 37: ...of photos Resolution Internal memory Storage media Capacity 8GB 16GB 32GB 1GB 2GB 4GB 8GB 16GB 32GB 2944x1656 5014 9999 9999 656 1251 2482 5014 9999 9999 1920x1080 9402 9999 9999 1173 2346 4654 9402 9999 9999 Unit Approximate number of images Actual recording times may differ depending on the recording conditions and the subject The higher the quality and resolution the more memory is used Lower r...

Page 38: ...rding press the Recording start stop button again 4 Touch the Quick View icon to view the most recently recorded video After the Quick View is complete your camcorder returns to the standby mode Using the continuous recording function Using the Continuous Recording function you can avoid recording unwanted scenes while recording video Using this function you can make one video file while you recor...

Page 39: ...ed no other function is enabled In the record mode you can set the Quick View menu option The Quick View icon appears when you have set the Quick View menu option to On The menu setting tabs shown on the LCD screen do not affect the image the camcorder is recording Under some low light conditions that may be encountered the video motion may not be fluid as under normal light conditions The noise f...

Page 40: ...ton The camcorder has recorded the photo image without a shutter sound and then it is available to record the next image after about six seconds Video keeps recording even while you take photos 3 To stop recording press the Recording start stop button again You cannot capture photos under the following conditions During a time lapse recording During paused when recording Photos are captured in 192...

Page 41: ...sound is heard when Shutter Sound On is set 4 Touch the Quick View icon to view the most recently recorded photo To return to the standby mode touch the Return tab Do not turn off the camcorder or remove the memory card when taking photos as it may damage the storage media or data The recordable number of photos varies depending on the recording conditions and the photo resolution page 37 The camc...

Page 42: ...e Appears when recording an outdoor scene Landscape Appears when recording images of close up Macro Appears when recording images of clear skies Blue sky Appears when recording images of forested areas Natural green Appears when recording images of sunsets Sunset 3 Press the Recording start stop button or PHOTO button pages 38 41 4 To cancel Smart Auto mode press the SMART AUTO button again Button...

Page 43: ... the image quality and clarity Use the digital zoom when you want to zoom more than the optical zoom range page 63 Focusing may become unstable when you record with a fast zoom or zoom into a subject standing too far away If this occurs use the manual focus function page 59 The minimum distance you can have between the camcorder and subject while maintaining sharp focus is about 1cm about 0 4 inch...

Page 44: ...en you turn on Smart Auto mode it automatically sets Anti shake OIS to On The Anti Shake OIS function may not correct gross camcorder shake entirely To decrease shake hold the camcorder firmly with both hands When this function is On the actual movement of the subject and the movement displayed on the screen may be slightly different When you record in dark or dim light at high magnification while...

Page 45: ...u can choose the video HD or SD or photo thumbnail view display options by touching the HD HD SD SD or photo tab on the LCD screen Understanding how to change the operation modes You can easily change the operation modes by touching the LCD screen or using the buttons as shown in the following figures To change thumbnail display type You can choose from these thumbnail display options 3x2 4x3 and ...

Page 46: ...They reappear when you touch anywhere on the screen To stop playback and return to the thumbnails touch the Return tab Do not power off the camcorder or eject the memory card during video playback Doing so may damage the recorded data It may take some time to start playback depending on the size and quality of the selected video The camcorder may not play the following video files A video recorded...

Page 47: ...f your finger the camcorder plays the video you selected Slow playback When playback is paused touching the Reverse slow Forward slow tab reduces the playback speed Reverse forward playback slow rate x1 2 x1 4 x1 8 x1 2 Frame by frame playback When playback is paused touch the Reverse frame advance Forward frame advance to make the video go in reverse or forward one frame at a time To adjust the v...

Page 48: ...ontrol tabs appear briefly They reappear when you touch anywhere on the screen 3 To return to the thumbnails touch the Return tab Do not power off the camcorder or eject the memory card during photo playback Doing so may damage the recorded data Loading time may vary depending on the size and quality of the photo you selected Your camcorder may not play back the following photo files normally A ph...

Page 49: ...ab while playing back the slide show with music Zooming during photo playback You can magnify a playback image Touch up down left right to select the area to magnify 1 Touch the photo you want to magnify The camcorder displays the selected photo on the full screen 2 Adjust the magnification with the Zoom W T lever Magnification starts from the centre of the photo You can zoom in from x1 1 to x8 0 ...

Page 50: ... used here as an example 3 Touch the desired option Adjust the setting values accordingly 4 To exit the menu touch the Exit or Return tab When using Menu items some menu items cannot be used at the same time or may be greyed out For more information see Troubleshooting on page 111 For easy understanding the menu setting procedures on this page are explained using the simplest methods Menu setting ...

Page 51: ...i 53 Video Quality Fine 54 Photo Resolution 2944x1656 54 Photo Sharpness Normal 55 White Balance Auto 55 Aperture Auto 56 Shutter Auto 57 EV 0 58 Super C Nite Normal 58 Focus Auto 59 Anti Shake OIS On 44 Digital Effect Off 60 Fader Off 61 Tele Macro Off 62 Cont Shot Off 62 Wind Cut Off 63 Digital Zoom Off 63 Self Timer Off 64 Time Lapse REC Off 64 Quick View On 66 Guideline Off 67 Using the menu i...

Page 52: ...py 72 Edit Divide X X 73 Combine X X X 74 File Info 69 Slide Show Start X X 49 Slide Show Option X X 69 available X not available Menu options and default values may be changed without prior notice Some grey coloured menu options cannot be selected page 111 Items marked with are available only with HMX H303 H304 H305 models Using the menu items Downloaded From VideoCamera Manual com Manuals ...

Page 53: ...cond 50p indicates the camcorder will record in progressive scan mode at 50 frames per second Recorded files are encoded using Variable Bit Rate VBR VBR is an encoding system that automatically adjusts the bit rate in response to the image being recorded The available video recording time differs according to the video resolution you select page 37 Submenu items Auto For recording under normal con...

Page 54: ...on page 29 1 Touch the Menu tab Photo Resolution 2 Touch the desired submenu item 3 To exit the menu touch the Exit or Return tab The number of recordable images differs according to the photo resolution you select page 37 Photos that are recorded on your camcorder may not playback properly on other digital devices that do not support these photo sizes Submenu items Super Fine Records videos in su...

Page 55: ...h the Exit or Return tab White Balance This camcorder automatically adjusts the colour of the subject You can record in natural colours depending on the subject and lighting conditions Select the record mode by pressing the MODE button page 29 1 Touch the Menu tab White Balance 2 Touch the desired submenu item 3 To exit the menu touch the Exit or Return tab Understanding White Balance The White Ba...

Page 56: ...e Balance to Auto may provide better results Cancel the digital zoom function for clear and precise white balance setting page 63 Reset the white balance if light conditions change Aperture The camcorder adjusts the aperture lens opening automatically depending on the subject and recording conditions You can also manually adjust the aperture Select the record mode by pressing the MODE button page ...

Page 57: ...h shutter speeds to record fast moving objects and low shutter speeds to record slow or stationary objects or objects in dimmer light Select the record mode by pressing the MODE button page 29 1 Touch the Menu tab Shutter 2 Touch the desired submenu item 3 To exit the menu touch the Exit or Return tab The image may not seem smooth when you set a high shutter speed When recording at a shutter speed...

Page 58: ... 0 3 lets in more light than 0 3 Super C Nite You can adjust the shutter speed when recording a slow moving object or record a brighter image in dark places without a compromise in colours Select the record mode by pressing the MODE button page 29 1 Touch the Menu tab Super C Nite 2 Touch the desired submenu item 3 To exit the menu touch the Exit or Return tab Submenu items Off Disables the functi...

Page 59: ...rding Your camcorder automatically focuses a subject from close up to infinity However the camcorder may not focus correctly depending on the recording conditions If it does not focus correctly use the manual focus mode To adjust the focus place and hold your finger on the for a nearer subject and on the tab for a farther subject The nearer or farther icon appears in the centre when focus adjustme...

Page 60: ... the Digital Effect function gives your recording a creative look Select the record mode by pressing the MODE button page 29 1 Touch the Menu tab Digital Effect 2 Touch the desired submenu item 3 To exit the menu touch the Exit or Return tab Advanced recording Digital Effect Off Black White Sepia Negative 1 3 Examples of Digital Effect options Off Without any Digital Effect the image retains a nor...

Page 61: ...recording stops Fade in out With Fader set to In Out press the Recording start stop button The recording starts with a dark screen and then the image and sound fade in To stop recording press the Recording start stop button The image and sound fade out the screen goes black and then the recording stops The camcorder automatically turns the Fader function off after it has been used once You must re...

Page 62: ...e zoom to telephoto in the Tele Macro mode the minimum distance you can have between the camcorder and subject is 50 cm Cont Shot The Continuous Shot function lets you capture up to eight photos in rapid succession to give you more photo taking opportunities when recording moving subjects Select the record mode by pressing the MODE button page 29 1 Touch the Menu tab Cont Shot 2 Touch the desired ...

Page 63: ...lect the record mode by pressing the MODE button page 29 1 Touch the Menu tab Digital Zoom 2 Touch the desired submenu item 3 To exit the menu touch the Exit or Return tab When you use the digital zoom the camcorder processes the image digitally more than in the optical zoom mode As a result the image resolution may deteriorate Submenu items Off Disables the function On Reduces wind noise when rec...

Page 64: ...create time lapse videos of blooming flowers and similar subjects Select the record mode by pressing the MODE button page 29 1 Touch the Menu tab Time Lapse REC On The menu screen appears 2 Touch the desired items Interval Rec Limit and then touch the up or down tab to set the values 3 Touch the tab to finish the setting 4 To exit the menu touch the Exit or Return tab 5 After setting the Time Laps...

Page 65: ...charge is exhausted during the time lapse recording the camcorder saves the recording up to that point and switches to standby mode After some time it displays a warning message then turns off automatically If memory runs out during a Time Lapse REC the camcorder switches to standby mode after saving what was recorded so far During Time Lapse REC the zoom and focus functions are fixed so that you ...

Page 66: ... conditions If the mode has been changed after the recording If the USB cable is connected to the camcorder If the camcorder has been restarted after the recording After playing Quick View For photos recorded with Cont Shot only the last file in the sequence is displayed Submenu items Off Quick View icon does not appear on the screen after you finish the recording On Quick View icon appears on the...

Page 67: ...Submenu items Off Disables the function Placing the subject at the centre cross point puts the subject in the middle of the frame Positioning subjects within the Safety Zone rectangle ensures they will be recorded For recording multiple subjects Putting subjects at or near the grid cross points creates a balanced composition Submenu items Play All Plays video clips in succession starting from a vi...

Page 68: ... random 30 sec to 5 min Plays 5 seconds of each 30 second section at random 5 min to 10 min Plays 11 seconds of each 2 minute section at random Over 10 min Plays 15 seconds of each 3 minute section at random lf you run the Highlight function in the date thumbnail display Highlight plays random portions of all the files in the selected date set In the Highlight play mode you can adjust the volume b...

Page 69: ...want to view the file information for The information of the selected file appears 3 To exit the menu touch the Return tab Submenu items Interval Continuously plays back photos at the interval you select You can choose 1 sec or 3 sec Music You can turn the internal background music on or off This camcorder has 7 default background melodies stored in the boot up flash memory When music is On starti...

Page 70: ...d images cannot be recovered Do not eject a memory card or power off the camcorder while deleting videos or photos recorded on the storage media Doing so may damage the storage media or data You can also operate this function in the full and single image display modes To protect important images from accidental erasure activate the image protection function in advance page 71 You cannot delete pro...

Page 71: ...tab Go to Step 4 See Submenu items below for additional details 4 Touch Yes If you selected All On the indicator appears on all files If you selected All Off the indicator disappears from all protected files If you selected Select Files the indicator appears on the files you selected for protection and disappears from the files you removed protection from You can also operate this function in the ...

Page 72: ...y The indicator is displayed on the selected images Touching the thumbnail image toggles the image between being selected or not selected Touch the tab The selected images are copied All Files Copy all images You can also operate this function in the full and single image display mode If the write protection tab on the memory card is set to lock you cannot copy the images page 35 You cannot copy a...

Page 73: ...humbnail After the division you can partially delete an unnecessary section or combine it with other videos Do not eject a memory card or power off the camcorder while editing a video recorded on the storage media Doing so may damage the storage media or data You can also operate this function in the full and single image display modes You cannot divide files that are protected Cancel the protect ...

Page 74: ...combines the video files you selected in the order you designated and then stores the combined videos as a single video file Do not eject a memory card or power off the camcorder while editing a video recorded on the memory card Doing so may damage the storage media or data You cannot combine files that are protected Cancel the protect function first page 71 The original videos are not preserved T...

Page 75: ...f On 79 Beep Sound On 80 Shutter Sound On 81 Auto Power Off 5 Min 81 Quick On STBY Off 82 PC Software On 82 USB Connect Mass Storage 83 HDMI TV Out Auto 84 TV Connect Guide 84 TV Display On 85 Format 85 Default Set 86 Language English 86 Demo On 87 Anynet HDMI CEC On 87 Menu options and default values may be changed without prior notice The time type may change depending on the language you select...

Page 76: ...me depend on the video resolution you ve selected 3 To exit the menu touch the Exit or Return tab Card Info HMX H300 H320 only This function shows you the storage information of the memory card such as used memory space available memory space etc Insert a memory card page 34 1 Touch the Menu Setting tab Card Info Used memory space available memory space and recordable time appear Available space a...

Page 77: ...ng the tab without touching the tab Submenu items Series Assigns file numbers in a continuous sequence even after you replace or format the storage media or delete all files Each file is given a unique file number that allows convenient image management on a PC Reset Resets the file number to 0001 after you format the memory card delete all files or insert a new memory card Submenu items Home The ...

Page 78: ...y option 3 To exit the menu touch the Exit or Return tab This function depends on the Date Time Display setting page 79 Submenu items 2011 01 01 Displays the date in the year month two digit day format JAN 01 2011 Displays the date in the month day year format 01 JAN 2011 Displays the date in the day month year format 01 01 2011 Displays the date in the day month two digit year format Submenu item...

Page 79: ... The date time is displayed on the LCD screen according to the selected option The date time will read 01 JAN 2011 00 00 in the following case When the internal rechargeable battery is depleted This function depends on the Date Type and Time Type setting page 78 Submenu items Off Current date time information is not displayed Date Displays the current date Time Displays the current time Date Time ...

Page 80: ...307Min 9999 OFF OFF SUPER SUPER 00 05 00 307Min OFF OFF SUPER SUPER STBY 00 00 00 307Min STBY 00 00 00 307Min STBY 00 00 00 307Min STBY 00 00 00 307Min STBY 00 00 00 307Min STBY 00 00 00 307Min STBY 00 00 00 307Min STBY 00 00 00 307Min STBY 00 00 00 307Min STBY 00 00 00 307Min STBY 00 00 00 307Min STBY 00 00 00 307Min STBY 00 00 00 307Min STBY 00 00 00 307Min STBY 00 00 00 307Min STBY 00 00 00 307...

Page 81: ...nd that plays when you press the PHOTO button on or off 1 Touch the Menu Setting tab Shutter Sound 2 Touch the desired submenu item 3 To exit the menu touch the Exit or Return tab The camcorder does not make the shutter sound If you press the PHOTO button during video recording When the camcorder has a cable connection Audio Video cable HDMI cable etc Submenu items Off Disables the function On You...

Page 82: ...you are recording playing except pause or running a photo slide show To turn the camcorder on again press the Power button Quick On STBY When you are going to record frequently for an extended time use the Quick On STBY function to reduce energy consumption and battery drain With the Quick On STBY function On closing the LCD screen starts Quick On STBY 1 Touch the Menu Setting tab Quick On STBY 2 ...

Page 83: ...er to your PC s hard disk and edit the videos and photos using the internal PC software 1 Touch the Menu Setting tab PC Software 2 Touch the desired submenu item 3 To exit the menu touch the Exit or Return tab The PC Software function is not available under the following conditions If USB Connect is set to PictBridge To enable the PC Software function set USB Connect to Mass Storage in the system ...

Page 84: ... Menu Setting tab HDMI TV Out 2 Touch the desired submenu item 3 To exit the menu touch the Exit or Return tab Submenu items Mass Storage Connect to a PC to transfer videos or photos page 99 PictBridge Connect to a PictBridge printer to print photos directly when using the PictBridge function page 92 Submenu items Auto The video signals are output in the same format as the recorded file Use this s...

Page 85: ... Menu Setting tab TV Display 2 Touch the desired submenu item 3 To exit the menu touch the Exit or Return tab The thumbnail display and Demo screens are shown on the TV even if you set TV Display to Off Submenu items HDMI Select HDMI when connecting the camcorder to a TV with an HDMI cable Composite Select Composite when connecting the camcorder to a TV with a Video Audio composite cable Submenu i...

Page 86: ... you cannot select the Format function and its name will be dimmed on the menu Formatting completely deletes all files and options on a memory card including protected files By deleting all files and options formatting typically corrects problems enabling stable read write speeds and operation Run memory card format by touching Format HMX H300 H320 only Default Set You can restore all menu setting...

Page 87: ...rder the Auto Power Off function turns the camcorder off before Demo can run Anynet HDMI CEC This camcorder supports Anynet Anynet is an AV network system that lets you control all connected Samsung AV devices with an Anynet supported Samsung TV remote control 1 Touch the Menu Setting tab Anynet HDMI CEC 2 Touch the desired submenu item 3 To exit the menu touch the Exit or Return tab When you turn...

Page 88: ...nterface for transmitting uncompressed digital data What is Anynet function The Anynet function lets you control all devices that support the Anynet function with the same remote You can use the Anynet function on the camcorder if the camcorder is connected by an HDMI cable to a TV that supports Anynet For more information refer to the Anynet supported TV s user manual When HDMI TV Out is set to A...

Page 89: ...play the right video information if the camcorder is connected incorrectly When connecting to a TV using the Audio Video cable match the colour of the cables to the colour of the corresponding jacks Video input may appear green depending on the TV If this occurs connect the yellow plug of the Audio Video cable to the green jack of the TV When the camcorder is connected to a TV with more than one t...

Page 90: ...ppearance on 4 3 TV Images recorded in a 16 9 ratio Video images Photo images Photo capture images Adjust the volume to a moderate level If the volume is too high the video may include noise If TV Display is set to Off the TV screen does not display the camcorder s OSD On Screen Display menus page 85 Downloaded From VideoCamera Manual com Manuals ...
Page 91: ...on the recording device Refer to the instruction manuals supplied with your recording device for details 4 When dubbing is finished stop the recording device and your camcorder Videos recorded on this camcorder can only be dubbed using the Audio Video cable in SD standard definition image quality regardless of the recording resolution HD SD You cannot dub to a recorder with an HDMI cable To copy a...

Page 92: ...umbnails appear on the LCD screen 4 Touch the photos you want to print and then touch the Print tab The corresponding message appears 5 Touch Yes To set the number of prints Touch the decrease increase tab to set the number of copies to print The number of copies is set To cancel the print setting Touch the Return tab on the LCD screen To stop printing after printing starts Touch Cancel on the scr...

Page 93: ...ices Various printing options are available depending on the printer Refer to the printer s user manual for details Off Date Date Time 1 1 Time Date Time Date Time 1 1 14 17 100 0014 01 01 JAN 2011 00 00 01 JAN 2011 00 00 01 JAN 2011 00 00 01 JAN 2011 00 00 01 JAN 2011 00 00 01 JAN 2011 00 00 01 JAN 2011 00 00 01 JAN 2011 00 00 01 JAN 2011 00 00 01 JAN 2011 00 00 01 JAN 2011 00 00 01 JAN 2011 00 0...

Page 94: ...igher is recommended Notebook Intel Core2 Duo 2 2GHz or AMD Athlon X2 Dual Core 2 6GHz or higher is recommended RAM 1GB or higher is recommended Video Card NVIDIA GeForce 8500 or higher ATI Radeon HD 2600 series or higher Display 1024 x 768 16 bit colour or higher 1280 x 1024 32 bit colour recommended USB USB 2 0 Direct X DirectX 9 0c or higher Memory Card A SDHC card of Class 6 or above System re...

Page 95: ... then click Stop 3 If the Stop a Hardware device window appears click OK 4 Disconnect the USB cable from the camcorder and PC Use the provided USB cable Supplied by Samsung Make sure you insert the USB plug into the USB jack with the plug facing in the correct direction Use the AC power adaptor to power the camcorder when transferring files to your computer When the USB cable is connected turning ...

Page 96: ...uilt in Intelli studio software is intended for home use It is not for precision or industrial productions For these applications we recommend an editing software designed for professional use No Description 1 Menu items 2 Display files in the selected folder 3 Switch to Photo edit mode 4 Switch to Video edit mode 5 Switch to Share mode 6 Enlarge or reduce the thumbnails in the list 7 Select a fil...

Page 97: ...lick to play back Playback starts and the controls appear Intelli studio supports the following file formats Video formats MP4 Video H 264 Audio AAC WMV WMV 7 8 9 Photo formats JPG GIF BMP PNG TIFF Step 4 Editing videos or photos You can edit the videos or photos in various ways with various functions Change Size Fine Tuning Image Effect Insert Frame etc Before editing a video or photo in Intelli ...

Page 98: ...ted file appears in the sharing window 3 Click the web site you would like to upload files to You can choose YouTube twitter Flickr Facebook Picasa Email or another web site you want to use for your site management 4 Click Upload to start uploading A pop up window appears asking for your ID and password 5 Enter your ID and the password to access Access to the web site contents can be limited depen...

Page 99: ...torage media appear Different file types are stored in different folders 6 Select the desired folder or files to copy then drag and drop them into the destination folder The folder or files are copied from the storage media to the PC If the Removable Disk window does not appear confirm the connection page 95 or perform steps 1 and 4 again If the removable disk does not appear automatically open th...

Page 100: ...e camcorder can create a maximum of 9 999 files in a storage media Photo file As with video files the file number used in the file name automatically increases when you create a new photo file Photos have a SAM_ JPG name format The folder names are given in the following order 100PHOTO 101PHOTO etc File format Video files Video files are compressed in H 264 format The file extension is MP4 Refer t...

Page 101: ...ic If not change to an authentic Samsung battery We recommend you use only genuine Samsung batteries in this camcorder Storage media Message Icon Informs that Action Internal Memory Full There is not enough space to record in the internal memory Delete unnecessary files in the internal memory Back up files to your PC or another storage media and delete files Use a memory card Insert card There is ...

Page 102: ...card with a card formatted correctly Not Supported Card The memory card is not supported in this camcorder Replace the memory card with a recommended card Low Speed Card Please record at a lower resolution The memory card is not fast enough to record at this resolution Record video at a lower resolution and quality Replace memory card with a faster card Recording Message Icon Informs that Action W...

Page 103: ...e a photo The number of photo files that can be stored is 9 999 Delete unnecessary files on the storage media Back up files to your PC or another storage media and delete unneeded files Change to another card which has enough free space Set File No to Reset Format the storage media File number is full Cannot record video Folder and file number have reached the maximum number and you cannot record ...

Page 104: ... combine have different resolutions You cannot combine files that have different resolutions Not enough free space in Card You cannot edit due to insufficient space on memory card Edit after deleting unnecessary files Select 2 files for combine Only two files can be combined Combine two files first and then combine the resulting file with an additional file Note that you cannot combine files if th...

Page 105: ...nk Error There is a problem with an ink cartridge Check the ink cartridge Put a new ink cartridge into the printer Paper Error There is a problem with the paper Check the paper in the printer If there is no paper insert paper File Error There is a problem with the file Your camcorder does not support this file format Try another file recorded on your camcorder Printer Error There is a problem with...

Page 106: ... adaptor and connect the power supply to the camcorder again before turning it on The battery discharges quickly The temperature is too low The battery is not fully charged Charge the battery again The battery has reached the end of its lifespan and cannot be recharged Use another battery Display Symptom Explanation Solution The TV screen or LCD display has distorted images or has stripes at the t...

Page 107: ...tant This is not a malfunction During recording the date time does not display Date Time Display is set to Off Set the Date Time Display to On page 79 You cannot record a photo image Set your camcorder to the record mode page 29 Release the lock on the write protection tab of the memory card if any The storage media is full Use a new memory card or format the storage media page 86 Or remove unnece...

Page 108: ...ectory structure complies with the international standard Adjusting the image during recording Symptom Explanation Solution Focus does not adjust automatically Set Focus to Auto page 59 The recording conditions are not suitable for auto focus Adjust the focus manually page 59 The lens is dusty on the surface Clean the lens and check the focus Recording is being made in a dark location Use a light ...

Page 109: ...ge appears distorted on a TV This phenomenon is caused by connecting to a TV with 4 3 aspect ratio You cannot view the image on or hear the sound from a TV connected using the HDMI cable The camcorder cannot output Images from the HDMI jack if the material is copyright protected Connecting Dubbing with other devices Recorder PC Printer etc Symptom Explanation Solution You cannot dub correctly usin...

Page 110: ...ly Exit the Intelli studio application and restart the Windows computer Intelli studio does not start Set PC Software to On in the Settings menu or install Intelli studio on the computer pages 83 95 Your computer is not playing videos images or sound located on your camcorder properly Video playback or sound may stop temporarily depending on your computer The video or sound copied to your computer...

Page 111: ...recording playback mode There are some functions you cannot activate simultaneously The list shown above shows examples of unworkable combinations of functions and menu items Menu cannot be used in Smart Auto mode The following functions cannot be used during video recording Video Resolution Video Quality Photo Resolution Photo Sharpness Fader Cont Shot Digital Zoom Self Timer The following functi...

Page 112: ...ppear on the LCD screen An LCD screen is manufactured using advanced technology which creates screens with pixel failure rates of less than 0 01 However a black or bright spot red blue white may appear in the centre of the LCD screen and up to two spots may appear outside the centre These spots which are normally incurred during the manufacturing process do not affect the recorded images When ther...

Page 113: ... external device and have the appropriate Audio Video jacks Otherwise you may need to use a separate video format transcoder For example an PAL to NTSC format converter The format transcoder is not provided by Samsung PAL compatible countries regions Australia Austria Belgium Bulgaria China CIS Czech Republic Denmark Egypt Finland France Germany Greece Great Britain Holland Hong Kong Hungary India...

Page 114: ...fied Shorter focal lengths result in wider angles of view F No F Number The f number defines the brightness of lens Smaller number lens has generally brighter image The f number is directly proportional to the focal length and inversely proportional to the lens diameter F No focal length diameter of lens aperture MPEG 4 AVC H 264 MPEG 4 AVC H 264 defines the latest video coding format standardized...

Page 115: ...ors Composite output 1Vp p 75 Ω terminated HDMI output C type connector Audio output 7 5 dBs 600 Ω terminated USB output mini USB B type USB2 0 High Speed General Power source DC 5 V Lithium Ion battery pack 3 7 V Power source type Lithium Ion battery pack Power supply 100 V 240 V 50 60 Hz Power consumption Recording 2 5W LCD on Operating temperature 32 F 104 F 0 C 40 C Storage temperature 4 F 140...

Page 116: ...42 27 5755 www samsung com AUSTRIA 0810 SAMSUNG 7267864 0 07 min www samsung com BELGIUM 02 201 24 18 www samsung com be Dutch www samsung com be_fr French Region Country Contact Centre Web Site Europe BOSNIA 05 133 1999 www samsung com BULGARIA 07001 33 11 www samsung com CROATIA 062 SAMSUNG 062 726 7864 www samsung com CZECH 800 SAMSUNG 800 726786 www samsung com DENMARK 70 70 19 70 www samsung ...

Page 117: ...msung com hk_en INDIA 1800 1100 11 3030 8282 1800 3000 8282 1800 266 8282 www samsung com INDONESIA 0800 112 8888 021 5699 7777 www samsung com Region Country Contact Centre Web Site Asia Pacific JAPAN 0120 327 527 www samsung com MALAYSIA 1800 88 9999 www samsung com PHILIPPINES 1 800 10 SAMSUNG 726 7864 for PLDT 1 800 3 SAMSUNG 726 7864 for Digitel 1 800 8 SAMSUNG 726 7864 for Globe 02 5805777 w...

Page 118: ...ycling Business users should contact their supplier and check the terms and conditions of the purchase contract This product and its electronic accessories should not be mixed with other commercial wastes for disposal Correct disposal of batteries in this product Applicable in the European Union and other European countries with separate battery return systems This marking on the battery manual or...

Page 119: ...dous Substances in electrical and electronic equipment and we do not use the 6 hazardous materials Cadmium Cd Lead Pb Mercury Hg Hexavalent Chromium Cr 6 Poly Brominated Biphenyls PBBs Poly Brominated Diphenyl Ethers PBDEs in our products Downloaded From VideoCamera Manual com Manuals ...

Reviews: