background image

Safety Instructions

Table of Contents

2

3

Warning! Important 

Safety Instructions

CAUTION:  TO REDUCE THE RISK OF ELECTRIC SHOCK, DO NOT REMOVE COVER (OR
BACK).  THERE ARE NO USER SERVICEABLE PARTS INSIDE. REFER ALL SERVICING TO QUALI-
FIED SERVICE PERSONNEL.

This symbol indicates high voltage is present. It is dangerous to make any
kind of contact with any part inside this product.

This symbol alerts you that important literature concerning operation and
maintenance has been included with this product.

CAUTION:  FCC/CSA regulations state that any unauthorized changes or modifications to this
equipment may void the user’s authority to operate it.

CAUTION:  To prevent electric shock, match the wide blade of plug to the wide slot, and fully
insert the plug.

ATTENTION:  Pour eviter les chocs electriques, introduire la lame le plus large de la fiche dans
la borne correspondante de la prise et pousser jusqu’au fond.

Note to CATV system installer:  This reminder is provided to call CATV system installer’s attention
to Article 820-40 of the National Electrical Code (Section 54 of Canadian 
Electrical Code, Part I), that provides guidelines for proper grounding and, in particular, speci-
fies that the cable ground shall be connected to the grounding system of the building as close to
the point of cable entry as possible.

Important: One Federal Court has held that unauthorized recording of copyrighted TV programs
is an infringement of U.S. copyright laws.  Certain Canadian programs may also be copyright-
ed and any unauthorized recording in whole or in part may be in violation of these laws.

To prevent damage which may result in fire or electric shock, 

do not expose this appliance to rain or moisture.

Introduction ................................................................................................6
Your New Wide TV ..................................................................................10

List of Features ........................................................................................................10
Checking Parts ........................................................................................................10
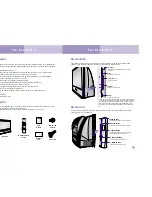
Side Panel Buttons ..................................................................................................11
Side Panel Jacks ......................................................................................................11
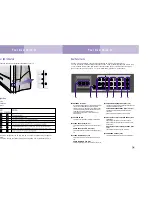
Side Panel LED Indicators ........................................................................................12
Rear Panel Jacks ......................................................................................................13
Remote Control........................................................................................................14

Connections ............................................................................................18

Connecting VHF and UHF Antennas ..........................................................................18

Antennas with 300-ohm Flat Twin Leads ............................................................18
Antennas with 75-ohm Round Leads ................................................................18
Separate VHF and UHF Antennas ....................................................................19

Connecting Cable TV and VCR ................................................................................20

Cable without a Cable box..............................................................................20
Cable with a Cable Box that Descrambles All Channels......................................20
Connecting a Cable Converter Box ..................................................................21
Connecting a Cable Converter Box and a VCR..................................................21

Connecting a Camcorder..........................................................................................22
Connecting a DVD Player ........................................................................................23
Connecting a Set Top Box ........................................................................................24
Connecting Surround Speakers..................................................................................25

Operation .............................................................................................. 28

Turning the TV On and Off ......................................................................................28
Adjusting Basic Convergence ....................................................................................28
Viewing the Menus and Displays ..............................................................................30

Displaying the Menus......................................................................................30
Displaying Status Information ..........................................................................30

Selecting the Menu Language ..................................................................................31
Selecting the Antenna Input ......................................................................................31
Channel Memory ....................................................................................................32

Selecting the Broadcast Source ........................................................................32
Storing Channels in Memory Automatically ......................................................33
Adding and Erasing Channels ........................................................................33

Changing Channels ................................................................................................34

Using the Channel Buttons ..............................................................................34
Using the Number Buttons ..............................................................................34
Using the Previous Channel ............................................................................34
Scanning channels..........................................................................................34

Selecting Your Favorite Channels ..............................................................................35

To Store Your Favorite Channels ......................................................................35
To View Your Favorite Channels ......................................................................35

As an ENERGY STAR Partner,
Samsung Electronics America, Inc. has determined that this product or product model meets the ENERGY
STAR guidelines for energy efficiency. 

Summary of Contents for HLK436W

Page 1: ...N U A L Projection Color Television HLK436W HLK506W SAMSUNG ELECTRONICS AMERICA INC 105 CHALLENGER ROAD RIDGEFIELD PARK NJ 07660 U S A FOR YOUR NEAREST SAMSUNG SERVICE CENTER DIAL 1 800 SAMSUNG www samsungusa com AA68 01242A ENG ...

Page 2: ... recording in whole or in part may be in violation of these laws To prevent damage which may result in fire or electric shock do not expose this appliance to rain or moisture Introduction 6 Your New Wide TV 10 List of Features 10 Checking Parts 10 Side Panel Buttons 11 Side Panel Jacks 11 Side Panel LED Indicators 12 Rear Panel Jacks 13 Remote Control 14 Connections 18 Connecting VHF and UHF Anten...

Page 3: ...n 54 Changing the Screen Size 55 Viewing Picture in Picture 56 Selecting a PIP Screen 56 Selecting an External Signal 57 Changing the Picture in Picture Channel 58 Swapping the Contents of the PIP image and Main image 59 Changing the Location of the PIP image 59 Changing the Size of the PIP image 59 Using the V Chip 60 Setting Up Your Personal ID Number PIN 60 How to Enable Disable the V Chip 61 H...

Page 4: ...on completion of any service or repairs to this TV ask the service technician to perform safety checks to determine that the TV is in a safe operating condition This device complies with part 15 of the FCC Rules Operation is subject to the following two conditions 1 This device may not cause harmful interference and 2 This device must accept any interference that may cause undesired operation This...

Page 5: ...Your New Wide TV ...

Page 6: ...e Side Panel Buttons The buttons on the side panel control your TV s basic features including the on screen menu system To use the more advanced features you must use the remote control Side Panel Jacks Use the side panel jacks to connect a component that is used only occasionally a camcorder video game or PC for example Menu Press to see the on screen menu Channel Press to change channels Volume ...

Page 7: ...nnel can be received only when a signal source is connected to ANT A S VIDEO IN jack Connects an S Video signal from an S VHS VCR or laserdisc player ˇ VIDEO INPUT jacks V1 V2 Connect video signals from external sources like VCRs or DVD play ers AUDIO INPUT jacks L1 R1 L2 R2 Connect audio signals from external sources like VCRs or DVD play ers VIDEO MONITOR OUT jack Sends a video signal from the T...

Page 8: ...all of the available video e TV VCR DVD DTV PC tick ghlight on screen menu items and menu values on he caption decoder picture in picture 16 TV PC Press to switch to the PC mode when the PC is connected to your TV 17 Fav CH Favorite Channel Press to switch between your favorite chan nels 18 S Mode Adjust the TV sound by selecting one of the preset factory settings or select your per sonal customiz...

Page 9: ...Connection ...

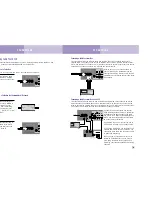
Page 10: ... back panel of the TV Connections Connections 19 ing VHF and UHF Antennas not have a cable system you will need to connect an antenna to your TV with 300 ohm Flat Twin Leads enna looks like this it has 300 ohm flat twin leads the wires from the twin s under the screws on the 75 ohm adapter includ Use a screwdriver to en the screws the adapter into the A terminal on the back el of the TV with 75 oh...

Page 11: ...eatures that you can not program using the remote control such as programming your favorite channels and block ing channels Connecting a Cable Converter Box and a VCR This connection allows you to watch and record basic and premium cable channels as well as watch videotapes You should keep your TV selected to ANT A so that you can use the TV s fea tures When viewing premium channels or recording w...

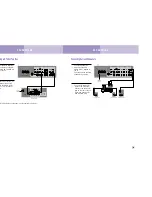
Page 12: ... your era s instructions and ection on Viewing a DVD or Camcorder in this manual Connecting a DVD Player The rear panel jacks on your TV make it easy to connect a DVD player to your TV Connecting to Y PB PR 1 Connect a set of audio cables between the Component audio in jacks on the TV and the AUDIO OUT jacks on the DVD play er 2 To enable Component video viewing connect video cables between the Y ...

Page 13: ... COMPO NT Y Pb Pr jacks of TV DTV Set Top Box connection is not supported in PC mode Connecting Surround Speakers 1 Connect inputs of an amplifier to the SUR ROUND OUT outputs of the TV Then connect the surround speakers to your amp 2 Connect the subwoofer input on the active sub woofer to the subwoofer jack on the rear of the TV Note Use a subwoofer with a built in amp ...

Page 14: ...Operation ...

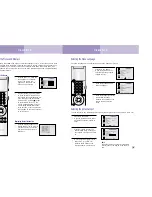
Page 15: ...8 While the word Blue is highlighted move the joystick to enter When the crosshair pattern appears move the joystick to con vergence the blue line same procedure as in steps 1 7 above After the blue convergence is correctly adjusted press Menu to exit menu NOTE Some flashes may appear on the screen during the convergence adjustments This does not indicate a problem and is normal 29 Operation the T...

Page 16: ...o control the settings of your TV Access the on screen menu pressing the Menu button on the remote control Once the on screen menu appears use k button on your remote control to move between menu items select menu items and ustments You can also view the on screen menu system and make some adjustments using de panel buttons the Menus 1 With the power on press the Menu button on the remote control ...

Page 17: ...rst select the broadcast source as described on the previous page With the CHANNEL SETUP menu on screen move the joystick down to select Auto channel memory 2 Press the joystick to enter The TV will begin memorizing all of the available stations Move joystick right or left at any time to interrupt the memorization process If the TV set stops operation when AUTO PROGRAM runs it is recommended to re...

Page 18: ...our TV by using the CH and CH buttons or by direct selec the number buttons You can use the number buttons to tune to any channel even one een erased or has not been memorized Using the Channel Buttons Press the CH or CH buttons to change channels The TV changes each channel in order up or down depend ing on which button you press You will see all the chan nels that the TV has memorized The TV mus...

Page 19: ...hen watching a show that is mostly dialogue like a news show Choose Custom if you want to adjust the settings yourself 37 Operation Control ontrol and customize the sound levels and settings of the TV with the remote control on screen menus you can change the TV s bass treble and balance settings Adjusting the Volume Press VOL to raise the volume or VOL to lower the volume Using the Mute Button Pr...

Page 20: ... settings yourself Control remote you can change the contrast brightness tint color and sharpness settings of Customizing the Picture 1 Press the Menu button Press the joystick to enter Move joystick left or right to select Custom You will see the items Brightness Contrast Color Tint and Sharpness 2 Move the joystick down to select the item you want to change 3 Move the joystick right or left to r...

Reviews: