background image

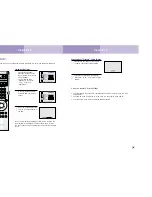
Selecting Your Favorite Channels

You can store up to ten of your favorite channels for each available input source (such as TV and
CATV). Then, when you press the Fav.CH button on the remote control, the TV displays only the
favorite channels you previously stored, allowing you to quickly and easily find frequently
watched channels. 

To Store Your Favorite Channels:

1

Press the Menu button. Move

the joystick down to select 

SETUP, then press the joystick 
to enter.

2

Press the joystick to enter.

The channel setup menu will 

appear.  Move the joystick 
down to select Air or CATV, 
then move the joystick to 
the right to display the type of
cable system or Air.

3

Move the joystick down to

select “Favorite Channel”,
then press the joystick to
enter.

4

Move the joystick to the left or

right to select channel.
Note: Only memorized chan-
nels can be set as Favorite
channels.

To View Your Favorite Channels:

Press the Fav.CH button repeatedly to
jump from one favorite channel 
to another.

Operation

Operation

34

35

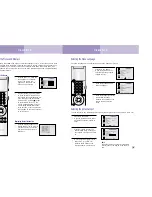
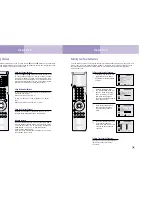
Changing Channels

You can change channels on your TV by using the CH

and CH

buttons, or by direct selec-

tion using the number buttons. You can use the number buttons to tune to any channel (even one
that has been erased or has not been memorized). 

Using the Channel Buttons

Press the CH

or CH

buttons to change channels. The

TV changes each channel in order, up or down, depend-
ing on which button you press. You will see all the chan-
nels that the TV has memorized. (The TV must have mem-
orized at least three channels.) You will not see channels
that were not memorized or have been erased.

Using the Number Buttons

To change to single-digit channels (0–9) faster, press “0”
before the single digit. 

Example: For channel 4, press “0,” then “4.” 

To select a channel over 100, press the +100 button
first.  

Example: For channel 122, press “+100,” then “2,” then “2.” 

Using the Previous Channel

Press the Pre-ch button on the remote control.  The TV
changes to the last channel you were watching.

Scanning channels

You can automatically scan all of the channels in memo-
ry at the touch of just one button.  Press the Scan button
on the remote control.  The TV will change the channels
automatically, one by one.  To stop channel scan, 
press the Scan button again. 
Note: When the ANT B mode is selected, the chan-nels
scan function doesn’t work.

Summary of Contents for HLK436W

Page 1: ...N U A L Projection Color Television HLK436W HLK506W SAMSUNG ELECTRONICS AMERICA INC 105 CHALLENGER ROAD RIDGEFIELD PARK NJ 07660 U S A FOR YOUR NEAREST SAMSUNG SERVICE CENTER DIAL 1 800 SAMSUNG www samsungusa com AA68 01242A ENG ...

Page 2: ... recording in whole or in part may be in violation of these laws To prevent damage which may result in fire or electric shock do not expose this appliance to rain or moisture Introduction 6 Your New Wide TV 10 List of Features 10 Checking Parts 10 Side Panel Buttons 11 Side Panel Jacks 11 Side Panel LED Indicators 12 Rear Panel Jacks 13 Remote Control 14 Connections 18 Connecting VHF and UHF Anten...

Page 3: ...n 54 Changing the Screen Size 55 Viewing Picture in Picture 56 Selecting a PIP Screen 56 Selecting an External Signal 57 Changing the Picture in Picture Channel 58 Swapping the Contents of the PIP image and Main image 59 Changing the Location of the PIP image 59 Changing the Size of the PIP image 59 Using the V Chip 60 Setting Up Your Personal ID Number PIN 60 How to Enable Disable the V Chip 61 H...

Page 4: ...on completion of any service or repairs to this TV ask the service technician to perform safety checks to determine that the TV is in a safe operating condition This device complies with part 15 of the FCC Rules Operation is subject to the following two conditions 1 This device may not cause harmful interference and 2 This device must accept any interference that may cause undesired operation This...

Page 5: ...Your New Wide TV ...

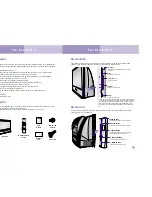
Page 6: ...e Side Panel Buttons The buttons on the side panel control your TV s basic features including the on screen menu system To use the more advanced features you must use the remote control Side Panel Jacks Use the side panel jacks to connect a component that is used only occasionally a camcorder video game or PC for example Menu Press to see the on screen menu Channel Press to change channels Volume ...

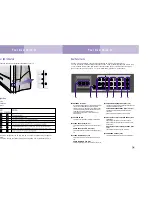
Page 7: ...nnel can be received only when a signal source is connected to ANT A S VIDEO IN jack Connects an S Video signal from an S VHS VCR or laserdisc player ˇ VIDEO INPUT jacks V1 V2 Connect video signals from external sources like VCRs or DVD play ers AUDIO INPUT jacks L1 R1 L2 R2 Connect audio signals from external sources like VCRs or DVD play ers VIDEO MONITOR OUT jack Sends a video signal from the T...

Page 8: ...all of the available video e TV VCR DVD DTV PC tick ghlight on screen menu items and menu values on he caption decoder picture in picture 16 TV PC Press to switch to the PC mode when the PC is connected to your TV 17 Fav CH Favorite Channel Press to switch between your favorite chan nels 18 S Mode Adjust the TV sound by selecting one of the preset factory settings or select your per sonal customiz...

Page 9: ...Connection ...

Page 10: ... back panel of the TV Connections Connections 19 ing VHF and UHF Antennas not have a cable system you will need to connect an antenna to your TV with 300 ohm Flat Twin Leads enna looks like this it has 300 ohm flat twin leads the wires from the twin s under the screws on the 75 ohm adapter includ Use a screwdriver to en the screws the adapter into the A terminal on the back el of the TV with 75 oh...

Page 11: ...eatures that you can not program using the remote control such as programming your favorite channels and block ing channels Connecting a Cable Converter Box and a VCR This connection allows you to watch and record basic and premium cable channels as well as watch videotapes You should keep your TV selected to ANT A so that you can use the TV s fea tures When viewing premium channels or recording w...

Page 12: ... your era s instructions and ection on Viewing a DVD or Camcorder in this manual Connecting a DVD Player The rear panel jacks on your TV make it easy to connect a DVD player to your TV Connecting to Y PB PR 1 Connect a set of audio cables between the Component audio in jacks on the TV and the AUDIO OUT jacks on the DVD play er 2 To enable Component video viewing connect video cables between the Y ...

Page 13: ... COMPO NT Y Pb Pr jacks of TV DTV Set Top Box connection is not supported in PC mode Connecting Surround Speakers 1 Connect inputs of an amplifier to the SUR ROUND OUT outputs of the TV Then connect the surround speakers to your amp 2 Connect the subwoofer input on the active sub woofer to the subwoofer jack on the rear of the TV Note Use a subwoofer with a built in amp ...

Page 14: ...Operation ...

Page 15: ...8 While the word Blue is highlighted move the joystick to enter When the crosshair pattern appears move the joystick to con vergence the blue line same procedure as in steps 1 7 above After the blue convergence is correctly adjusted press Menu to exit menu NOTE Some flashes may appear on the screen during the convergence adjustments This does not indicate a problem and is normal 29 Operation the T...

Page 16: ...o control the settings of your TV Access the on screen menu pressing the Menu button on the remote control Once the on screen menu appears use k button on your remote control to move between menu items select menu items and ustments You can also view the on screen menu system and make some adjustments using de panel buttons the Menus 1 With the power on press the Menu button on the remote control ...

Page 17: ...rst select the broadcast source as described on the previous page With the CHANNEL SETUP menu on screen move the joystick down to select Auto channel memory 2 Press the joystick to enter The TV will begin memorizing all of the available stations Move joystick right or left at any time to interrupt the memorization process If the TV set stops operation when AUTO PROGRAM runs it is recommended to re...

Page 18: ...our TV by using the CH and CH buttons or by direct selec the number buttons You can use the number buttons to tune to any channel even one een erased or has not been memorized Using the Channel Buttons Press the CH or CH buttons to change channels The TV changes each channel in order up or down depend ing on which button you press You will see all the chan nels that the TV has memorized The TV mus...

Page 19: ...hen watching a show that is mostly dialogue like a news show Choose Custom if you want to adjust the settings yourself 37 Operation Control ontrol and customize the sound levels and settings of the TV with the remote control on screen menus you can change the TV s bass treble and balance settings Adjusting the Volume Press VOL to raise the volume or VOL to lower the volume Using the Mute Button Pr...

Page 20: ... settings yourself Control remote you can change the contrast brightness tint color and sharpness settings of Customizing the Picture 1 Press the Menu button Press the joystick to enter Move joystick left or right to select Custom You will see the items Brightness Contrast Color Tint and Sharpness 2 Move the joystick down to select the item you want to change 3 Move the joystick right or left to r...

Reviews: