background image

English - 22

I

N S TA L L AT I O N

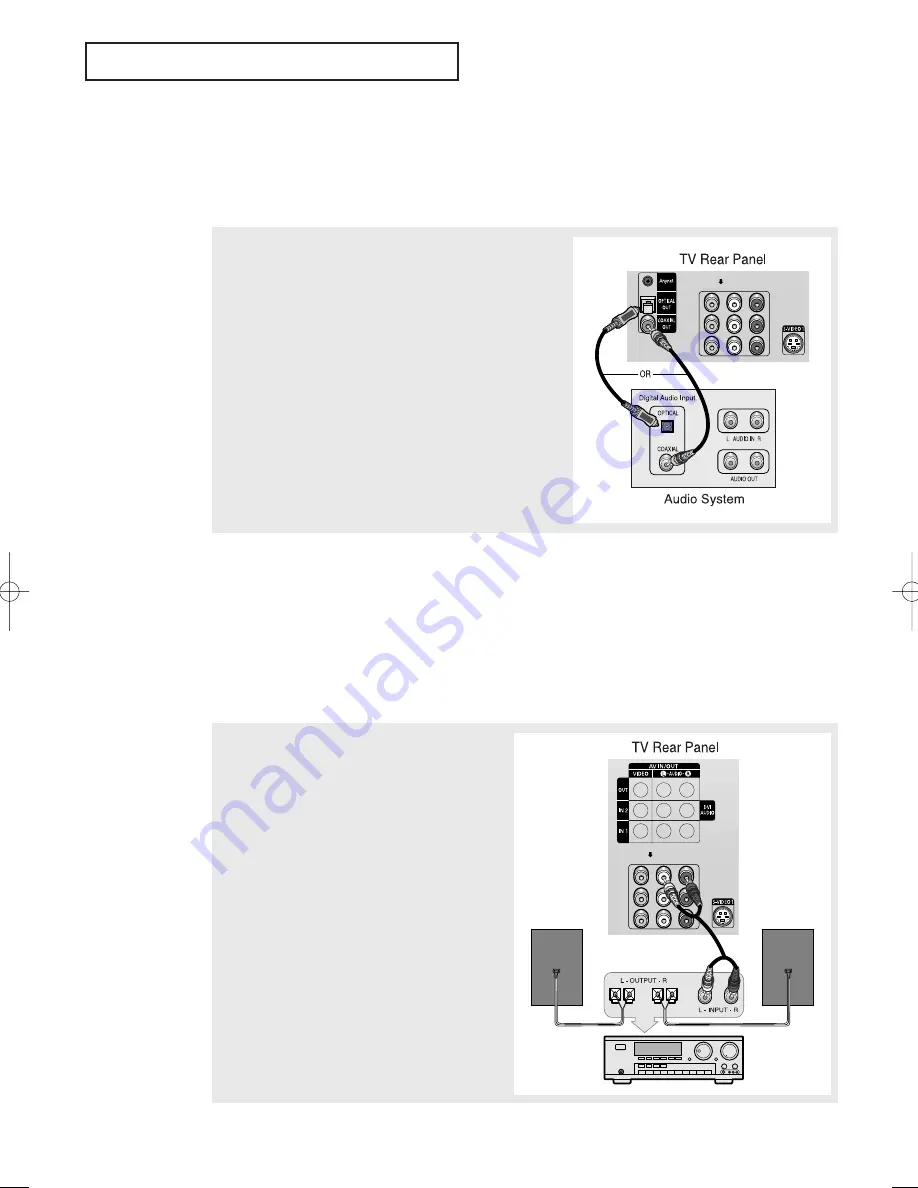
Connecting a Digital Audio System

There are many types of digital audio systems on the market today. 
A simplified illustration of an audio system is shown below. For more information, see your
audio system owner’s manual.

Connecting to an Analog Amplifier

1

If your audio system has a coaxial digital audio input, connect
to the “COAXIAL OUT” jack on the TV.

2

If your audio system has a optical digital audio input, connect
to the “OPTICAL OUT” jack on the TV.
Be certain to remove the black cover from the optical output
before inserting the cable.

3

If your system has both coaxial and optical digital audio inputs,
SAMSUNG recommends you use the optical digital output on
the TV.
Do not connect both optical and coaxial cables. This may
damage your audio system.  

1

The “AUDIO OUT” terminals cannot be used for
external speakers. You must hook them up to an
amplifier.

When an audio amplifier is connected to the
“AUDIO OUT” terminals: Decrease the gain
(volume) of  the audio amplifier,  and adjust the
volume level with the volume control on the TV. 

• OPTICAL: converts the electric signal into an optical light signal, and transmits it through glass fibers.

A transmission system of digital audio in the form of a light wave, S/PDIF format using a glass
conductor.

• COAXIAL: The digital audio signal is received through a coaxial copper cable.

BP68-00334A-00Eng  5/20/04  4:52 PM  Page 22

Summary of Contents for HC-P5256W

Page 1: ...Arlington NJ 07856 www samsungusa com Samsung Electronics Canada Inc Samsung Customer Care 7037 Financial Drive Mississauga Ontario L5N 6R3 www samsung ca BP68 00334A 00 Owner s Instructions PROJECTION TELEVISION HC P5256W This device is a Class B digital apparatus BP68 00334A 00Eng 5 20 04 5 28 PM Page 80 ...

Page 2: ...cs and images on screen such as the dark side bars on non expanded standard format television video and programming should be limited to no more than 15 of the total television viewing per week Additionally viewing other stationary images and text such as stock market reports video game displays station logos web sites or computer graphics and patterns should be limited as described above for all ...

Page 3: ...ed 480i and 480 line progressive 480p video 480i programs are essentially a digital version of our current analog TV programs while the 480p format offers improved image detail over 480i Some 480p programs are broadcast in widescreen and are comparable to progressive scan DVD movies in image quality HDTV program formats include 1080 line interlaced 1080i and 720 line progressive 720p Both HDTV for...

Page 4: ...Vs and monitors The advantage of an integrated DTV set is that it can tune both analog and digital TV channels at the same time All you ll need to do is add an external antenna and you are ready to watch DTV However integrated DTV sets are not as common as DTV ready TVs and monitors If you already own a DTV ready TV with component video inputs you can enjoy DTV broadcasts by simply adding a low co...

Page 5: ...y it was originally encoded for broadcast This is a big advantage for DTV over analog TV there is no noise ghosting static or scratchy audio 3 How can I connect an antenna in my townhouse co operative apartment condominium or apartment The Federal Communications Commission s OTARD Rule part of the Telecommunications Act of 1996 allows residents of condominiums townhouse or members of neighborhood ...

Page 6: ... Analog Amplifier 22 Installing Batteries in the Remote Control 23 Chapter 3 Operation Turning the TV On and Off 24 Plug Play Feature 24 Adjusting the Screen Automatically Self Focus 26 Activating the Automatic Execution of the Self Focus 26 Deactivating the Automatic Execution of the Self Focus 27 Removing the Self Focus Message from the Display 27 Viewing the Menus and On Screen Displays 28 View...

Page 7: ... Melody 57 Setting the On Off Timer 58 Setting the Sleep Timer 59 Using the V Chip USA 60 How to Change Your Password 60 How to Enable Disable the Rating Controls 61 How to Set up Restrictions Using the TV Parental Guidelines 62 How to Set up Restrictions using the Movie Ratings G PG PG 13 R NC 17 X 63 Important Notes About Parental Locks 64 Viewing Closed Captions On Screen Text Messages Analog 6...

Page 8: ...at lets you watch two channels at once Component Video Input jacks to obtain a sharper image from external sources Adjusting the Screen Automatically Self Focus DNIe Digital Natural Image engine Digital Input Digital Visual Interface jack Digital Audio Output COAXIAL OPTICAL jacks AV network system Anynet that enables you to easily control Samsung audio video AV devices from this TV CableCARD slot...

Page 9: ...Power Off Red Power On Off Timer On Green ˇ Remote Control Sensor Aim the remote control towards this spot on the TV SOURCE Press to switch between viewing TV programs and signals from connected components ˆ MENU Press to see an on screen menu of your TV s features Ø VOL Press to lower or raise the volume and to select items when using the on screen menu CH Press to change channels and move betwee...

Page 10: ... Connect the audio signals from a camcorder or video game ˇ S VIDEO Input Connect an S Video signal from a camcorder or video game Connection Jacks Side You can connect an A V component that is used only occasionally such as a camcorder or video game For information on connecting equipment see pages 18 22 ...

Page 11: ...lot ˇ DVI Video Input jack Digital Visual Interface Connect the DVI jack to a device with DVI output Anynet Please refer to the Anynet Owner s Instructions ˆ OPTICAL Output jack Connect to a Digital Audio component Ø COAXIAL Output jack Connect to a Digital Audio component Audio Video Output jacks Connect to the audio video input jacks of a recording VCR Video Input jacks Connect to the video outp...

Page 12: ... Press to temporarily cut off the sound Anynet Please refer to the Anynet Owner s Instructions MENU Displays the main on screen menu œ Controls the cursor in the menu Ô FAV CH Favorite Channel Press to switch to your favorite channels CH LIST Displays the channel list Ò MODE Selects a target device to be controlled by this remote control i e TV Samsung STB VCR Cable box or DVD Ú PRE CH Tunes to th...

Page 13: ...sed during set up of this remote control so that it will work compatibly with other devices VCR Samsung Set Top box Cable box DVD etc SLEEP Press to select a preset time interval for automatic shut off CH CH Displays the available channels in sequence These buttons change channels in the PIP window only CAPTION Press to view closed caption information µ RESET If your remote control is not function...

Page 14: ... antennas see Separate VHF and UHF Antennas on page 15 Antennas with 300 ohm Flat Twin Leads If you are using an off air antenna such as a roof antenna or rabbit ears that has 300 ohm twin flat leads follow the directions below Chapter Two INSTALLATION 1 Place the wires from the twin leads under the screws on the 300 75 ohm adaptor not supplied Use a screwdriver to tighten the screws 2 Plug the ad...

Page 15: ...he Cable IN or Air IN terminal on the rear panel Separate VHF and UHF Antennas If you have two separate antennas for your TV one VHF and one UHF you must combine the two antenna signals before connecting the antennas to the TV This procedure requires a an optional combiner adaptor available at most electronics shops 1 Connect both antenna leads to the combiner ...

Page 16: ...nal on the rear panel œ This terminal might be labeled ANT OUT VHF OUT or simply OUT Connecting Cable TV You can connect different cable systems to your TV including cable without a cable box and cable with a cable box that descrambles some or all channels Cable without a Cable Box If you want to connect cable and you do not need to use a cable box Plug the incoming cable into the Cable IN or Air ...

Page 17: ...nal on the splitter and the IN terminal on the cable box INSTALLATION 3 Connect a coaxial cable between the ANTENNA OUT terminal on the cable box and the B IN terminal on the A B switch 4 Connect another cable between the other OUT terminal on the splitter and the A IN terminal on the RF A B switch 5 Connect the last coaxial cable between the OUT terminal on the RF A B switch and the VHF UHF termi...

Page 18: ...o an antenna or a cable TV system according to the instructions on pages 14 17 Skip step 1 if you have not yet connected to an antenna or a cable system 1 Connect a coaxial cable between the Air IN or Cable IN terminal on the TV and the antenna out terminal on the VCR A coaxial cable is usually included with a VCR If not check your local electronics store 2 Connect a set of audio cables between th...

Page 19: ...he AV OUT VIDEO jack on the TV and the VIDEO IN jack on the VCR Refer to your VCR s instructions for more information about how to record using this kind of connection 1 Locate the A V output jacks on the camcorder They are usually found on the side or rear of the camcorder 2 Connect a set of audio cables between the AV 3 L R jacks on the TV and the AUDIO OUT jacks on the camcorder If you have mon...

Page 20: ... Connect a set of video cables between the COMPONENT IN 1 Y PB PR or COMPONENT IN 2 Y PB PR jacks on the TV and the VIDEO OUT Y PB PR jacks on the DVD player or DTV Set Top Box For an explanation of Component video see your DVD player s or DTV Set Top Box owner s instruction 1 Connect a set of audio cables between the AV IN 1 L R or AV IN 2 L R jacks on the TV and the AUDIO OUT jacks on the DVD pl...

Page 21: ...the screen in their digital form INSTALLATION Notes The DVI INPUT jack is not compatible with the picture signal of a personal computer Use a DVI 25 pin cable commercially available in order to digitally connect the TV with a DTV decoder 1 Connect a set of audio cables between the DVI AUDIO L R jacks on the TV and the AUDIO OUT jacks on the Set Top Box 2 Connect a video cable between the DVI INPUT...

Page 22: ... your system has both coaxial and optical digital audio inputs SAMSUNG recommends you use the optical digital output on the TV Do not connect both optical and coaxial cables This may damage your audio system 1 The AUDIO OUT terminals cannot be used for external speakers You must hook them up to an amplifier When an audio amplifier is connected to the AUDIO OUT terminals Decrease the gain volume of...

Page 23: ...the batteries last for about one year The remote control can be used up to about 23 feet from the TV 2 Install two AAA size batteries œ Make sure to match the and ends of the batteries with the diagram inside the compartment Installing Batteries in the Remote Control 1 Slide the back cover all the way out to open the battery compartment of the remote control INSTALLATION ...

Page 24: ...matically displayed 2 Press the ENTER button to enter the language Press the or button to select language then the ENTER button Ant input check menu is automatically displayed 3 Press the or button to memorize the channels of the selected connection Press the ENTER button to select Start When selecting Cable TV Press the or button to select Cable then press the ENTER button Press the or button to ...

Page 25: ...Completed Time will be updated automatically is displayed When you have finished press the ENTER button Channel Memory in Process Air Channel 15 Stop 7 Channels were memorized Air 9 Cable 30 Return Next Select your time zone in which you live Eastern Central Mountain Pacific Alaska Hawaii 5 Press the ENTER button Press the or button to select Yes or No then the ENTER button Select your time zone i...

Page 26: ... is finished the menu will disappear and the optimum picture quality can be enjoyed Mode Dynamic Custom Color Tone Normal Size DNIe On Self Focus PIP T V Picture Mode Dynamic Custom Color Tone Normal Size DNIe On Self Focus PIP T V Picture Self Focus Auto Perform On Message Display On Self Focus T V œ During the process minor distortions of the picture may occur At this time the colors may diffuse...

Page 27: ...fter switching on the power and the appearance of the screen image To set the optimum picture quality the Self Focus will automatically begin again after another 30 minutes as the screen image is then fully stabilized 1 Press the MENU button Press the or button to select Picture then press the ENTER button 2 Press the or button to select Self Focus then press the ENTER button Press the or button t...

Page 28: ...nimated when highlighted Press the œ or button to display change or use the selected items Press the ENTER button to enter items in the menu 3 Press the EXIT button to exit Source List Edit Name Anynet Source List Edit Name Anynet T V Input T V Input œ You can also use the MENU CH VOL and ENTER buttons on the control panel of the TV to make selections English 28 OPERATION Press the INFO button on ...

Page 29: ...lect Setup then press the ENTER button Language English Time V Chip Caption Menu Transparency Medium DVI Signal 861B More Language English Time V Chip Caption Menu Transparency Medium DVI Signal 861B More English Spanish French T V Setup T V Setup Selecting the Antenna Input You can connect to two different signal sources by choosing the antenna input AIR or CABLE Press the ANTENNA button then pre...

Page 30: ...n begin memorizing the available channels you must specify the type of signal source that is connected to the TV i e an antenna or a cable system 3 Press the or button to select Auto Program then press the ENTER button 1 Press the MENU button Press the or button to select Channel then press the ENTER button 2 Press the ENTER button to select Antenna Press the or button to select Air or Cable then ...

Page 31: ... or IRC then press the ENTER button Select the cable system STD HRC IRC T V Auto Program Auto Program in Process AIR Channel 15 Stop Auto Program T V Auto Program Select the antennas to memorize Air Cable Air Cable Start Start Start T V Auto Program Select the antennas to memorize Air Cable Air Cable Start Start Start T V Auto Program Select the antennas to memorize Air Cable Air Cable Start Start...

Page 32: ...T button to exit Channel 11 Not In Memory Press ENTER to add the channel Add Channel 11 In Memory Press ENTER to delete the channel Delete Add channel Delete channel Add Delete Add Delete 2 Press the or button to select Add Delete then press the ENTER button Antenna Air Auto Program Add Delete Favorite Channels Name Fine Tune More T V Channel 1 Press the MENU button Press the or button to select C...

Page 33: ...ess 2 then 7 The TV will change channels when you press the second number Using the Previous Channel Press the PRE CH button The TV changes to the last channel you were watching Using the Button The button is used to select stations that broadcast both a digital and analog signal For example for Channel 7 digital press 7 then then 1 and you will see as left DTV CABLE 7 1 KYW HD HD Picture Mode Dyn...

Page 34: ...ress the or button to select a channel as a favorite channel then press the ENTER button Press the ENTER button again to deselect the selected channel Press the EXIT button to exit œ Only memorized channels can be set as Favorite channels œ Select All Press to select all channels Clear All Press to clear all channels T V Favorite Channels Select All Clear All AIR 6 AIR 7 AIR 9 AIR 11 AIR 13 AIR 14...

Page 35: ... A Z 0 9 blank Press the button to switch to the next field which will be selected Select a second letter or digit by pressing the or button as above Repeat the process to select the last two digits When you have finished select OK then press the ENTER button to assign the new name Press the EXIT button to exit œ If you add or delete the TV channel the corresponding label information will also be ...

Page 36: ...se the Yellow button 1 Press the MENU button Press the or button to select Channel then press the ENTER button 2 Press the or button to select Channel List then press the ENTER button More Channel List Signal Strength Channel Antenna Air Auto Program Add Delete Favorite Channels Name Fine Tune More T V Channel All 1 2 Channel List 2 5 6 7 8 9 10 11 12 13 14 16 18 20 21 22 23 24 25 26 27 28 29 33 M...

Page 37: ... of the automatic settings See next page Customizing the Picture 2 Press the or button to select Custom then press the ENTER button 3 Press the or button to select a particular item then press the ENTER button Press the œ or button to increase or decrease the value of a particular item Press the EXIT button to exit Contrast 100 Brightness 45 Sharpness 75 Color 50 Tint G 50 R50 T V Custom Mode Dyna...

Page 38: ...e room Choose Standard for the standard factory settings Choose Movie when viewing the movie Choose Custom if you want to adjust the settings according to personal preference see Customizing the Picture page 37 2 Press the ENTER button to select Mode Press the or button to select a particular item then press the ENTER button Press the EXIT button to exit T V Picture Mode Dynamic Custom Color Tone ...

Page 39: ...r personal preferences Alternatively you can use one of the automatic settings See next page Mode Custom Equalizer SRS TruSurround XT Off Auto Volume Off Multi Track Options Digital Output Dolby Digital Melody On T V Equalizer T V Sound Sound Control Adjusting the Volume Using the MUTE Button At any time you can temporarily cut off the sound using the MUTE button Press the VOL or VOL buttons to in...

Page 40: ...watching movies Choose Speech when watching a show that is mostly dialogue i e news Choose Custom to recall your personalized settings 2 Press the ENTER button to select Mode Press the or button to select a particular item then press the ENTER button Press the EXIT button to exit OPERATION T V Sound Mode Custom Equalizer SRS TruSurround XT Off Auto Volume Off Multi Track Options Digital Output Dol...

Page 41: ...the remote control T V Time Clock Sleep Timer On Timer Inactivated Off Timer Inactivated T V Clock T V Clock Set Clock Mode Manual Clock Set Time Zone DST Yes Set current date and time Month Day Year Hour Minute am pm 02 5 Press the œ or button to move to Month Day Year Hour Minute or am pm Set the clock you want by pressing the or button then press the ENTER button Press the EXIT button to exit 1...

Page 42: ...Mode Auto Clock Set Time Zone DST Yes 1 Press the MENU button Press the or button to select Setup then press the ENTER button Language English Time V Chip Caption Menu Transparency Medium DVI Signal 861B More T V Setup Manual Auto 5 Press the or button to select DST Daylight Saving Time then press the ENTER button Press the or button to select Yes or No then press the ENTER button Press the EXIT b...

Page 43: ...Name Anynet T V Input 2 Press the ENTER button to select Source List Press the or button to select signal source then press the ENTER button TV AV1 AV2 AV3 S Video1 S Video2 More T V Source List œ When you connect equipment to the TV you can choose between the following sets of jacks AV1 AV2 S Video1 Component1 Component2 or DVI on the TV s rear panel and AV3 or S Video2 on the TV s side panel Alt...

Page 44: ...es AV2 AV3 S Video1 S Video2 Component1 Component2 DVI using the same method as listed above Press the EXIT button to exit AV1 AV2 AV3 S Video1 S Video2 More T V Edit Name VCR DVD D VHS Cable STB HD STB Satellite STB PVR STB 2 Press the or button to select Edit Name then press the ENTER button AV1 AV2 AV3 S Video1 S Video2 More T V Input Assigning Names to External input mode 1 Press the MENU butt...

Page 45: ...R button Press the œ or button to adjust the fine tuning To store the fine tuning setting in the TV s memory press the ENTER button To reset the fine tuning to 0 press the or button to select Reset then press the ENTER button Press the EXIT button to exit Note Only analog TV channels can be fine tuned Analog 1 Press the MENU button Press the or button to select Channel then press the ENTER button ...

Page 46: ...ignal Strength 2 Press the or button to select Signal Strength then press the ENTER button If the signal strength meter indicates that the signal is weak physically adjust your antenna to increase the signal strength Continue to adjust the antenna until you find the best position with the strongest signal Press the EXIT button to exit SPECIAL FEATURES Digital OK 1 Press the MENU button Press the o...

Page 47: ...nal format Changing the Screen Size 1 Press the MENU button Press the or button to select Picture then press the ENTER button 2 Press the or button to select Size then press the ENTER button Mode Dynamic Custom Color Tone Normal Size DNIe On Self Focus PIP T V Picture T V Size 3 Press the œ or button to select the screen format you want Press the EXIT button to exit Panorama Zoom1 Zoom2 Normal œ Q...

Page 48: ... MENU button Press the or button to select Picture then press the ENTER button Mode Dynamic Custom Color Tone Normal Size DNIe On Self Focus PIP Mode Dynamic Custom Color Tone Normal Size DNIe On Self Focus PIP Off Demo On T V Picture T V Picture Alternate method Press the DNIe button on the remote control repeatedly to select one of the settings On Switches on the DNIe mode Off Switches off the D...

Page 49: ...ll return to normal video SPECIAL FEATURES Mode Dynamic Custom Color Tone Normal Size DNIe On Self Focus PIP T V Picture 3 Press the ENTER button to select PIP Press the or button to select On then press the ENTER button The sub picture appears in the corner of the screen PIP Off Source TV Swap Size Position PIP Channel Cable 6 T V PIP Off On 1 Press the MENU button Press the or button to select P...

Page 50: ...gnal Source See page 43 If you select TV the sub picture is the same as the main picture œ The sub picture doesn t support Air IN Component1 Component2 and DVI 5 Press the or button to select Swap then press the ENTER button The sub picture appears in the main picture and vice versa Swapping the Sub picture and Main picture œ The sub picture doesn t support Air IN Component1 Component2 and DVI 6 P...

Page 51: ...ss the or button to select Channel then press the ENTER button Press the or button to select a channel you want then press the ENTER button Press the EXIT button to exit œ The channels of sub picture are not available when the antenna is set to Air IN It links to Cable IN œ In the PIP mode the main and sub pictures are stilled at the same time Alternate method Press the CH or CH button to change c...

Page 52: ...3D Mono or Stereo then press the ENTER button Press the EXIT button to exit Alternate method Press the SRS button on the remote control repeatedly to select one of the settings 3D Mono TruSurround XT SRS and Symbol are trademarks of SRS Labs Inc TruSurround XT technology is incorporated under license from SRS Labs Inc 1 Press the MENU button Press the or button to select Sound then press the ENTER...

Page 53: ...o Volume automatically adjusts the volume of the desired channel by lowering the sound output when the modulation signal is high or by raising the sound output when the modulation signal is low Mode Custom Equalizer SRS TruSurround XT Off Auto Volume Off Multi Track Options Digital Output Dolby Digital Melody On T V Sound Off On 1 Press the MENU button Press the or button to select Sound then pres...

Page 54: ...oming audio is Spanish French or English 2 Press the or button to select Multi Track Options then press the ENTER button 1 Press the MENU button Press the or button to select Sound then press the ENTER button Mode Custom Equalizer SRS TruSurround XT Off Auto Volume Off Multi Track Options Digital Output Dolby Digital Melody On T V Sound Mode Custom Equalizer SRS TruSurround XT Off Auto Volume Off ...

Page 55: ... Track Options Digital Output Dolby Digital Melody On T V Sound 3 Press the or button to select Multi Track Sound then press the ENTER button Press the or button to select a setting you want then press the ENTER button Press the EXIT button to exit Preferred Language English Multi Track Sound Stereo Mono Stereo SAP Alternate method Press the MTS button on the remote control repeatedly to select on...

Page 56: ...ss the ENTER button Press the or button to select Dolby Digital or PCM then press the ENTER button Press the EXIT button to exit 1 Press the MENU button Press the or button to select Sound then press the ENTER button Mode Custom Equalizer SRS TruSurround XT Off Auto Volume Off Multi Track Options Digital Output Dolby Digital Melody On T V Sound Mode Custom Equalizer SRS TruSurround XT Off Auto Vol...

Page 57: ...melody sound can be set to come on when the TV is powered On or Off Mode Custom Equalizer SRS TruSurround XT Off Auto Volume Off Multi Track Options Digital Output Dolby Digital Melody On T V Sound Off On 1 Press the MENU button Press the or button to select Sound then press the ENTER button Mode Custom Equalizer SRS TruSurround XT Off Auto Volume Off Multi Track Options Digital Output Dolby Digit...

Page 58: ...ress the ENTER button Language English Time V Chip Caption Menu Transparency Medium DVI Signal 861B More T V Setup T V On Timer Set on timer Hour Minute am pm Antenna Channel Volume Activation 01 00 am Cable 2 10 No T V 3 Press the or button to select Off Timer then press the ENTER button Press the or button to adjust Hour then press the button to move to the next step Set other items using the sa...

Page 59: ...Timer On Timer 01 00 am Act Off Timer 12 00 pm Act 3 Press the or button to adjust Minute T V Sleep Timer Set sleep timer Minute Activation No 4 Press the button to select Activation Press the or button to select Yes then press the ENTER button Press the EXIT button to exit T V Sleep Timer Set sleep timer Minute Activation 030 Yes 1 Press the MENU button Press the or button to select Setup then pr...

Page 60: ...sword Re enter the new password to confirm 1 Press the MENU button Press the or button to select Setup then press the ENTER button Language English Time V Chip Caption Menu Transparency Medium DVI Signal 861B More T V Setup 2 Press the or button to select V Chip then press the ENTER button Press the number buttons to enter your current 4 digit pin number V Chip Lock Off TV Parental Guidelines MPAA...

Page 61: ...ton to exit 1 Press the MENU button Press the or button to select Setup then press the ENTER button Language English Time V Chip Caption Menu Transparency Medium DVI Signal 861B More T V Setup 2 Press the or button to select V Chip then press the ENTER button Press the number buttons to enter your current 4 digit pin number Enter PIN T V V Chip V Chip Lock Off TV Parental Guidelines MPAA Rating Ch...

Page 62: ...are indicated by the symbol Press the œ buttons and the ENTER button to activate the appropriate restrictions for TV FCC rating system Press the EXIT button to exit T V TV Parental Guidelines ALL FV V S L D TV Y TV Y7 TV G TV PG TV 14 TV MA Allow All Block All T V TV Parental Guidelines ALL FV V S L D TV Y TV Y7 TV G TV PG TV 14 TV MA Allow All Block All These categories consist of two separate gr...

Page 63: ...for movies When the Rating Control is on the TV will automatically block any programs that are coded with objectionable ratings either MPAA or TV Ratings 3 The V Chip menu is displayed Press the or button to select MPAA Rating then press the ENTER button T V MPAA Rating Block G PG PG 13 R NC 17 X NR Allow All Block All 1 Press the MENU button Press the or button to select Setup then press the ENTE...

Page 64: ...r a very young audience including children from ages two six V Violence S Sexual content L Offensive language D Dialog sexual innuendo FV Fantasy or cartoon violence G General audience No restriction PG Children under 13 should be accompanied by an adult PG 13 Parental guidance suggested Children under 13 should be accompanied by an adult R Restricted Viewers should be 17 or older NC 17 Not classi...

Page 65: ...me V Chip Caption Menu Transparency Medium DVI Signal 861B More T V Setup 1 Press the MENU button Press the or button to select Setup then press the ENTER button Language English Time V Chip Caption Menu Transparency Medium DVI Signal 861B More T V Setup 3 Press the ENTER button to select Caption Press the or button to select On then press the ENTER button Caption On Caption Mode CC1 Caption Optio...

Page 66: ...n digital channels 2 Press the or button to select Caption then press the ENTER button Digital T V Setup Language English Time V Chip Caption Menu Transparency Medium DVI Signal 861B More T V Setup Caption On Caption Mode CC1 Caption Options T V Caption Caption On Caption Mode CC1 Caption Options T V Caption Off On 1 Press the MENU button Press the or button to select Setup then press the ENTER bu...

Page 67: ...Cyan You can change the background color of the caption The default is Black Foreground Opacity This option consists of Default Transparent Translucent Solid and Flashing You can change the opacity of the letter Background Opacity This option consists of Default Transparent Translucent Solid and Flashing You can change the background opacity of the caption Return to Default This option sets each o...

Page 68: ...ter dislocated by the differences of various DVI signal sources Initial setting is 861B If you experience not aligned screen image center when the DVI INPUT jack on the rear of your TV is used for external device switch the setting to SMPTE This feature only works when the external source is set to DVI Refer to the Viewing an External Signal Source on the page 43 for further details 2 Press the or...

Page 69: ...Function Help Off CableCARDTM T V Setup Off On Activates Help functions for menu items 2 Press the or button to select Function Help then press the ENTER button More Function Help Off CableCARDTM T V Setup 1 Press the MENU button Press the or button to select Setup then press the ENTER button Language English Time V Chip Caption Menu Transparency Medium DVI Signal 861B More T V Setup ...

Page 70: ...n on the remote control E Displays titles and other details about upcoming programs of particular channels Highlight the program and press the INFO button to see additional and detailed information The availability of additional details depends on the broadcaster Use the buttons to search information about another channel F Scrolls forward quickly 2 hours Press the Yellow button on the remote cont...

Page 71: ...e Full Guide Reminder List Default Guide Mini Guide T V Guide Mini Guide Full Guide Reminder List Default Guide Mini Guide T V Guide 3 Press the or button to select Mini Guide or Full Guide then press the ENTER button Press the EXIT button to exit Mini Guide Full Guide Reminder List Default Guide Mini Guide T V Guide Mini Guide Full Guide œ Mini Guide Displays the guide for one channel Full Guide ...

Page 72: ...ess again to switch to the program information for the selected channel Blue button Press to exit INFO button Press to view detailed information for the selected digital program Notes You can also view information about a single channel by pressing the GUIDE button on the remote control The EPG should be pre set in Mini Guide mode Press the INFO button on the remote control to view the program inf...

Page 73: ... view the program information for all channels However this function is available only when the default program guide setting is set to All Program Guide œ INFO button Displays detailed information for the selected digital program button Displays program information for each channel based on the time Select your desired program using the button and then press the ENTER button to view the program i...

Page 74: ...s the ENTER button Mini Guide Full Guide Reminder List Default Guide Mini Guide T V Guide 2 Press the ENTER button to select Mini Guide Press the or button to select programs you would like to see then press the ENTER button The symbol will be displayed Each press of the ENTER button will switch between Reminded and Clear Press the EXIT button to exit MINI GUIDE MINI GUIDE 3 0 Remind Prog Info Ful...

Page 75: ...utton Press the EXIT button to exit To remove the scheduled programs 2 Press the or button to select Reminder List then press the ENTER button 1 Press the MENU button Press the or button to select Guide then press the ENTER button Mini Guide Full Guide Reminder List Default Guide Mini Guide T V Guide Mini Guide Full Guide Reminder List Default Guide Mini Guide T V Guide T V Reminder List Cancel Al...

Page 76: ...its of the code even if the first digit is a 0 If more than one code listed try the first one 5 Press the POWER button on the remote control Your VCR Cable box or DVD player should turn on If your VCR Cable box or DVD player turns on your remote control is now set correctly œ If your VCR Cable box or DVD player does not turn on repeat steps 2 3 and 4 but try one of the other codes listed for the b...

Page 77: ...English 77 SPECIAL FEATURES VCR Codes Cable Box Codes DVD Codes Remote Control Codes ...

Page 78: ... picture or sound Try another channel Press the SOURCE button Make sure the TV is plugged in Check the antenna connections No color wrong colors or tints Make sure the program is broadcast in color Adjust the picture settings Picture rolls vertically Adjust the antenna Check all wire connections The TV operates erratically Unplug the TV for 30 seconds then try operating it again Your remote contro...

Page 79: ...r touch the parts inside Wipe your TV with a clean dry cloth Never use water cleaning fluids wax or chemicals Do not put heavy objects on top of the cabinet Temperature If your TV is suddenly moved from a cold to a warm place unplug the power cord and allow at least two hours for moisture that may have formed inside the unit to dry completely Using Your TV in Another Country If you plan to take yo...

Reviews: