background image

SAMSUNG FIBRE TV SET-TOP BOX GX-SH435EH  

USER GUIDE 

33 


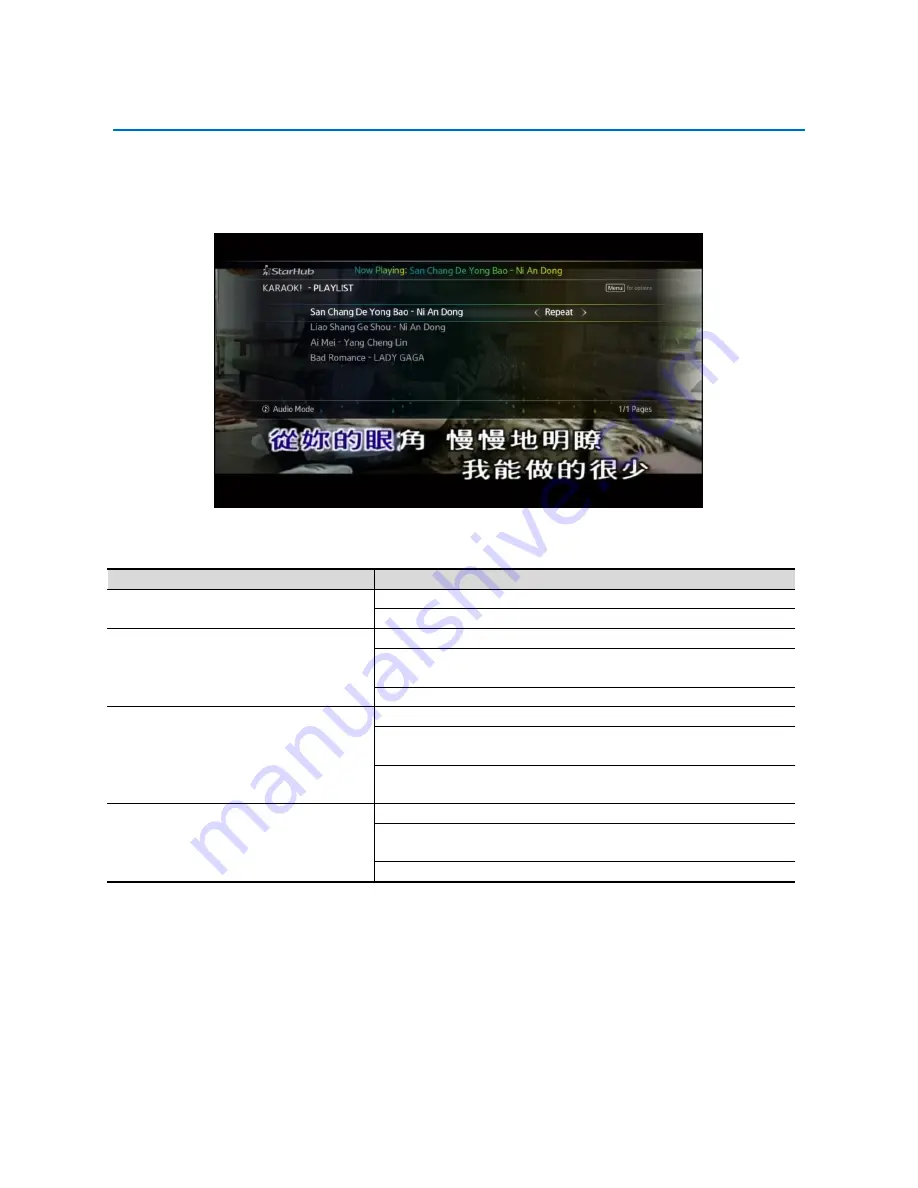
KARAOK! - PLAYLIST 

 
KaraOK!  offers  a  similar  experience  as  the  commercial  Karaoke  outlets,  where  you  can  schedule  your 
favourite songs to be played out in a sequence. The order of the songs can be changed and managed from 
the Playlist. 


How To Use 


Functions 

Directions 

 To launch the playlist 

Press the 

MENU

 button for Options and select Current Playlist

Press the 

OK 

button to load. 

 To insert a song 

Use the 

UP

 or 

DOWN

 arrow buttons to select the song.  

Use  the 

LEFT

  or 

RIGHT

  arrow  buttons  to  toggle  the  mode  to 

Insert and press the 

OK 

button.  

The song will be rescheduled as the next song to be played out. 

 To repeat a song 

Use the 

UP

 or 

DOWN

 arrow buttons to select the song.  

Use  the 

LEFT

  or 

RIGHT

  arrow  buttons  to  toggle  the  mode  to 

Repeat and press the 

OK 

button.  

The  song  entry  will  be  duplicated  in  the  playlist  and  will  be 
repeated. 

 To delete a song 

Use the 

UP

 or 

DOWN

 arrow buttons to select the song.  

Use  the 

LEFT

  or 

RIGHT

  arrow  buttons  to  toggle  the  mode  to 

Remove and press the 

OK 

button.  

The song entry will be deleted in the playlist. 


Summary of Contents for Fibre TV Set-Top Box

Page 1: ...Fibre TV Set Top Box USER GUIDE SAMSUNG GX SH435EH ...

Page 2: ... SCREEN TV GUIDE 11 GENRE SEARCH 13 MORE SHOW TIMES 14 PROGRAMME INFORMATION IN CHINESE 15 FAVOURITE CHANNELS 16 LAST CHANNEL RECALL 17 SEARCH 17 PICTURE IN PICTURE 18 GENERAL SETTINGS 22 PARENTAL CONTROL 24 Guide to Video On Demand 26 MOVIES AND SHOWS ON DEMAND 26 ON DEMAND CATALOGUE 27 ON DEMAND INFO PAGE 28 MY PURCHASED CONTENT 30 ON DEMAND CHANNELS 31 KARAOK SONG CATALOGUE 32 KARAOK PLAYLIST 3...

Page 3: ...TION 50 TWITTER INTEGRATION ENABLE TWEETS 51 TWITTER INTEGRATION TWEETS 52 Guide to Smart TV 53 SMART TV 53 SETTING UP SMART TV 54 CONTROL LIVE TV 55 INSTANT RECORDING 57 RECORD BY SHOW 58 RECORD BY SERIES 59 RECORD BY TIME 60 RECORDING SCHEDULES 61 MY RECORDINGS 62 RECORDING PLAYBACK AND BOOKMARK LIST 64 PICTURE IN PICTURE 65 SMART TV SETTINGS 67 Installation Guide 69 CONNECTION VIA HDMI HIGH DEF...

Page 4: ...lat surface Air should circulate freely under and around the box to prevent overheating Do not place anything on top of your set top box Do not place the set top box near wet or moist areas If the Power LED is not Green or the Network LED is not solid Amber power OFF and ON the set top box to reconnect Do not dismantle the set top box to attempt servicing it on your own Please provide the error co...

Page 5: ...otely IMPORTANT When using the remote control make sure there are no obstructions between the remote control and the set top box If the channels can be changed with the set top box and not with the remote control check if the remote control batteries are weak If you cannot change channels using either the set top box or the remote control do not attempt your own servicing Please call 1633 ...

Page 6: ...using the same box Here s how to enhance your TV viewing experience Widescreen Picture 16 9 Get a panoramic view of the action with 33 more of the picture to see True to life Colours Be mesmerized by lifelike images with a display of million more colours Crystal Clear Images You won t miss a single detail with 4x more sharpness than ever before Cinematic Sound Enjoy Dolby Digital 5 1 surround soun...

Page 7: ...n set to 1080i How To Use Functions Directions To view the current video resolution Press the HEX button on your remote control The current video output resolution will be shown on screen To change video output resolution Press the HEX button on your remote control again and the selection will toggle to the next available video output resolution When you have reached your desired video output reso...

Page 8: ...round sound digital audio effects How To Use Functions Directions To enable Dolby Digital 5 1 audio output Press the MENU button on your remote control Use the navigation arrow buttons to select Settings followed by General Settings and Dolby Digital Use the LEFT or RIGHT arrow button to change the selection to YES Press the EXIT or BACK button to save your selection Enable Dolby Digital audio out...

Page 9: ...ss the MENU button on your remote control and navigate using the navigation arrow buttons The sub menu will be displayed at the bottom of the screen if applicable In different applications the MENU button also functions as an Options button This is applicable to applications with the on screen MENU for options prompt Similarly Options can be navigated using the navigation arrow buttons and the OK ...

Page 10: ...rol To access channel information for a programme on another channel Use the UP or DOWN arrow button on your remote control to scroll through the channel listing To check the programmes within 24 hours Press RIGHT arrow button to view the next programme Press LEFT arrow button to go back to the previous programme To access additional programme information Info Page For more information please refe...

Page 11: ...e Show Times using the LEFT or RIGHT arrow buttons Press the OK button to view more show times To Search for other programmes Select Search using the LEFT or RIGHT arrow buttons Press the OK button to proceed To Lock this channel Select Lock using the LEFT or RIGHT arrow buttons Press the OK button to proceed To Add To Favourites Select Add To Favourites using the LEFT or RIGHT arrow buttons Press...

Page 12: ... upcoming programmes including schedules synopses cast and crew available audio tracks and programme genre for the channel of your choice Information may not be available for some programmes To access the On Screen TV Guide press the GUIDE button on your remote control You will see the channel listing on your TV screen as shown below GRID GUIDE LIST GUIDE ...

Page 13: ...ramme schedules from 4th to 7th day Press the NEXT button on your remote control To return to the previous day press the PREVIOUS button on your remote control To go to the previous or next page Press the CH UP or CH DOWN buttons on your remote control to go to the previous or next page For additional information on programmes Additional programme information such as synopses cast and audio tracks...

Page 14: ... in the On Screen TV Guide based on one of the following Alphabetical Sports Movies Favourites Kids News My Subscribed Channels Education Chinese International Lifestyle Ethnic Entertainment How To Use Functions Directions To sort the channels according to genre on the TV Guide Press the GUIDE button on your remote control The channels are arranged according to Channel Number by default Press the ...

Page 15: ...To access More Show Times from Info Page Press the INFO button on your remote control twice for the Info Page Select More Show Times using the LEFT or RIGHT arrow buttons Press the OK button to view more show times To access More Show Times from TV Guide Press the GUIDE button on your remote control Press the MENU button for Options and select More Show Times Press the OK button to confirm your se...

Page 16: ...ion in English only you may change the Preferred Language Setting to English PROGRAMME INFORMATION IN CHINESE ON THE INFO BAR PREFERRED LANGUAGE SETTING IN GENERAL SETTINGS How To Use Functions Directions To change the Preferred Language Press the MENU button on your remote control Use the navigation arrow buttons to select Settings followed by General Settings and Preferred Language Use the LEFT ...

Page 17: ...ourites list Press the BACK button to return to the Favourites list To access a favourite channel The FAVOURITE button will only tune to the channels in the activated Favourites list Option 1 Press the FAVOURITE button on your remote control to access your favourite channels Surf your favourite channels by toggling using the FAVOURITE button Option 2 Press the GUIDE button on your remote control w...

Page 18: ...function Press the MENU button on your remote control and select Search Use the navigation arrow buttons to highlight the letter and press the OK button to input into the search To correct a mistake select the or to adjust the position of the cursor and the DELETE to edit To clear the search key words select Clear and press the OK button After the entry of the key words navigate to DONE and press ...

Page 19: ...by selecting Enable PIP from the Info Bar or the TV Guide PIP can only be enabled for your subscribed live channels except for On Demand Channels and Apps There are 2 modes of PIP available Small Size via a small video frame or Half Screen 2 channels side by side SMALL SIZE PICTURE IN PICTURE The position of the small size PIP can be changed to one of the 4 corners of the TV screen via MENU for Op...

Page 20: ...ge PIP channel Press the MENU button on your remote control and select Select PIP Press the OK button to confirm Use the CH UP or CH DOWN button or press the numeric buttons to change channel To adjust volume for the PIP channel Press the MENU button on your remote control and select Select PIP Press the OK button to confirm Use the VOL UP or VOL DOWN button to adjust the volume To deselect PIP Op...

Page 21: ...sable PIP Press the OK button to confirm To switch PIP with TV Option 1 Press the MENU button for Options and select Switch PIP with TV Press the OK button to confirm Option 2 Press the MENU button for Options and select Select PIP Press the OK button to confirm Press the OK button again to switch PIP with TV To select PIP Press the MENU button for Options and select Select PIP Press the OK button...

Page 22: ...n LOCKED CHANNEL FOR SMALL SIZE PIP LOCKED CHANNEL FOR HALF SCREEN PIP For more information please refer to Parental Control on page 24 How To Use Functions Directions To unlock the channel Press the MENU button for Options and select Switch PIP with TV Press the OK button to confirm Enter your 6 digit Parental PIN to unlock the channel ...

Page 23: ...ton to set the duration you wish the Info Bar to appear on the TV screen Press the EXIT or BACK button to save your selection To change Preferred Language The default language is Bilingual This mode allows for programme information to be displayed in Chinese text for Chinese Channels 800 series and in English text for all other channels Press the MENU button on your remote control Select Settings ...

Page 24: ...On Demand Channels KaraOK or Apps Press the EXIT or BACK button to save your selection To change Resolution Press the MENU button on your remote control Select Settings followed by General Settings and Resolution Use the LEFT or RIGHT arrow button to set your preferred video resolution 576i 576p 720p 1080i Press the EXIT or BACK button to save your selection To change Background Press the MENU but...

Page 25: ...evels None G PG PG13 NC16 M18 Press the EXIT or BACK button to save your changes To lock a channel All channels in the list will be locked at all times and can be unlocked using the Parental PIN when you tune to the channel Select Channels and press the OK button Press the OK button on New Select your channel category and press the RIGHT arrow button to choose the channels in the selected category...

Page 26: ...e app in the list and press the OK button to unlock To unlock all apps Select Unlock All and press the OK button To change Parental PIN Please be reminded that the PIN should be kept confidential at all times This feature allows you to replace the default or old PIN of your set top box with a new one The PIN should be kept confidential as it will enable you secured access to selected services or f...

Page 27: ...f running to the video rental store Now you can shop for the video on demand titles you want and watch them instantly Select from a wide variety of content ranging from movies sports special to ethnic shows and Asian drama series For drama series you can buy a single episode or the entire series and enjoy them in the language you like for series that come in dual sound To access Video On Demand se...

Page 28: ...the different categories Use the LEFT or RIGHT arrow buttons to browse the different categories Each category will provide a snapshot of the titles available Press the OK button on the selected category Use the LEFT or RIGHT arrow buttons to browse the different titles Press the OK button to view the Info Page with the various purchase options To use the Search function Press the MENU button for O...

Page 29: ...and the programme synopsis At the same time you can also find the various purchase options available for the selected programme Information such as the expiry date of the viewing period and pricing details will also be shown on this page To access the Info Page select the title and press the OK button If titles are free or have been purchased before they will play immediately once selected MOVIES ...

Page 30: ...lease refer to Parental Control on page 25 For Movies Press the OK button and follow the on screen instructions to complete your purchase For Shows Press the OK button and select your purchase option for either an individual episode or the entire series Follow the on screen instructions to complete your purchase The programme will play immediately once the transaction is successful ...

Page 31: ... the VOD button on your remote control and use the navigation arrow buttons to select How To Use Functions Directions To play a purchased title series Press the VOD button on your remote control and select My Purchased Content In My Purchased Content use the LEFT or RIGHT arrow buttons to select the title or series Press the OK button to view the Info Page In the Info Page press the OK button to s...

Page 32: ...proceed Use the UP or DOWN arrow buttons to browse through the list of channels To access an On Demand Channel from Live TV Enter the channel number using the numeric buttons on your remote control to tune to the On Demand Channel To select the categories within an On Demand Channel Use the UP or DOWN arrow buttons to select a category Press the OK button or RIGHT arrow button to browse the progra...

Page 33: ...rowse and select songs from the catalogue Use the navigation arrow buttons to scroll through the categories and press the OK button to confirm Alternatively you can press the corresponding number key to go to the respective categories To schedule a song Select the song you wish to schedule and press the OK button or the corresponding number The song title will be highlighted when it has been sched...

Page 34: ...ong Use the UP or DOWN arrow buttons to select the song Use the LEFT or RIGHT arrow buttons to toggle the mode to Insert and press the OK button The song will be rescheduled as the next song to be played out To repeat a song Use the UP or DOWN arrow buttons to select the song Use the LEFT or RIGHT arrow buttons to toggle the mode to Repeat and press the OK button The song entry will be duplicated ...

Page 35: ... Favourites Press the OK button to load To add a song to Favourites Select the song and press the MENU button for Options and select Add to Favourites To load Favourites as playlist Press the MENU button for Options and select Load Favourites The current playlist will be replaced with the Favourites list To add a favourite song to playlist In Favourites use the UP or DOWN arrow buttons to select t...

Page 36: ...ntinue pressing the REWIND or FORWARD button to increase the speed up to 60x To restart the song Press the PREVIOUS button on your remote control To go to the next song Press the NEXT or STOP button on your remote control To pause the song Press the PAUSE button on your remote control To resume the song press the PLAY button To search for songs or artistes Select one of the Search functions from t...

Page 37: ...e channel will be activated and you can start viewing it instantly To preview a short video about the channel if available Tune to the channel you wish to preview Press the BLUE button to continue If a preview video is available select Preview and press the OK button to confirm The video will start to play instantly To exit application and return to Live TV Press the EXIT button on your remote con...

Page 38: ...ough the list of channels To access Catch Up TV from a channel Tune to a channel with Catch Up TV and press the YELLOW button when the icon appears at the top right corner of the screen To select the categories within an On Demand Channel Use the UP or DOWN arrow buttons to select a category Press the OK button or RIGHT arrow button to browse the programmes in that category To play a programme Use...

Page 39: ...pm you will be able to Start Over that programme anytime between 9pm and 10pm eTV provides you more interactivity with your favourite TV programme You can get more information on the programme you are watching while watching TV To access eTV press the GREEN button on your remote control when the eTV icon appears on the top of the screen How To Use Functions Directions To access the different tabs ...

Page 40: ...r EXIT or LIVE TV buttons on your remote control A separate subscription to Netflix is required for streaming content on the Fibre TV Set Top Box For more information please visit www netflix com To access Facebook and Twitter please link your respective social media accounts by creating a user account on the set top box Please refer to Personalisation on page 43 To remain signed in to your Flickr...

Page 41: ... How To Use Functions Directions To browse the titles from the different categories Use the LEFT or RIGHT arrow buttons to browse the different categories Each category will provide a snapshot of the titles available Press the OK button on the selected category Use the LEFT or RIGHT arrow buttons to browse the different titles Press the OK button to view the Info Page To use the Filter function Pr...

Page 42: ...orted by the set top box Video MPEG TS MPEG PS MPEG 1 ASF MKV MP4 and AVI files Audio AAC MP3 WMA and WAV files Image PNG JPEG and GIF files Note that the Fibre TV Set Top Box is not a dedicated media player Some supported file formats may not work due to several factors Some specific technical specifications are not supported by the set top box Some content may have Digital Rights Management DRM ...

Page 43: ...the PREVIOUS or NEXT button on your remote control to switch from Videos to Music or Photos To go to the previous or next page Use the LEFT or RIGHT arrow buttons to go the previous or next page if applicable To play a file Press the OK button to playback the file To change display view Press the MENU button for Options and select Grid List View Press the OK button to confirm To search for a file ...

Page 44: ...viewing preferences based on the following Remembers your Last Watched Channel and tunes to it when you login General Settings Favourite Channels App Preferences o Watchlist and Portfolio in Financial Information o Favourite Cities in Weather o Traffic Cameras in Traffic Information KaraOK Favourite List subscription required You will only be able to login to your User Account on the set top box w...

Page 45: ... space allowed is 20 The user name cannot be changed once the account is created Press OK and the on screen keyboard will be displayed Use the navigation arrow buttons to highlight the letter and press the OK button to input To correct a mistake select the or to adjust the position of the cursor and the DELETE to edit After the entry of the user name navigate to DONE and press the OK button to ret...

Page 46: ...book Grant permissions to the StarHub TV app and set your Privacy settings accordingly Once successfully connected and a tick will be indicated in the checkbox Link Twitter Account optional Press OK and follow the on screen instructions Scan the QR Code using your Mobile device or enter the Short URL on your web or mobile browser and login to Twitter Authorise the StarHub Social TV app and enter t...

Page 47: ...nd press the OK button Set your User Avatar using one of the options Select from list choose from 24 choices Use Facebook profile picture if linked Use Twitter profile picture if linked Use default picture Select Confirm and press the OK button Customise General Settings Customise your General Settings Press the EXIT or BACK button to save your selection ...

Page 48: ...matically go to Live TV Alternatively press the BACK or EXIT button to skip directly to Live TV USER LOGIN SCREEN USER LOGIN UPON BOOT UP IN GENERAL SETTINGS How To Use Functions Directions To change User Login Upon Boot Up setting Press the MENU button on your remote control Select Settings followed by General Settings and User Login Upon Boot Up Use the LEFT or RIGHT arrow button to set whether ...

Page 49: ...er Account will be automatically logged out if the set top box is put on standby mode or powered off How To Use Functions Directions To log out of your user account Press the MENU button on your remote control Select Users followed by Logout and press OK to proceed To switch user Press the MENU button on your remote control Select Users followed by Switch User and press OK to proceed Select your U...

Page 50: ...tructions To Link Unlink Twitter Account press OK and follow the on screen instructions Select Next and press OK to proceed To change your User Avatar select one of the options Select Confirm and press OK to save your changes To deactivate a user account Deactivating a user account only disables the account from login Select your User Account using the UP or DOWN arrow buttons Select Deactivate an...

Page 51: ...sage select Edit and press OK To post the default message select Post and press OK To access Post To Facebook from the Info Page Live TV VOD or Catch Up In the respective Info Page use the LEFT or RIGHT arrow buttons and select Post to Facebook To edit the default message select Edit and press OK To post the default message select Post and press OK To access Post To Facebook from the TV Guide Pres...

Page 52: ...DOWN arrow buttons to select one of the Tweets displayed on the overlay Use the LEFT or RIGHT arrow buttons and select Reply Press OK and use the on screen keyboard to compose Select DONE and press OK to reply To Retweet a Tweet Use the UP or DOWN arrow buttons to select one of the Tweets displayed on the overlay Use the LEFT or RIGHT arrow buttons and select Retweet Press OK to proceed To Favouri...

Page 53: ... VOD or Catch Up In the respective Info Page use the LEFT or RIGHT arrow buttons and select Tweet To edit the default message select Edit and press OK To post the default message select Tweet and press OK To access Tweet from the TV Guide Press the GUIDE button on your remote control Press the MENU button for Options Select Tweet and press OK To edit the default message select Edit and press OK To...

Page 54: ...to enter the recording once and Smart TV will start to record all the episodes of a TV series Record By Time Preset a programme to be recorded by specifying the date time and channel Watch one show and record another Watch a show on a channel while recording another show on another channel Take control over the programmes you are watching Smart TV gives you the option to control Live TV for your v...

Page 55: ...via the provided USB cable The Media Centre prompt will be displayed as the default auto detection Select NO and press the OK button The Hard Disk Format prompt will be displayed for the Smart TV set up Select YES and press the OK button for the set top box to configure the Digital Video Storage Device Once completed the set top box will prompt if you wish to enable Smart TV ...

Page 56: ... programme you are watching Start of Buffer The buffer will start to temporarily record the programe on the current channel whenever the Fibre TV Set Top Box is powered on Duration of Buffer The buffer is set at a maximum of 2 hours for both SD and HD programmes You are able to buffer up to 2 hours of SD or HD programmes at any time End of Buffer When the buffer reaches its maximum 2 hours of SD o...

Page 57: ...tton to increase the speed to 0 5x Press the PLAY button to resume watching at normal speed To jump forward or backwards by a fixed interval To jump forward press the RIGHT arrow button on your remote control It will jump forward by an interval of 30 secs default setting To jump backwards press the LEFT arrow button on your remote control It will jump backwards by an interval of 30 secs default se...

Page 58: ... to finish it at a more convenient time How To Use Functions Directions To instantly record a programme Press the REC button on your remote control Select Yes and press the OK button to confirm To stop a recording Press the SMART TV button and select Recording Schedules Use the UP or DOWN arrow button to select the recording Use the LEFT or RIGHT arrow button to select Stop and press the OK button...

Page 59: ...tion arrow buttons to select the channel and programme of your choice Press the REC button or the MENU button for Options and select Record If the programme is part of a TV series there will be a pop up for you to select to Record By Show or Series To save the programme to your favourite folder On the Record Programme pop up select Record to and use the LEFT or RIGHT arrow button to change the fol...

Page 60: ...our choice Press the REC button or the MENU button for Options and select Record If the programme is part of a TV series there will be a pop up for you to select to Record By Show or Series Once Record By Series is selected the Record Programme pop up will automatically set the Series field to Yes Press the OK button on DONE to schedule the recording Record by Series feature is programmed based on...

Page 61: ...time of the recording Use the LEFT or RIGHT arrow button to toggle between AM or PM To set the duration of the recording Use the numeric buttons on your remote control to enter the duration of the recording in hours and minutes To set the frequency of the recording Use the LEFT or RIGHT arrow button to select one of the available options Once Daily Weekly Weekday Weekends To select the channel Use...

Page 62: ...n either choose to amend your scheduled recordings which will be highlighted in yellow or cancel the current recording schedule which will not be added In the event of a scheduling conflict and you are unable to resolve it in person Smart TV will record the scheduled recording with the earlier start time or the first scheduled recording if they start at the same time To edit a scheduled recording ...

Page 63: ...button To delete a recorded programme Option 1 Use the UP or DOWN arrow button to select the recording Press the MENU button for Options and select Delete Press the OK button to confirm Option 2 Use the UP or DOWN arrow button to select the recording Press the YELLOW button to select the recording Use the RIGHT arrow button to select Delete Press the OK button to confirm Option 3 Use the UP or DOW...

Page 64: ...plicable if there is at least one user created folder or from a series folder Option 1 Use the UP or DOWN arrow button to select the recording Press the MENU button for Options and select Move Select a folder and press the OK button Option 2 Use the UP or DOWN arrow button to select the recording Press the YELLOW button to select the recording Use the RIGHT arrow button to select Move Select a fol...

Page 65: ...ns and select Jump To Use the numeric buttons to enter the time and press the OK button to confirm To view programme information Press the OK button to view the progress bar Press the MENU button for Options and select Info Press the BACK button to dismiss the programme information To access Bookmark List Press the OK button to view the progress bar Press the MENU button for Options and select Boo...

Page 66: ... The active audio will be from the recording To disable PIP Press the MENU button for Options and select Disable PIP Press the OK button to confirm To select PIP Press the MENU button for Options and select Select PIP Press the OK button to confirm The PIP will be highlighted and the active audio will be from the PIP channel To change PIP channel The last viewed channel will be updated Press the M...

Page 67: ...tom Right or Bottom Left Press the OK button to confirm Option 2 Press the MENU button for Options and select Select PIP Press the OK button to confirm Use the navigation arrow buttons to change the position of the PIP To change PIP to Half Screen Press the MENU button for Options and select Change PIP to Half Screen Press the OK button to confirm To change PIP to Small Size Press the MENU button ...

Page 68: ...take note that this feature will auto delete the oldest unprotected recordings to make space for new recordings when the disk space is about 80 full Do not use this feature if you wish to keep all your recorded programmes Use the LEFT or RIGHT arrow button to change the setting Optimise Hard Disk Please take note that this option will erase all your recorded programmes in your Digital Video Storag...

Page 69: ... BACK button to save your selection To change Progress Bar Duration Use the LEFT or RIGHT arrow button to set the duration you wish the progress bar to appear on the TV screen 5 sec 10 sec 15 sec 20 sec 30 sec Always Press the EXIT or BACK button to save your selection To change Preferred Folder Use the LEFT or RIGHT arrow button to select the preferred folder to save your recorded programmes when...

Page 70: ...nder the Dolby Digital audio selection in General Settings Some HD ready TV models may have compatibility problems with the Fibre TV Set Top Box when connected using the HDMI connection If your TV set is HD ready TV but still experience problems displaying video please connect the set top box to your HD ready TV using the Optional set up Viewing Procedure 1 Switch your TV source to HDMI to watch y...

Page 71: ...ocedure 1 Switch your TV source to Composite or AV to watch your programmes 2 Select the desired channel using the remote control of your Fibre TV Set Top Box Please note that on some HD ready TV sets you may experience problems displaying video output on the 576i resolution If you see a black screen on TV please continue to press the HEX button on your remote control to change to the next higher ...

Page 72: ... or dark Adjust brightness control of TV unit Picture rolling Adjust vertical hold of TV unit Washed out Picture Adjust contrast control of TV unit Blank screen Sound ok Check if TV brightness and contrast controls are adjusted No sound Picture ok Adjust TV or Set Top Box volume control Check if either are in MUTE mode No Picture Turn OFF and turn ON the main power to the Set Top Box Check all con...

Page 73: ...d Dolby Digital Product Notice Manufactured under license from Dolby Laboratories Dolby and the double D symbol are trademarks of Dolby Laboratories HDMI Product Notice The terms HDMI and HDMI High Definition Multimedia Interface and the HDMI Logo are trademarks or registered trademarks of HDMI Licensing LLC in the United States and other countries Open Source Software License Notice You may find ...

Page 74: ...SAMSUNG FIBRE TV SET TOP BOX GX SH435EH USER GUIDE 73 Memo Rev 2016 05 ...

Page 75: ...67 Ubi Avenue 1 StarHub Green Singapore 408942 ...

Reviews: