background image

32

ENG

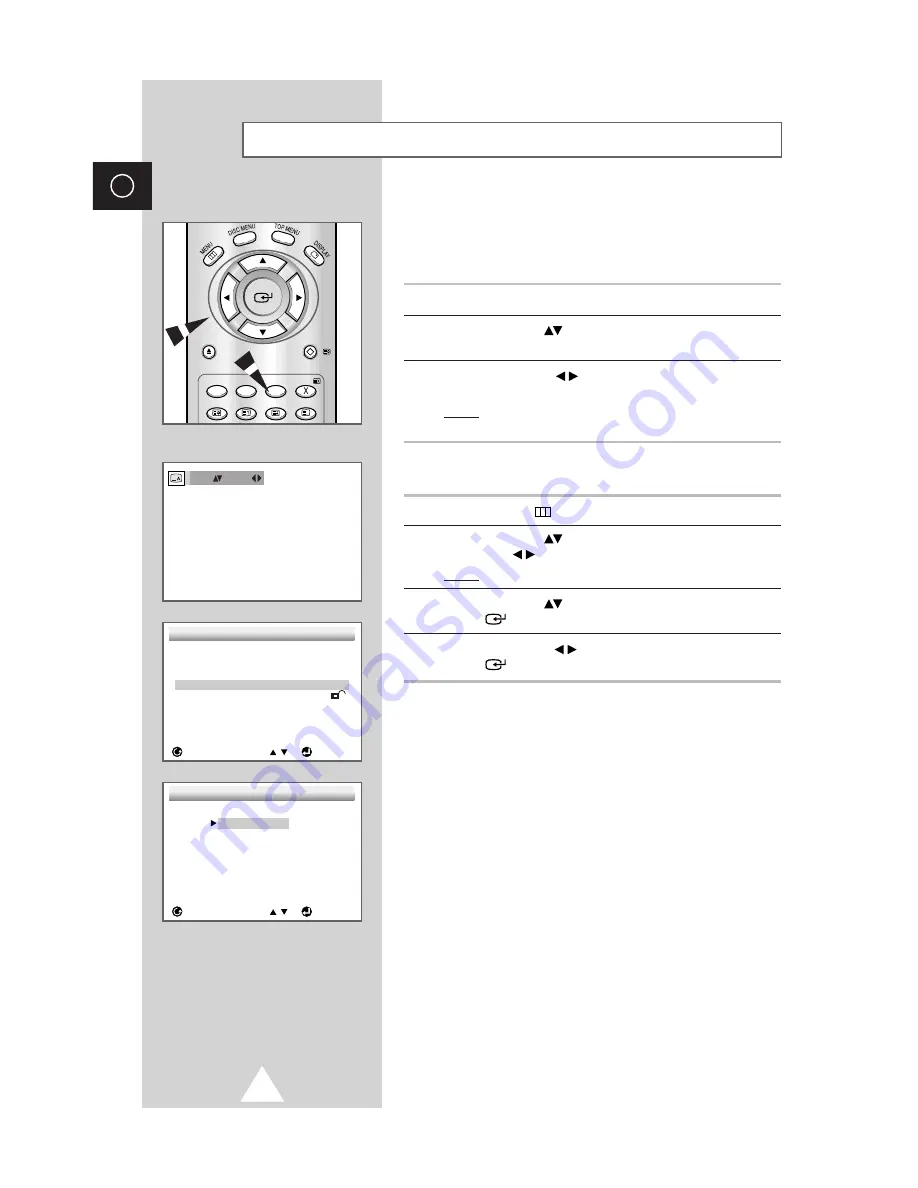
You can select a desired subtitle quickly and easily with the
SUBTITLE button.

Using the SUBTITLE button

1

Press the 

SUBTITLE

button.

2

Use the UP/DOWN

button to select the desired subtitle

language.

3

Use the LEFT/RIGHT

button to determine whether or not the

subtitle will be displayed.

Result:

Initially, the subtitling will not appear on screen. The
subtitle languages are represented by abbreviations.

Using the MENU button (When playing a DVD)

1

Press the  

MENU

button.

2

Use the UP/DOWN

button to select 

DVDP SETUP

. Use the

LEFT/RIGHT

button.

Result:

The 

SETUP MENU

is displayed.

3

Use the UP/DOWN

button to select 

Subtitle

. Press the

ENTER

button.

4

Use the LEFT/RIGHT

button to select

English

. Press the

ENTER

button.

This function depends on what languages are encoded on
the disc and may not work with all DVDs.

A DVD disc can contain up to 32 subtitle languages.

How to have the same subtitle language come up
whenever you play back a DVD?

Refer to “Setting Up the Language Features” 

on page 37

.

Selecting the Subtitle Language

ZOOM

 OPEN
/CLOSE

STEP

SUBTITLE

CLEAR

RETURN

ANGLE

REPEAT

BOOKMARK PROGRAM

SLEEP

P SIZE

ENG            On

SETUP  MENU

RETURN

ENTER

1  Player Menu

English

2  Disc Menu

English

3  Audio

English

4  Subtitle

Automatic

5  Parental

Unlocked

6  Audio Options
7  Display Options

SUBTITLE  LANGUAGE

RETURN

ENTER

1  Automatic
2  English
3  Fran ais
4  Deutsch
5  Espa ol
6  Italiano
7  Nederlands
8  Others

Summary of Contents for DW21G5

Page 1: ... DW21G5 Owner s Instructions Before operating the unit please read this manual thoroughly and retain it for future reference FULL FLAT SCREEN DVD VIDEO CD CD MP3 ON SCREEN MENUS TELETEXT FUNCTION depending on the model ENG ...

Page 2: ... not expose the television to rain or excessive moisture Please use a soft and dry cloth not containing volatile matter when you clean the TV If the television is broken do not try to repair it yourself Contact qualified service personnel If the remote control is not used for a long period of time remove the batteries and store it in a cool dry place Do not drop the remote control Safety Instructi...

Page 3: ...odel 17 18 Adjusting the Sound 19 Selecting the Sound Mode depending on the model 20 Setting the Time and Switching the TV On Off Automatically 21 Setting the Sleep Timer 22 Locking the Front Panel 22 Using the Melody Function depending on the model 23 Viewing Pictures from External Sources 23 Using the DVD VIDEO CD CD MP3 Function Playing a Disc 24 Using the Search and Skip Functions 26 Using the...

Page 4: ...ONNECTORS VIDEO INPUT CONNECTOR HEADPHONE JACK STAND BY INDICATOR REMOTE CONTROL SENSOR SKIP SEARCH TITLE CHAPTER TRACK STOP PLAY PAUSE OPEN CLOSE 75Ω COAXIAL CONNECTOR FOR AERIAL CABLE NETWORK RCA AUDIO VIDEO INPUT OUTPUT CONNECTORS DIGITAL AUDIO OUTPUTS Rear of the TV TELEVISION ON OFF OPTION ...

Page 5: ...ON TEN OR HIGHER TEMPORARY SOUND SWITCH OFF SOUND EFFECT SELECTION PICTURE EFFECT SELECTION SEARCH FORWARD THROUGH A DISC PROGRAMME SELECTION BY NAME SEARCH BACKWARD THROUGH A DISC OPEN CLOSE THE DISC TRAY BRINGS UP THE DISC MENU TELETEXT DISPLAY SKIP THE TITLE CHAPTER OR TRACK DISPLAY BOTH TELETEXT INFORMATION AND THE NORMAL BROADCAST TV DVD SELECTION Press this button during the play of DVD The ...

Page 6: ...CableTelevision Network Cable Television Network or Rear of the TV In order to descramble a coded transmission signal you must connect a decoder to the TV set If you wish to connect both a decoder and a VCR you should connect the Decoder to the VCR VCR to the television Otherwise connect the decoder directly to the television Using a coaxial cable Connect a coaxial cable to the Receiver output soc...

Page 7: ...layers and camcorders Rear of the TV or VCR Video game device Video disc player Camcorder The RCA connectors are used for equipment such as VCRs camcorders video disc players and video game devices Side of the TV Connecting to the Audio Output depending on the model AUDIO SYSTEM The DIGITAL AUDIO OUT connector is used for equipment such as an audio system to take full advantage of the Surround sou...

Page 8: ... aligning it with the base of the remote control and pressing it back into place Do not mix battery types i e alkaline and monganese Inserting the Batteries in the Remote Control You can connect a set of headphones to your television if you wish to watch a television programme without disturbing the other people in the room 1 Plug a set of headphones into the 3 5 mm mini jack socket on the televis...

Page 9: ... time when you are away on holiday for example Turn your television off by pressing the ON OFF button on the front of the television It is best to unplug the set from the mains and aerial The mains lead is attached to the rear of your television 1 Plug the mains lead into an appropriate socket 2 Press the ON OFF button on the front of the television Result The Standby indicator lights up on the fr...

Page 10: ...e second digit must be pushed immediately after the first Failure to do this will result in a single digit channel being displayed Used to increase the volume Used to reduce the volume MUTE Used to switch the sound off temporarily When you wish to turn the sound back on press the this button again or press the volume down up button Button Menu Function MENU Used to Display the on screen menu Retur...

Page 11: ...in Result The languages available are listed ENGLISH FRANÇAIS ARABIC 4 Select the appropriate language by pressing the UP DOWN button 5 To return to normal viewing press the MENU button repeatedly until the menus disappear ChoosingYour Language MENU PICTURE SOUND CHANNEL FUNCTION ADJUST SELECT EXIT FUNCTION LANGUAGE PANEL LOCK OFF TIME ADJUST SELECT EXIT You can display various types of informatio...

Page 12: ...IGHT button Result The options available in the CHANNEL menu are displayed 3 Press the UP DOWN button until the AUTO TUNE is selected Press the LEFT RIGHT button Result The search will end automatically Channels are sorted and stored in an order which reflects their position in the frequency range with lowest first and highest last The programme originally selected is then displayed To stop the se...

Page 13: ...g the UP DOWN button until the the SYSTEM Color system option is selected followed by pressing the LEFT RIGHT button repeatedly Result The color standards are displayed in the following order AUTO PAL SECAM NTSC 5 Select the S SYSTEM Sound system option by pressing the UP DOWN button and followed by pressing the LEFT RIGHT button repeatedly Result The sound standards are displayed in the following...

Page 14: ...l go to Step 7 7 When the channel to be stored appears on the screen select the NEW PR option by pressing the UP DOWN button 8 Enter the programme number to be assigned to the channel by pressing the numeric buttons or the LEFT RIGHT button 9 Press the memory button to store the channel 10 If you wish to store other channels return to Step 6 Storing the Channels Manually depending on the model CUR...

Page 15: ...f you wish to Then Assign a new number Press the UP DOWN button to to a preset station select the NEW PR option Enter the new programme number by pressing the numeric buttons or the LEFT RIGHT button Press the memory button to store the change Clear a preset channel Press the UP DOWN button to select the CURRENT PR option Press the CLEAR button X The programme number can be reused for another chan...

Page 16: ...ble in the MANUAL TUNE menu are displayed 4 Select the NAME by pressing the LEFT RIGHT button 5 To Then press the Select a letter number or symbol UP DOWN button Move on the next letter RIGHT button Move back the previous letter LEFT button The characters available are Letters of the alphabet A Z a z Numbers 0 9 Various special characters 6 When you have finished entering the name press the memory...

Page 17: ... following settings are available CONTRAST BRIGHT SHARPNESS COLOR 5 Select one of the options by pressing the UP DOWN button followed by pressing the LEFT RIGHT button Result The horizontal bar is displayed Then press the LEFT RIGHT button to decrease or increase the value displayed 6 When you are satisfied with the settings press the MENU button to return to the PICTURE menu 7 Select the COLOR TO...

Page 18: ...ze button on the remote control If the signal received by your television is weak you can activate the noise reduction feature to help reduce any static and ghosting that may appear on the screen 10 Press the UP DOWN button to select the NR option To activate the noise reduction feature set the NR option to ON by pressing the LEFT RIGHT button depending on the model If you find that the picture re...

Page 19: ...OLUME set to ON by pressing the LEFT RIGHT button PSEUDO STEREO converts a monaural sound signal into two identical left and right channels Once the PSEUDO STEREO or VIRTUAL SURROUND is set to ON or OFF the setting applies to the sound effects such as STANDARD MUSIC MOVIE and SPEECH Each broadcasting station has its own signal conditions and so it is not easy for you to adjust the volume every tim...

Page 20: ...on Mono Normal use Mono Mono Nicam Normal Stereo Mono Nicam Normal Mono Normal use Dual I Dual II Stereo Mono Forced Mono Dual I Dual II Mono Nicam Nicam Normal NICAM Stereo A2 Stereo If the receiving conditions deteriorate listening will be easier if the mode is set to the Mono position using the AUDIO I II button If the stereo signal is weak or if intermittent Stereo Mono and automatic switching...

Page 21: ...he hour and then the minutes by pressing the numeric buttons At this time if you have not set the time the message SET THE CLOCK FIRST is displayed Result The set will be switched on automatically every day at the time requested 6 Press the UP DOWN button to select the OFF TIMER Enter the hour and then the minutes by pressing the numeric buttons Result The set will be switched off automatically ev...

Page 22: ... time period of between 15 and 180 minutes after which the television automatically switches to Standby mode 1 Press the SLEEP button on the remote control Result If the sleep timer is The screen displays not yet set OFF already set The remaining time before the television switches to Standby mode 2 Press the SLEEP button repeatedly and cycle through the preset time intervals 15 30 45 60 90 120 15...

Page 23: ...e the input connectors on the side and rear panels RCA and SCART respectively If equipment if plugged into both these connectors the side connector has priority Viewing Pictures from External Sources S STD MUTE INPUT P P STD AUDIO TV TEXT You can hear clear melody sound when the TV is powered on or off 1 Press the MENU button Result The main menu is displayed 2 Press the UP DOWN button until the F...

Page 24: ... during playback Screen stops no sound To resume again press the PLAY PAUSE button once again Step Motion Playback Except CD Press the STEP button on the remote control during playback Each time the button is pressed a new frame will appear No sound is heard during STEP mode Press the PLAY PAUSE button to resume normal playback You can only perform step motion playback in the forward direction Slo...

Page 25: ...characters or less have no spaces in the name and avoid the use of special characters including Use a decompression transfer rate of at least 128 Kbps when recording MP3 files Sound quality with MP3 files basically depends on the rate of compression decompression you choose Getting audio CD quality sound requires an analog digital sampling rate conversion to MP3 format of at least 128 Kbps and up ...

Page 26: ...e NEXT SKIP button it moves to next track If you press the BACK SKIP button it moves to the the beginning of the track One more press makes it move to the beginning of the previous track If a track exceeds 15 minutes when playing a VCD and you press the NEXT SKIP button it moves forward 5 minutes If you press the BACK SKIP button it moves backward 5 minutes When playing a VCD 2 0 in the MENU MODE ...

Page 27: ... CD VCD 1 During playback press the DISPLAY button Result Current track number elapsed time and volume control will be displayed 2 Use the UP DOWN button to select a track Use the LEFT RIGHT button or numeric buttons to enter a different track number then press the ENTER button 3 To enter the time from which you want to start use the UP DOWN button to select then use the numeric buttons to enter t...

Page 28: ... where you want the repeat play to stop B 4 Press the ENTER button 5 To return to normal playback press the REPEAT button again then press the LEFT RIGHT button to select Off and press the ENTER button DVD repeats playback by chapter or title CD and VCD repeat playback by disc or track Depending on the disc the Repeat function may not work If the title or track is completed before marking the end ...

Page 29: ...IGHT button to select RANDOM Press the ENTER button Result The disc will be played back in random order Depending on the disc the Program and Random Playback function may not work When in VCD 2 0 mode MENU ON mode these functions do not work To resume normal playback press the CLEAR X button Program Play and Random Play ZOOM STEP SUBTITLE CLEAR ANGLE REPEAT BOOKMARK PROGRAM SLEEP P SIZE PROGRAM RA...

Page 30: ...the TOP MENU button 2 Press the UP DOWN button to select Index View Press the ENTER button 3 Select the desired view by pressing the UP DOWN or LEFT RIGHT buttons 4 Press the ENTER button When pressing the TOP MENU button with a DVD the disc s TITLE MENU function comes up A disc must have at least two titles for the TITLE MENU function to work When pressing the TOP MENU button with a CD the unit e...

Page 31: ...s the ENTER button 4 Use the LEFT RIGHT button to select English Press the ENTER button This function depends on what languages are encoded on the disc and may not work with all DVDs A DVD disc can contain up to 8 audio languages How to have the same audio language come up whenever you play back a DVD Refer to Setting Up the Language Features on page 37 Selecting the Audio Language DVD OPEN CLOSE ...

Page 32: ...WN button to select Subtitle Press the ENTER button 4 Use the LEFT RIGHT button to select English Press the ENTER button This function depends on what languages are encoded on the disc and may not work with all DVDs A DVD disc can contain up to 32 subtitle languages How to have the same subtitle language come up whenever you play back a DVD Refer to Setting Up the Language Features on page 37 Sele...

Page 33: ...ght hand corner of the screen 1 When an ANGLE mark is shown press the ANGLE button Result The angle select icon will appear at the upper left hand corner of the screen 2 Use the UP DOWN button to select the desired screen angle 3 To turn off the display press the ANGLE button again Changing the Camera Angle ZOOM OPEN CLOSE STEP SUBTITLE CLEAR RETURN ANGLE REPEAT BOOKMARK PROGRAM SLEEP PSIZE 1 6 ...

Page 34: ...OWN or LEFT RIGHT button to select the part of the screen you want to zoom 3 Press the ENTER button During DVD playback press the ENTER button to zoom in 2X 4X 2X in order During VCD playback press the ENTER button to zoom in 2X Using the Zoom Function DVD VCD ZOOM STEP SUBTITLE CLEAR ANGLE REPEAT BOOKMARK PROGRAM SLEEP P SIZE ...

Page 35: ...KMARK button 2 Use the LEFT RIGHT button to select a marked scene 3 Press the PLAY PAUSE button to skip to the marked scene Clearing a Bookmark 1 During playback press the BOOKMARK button 2 Use the LEFT RIGHT button to select the bookmark number you want to delete 3 Press the CLEAR X button to delete a bookmark number Press the BOOKMARK button to turn off display Up to three scenes may be marked a...

Page 36: ...P MENU is displayed 3 Use the UP DOWN button to access the different features 4 Press the ENTER button to access the sub features 5 To make the setup screen disappear after setting up press the RETURN button Depending on the disc some Setup Menu selections may not work Using the Setup Menu MENU PICTURE SOUND CHANNEL FUNCTION DVDP SETUP ADJUST SELECT EXIT SETUP MENU RETURN ENTER 1 Player Menu Engli...

Page 37: ...eference menu to select the language you want a DVD s disc menu to be displayed in 1 Use the UP DOWN button to select Disc Menu 2 Press the ENTER button 3 Use the UP DOWN button to select English Select Others if the language you want is not listed 4 Press the ENTER button English is selected and the screen returns to SETUP MENU Setting Up the Language Features SETUP MENU RETURN ENTER 1 Player Men...

Page 38: ...the language selected as the audio preference Select Others if the language you want is not listed Some discs may not contain the language you select as your initial language in that case the disc will use its original language setting 4 Press the ENTER button English is selected and the screen returns to SETUP MENU If the selected language is not recorded on the disc the original pre recorded lan...

Page 39: ...ct Rating Level Press the ENTER button Use UP DOWN button to select the level e g Level 6 and press the ENTER button Discs that contain Level 7 will now not play To cancel the rating level use the LEFT RIGHT button to select No in Use Password 8 About the Change Password Use the UP DOWN button to select Change Password Press the ENTER button Then the Enter New Password screen appears Enter your ne...

Page 40: ... the Digital Audio Output DTS On Outputs DTS Bitstream via digital output only Select DTS when connecting to a DTS Decoder Off Doesn t output digital signal Dynamic Compression On To select dynamic compression Off To select the standard range Manufactured under license from Dolby Laboratories Dolby and the double D symbol are trademarks of Dolby Laboratories DTS and DTS Digital Out are trademarks ...

Page 41: ...de screen TV Still Mode These options will help prevent picture shake in still mode and display small text clearer Auto When selecting Auto Field Frame mode will be automatically converted Field Select this feature when the screen shakes in the Auto mode Frame Select this feature when you want to see small letters more clearly in the Auto mode Screen Messages Use to turn on screen messages on or o...

Page 42: ...ellent sound and video due to Dolby Digital and MPEG 2 system Various screen and audio functions can be easily selected through the on screen menu VIDEO CD AUDIO CD 74 min 20 min DVD Disc Types Logos Recording Types Disc Size Max Playing Time Characteristics 31 2 5 31 2 74 min 20 min 5 31 2 Disc Markings Play Region Number Both the DVD player and the discs are coded by region These regional codes ...

Page 43: ...he Selected page number Broadcasting channel identity Current page number or search indications Date and time B Text C Status information Teletext information is often divided between several pages displayed in sequence These pages can be accessed in different ways By entering the page number By selecting a title in a list By selecting a coloured heading FASTEXT system You can also store a few pag...

Page 44: ... Screen When you have displayed a Teletext page you can select various options to suit your requirements To Press the Display the next page Display the previous page Display both the Teletext information and the normal broadcast Temporarily hide the Teletext page to view the normal broadcast press the same button again to recall the same page Reveal hidden text answers in questionnaire games for e...

Page 45: ...ber given in the contents by pressing the corresponding numeric buttons Result The current page number is incremented until the requested page is reached That page is then displayed 2 If the selected page is linked with several secondary pages the secondary pages are displayed in turn To freeze the display on a given page press the button Press the button again to continue the display 3 If the FAS...

Page 46: ...n and move it further away Plug your television into a different mains socket Check the direction location and connections of your aerial This interference is often due to the use of an indoor aerial Replace the remote control batteries Clean the upper edge of the remote control transmission window Check the battery terminals Specifications General Power Requirements 100 240V 50Hz Dimensions W x D...

Page 47: ... set to Bitstream The features or action cannot be completed at this time because 1 The DVD s software restricts it 2 The DVD s software doesn t support the feature e g angles 3 The feature is not available at the moment 4 You ve requested a title or chapter number or search time that is out of range Check if the disc has a Menu Some of the functions selected in the Setup Menu may not work properl...

Page 48: ...FTER SALES SERVICE Do not hesitate to contact your retailer or service agent if a change in the performance of your product indicates that a faulty condition may be present ELECTRONICS AA68 02285B 00 ENG ...

Reviews: