background image

4

English

Safety Instructions  . . . . . . . . . . . . . . . . . . . . . . . . . . . . . . .2
Disc Type and Characteristics  . . . . . . . . . . . . . . . . . . . . . .3
Overviews  . . . . . . . . . . . . . . . . . . . . . . . . . . . . . . . . . . . . .5

Front View of the DVD-VCR    . . . . . . . . . . . . . . . . . . . . .5
Rear View of the DVD-VCR   . . . . . . . . . . . . . . . . . . . . . .5

Display Indicators  . . . . . . . . . . . . . . . . . . . . . . . . . . . . . . .5
Accessories  . . . . . . . . . . . . . . . . . . . . . . . . . . . . . . . . . . . .6
Inserting Batteries in the Remote Control  . . . . . . . . . . . . . .6

Tour of the Remote Control  . . . . . . . . . . . . . . . . . . . . . . .6

Connections

Connections

Connecting DVD-VCR to the TV using the 
Audio/Video Cable   . . . . . . . . . . . . . . . . . . . . . . . . . . . . . 8
Connecting DVD-VCR to the TV using the 
S-Video Cable   . . . . . . . . . . . . . . . . . . . . . . . . . . . . . . . . 8
Connecting DVD-VCR to the TV using the 
Component Video Cable   . . . . . . . . . . . . . . . . . . . . . . . . 9
Connecting to an AV amplifier with the digital input jack . . 10
Connecting Extend Device  . . . . . . . . . . . . . . . . . . . . . . . 10
Copying From DVD to VCR  . . . . . . . . . . . . . . . . . . . . . . 11

Settings

Settings

Setting the Date and Time  . . . . . . . . . . . . . . . . . . . . . . . .12
Setting the Menu Language  . . . . . . . . . . . . . . . . . . . . . . .12

VCR Functions

VCR Functions

Selecting the Colour Mode  . . . . . . . . . . . . . . . . . . . . . . . .13
Intelligent Picture Control  . . . . . . . . . . . . . . . . . . . . . . . . .13
Auto Power off  . . . . . . . . . . . . . . . . . . . . . . . . . . . . . . . . .14
Screen Messages  . . . . . . . . . . . . . . . . . . . . . . . . . . . . . .14
Selecting the Cassette Type  . . . . . . . . . . . . . . . . . . . . . . .15
Repeat Play  . . . . . . . . . . . . . . . . . . . . . . . . . . . . . . . . . . .15
Selecting the Recording Speed  . . . . . . . . . . . . . . . . . . . .15
Protecting a Recorded Cassette  . . . . . . . . . . . . . . . . . . . .15
Recording from Another VCR or Camcorder  . . . . . . . . . . . . .16
Using the Assemble Edit Function  . . . . . . . . . . . . . . . . . .16

Playing Back

Playing Back

Playing a Cassette  . . . . . . . . . . . . . . . . . . . . . . . . . . . . . .17
Adjusting Picture Alignment Manually  . . . . . . . . . . . . . . . .17
Playing a Cassette in Slow Motion  . . . . . . . . . . . . . . . . . .17
Playing a Sequence Frame by Frame . . . . . . . . . . . . . . . .18
Playing a Sequence at Variable Speeds  . . . . . . . . . . . . . .18
Searching for a Specific Sequence  . . . . . . . . . . . . . . . . . .18
Using the Tape Counter  . . . . . . . . . . . . . . . . . . . . . . . . . .20

VCR KARAOKE Functions

VCR KARAOKE Functions

Using the KARAOKE Function (VCR)  . . . . . . . . . . . . . . . .21
SCORE Function (VCR)  . . . . . . . . . . . . . . . . . . . . . . . . . .21
KARAOKE SEARCH Function (VCR)  . . . . . . . . . . . . . . . .21

DVD Functions

DVD Functions

Setting Up the Language Features  . . . . . . . . . . . . . . . . . .22
Setting Up the Audio Options  . . . . . . . . . . . . . . . . . . . . . .23
Setting Up the Display Options  . . . . . . . . . . . . . . . . . . . . .24
Setting Up the Parental Control . . . . . . . . . . . . . . . . . . . . .25
DivX(R) Registration   . . . . . . . . . . . . . . . . . . . . . . . . . . . .26
Firmware Upgrade  . . . . . . . . . . . . . . . . . . . . . . . . . . . . . .27
Special Playback Features  . . . . . . . . . . . . . . . . . . . . . . . .28
Using the Display Function  . . . . . . . . . . . . . . . . . . . . . . . .29
Adjusting the Aspect Ratio (EZ View)  . . . . . . . . . . . . . . . .30
Selecting the Subtitle Language  . . . . . . . . . . . . . . . . . . . .31
Selecting the Audio Language . . . . . . . . . . . . . . . . . . . . . .32
Changing the Camera Angle  . . . . . . . . . . . . . . . . . . . . . . .32
Zoom  . . . . . . . . . . . . . . . . . . . . . . . . . . . . . . . . . . . . . . . .32
Marks  . . . . . . . . . . . . . . . . . . . . . . . . . . . . . . . . . . . . . . . .33
Repeat Chapter/Title . . . . . . . . . . . . . . . . . . . . . . . . . . . . .33
A to  B  Repeat  . . . . . . . . . . . . . . . . . . . . . . . . . . . . . . . . . .34
MP3/WMA Play   . . . . . . . . . . . . . . . . . . . . . . . . . . . . . . . .35
Program & Random Play (CD/MP3/WMA)  . . . . . . . . . . . . . . .36
Picture CD Playback . . . . . . . . . . . . . . . . . . . . . . . . . . . . .36
DivX/MPEG4 Playback   . . . . . . . . . . . . . . . . . . . . . . . . . .38
DivX/MPEG4 Special Playback Features    . . . . . . . . . . . .38

DVD KARAOKE Function

DVD KARAOKE Function

Using the KARAOKE Function (DVD)   . . . . . . . . . . . . . . .39
Key Control (DVD)  . . . . . . . . . . . . . . . . . . . . . . . . . . . . . .40
Reserving a  song (DVD)  . . . . . . . . . . . . . . . . . . . . . . . . .40
Vocal Function (DVD)   . . . . . . . . . . . . . . . . . . . . . . . . . . .41

Reference

Reference

Technical Specifications  . . . . . . . . . . . . . . . . . . . . . . . . . .42
Troubleshooting Guide (VCR) . . . . . . . . . . . . . . . . . . . . . .43
Troubleshooting Guide (DVD) . . . . . . . . . . . . . . . . . . . . . .44

Contents

AFR 6600K ENG 1  27/07/2006  08:40  Page 4

Summary of Contents for DVD-V6600K

Page 1: ...User s Manual PAL NTSC www samsung com za DVD V6600K ...

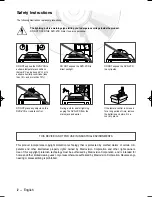
Page 2: ...ime remove the batteries and store it in a cool dry place During a storm and or lightning unplug the DVD VCR from the mains jack and aerial This product incorporates copyright protection technology that is protected by method claims of certain U S patents and other intellectual property rights owned by Macrovision Corporation and other rights owners Use of this copyright protection technology must...

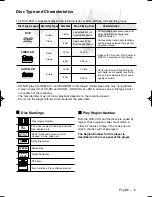
Page 3: ...n order for the disc to play If the codes do not match the disc will not be played The Region Number for this player is described on the rear panel of the player Disc Types Logos Recording Types Disc Size Max Playing Time Characteristics Single sided 240 min Double sided 480 min Audio Video VIDEO CD AUDIO CD DVD DVD contains excellent sound and video due to Dolby Digital and MPEG 2 system Various ...

Page 4: ...Adjusting Picture Alignment Manually 17 Playing a Cassette in Slow Motion 17 Playing a Sequence Frame by Frame 18 Playing a Sequence at Variable Speeds 18 Searching for a Specific Sequence 18 Using the Tape Counter 20 VCR KARAOKE Functions VCR KARAOKE Functions Using the KARAOKE Function VCR 21 SCORE Function VCR 21 KARAOKE SEARCH Function VCR 21 DVD Functions DVD Functions Setting Up the Language...

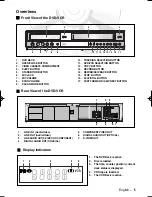
Page 5: ...OP BUTTON 16 PLAY STILL BUTTON 17 FAST FORWARD SKIP NEXT BUTTON Overviews 5 6 7 8 9 10 11 12 13 14 15 16 17 1 2 3 4 1 LINE IN 1 Audio Video 2 LINE OUT Audio Video 3 LINE AUDIO OUT S VIDEO OR COMPONENT 4 DIGITAL AUDIO OUT COAXIAL 5 COMPONENT VIDEO OUT 6 DIGITAL AUDIO OUT OPTICAL 7 S VIDEO OUT 2 4 6 7 1 3 5 Display Indicators 1 The DVD Deck is active 2 Disc is loaded 3 The time counter position curr...

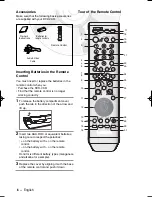
Page 6: ... RO3 or equivalent batteries taking care to respect the polarities on the battery with on the remote control on the battery with on the remote control Do not mix different battery types manganese and alkaline for example 3 Replace the cover by aligning it with the base of the remote control and push it down Batteries for remote controls Remote Control Audio Video Cable Owner s Instructions Accesso...

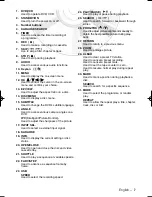
Page 7: ...signal 18 KARAOKE 19 INFO Used to display the current setting or disc status 20 OPEN CLOSE Used to open and close the disc and video cassette tray 21 SHUTTLE Used to play a sequence at variable speeds 22 F ADV STEP Used to advance a sequence frame by frame 23 USB SPEED Used to select the recording speed 24 PLAY PAUSE Used to play or pause during playback 25 SEARCH Used to search forward or backwar...

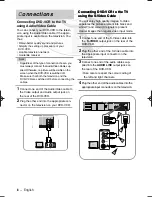
Page 8: ...opriate input connectors on the television C Connections onnections You can connect your DVD VCR to the televi sion using the Audio Video cable if the appro priate input is available on the television You thus Obtain better quality sound and pictures Simplify the setting up procedure of your DVD VCR A cable television network A satellite receiver 1 Connect one end of the Audio Video cable to the V...

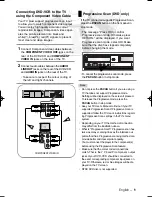
Page 9: ...topped completely before changing the mode To cancel the progressive scan mode press the P SCAN button in stop mode Do not press the P SCAN button if you are using a TV that does not support Progressive mode Nothing will be displayed on the screen if pressed To release the Progressive mode press the P SCAN button in stop mode See your TV User s Manual to find out if your TV supports Progressive Sc...

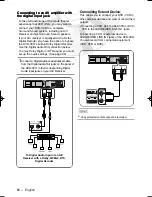
Page 10: ...able from the Digital Audio Out jacks on the panel of the DVD VCR to their corresponding Digital Audio Input jacks on your A V Receiver Connecting to an AV amplifier with the digital input jack Connecting to an AV amplifier with the digital input jack This allows you to connect your DVD VCR to other external devices and view or record their outputs Connecting a VCR Set Top Box STB or DVD VCR to th...

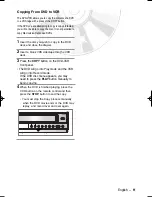
Page 11: ...deck and close the drawer 2 Insert a blank VHS videotape into the VCR deck 3 Press the COPY button on the DVD VCR front panel The DVD will go into Play mode and the VCR will go into Record mode If the DVD disc menu appears you may need to press the PLAY button manually to begin copying 4 When the DVD is finished playing press the VCR button on the remote control and then press the STOP button to e...

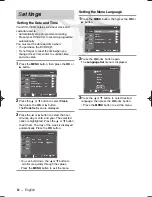
Page 12: ... automatically Press the OK button You can hold down the or button to scroll more quickly through the values Press the MENU button to exit the menu Setting the Date and Time S Settings ettings Setting the Menu Language 1 Press the MENU button then press the OK or button 2 Press the OK or button again The Language Set menu is displayed 3 Press the or button to select desired language then press the...

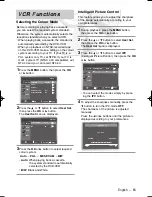
Page 13: ...ally selects the reception standard when you select AUTO When playing back a cassette the standard is automatically selected by the DVD VCR When you playback an NTSC recorded tape on this DVD VCR make a setting on the colour system according to your TV If your TV is a PAL system only TV set NTPB If your TV is multi system TV NTSC 4 43 compatible set NT4 43 and you can record NT4 43 1 Press the MEN...

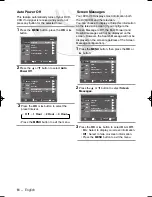
Page 14: ...yed on the screen However the Search Message will not be displayed on the screen regardless of the Screen Message configuration 1 Press the MENU button then press the OK or button 2 Press the or button to select Screen Messages 3 Press the OK or button to select On or Off On Select to display on screen information Off Select to hide on screen information Press the MENU button to exit the menu OK S...

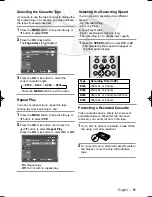
Page 15: ...nd 20 mins E300 300 mins or 5 hours Protecting a Recorded Cassette You can set repeat play to repeat the tape continously from beginning to end 1 Press the MENU button then press the or button to select VCR 2 Press the OK or button then press the or button to select Repeat Play Press the OK or button to select On or Off On Repeat play Off Do not wish to repeat play Selecting the Cassette Type If y...

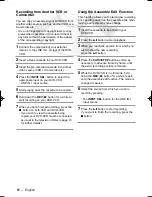
Page 16: ...the button on both VCR and DVD VCR If you wish to view the cassette being copied your DVD VCR must be connected as usual to the television Refer to page 10 for further details Using the Assemble Edit Function This function allows you to start a new recording at a specific position on the cassette while main taining a very smooth scene change 1 Insert the cassette to be edited in your DVD VCR 2 Pre...

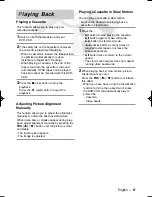
Page 17: ... alignment manually by pressing the TRK or button until the picture is clear and stable The tracking bar appears The image is adjusted Playing a Cassette Adjusting Picture Alignment Manually P Playing Back laying Back You can play a cassette in slow motion No sound is heard when playing back a cassette in slow motion 1 Press the ll button to start playing the cassette ll button again to make still...

Page 18: ...LAY X9 Playing a Sequence at Variable Speeds Each time you record a cassette on this DVD VCR an index is automatically marked on the tape when recording starts The Search function allows you to fast forward or rewind to a specific index and start playback from that point Depending on the direction selected the index es are numbered as follows This DVD VCR uses a standard indexing system VISS As a ...

Page 19: ...inue searching for the next Index mark 5 If you want to watch the tape from a particular Index press the ll button twice End Search Use this feature when you want to search for a blank position to record a program on a cassette The VCR will fast forward searching for a blank position and then automatically stop at that position If the VCR reaches the end of the tape during end search the tape will...

Page 20: ...counter Press the CLEAR button when you want to set the tape counter to zero 2 When you are ready Start Playback or Recording Press the button To fast froward or rewind to the sequence at which the counter was set to zero press the or button Some DVD VCR information such as the counter can be displayed on the television screen Unless you have deactivated the Screen Messages mode refer to page 14 P...

Page 21: ...c into MIC1 or MIC2 jack Then the KARAOKE mode is transferred ON mode Disconnect the Mic makes the KARAOKE mode transfer to OFF mode automatically Press the KARAOKE button on the remote control Press the or button to select KARAOKE mode ON 3 To adjust the Mic volume and ECHO level 4 To sing with accompaniment Using the KARAOKE Function VCR 1 Press the KARAOKE button on the remote control 2 Press t...

Page 22: ...select DVD then press the OK or button 2 Press the OK or button again Press the or button to select Audio then press the OK or button 3 Press the or button to select the required language Select Original if you want the default soundtrack language to be the original language the disc is recorded in Select Others if the language you want is not listed 4 Press the OK button OK RETURN MENU Audio Lang...

Page 23: ...audio language Select Others if the language you want is not listed 4 Press the OK button Some discs may not contain the language you select as your initial language in that case the disc will use its original language setting Language Setup OK RETURN MENU Disc Menu English Audio English Subtitle English OK RETURN MENU Automatic English Français Deutsch Español Italiano Nederlands Others Subtitle ...

Page 24: ... appear at the top and bottom of the screen 4 3 Pan Scan Select this for conventional size TVs when you want to see the central portion of the 16 9 screen Extreme left and right side of movie picture will be cut off 16 9 Wide You can view the full 16 9 picture on your widescreen TV Black Level Adjusts the brightness of the screen On Off OK RETURN MENU Display Setup OK RETURN MENU TV Aspect 4 3 Let...

Page 25: ...d the Parental Setup menu is displayed The DVD VCR is locked RETURN Create Password Enter Password RETURN Create Password Re enter Password Parental Setup OK RETURN MENU Use Password Yes Rating Level 1 Change Password OK RETURN MENU Parental Setup Use Password No Setting up the Rating Level 5 Press the or button to select Rating Level then press the OK or button Parental Setup OK RETURN MENU Use P...

Page 26: ...istration code to register this DVD VCR with the DivX R Video On Demand service This will allow you to rent and purchase videos using the DivX R Video On Demand format To learn more go to www divx com vod 1 Press the MENU button in the stop mode Press the or button to select DVD The DVD Setup menu is displayed 2 Press the OK or button Press the or button to select DivX R Registration 3 Press the O...

Page 27: ... DivX4 DivX5 GMC 1WP Supported file formats avi mpeg Supported audio formats AC3 MP3 WMA Supported caption formats SMI SRT SUB How to make an update disc Write the downloaded file onto a blank CD R disc using the following settings 1 Download the software update file from the Samsung Internet Site http www samsung com Support Product Support Download index aspx After checking your DVD VCR Model na...

Page 28: ... Search Forward Back While a disc is in play mode press the or button to visually search forward backward at 2X 4X 8X 16X 32X 128X speed Press the ll button to resume normal speed VCD CD 2X 4X 8X 16X 32X Slow Motion During playback press the ll button to still the image Then press the l button to play in slow motion at variable speeds Each press increases the slow motion speed playback to 1 8 1 4 ...

Page 29: ...osition press the INFO button during DVD playback The display screen can also be used to quickly choose a title chapter track or playing time 1 View the Display During DVD VCD CD playback press the INFO button To make the screen disappear press the INFO button again 2 Press the or button to select the desired item 3 Press the or button to make the desired setup then press the OK button You may use...

Page 30: ...Fit The top and bottom portions of the screen are cut off and the full screen appears The picture will look vertically stretched Zoom Fit The top bottom left and right portions of the screen are cut off and the central portion of the screen is enlarged To access the desired title when there is more than one in the disc For example if there is more than one movie on a DVD each movie will be identif...

Page 31: ... screen are cut off and the full screen appears The picture will look vertically stretched Zoom Fit The top bottom left and right portions of the screen are cut off and the central portion of the screen is enlarged Selecting the Subtitle Language Some DVDs provide subtitles in one or more languages You can use the SUBTITLE button to quickly view and change settings 1 During playback press the SUBT...

Page 32: ...isc 1 During playback press the AUDIO button Press the or button to select stereo Left or Right 2 Press the or button to select the desired language or audio setup on the DVD Languages are represented by abbrevia tions e g ENG for English This function depends on what languages are encoded on the disc and may not work with all DVDs A DVD disc can contain up to 32 subtitle languages How to have the...

Page 33: ... button to delete the mark Press the MARK button again to exit the mark menu 1 CLEAR 1 CLEAR Up to three scenes may be marked at a timer When VCD 2 0 is in Menu Off mode only this function works Depending on the disc the mark function may not work 1 Repeat Chapter Title You can repeat a single chapter or a complete title 1 Press the REPEAT button while in playback mode to open the repeat menu The ...

Page 34: ... B Repeat A to B Repeat feature enables you to repeat the designated section on a DVD or VCD CD To activate mark where to start A and where to end B of the section you want to watch 1 Press the REPEAT button while in playback mode then press the or button to select A 2 Press the OK button at the beginning of the segment you want to repeat Point A The B is selected 3 Press the OK button again at th...

Page 35: ...rate of at least 128Kbps when recording MP3 files Sound quality with MP3 files basically depends on the rate of compression decompression you choose Getting audio CD quality sound requires an analog digital sampling rate that is conversion to MP3 format of at least 128Kbps and up to 160Kbps However choosing higher rates like 192Kbps or more only rarely give better sound quality Conversely files wi...

Page 36: ...EG Total 1 215 OK RETURN Photo 1 215 Program Random Play CD MP3 WMA You can listen to songs randomly or in the desired sequence Program Play 1 Press the MODE button in the stop mode Press the or button to select PROGRAM Press the OK button 2 Press the buttons to select the first track to add to the program Press the OK button The selection numbers are displayed in the Program Order box 3 Press the...

Page 37: ...he menu bar Slide show Press the or button to select Press the OK button The 3 icons are displayed for time interval Press the or button to select one of these Press the OK button The pictures change automatically with about an 6 second interval The pictures change automatically with about an 12 second interval The pictures change automatically with about an 18 second interval Depending on the fil...

Page 38: ...n select from the following special playback options 1 Still Press the ll button on the remote control during playback The picture will still and the audio will mute To resume playback press the ll button If the player is left in Still mode for 5 minutes it will stop automatically 2 Frame Advance Step While in playback mode press the F ADV STEP button on the remote control to advance one frame at ...

Page 39: ...emote control Then press the or button to select the FUNC then press the OK or button The Function menu is displayed Press the or button to select DVD Function Press the OK or button Press the or button to select ZOOM then press the OK button Press the or button to select the part of the screen you want to zoom in on then press the OK button The screen will be enlarged to twice the normal size Aut...

Page 40: ...udio Out Key Control DVD Note It is the function to reserve the desired song in advance by use of Karaoke function Sequence of reservation 1 Playback the Karaoke Disc containing the wanted songs Press the KARAOKE button 2 Press the buttons to select Request then press the OK button 3 Input the number Track or Chapter No of the desired song into the flickering part You can reserve up to 10 songs Wh...

Page 41: ...ttons to select the SCORE mode 3 Press the or buttons to select the SCORE mode ON 4 Score will pop up whenever a song is com pleted Types of Karaoke disc DVD Karaoke Disc CVD VCD CD Karaoke Disc Channel Karaoke 5CH DVD 2CH DVD Channel 1 CH L Left stereo music Left stereo music Vocal 2 CH R Right stereo music Right stereo music Vocal 3 CH M Guide melody 4 CH V1 Vocal track 5 CH V2 Vocal track Chann...

Page 42: ... 47Kohm unbalanced Mic Front 2 Mic Input Audio DVD VCR RCA jack Audio DVD only Digital audio out OPTICAL COAXIAL Video DVD VCR RCA jack Video DVD only S Video out COMPONENT out RCA jack Tape format VHS type video tape Colour system PAL MESECAM NT 3 58 NTSC4 43 NTSC playback on PAL TV Video S N Above 43dB standard recording Resolution Above 240 lines standard recording Audio S N Above 39dB Mono Aud...

Page 43: ... button pressed to activate the timer Re check the recording start stop time settings If there was a power failure or interruption during timer recording the recording will have been cancelled You cannot see normal broadcasts Check the tuner or external setting It should be on tuner Check the TV or VCR aerial connections Noise bars or streaks on playback Press the TRK or buttons to minimize this e...

Page 44: ...ricts it 2 The DVD s software doesn t support the feature e g angles 3 The feature is not available at the moment 4 You ve requested a title or chapter number or search time that is out of range Some of the functions selected in the Setup menu may not work properly if the disc is not encoded with the corresponding function The screen ratio is fixed on your DVDs Make sure you have selected the corr...

Page 45: ...ALIA 199 153 153 www samsung com it LUXEMBURG 02 261 03 710 www samsung lu NETHERLANDS 0900 20 200 88 0 10 Min www samsung com nl NORWAY 231 627 22 www samsung com no POLAND 0 801 801 881 www samsung com pl PORTUGAL 80 8 200 128 www samsung com pt SLOVAKIA 0850 123 989 www samsung com sk SPAIN 902 10 11 30 www samsung com es SWEDEN 08 585 367 87 www samsung com se U K 0870 242 0303 www samsung com...

Page 46: ...AK68 01221A Contact SAMSUNG WORLD WIDE If you have any questions or comments relating to Samsung products please contact the SAMSUNG customer care centre 0860 7267864 SAMSUNG www samsung com za ...

Reviews: