background image

ENG-6

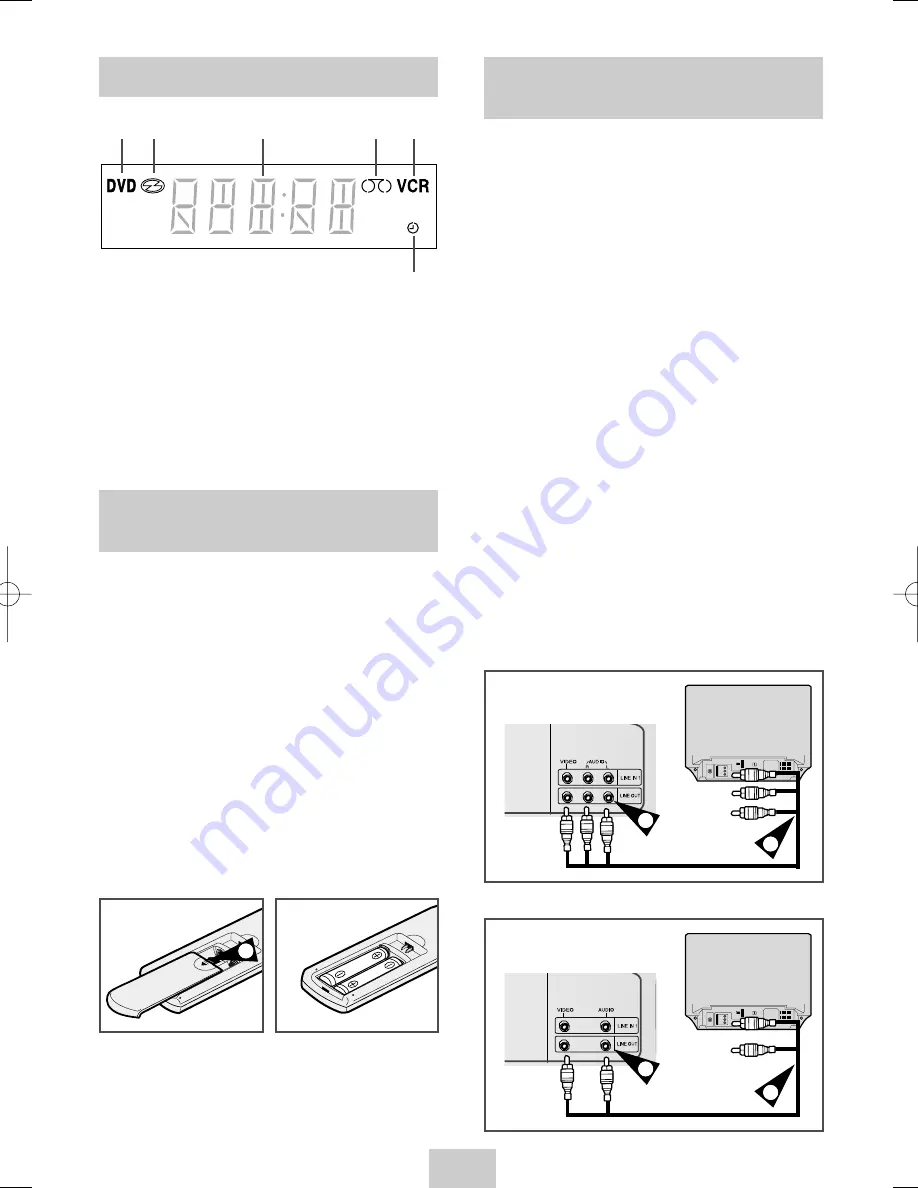
Connecting DVD-VCR to the
TV using the A/V Cable

You can connect your DVD-VCR to the television using
the A/V cable if the appropriate input is available on
the television. You thus:

Obtain better quality sound and pictures

Simplify the setting up procedure of your 
DVD-VCR

Regardless of the type of connection chosen, you
must always connect the coaxial cable supplied. 
Otherwise, no picture will be visible on the 
screen when the DVD-VCR is switched off.

Make sure that both the television and the 
DVD-VCR are switched off before connecting the
cables.

1

Connect the coaxial cable as indicated on page 6.

2

Connect one end of the Audio/Video cable to the
Video output and Audio L, R output socket on the
rear of the DVD-VCR.

3

Plug the other end into the appropriate connector 
on the television.

4

To view DVD-VCR, you must select AV mode on
your TV.

TV

3

2

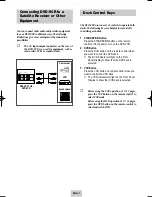
Display Indicators

6

1

The DVD Deck is active

2

A DVD, CD, VCD, or SVCD is loaded

3

The time, counter position, time remaining or 
current deck status is displayed

4

VHS tape is inserted

5

The VCR Deck is active

6

A Timer Recording is programmed or in progress.

1       2   

3                           4        5

Inserting Batteries in the
Remote Control

You must insert or replace the batteries in the remote
control when you:

Purchase the DVD-VCR

Find that the remote control is no longer 
working correctly

1

Push the tab in the direction of the arrow to release
the battery compartment cover on the rear of the 
remote control.

2

Insert two AAA, RO3 or equivalent batteries, taking 
care to respect the polarities:

+ on the battery with + on the remote control

– on the battery with – on the remote control 

3

Replace the cover by aligning it with the base of 
the remote control and pushing it back into place.

Do not mix different battery types (manganese
and alkaline for example).

1

TV

3

2

(DVD-V645K)

(DVD-V642K)

00374Y DVD-V645K/XSG-ENG  5/6/04 11:36 AM  Page 6

Summary of Contents for DVD-V642K

Page 1: ...OPEN CLOSE STANDBY ON PROG TRK OK KARAOKE SEARCH KARAOKE VOLUME Instruction Manual DVD V645K DVD V642K PAL NTSC www samsungvcr com AK68 00374Y...

Page 2: ...Remote Control Overview OPEN CLOSE STANDBY ON PROG TRK OK KARAOKE SEARCH KARAOKE VOLUME...

Page 3: ...quence Frame by Frame 14 Playing a Sequence at Variable Speeds 14 Searching for a Specific Sequence 15 Using the Tape Counter 16 Recording from Another VCR or Camcorder 16 KARAOKE Functions VCR Using...

Page 4: ...storm and or lightning unplug the DVD VCR from the mains socket and aerial If the remote control is not used for a long period of time remove the batteries and store it in a cool dry place THIS DEVIC...

Page 5: ...min 74 min 20 min Audio Video Video with CD sound VHS quality MPEG 1 compression technology 12 Cm 8 Cm Audio An LP is recorded as an analog signal with more distortion CD is recorded as a Digital Sig...

Page 6: ...COMPARTMENT 4 EJECT BUTTON 5 STANDBY ON BUTTON 6 REW SKIP BACK BUTTON 7 STOP BUTTON 8 PLAY STILL BUTTON 9 F F SKIP NEXT BUTTON 10 RECORD BUTTON 11 COPY BUTTON 12 DVD VCR SELECT BUTTON 13 PROGRESSIVE...

Page 7: ...ew DVD VCR you must select AV mode on your TV TV 3 2 Display Indicators 6 1 The DVD Deck is active 2 A DVD CD VCD or SVCD is loaded 3 The time counter position time remaining or current deck status is...

Page 8: ...lly controlling each deck 1 STANDBY ON Button Press the STANDBY ON button on the remote control or front panel to turn on the DVD VCR 2 DVD Button Press the DVD button on the remote control when you w...

Page 9: ...RETURN to exit the menu Time Date Year Clock Set 12 00 1 JAN 2004 THU Language English User Set Auto Power Off Off Screen Messages On Copying from DVD to VCR The DVD VCR allows you to copy the content...

Page 10: ...cture Control Feature allows you to adjust the sharpness of the image automatically according to your own preferences 1 During playback press the MENU button on the remote control 2 Press the OK or Re...

Page 11: ...essing the MENU press the OK or 2 Press the corresponding buttons until the Screen Messages option is selected 3 To Press OK or until Display on screen information On is displayed Hide on screen infor...

Page 12: ...Press the corresponding buttons until the Tape Select option is selected 4 Press the OK or buttons as many times as required until the correct cassette length is displayed E180 E240 E 300 E260 5 Press...

Page 13: ...ect the television channel reserved for use with your DVD VCR or the AV input if used 3 Insert the cassette on which the programme is to be recorded with the window visible and the safety tab intact o...

Page 14: ...d Adjusting Picture Alignment Manually The Picture Adjustment feature allows you to adjust the alignment manually to obtain the best possible picture When noise bars or streaks appear during playback...

Page 15: ...eed Example You wish to analyse a sportsperson s technique movement by movement The Shuttle function is available on the Remote control No sound is heard when playing a sequence at variable speeds 1 P...

Page 16: ...rch Use this feature when you want to search for a blank position to record a program on a cassette The VCR will fast forward searching for a blank position and then automatically stop at that positio...

Page 17: ...6 for further details 3 When you are ready Start playback or Recording Press the button To fast froward or rewind to the sequence at which the counter was set to zero press or Some DVD VCR information...

Page 18: ...ver a song is completed KARAOKE SEARCH Function KARAOKE ON SCORE ON 1 Press the STANDBY ON button and insert KARAOKE tape 2 Press the KARAOKE button on the remote control Press the or button to select...

Page 19: ...matic Setting Up the Language Features If you set the player menu s disc menu audio and subtitle language in advance they will come up automatically every time you watch a movie Using the Disc Menu La...

Page 20: ...unit in Stop mode press the MENU button 2 Select DVD using buttons then OK or button 3 Select Audio Setup using buttons then press the OK or button 4 Use the buttons to select the desired item Then p...

Page 21: ...to leave PAL60 as is Setup Setup Setup Display Setup Dynamic Compression 1 On To select dynamic compression 2 Off To select the standard range PCM Down Sampling 1 On Select this when the amplifier con...

Page 22: ...The Re Enter Password screen appears to confirm the password Ok your password again The Parental Control screen appears About the Rating Level The Rating Level will work only when Use Password is set...

Page 23: ...it will stop automatically 2 Frame Advance Step While in playback mode press the F ADV STEP button on the remote control to advance one frame at a time Audio is muted during Frame Advance mode Press...

Page 24: ...then the picture will be played in Progressive Scan mode 4 To deactivate Progressive Scan press the Progressive button again If the Progressive button on the front panel of the DVD VCR is pressed agai...

Page 25: ...are cut off and the full screen appears The picture will look vertically stretched Zoom Fit The top bottom left and right of the screen are cut off and the central portion of the screen is enlarged T...

Page 26: ...und effect is generated using only two front speakers When in VCD 2 0 mode MENU ON mode this function does not work Use the DISC MENU button in VCD 2 0 mode to select MENU ON or OFF TITLE CHAPTER TIME...

Page 27: ...gain Using the ANGLE button Selecting the Subtitle Language You can select a desired subtitle quickly and easily with the subtitle button Using the SUBTITLE button 1 Press the SUBTITLE button 2 Use th...

Page 28: ...T button on the remote Repeat screen appears 2 Select Chapter Title or A B using the buttons Press the REPEAT button Select A B on screen with the buttons Press OK at the point where you want the repe...

Page 29: ...to a number 1 2 or 3 4 Press the MARK button to turn off the display 1 During play press the MARK button on the remote 2 Use the buttons to select a marked scene 3 Press the ll buttons to skip to the...

Page 30: ...3 A B C Program Random playback CD R MP3 WMA discs 1 Press the MODE button in STOP mode to switch between the RANDOM and PROGRAM modes Press the REPEAT button in PLAY mode to hear only music continuou...

Page 31: ...es like 192 Kbps or more only rarely give better sound quality Conversely files with decompression rates below 128 Kbps will not be played properly Use a decompression transfer rate of at least 64Kbps...

Page 32: ...matically with about an 18 second interval Depending on the file size each interval between images may take longer or shorter than the manual suggests 1 Open the disc tray 2 Load the disc on the tray...

Page 33: ...e Then press the corresponding buttons to select the FUNC option Auto Scaling CIF 100kbps D1 784kbps resolution If the file resolution is small it scales up to 2 times automatically So you can see the...

Page 34: ...fic time while viewing the movie press the INFO key The file format of the current file or and time information will be displayed 2 Use the numeric keys on the remote control to enter the time to jump...

Page 35: ...e To let 7 scales down by half scale Original scale To let 7 scales up by half scale This function operates only in DVD VCD and CD DISC This function cannot operate according to the disc type Keycon R...

Page 36: ...lect only the L R OFF To guide melody through xylophone and piano help you sing easily This function works only on the DVD Karaoke disc on which the guide melody is recorded Vocal Fader Guide Melody S...

Page 37: ...8dBm 47Kohm unbalanced Mic front 2 Mic Input Audio DVD VCR A V jack Output Audio DVD only Digital audio out OPTICAL COAXIAL Video DVD VCR A V jack Video DVD only S Video out COMPONENT out A V jack Tap...

Page 38: ...ll picture may have noise bars depending on the during playback the still picture condition of the tape Press the TRK or buttons has severe noise bars streaks during SLOW motion to minimize this effec...

Page 39: ...support the feature e g angles 3 The feature is not available at the moment 4 You ve requested a title or chapter number or search time that is out of range Some of the functions selected in the Setu...

Page 40: ...THIS APPLIANCE IS DISTRIBUTED BY www samsungvcr com ELECTRONICS...

Reviews: