background image

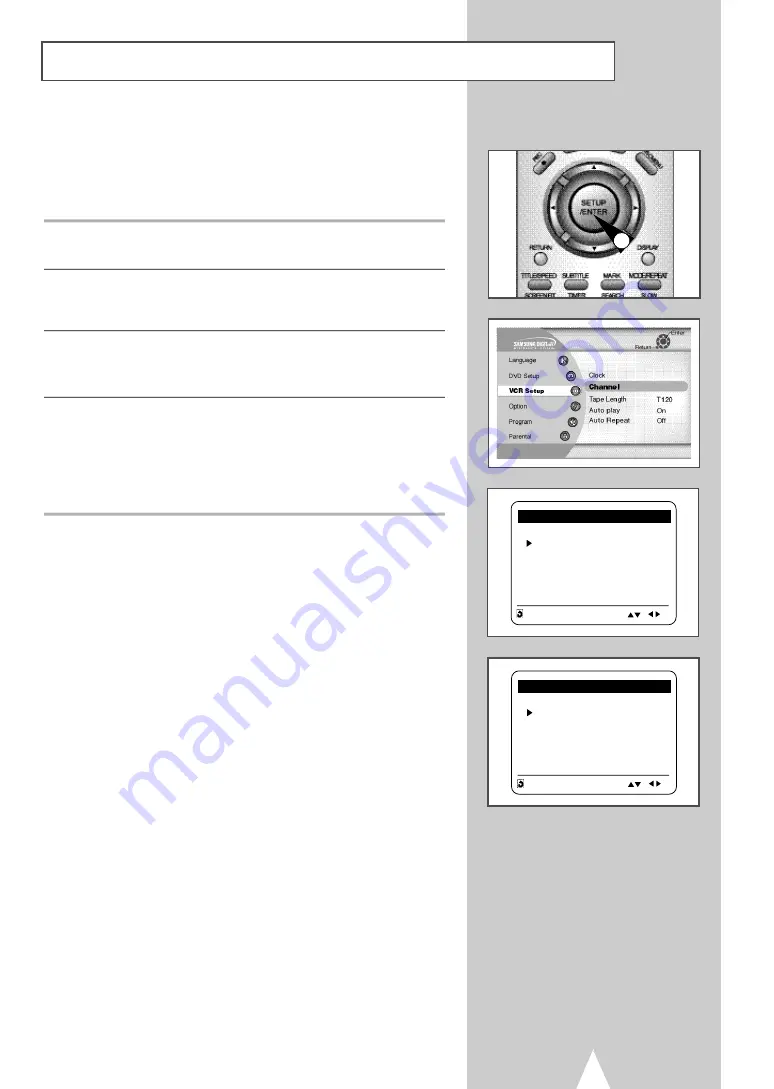
Tuner Band Setting

19

This feature allows you to manually set the DVD-VCR’s tuner band
to Antenna or Cable, whichever you connected to the Antenna In
jack during initial setup.
• Use this setting only if Auto Setup detected the incorrect tuner

band, i.e. channels are coming in on the wrong channel numbers.

1

Open “SETUP MENU”

With the DVD in stop mode, press the SETUP button.

2

Select “VCR Setup”

Using the up and down buttons, move the selection cursor to 
“VCR Setup,” then press ENTER to select.

3

Select “Channel”

Using the up and down buttons, move the selection cursor to
“Channel”, then press ENTER to select.

4

Select “Ant/Cable”

Move the selection arrow to “Ant/Cable” then press right to select 
from the following options:

• Antenna - Indicates that the DVD-VCR is connected to an indoor

or outdoor VHF/UHF antenna.

• Cable TV - Indicates that the DVD-VCR is connected to Cable TV.

1

CHANNEL SETUP

Ant/Cable:                  [Cable TV]
Auto channel memory
Channel add/delete

RETURN                          

CHANNEL SETUP

Ant/Cable:                   [Antenna]
Auto channel memory
Channel add/delete

RETURN                          

Summary of Contents for DVD-V2500

Page 1: ...Instruction Manual DVD V2500 www samsungasc com ...

Page 2: ...ly the recommended accessories To prevent electric shock do not use this polarized plug with an extension cord receptacle or other outlet unless the blades can be fully inserted to prevent blade exposure To reduce the risk of electric shock do not remove the unit cover or back There are no serviceable parts inside Refer servicing to qualified personnel only CUIDADO Para prevenir incendio riesgo de...

Page 3: ...sult an electrician for replacement of the obsolete outlet 10 Protect the power cord from being from being walked on or pinched particularly at plugs convenience receptacles and the point where they exit from the apparatus 11 Only use attachments accessories specified by the manufacturer 12 Use only with cart stand tripod bracket or table specified by the manufacturer or sold with the apparatus Wh...

Page 4: ... Batteries into Remote 11 Using the TV Buttons on the Remote Control 12 2 Getting Started Basic Connections Auto Setup 13 3 Basic Operation Deck Control Buttons 14 Basic DVD Operation 14 Basic VCR Operation 15 Basic TV Tuner Operations 16 4 System Setup On Screen Menu Navigation 16 Menu Language 17 Manual Clock Set 18 Tuner Band Setting 19 Auto Channel Memory 20 Channel Add Delete 21 Auto Power Of...

Page 5: ...D Operations Special Playback Features 33 Disc Menu Navigation 34 Screen Fit Playback 34 Title Chapter Time Selection 35 Zoom 36 Angle View 36 Subtitle 37 Audio 38 3D Sound 38 Repeat Chapter Title 39 Bookmarks 40 Programmed Playback 41 Random Playback 41 MP3 Playback 42 8 Memory Stick Memory Stick 43 DAM Digital Audio Manager Playback 47 Memory Stick Pull out 48 DPM Digital Photo Manager Playback ...

Page 6: ...57 Special Recording Features 58 One Touch Recording OTR 59 Record Speed 59 11 Timer Recording How to Set a Timer Recording 60 Appendix A Advanced Connections S Video Component Video Connections for DVD 61 Stereo Connections 62 Monitor TV Connections 63 Connecting Other Video Equipment 64 Appendix B Help Technical Specifications 65 Table of Contents 6 ...

Page 7: ...during 2x speed playback VCR Features Hi Fi Stereo VCR 4 heads for superior slow motion and stop action Playback of S VHS tapes at better than standard resolution VISS Scan Zero Return Blank Search 8 event 1 month timer recording Time remaining counter real time counter Note Discs which cannot be played with this player Ability to play back may depend on recording DVD ROM DVD RAM conditions CD ROM...

Page 8: ...not play The Region Number for this player is described on the rear panel of the player 5 31 2 Single sided 240 min Double sided 480 min Single sided 80 min Double sided 160 min Audio Video Audio Video Audio CD is recorded as a Digital Signal with better audio quality less distortion and less deterioration of audio quality over time Video with CD sound VHS quality MPEG 1 compression technology DVD...

Page 9: ... SELECT p 14 7 VCR EJECT p 15 8 POWER p 14 9 MEMORY STICK p 43 10 STOP p 33 11 REWIND REV p 33 54 12 PLAY PAUSE p 14 15 33 58 13 FAST FORWARD FWD p 33 54 14 FRONT PANEL DISPLAY p 10 15 LINE IN 2 COMPOSITE VIDEO JACK 16 LINE IN 2 LEFT AUDIO JACK 17 LINE IN 2 RIGHT AUDIO JACK 1 2 3 4 5 6 7 9 10 11 12 13 14 15 16 17 8 ...

Page 10: ...HAP displays the current chapter showing 11 The Hi Fi track of a VHS tape is playing The current TV show or video is broadcast in Stereo 12 Timer Recording is in progress It also blinks when you pause VCR 1 2 3 4 5 6 7 8 9 10 1 RF ANTENNA INPUT 2 RF OUT TO TV 3 LINE OUT TO TV COMPOSITE 4 LINE IN 1 5 VIDEO OUT SELECT SWITCH If 525P 480P VIDEO OUT is selected VIDEO and S VIDEO will not work If your ...

Page 11: ...13 LEFT p 16 14 SETUP p 16 ENTER p 16 15 RETURN p 16 16 TITLE p 35 SPEED p 59 17 SCREEN FIT p 34 18 SUBTITLE p 37 TIMER p 60 19 SHUTTLE DIAL p 33 20 JOG DIAL p 33 21 OPEN CLOSE p 14 15 22 TV VCR p 16 23 AUDIO p 38 24 INPUT SEL p 57 ANGLE p 36 25 CHANNEL p 12 16 TRACKING p 54 26 VCR TV SELECT p 14 27 FAST FORWARD p 33 54 SKIP NEXT p 33 54 28 PLAY PAUSE p 14 15 29 CLEAR p 40 41 30 DISC MENU p 34 31 ...

Page 12: ...5 MITSUBISHI 13 TELEFUNKEN 26 NEWSAN 27 Result If your television is compatible with the remote control it will switch off It is now programmed to operate with the remote control If several codes are indicated for your television brand try each one in turn until you find one that works When you change the batteries in the remote control you must reprogram the code following the same procedure You ...

Page 13: ...hite yellow from the LINE OUT jacks on the back panel of the DVD VCR to your television s Line In jacks Use red for right audio white for left audio and yellow for video NOTE It is recommended that you use the Line Connection if your TV is equipped with RCA jacks 3 Plug In Connect the DVD VCR power cord to a standard 120V 60Hz wall outlet Don t press any buttons on the DVD VCR or remote during aut...

Page 14: ... SEL button repeatedly to cycle through all of your input sources including the Tuner Ch Line 1 rear AV input and Line 2 front AV input Input Select is only available when the VCR deck is selected 2 3 4 1 1 1 4 Follow the instructions below to playback a DVD 1 Open the Disc Tray Press the Open Close button on your remote or front panel to both power on and open the tray 2 Insert a Disc Put a disc ...

Page 15: ...Press the ll Play Pause button on the remote control or front panel If the tape is missing the Record Safety Tab and Auto Play is turned on the tape will begin to play automatically see page 56 3 Stop Playback Press the Stop button on the remote control or front panel 4 Eject Tape Press the OPEN CLOSE button on the remote control or the EJECT button on the front panel 5 Additional VCR Options For ...

Page 16: ...play the channel you are watching Also works in DVD and VCR mode The on screen menu system allows you to set all functions for your DVD VCR The following buttons are used to open and navigate through the on screen menu system 1 SETUP Button With the DVD in stop mode press to access the DVD VCR on screen menu system 2 Up Down and Left Right Moves menu selection cursor up down left and right to cycl...

Page 17: ... Open SETUP MENU With the DVD in stop mode press the SETUP button 2 Set Language Using the Up and Down buttons move the selection arrow to Language Idioma Langue then press the ENTER button 3 Set menu Language Move the selection bar to your desired Language then press the ENTER button English Setup Menu 1 ...

Page 18: ...lect MANUAL Move the selection arrow to MANUAL then press ENTER to turn this feature On The Set Clock Menu will change as shown 5 Set the Clock Press LEFT RIGHT to select each of the following options then press UP DOWN to set each option Set Hour Set the hour using the up and down buttons Set Minute Set the minute using the up and down buttons Set Month Set the month using the up and down buttons...

Page 19: ...own buttons move the selection cursor to VCR Setup then press ENTER to select 3 Select Channel Using the up and down buttons move the selection cursor to Channel then press ENTER to select 4 Select Ant Cable Move the selection arrow to Ant Cable then press right to select from the following options Antenna Indicates that the DVD VCR is connected to an indoor or outdoor VHF UHF antenna Cable TV Ind...

Page 20: ...Using the up and down buttons move the selection cursor to Channel then press ENTER to select 4 Run Auto channel memory Move the selection arrow to Auto channel memory then press ENTER to select The DVD VCR will automatically search for all available channels in the selected Tuner Band This procedure may take a few minutes to complete When finished the lowest channel found will be displayed 1 3 CH...

Page 21: ...tion cursor to Channel then press ENTER to select 4 Select Channel add delete Move the selection bar to Channel add delete then press ENTER to select 5 Select Channel to add delete Use the CH buttons to tune in the channel number you wish to add or remove 6 Select CHANNEL ADD DELETE Press right to add or press left to remove the channel from your channel list Repeat steps 4 and 5 to add or remove ...

Page 22: ...selection cursor to Option then press ENTER to select 3 Select Auto Power Off Move the selection bar to Option Setup then press right to select from following options Off Auto power off is disabled 1Hr DVD VCR will auto shut off 1 hour after the last button is pressed 2Hr DVD VCR will auto shut off 2 hours after the last button is pressed 1 ...

Page 23: ...atically during power off Dim Front Panel Display will be dim all the time Bright Front Panel Display will be bright all the time 1 Open SETUP MENU With the DVD in stop mode press the SETUP button 2 Select Option Using the up and down buttons move the selection cursor to Option then press ENTER to select 3 Select RF Output Channel Move the selection bar to RF Output Channel then press right to cha...

Page 24: ...Move the selection bar to your preferred language for DVD disc menus then press ENTER to select Player Menu Language Follow these steps to choose preferred language for player menus The DVD VCR will automatically default to the language you choose if it is available on a given DVD 1 Open SETUP MENU With the DVD in stop mode press the SETUP button 2 Select Language Using the up and down buttons mov...

Page 25: ...rence Move the selection bar to your preferred language for DVD subtitles then press ENTER to select Audio Language Follow these steps to choose your preferred language for DVD audio soundtracks The DVD VCR will automatically default to the language you choose if it is available on a given DVD 1 Open SETUP MENU With the DVD in stop mode press the SETUP button 2 Select Language Using the up and dow...

Page 26: ...ting Control options The menu will change as shown NOTES The first time Enter Password is set to On you will be prompted to enter a password If the Enter Password screen appears then Re enter Password has already been set to Yes Please skip to Step 5 4 Enter Password Enter a 4 digit password using the 0 9 buttons on the remote control Write your password down and keep it in a safe place in case yo...

Page 27: ... coaxial on the DVD VCR back panel 1 Open SETUP MENU With the DVD in stop mode press the SETUP button 2 Select DVD Setup Using the up and down buttons move the selection cursor to DVD Setup then press ENTER to select 3 Set Digital Output Move the selection bar to Digital Output then press the right left button to select from the following options PCM To use your DVD TV with an A V receiver NOT equ...

Page 28: ...al on the DVD VCR back panel 1 Open SETUP MENU With the DVD in stop mode press the SETUP button 2 Select DVD Setup Using the up and down buttons move the selection cursor to DVD Setup then press ENTER to select 3 Set DTS Move the selection bar to DTS then press right or left to select from the following options Off To use your DVD TV with an A V receiver NOT equipped with a DTS decoder On To use y...

Page 29: ...Setup Using the up down and left right buttons move the selection cursor to DVD Setup then press ENTER to select 3 Set Dynamic Compression Move the selection bar to Dynamic Compression then press right or left to select from the following options On The total dynamic range of the DVD soundtrack will be compressed so quiet passages will be louder and loud passages will be softer Off The original dy...

Page 30: ...nd down buttons move the selection cursor to DVD Setup then press ENTER to select 3 Set 2x Scan Audio Move the selection bar to 2x Scan Audio then press right or left button to select from the following options Off Turns 2x audio off Though 2x Scan Audio is ON in the SETUP MENU no sound will be heard on discs which are recorded with LPCM DTS or MPEG 2 Audio On Turns 2x audio on Off On ...

Page 31: ...he selection bar to TV Aspect then press the left or right button to select from the following options Widescreen This method allows you to view the full 16 9 picture on a widescreen television Letterbox This method displays the full width of the widescreen movie on a standard 4 3 television As a result black bars will appear at the top and bottom of the screen Pan Scan The familiar way of watchin...

Page 32: ...igital Decoder you have the option to bypass the DVD VCR s built in Dolby Digital Decoder Use the DIGITAL AUDIO OUT connection below 1 Digital Audio Out Connect EITHER an optical cable OR a digital coaxial cable from the DIGITAL AUDIO OUT jacks on the back panel of the DVD VCR to their corresponding Digital Audio Input jacks on your A V Receiver Optical Coaxial Use whichever connection is availabl...

Page 33: ...urrent chapter track Press Skip Back again to jump to the beginning of the previous chapter track Search Forward Back While a disc is in Play mode rotate shuttle ring on the remote control and press the Forward Back buttons on the remote control or front panel to visually search forward backward at 2X 4X 8X 16X 32X 128X speed Press ll Play Pause button to resume normal speed 4 Slow Motion During p...

Page 34: ...n the Disc menu 4 TITLE Button Press to access the DVD s Title menu if applicable 1 SCREEN FIT Button During play press SCREEN FIT button on the remote control Allows you to eliminate the black bars in the top and bottom of the screen when a DVD movie is playing Screen Fit will work when the Zoom mode is active you can not remove the black bars on the screen However Zoom mode will work when Screen...

Page 35: ... titles on the disc The TITLE icon light will appear on the Front Panel Display 3 Select Chapter or Track Press the up down and left right buttons to select Chapter or Track then press ENTER to change among all available Chapters Tracks on the disc The CHAP icon light will appear on the Front Panel Display followed by the current title number hours minutes and seconds 4 Select Counter Position Pre...

Page 36: ...on repeatedly to zoom in at 2X 4X 2X and normal magnification 1 Angle View Some DVD Movies provide you with various camera angle views on the same scene while they are playing To activate the feature press the Angle Button 1 Check for the Angle Icon Press the Angle button you ll see the Angle Icon when watching a DVD with multi Angles available 2 View Angle Menu Options When the Angle Icon comes u...

Page 37: ...s 1 Open Subtitle Menu During playback press the SUBTITLE button 2 Set Subtitle Language Press the left right buttons to select among all available subtitle languages Subtitle languages are often represented by abbreviations 3 Activate Subtitles Press the up down buttons to turn subtitles On or Off The default subtitle setting is Off 1 ...

Page 38: ... control 2 Select DVD Audio Track Press the left right buttons to select the desired language audio setup on the DVD Languages are represented by abbreviations i e ESP for español 1 3D Sound 3D Audio is an enhanced audio mode that creates the illusion of Surround Sound with only two speakers 1 Open 3D Sound Menu During playback of a DVD press the 3D SOUND button on the remote control 2 Set 3D Soun...

Page 39: ...de will highlighted 2 Select Chapter Press the left right buttons to select Chapter Chapter will highlight when Chapter Repeat is selected 3 Repeat Chapter Press the ENTER button to repeat the current chapter track 4 Select Title Press the left right buttons to select Title Title will highlight when Title Repeat is selected 5 Repeat Title Press the ENTER button to repeat the title 1 ...

Page 40: ...ighted 3 Set the Bookmark Play the DVD to the scene you want to bookmark then press the ENTER button The placeholder will change to a number 1 2 or 3 You can continue setting up to three bookmarks When finished press the MARK button to exit Depending on the disc the bookmark function may not work 4 Play Bookmark During playback press the MARK button on the remote control Press the left right butto...

Page 41: ...f chapters tracks on a DVD or CD 1 Open Playback Mode Menu While in Stop mode press the MODE button 2 Select PROGRAM Using the left right buttons move the selection bar to PROGRAM then press ENTER to select 3 Select Chapter Track Press the up down and left right buttons to select the first chapter track in your revised playback list then press the ENTER button 4 Program Playback Order Use the up d...

Page 42: ...ep 3 3 Select MP3 File Press the up down buttons to select the desired MP3 file If there are more than 10 MP3 files in the selected folder press the left right buttons to view additional MP3 files Press the Return button to back up and select another folder 4 Play MP3 File Press the ENTER button on the remote control to play the selected song While the song is playing you can use the up down butto...

Page 43: ...be used for external data storage There are two types of Memory Sticks One is the regular Memory Stick and the other is the MagicGate Memory Stick equipped with MagicGate copyright protection technology MagicGate is a copyright protection technology that uses encryption 1 MagicGate Memory Stick Can be used for both copyright protected and regular data 2 Memory Stick Can be used for regular data on...

Page 44: ...emory sticks can only be read in this unit not written 3 Do not attach any other material than the supplied label on the label space 4 Attach the label so that it does not stick out from the proper attachment location 5 When moving or storing the Memory Stick use the storage case 6 Do not touch the Memory Stick connector with your finger or metallic objects 7 Do not bend drop or apply strong shock...

Page 45: ... been initialized using a computer or initialize a Memory Stick attached to a camera using USB connection further operation is not guaranteed 4 Be careful not to optimize the Memory Stick from a computer running a Windows operating system The life of the Memory Stick will be shortened 5 Do not compress the data recorded on the Memory Stick A compressed file cannot be played back on this unit 1 Dep...

Page 46: ...ill be displayed in The Thumbnail View however they can still be played back in Photo View Directories Supported Memory Stick DPM DCIM dir jpg Picture CD DPM Compatible with Picture CD of Kodak Fuji Qss Noritus and Konica 1 Still image files with jpg extension that have been recorded with a digital camcorder or digital still camera equipped with Memory Stick functions 2 JPEG image files stored in ...

Page 47: ...lders 2 PLAYLIST Shows the playlist 3 INFO Shows information about the Selected song being played 4 EXIT Takes you to the Start menu 5 Shows brief information about the selected song 6 The title of the song currently playing 7 Shows a list of MP3 files and folders found in the memory stick 8 Shows the title and playback time of the currently playing song in the scroll box lf the REPEAT button is p...

Page 48: ... or use the UP DOWN LEFT RIGHT buttons to select SLIDE SHOW and then press the ENTER button to begin the slide show Slides will be displayed in order for a few seconds at a time The Auto Power Off function does not work while any DPM function is active View Photo Album Memory Stick 1 5 2 3 4 1 If using DPM Digital Photo Manager or DAM Digital Audio Manager move to Exit and then press the ENTER but...

Page 49: ...Use the UP DOWN LEFT RIGHT buttons to select the image you want and then press the ENTER button to display it in full view on the TV screen or use the UP DOWN LEFT RIGHT buttons to select SLIDE SHOW press ENTER and the silde show will begin Slides will be displayed in order for a few seconds at a time 1 EXIT Takes you to the Start menu 2 SLIDE SHOW Begins the slide show 3 PAGE Highlight the PAGE m...

Page 50: ...or 5 seconds the Slide Show menu will disappear and the slide show will begin To view the Slide Show menu press the UP DOWN LEFT RIGHT button on the remote control The slide show will stop and the menu will be displayed Select the PLAY menu item to resume ALBUM Takes you back to the Photo Album TIMER Indicates the delay between images in a slide show REPEAT If ON is selected the slide show will re...

Page 51: ...o and then press the ENTER button Source location is indicated with yellow borders Destination location is indicated with green borders 5 After moving the images to another location you can begin the slide show by choosing START SHOW For those images you don t want to include in the slide show select the image from the Slide Show Order screen and then press the CLEAR button Slide Show order will r...

Page 52: ... UP DOWN LEFT RIGHT button ALBUM Takes you to Photo Album EDIT You can apply various effects to the selected image This is only for viewing the edited image cannot be saved SLIDE SHOW Begins the slide show ROTATE Each time the ENTER button is pressed the image will rotate clockwise 90 degrees ZOOM Each time the ENTER button is pressed the image will enlarge up to 6X Normal 2X 4X 6X Normal PAN Pres...

Page 53: ...hoto Album FLIP Shows the mirror image FILTERS 1234 You can apply various effects to the selected image 1 Black and white filter 2 Sepia brown filter 3 Image negative filter 4 Color negative filter To restore the image to its original state select RESET from the menu and then press the ENTER button COLOR R G B Adjust Red Green and Blue color balances each time ENTER is pressed SOFTEN 123 Highlight...

Page 54: ...ause to still a single frame 2 Frame Advance From still mode press JOG DIAL to advance to the next frame 3 Cue Review From Play mode press F Forward or Rewind to cue review at two speeds Picture Search Press and release to advance the tape forward or backward at 5 times normal speed Jet Search Press and hold to advance the tape forward or backward at 7 times normal speed 4 Repeat From Play mode pr...

Page 55: ...it is inserted as long as the safety tab of the cassette has been removed Off Auto play is disabled 4 Tape Length Press the left button to select the video cassette length This information is usually printed on the tape box The menu cycles through T120 T160 or T180 Once the type of cassette is set the VCR can display the amount of time remaining on the tape when you press the DISPLAY button 5 Auto...

Page 56: ...t five seconds Press the PLAY button to view that program If you don t press PLAY the VCR automatically searches for the next index or until the end of the tape is reached 2 Go to 0 00 00 stop Use this feature when you want to search for the 0 00 00 counter position on a cassette Press the CLEAR button at the point on the tape where you want to set the counter to 0 00 00 Later while a cassette is ...

Page 57: ...TV Set the TV to channel 3 or 4 1 Insert Tape Insert a blank VHS tape into the VCR deck Make sure the tape is long enough to record the entire program To change the Recording Speed see page 49 2 Select a Channel to Record Use the 0 9 buttons or the Channel Up Down arrow buttons to select the desired channel or press the INPUT SEL button to select Line 1 or 2 if recording from an external device co...

Page 58: ... Play Pause button Press REC again to resume 2 Stop Recording Press the STOP button 3 Watch a Different Channel Press the TV VCR button on the remote to switch to your TV tuner then select a different channel on your television 4 To Watch a DVD Insert a DVD in the DVD deck and press Play The output will automatically change to the DVD 5 Add Recording Time See One Touch Recording OTR on the next pa...

Page 59: ...SP vs SLP Tape Length SP Standard Play SLP Super Long Play T 120 2 hrs 6 hrs T 160 2hrs 40 mins 8 hrs T 180 3 hrs 9 hrs 2 One Touch Recording OTR allows you to add recording time in 30 minute increments up to 4 hours at the touch of a button 1 Start Recording Follow the instructions on page 57 to begin recording 2 Activate OTR While in Record mode press the REC button again to activate One Touch R...

Page 60: ...N button to complete programming of the timer recording Stop the VCR or turn the power off The timer indicator comes on the VCR The VCR will automatically turn on and begin recording at the time you set To stop a timer recording press the POWER button or STOP button on the VCR 6 Auto Speed Select If you are not sure the tape is long enough for timer program recording in the SP tape speed set the r...

Page 61: ...ut to TV Connect a component video cable from the COMPONENT VIDEO OUT Y Pb Pr on the back panel of the DVD VCR to the Component Video Input on your television 3 Connect Audio Out DVD only Connect RCA audio cables from the Left Right Line Out jacks on the back panel of the DVD VCR to the Left Right Audio Line In jacks on your television You must use these Line Out jacks when connecting the DVD VCR ...

Page 62: ...using a stereo television connect the Video Output as well 2 Set Stereo to Auxiliary Mode Set your stereo receiver or television to Aux or Tape whichever selects the line input for your particular device 3 Play a Tape Insert a DVD or Hi Fi stereo videotape in your system and adjust the volume on your stereo receiver or television You should hear the audio through your stereo speakers If you still ...

Page 63: ... Connect VCR to Monitor TV Connect RCA cables from the Audio Video Line Out jacks on the back panel of the DVD VCR to the Audio Video Line Inputs of your monitor TV 2 Set TV to Auxiliary Mode Set your monitor TV to Aux Video or Line Refer to your monitor television owner s manual for the correct setting 3 Connection is Complete NOTE With this connection the TV VCR button has no effect It is as if ...

Page 64: ...n the front or back panel of the DVD VCR 2 Watch Device Play your external device then press the Input Sel button until the playback from LINE1 rear panel inputs or LINE2 front panel inputs appears on your TV screen 3 Record Device First play your external device Next press the Input Sel button until the playback from LINE1 rear panel inputs or LINE2 front panel inputs appears on your TV screen Th...

Page 65: ...YSTEM 1 2 inch VHS system 4 rotary head helical scanning FM azimuth luminance chrominance converted sub system phase shift AUDIO TRACK Normal 1 track Hi Fi 2 track PLAY RECORD TIME T 180 tape SP 3 hours SLP 9 hours VCR FF REW TIME T 120 tape 2 minutes HEADS Video DA 4 rotary Audio 2 rotary heads Hi Fi 1 stationary head Linear Control 1 stationary head Erase 1 full track 1 audio track WOW FLUTTER L...

Page 66: ...essories applications installations repairs external wiring or connectors not supplied and authorized by SAMSUNG or which damage this product or result in service problems incorrect electrical line voltage fluctuations and surges customer adjustments and failure to follow operating instructions cleaning maintenance and environmental instructions that are covered and prescribed in the instruction b...

Page 67: ...AMERICA INC HEADQUARTERS 105 Challenger Road Ridgefield Park N J 07660 0511 TEL 1 800 SAMSUNG SERVICE DIVISION 400 Valley Road Suite 201 Mount Arlington NJ 07856 1 800 SAMSUNG 1 800 726 7864 www SAMSUNGUSA com AC68 01821A ...

Reviews: