background image

ENG-8

EZ VIEW

STANDBY/ON

MIN

MIC

VOLUME

MAX

S

E T U P

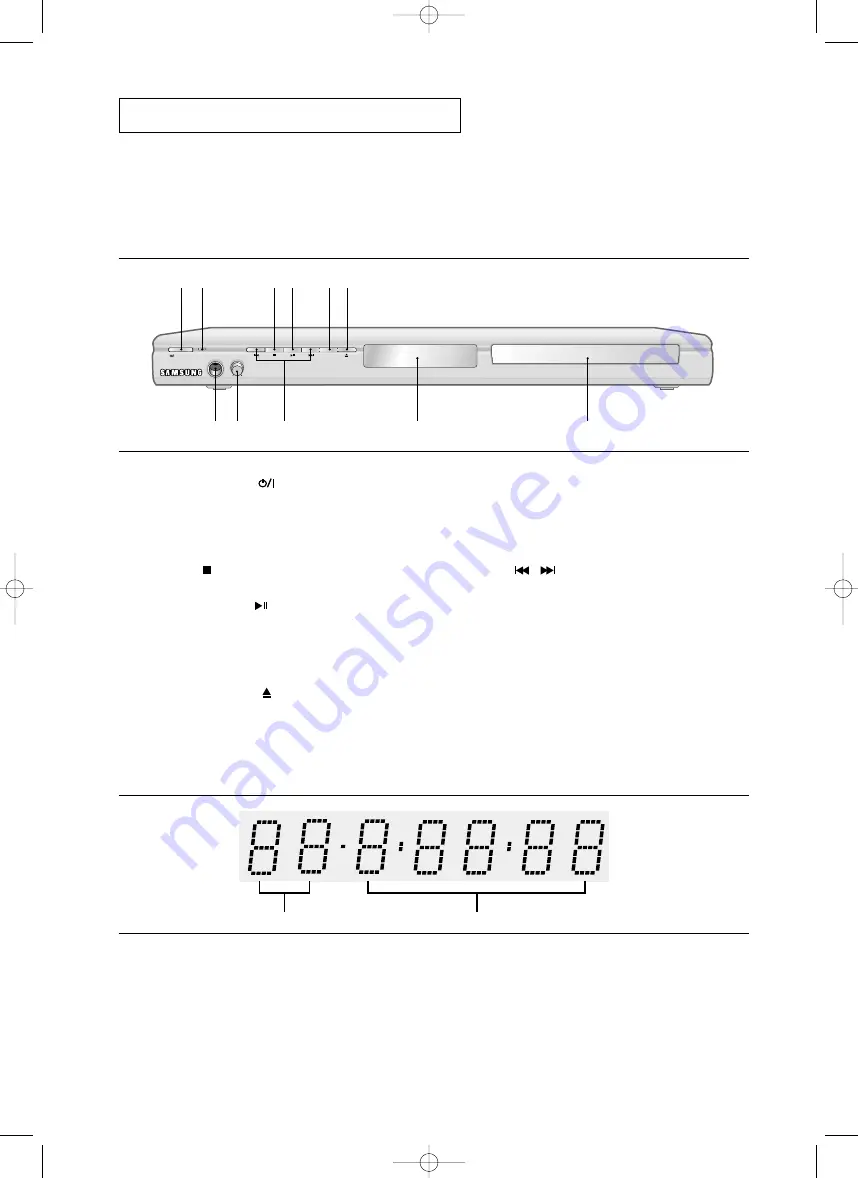
Description

Front Panel Controls

1.

STANDBY/ON (

)

When STANDBY/ON is pressed on, the indicator goes 
out and the player is turned on.

2.

STANDBY indicator
When the unit is first plugged in, this indicator lights.

3.

STOP (

)

Stops disc play.

4.

PLAY/PAUSE (

)

Begin or pause disc play.

5.

EZ VIEW
The aspect ratio of a picture can easily be adjusted to
your TV's screen size (16:9 or 4:3).

6.

OPEN/CLOSE (

)

Press to open and close the disc tray.

7.

MIC
Connect Microphone for karaoke functions.

8.

MICROPHONE VOLUME
Use to adjust microphone volume level. Use the button by
pressing it. Turn it to the left or right to control the volume.

9.

SKIP (

/

) SEARCH

Allow you to search forward/backward through 
a disc. Use to skip the title, chapter or track.

10. DISPLAY

Operation indicators are displayed here.

11. DISC TRAY

Place the disc here.

1

8

7

9

10

11

2

3 4

5 6

Front Panel Display

1.

Chapter/Track number indicator

2.

Total playing time/Displays various
messages concerning operations
such as PLAY, STOP, LOAD ...
no DISC: No disc loaded.
OPEN: The disc tray is open.
LOAD: Player is loading disc information.

1

2

00639M-P350K_XFA_Eng_1  2/28/05  3:41 PM  Page 8

Summary of Contents for DVD-P350K

Page 1: ...DVD Oynatıcı DVD Player DVD P350K TUR ENG 00 P350K FES Cover 3 8 05 6 46 PM Page 3 ...

Page 2: ...ndüstriyel deðil ev kullanýmýna yönelik tasarýmlanmýþtýr Bu ürünü yalnýzca kiþisel amaçlý kullanýnýz Oynatýcýnýn üzerine içi sývýyla dolu herhangi bir kap veya küçük metal nesneler koymayýnýz Aydýnlatma veya durgun elektrik gibi dýþ etkiler bu oynatýcýnýn normal çalýþmasýný etkiler Bu durumda POWER düðmesine basarak oynatýcýyý kapatýp açýn veya fiþini çekip tekrar takýn Oynatýcý normal olarak çalý...

Page 3: ...erhangi bir ürünü kapsamaz ve lisans bu ürünle birlikte kullanýlan veya satýlan ISO OUR 11172 3 veya ISO OUR 13818 3 e uyan lisanslanmamýþ herhangi bir ürün veya iþlem için geçerli deðildir Lisans sadece bu ürünün ISO OUR 11172 3 veya ISO OUR 13818 3 e uyan ses dosyalarýný kodlamak veya kodunu çözmek için kullanýmýný kapsar ISO OUR 11172 3 veya ISO OUR 13818 3 e uymayan ürün özellikleri ve iþlevle...

Page 4: ...krar yerine yerleþtirin Uzaktan kumanda düzgün çalýþmýyorsa Pillerin kutbunu kontrol ediniz Kuru Pil Pillerin akýp akmadýðýný kontrol ediniz Uzaktan kumandanýn sensorunun engellenip engellenmediðini kontrol ediniz Yakýnlarda herhangi bir flüoresan ýþýðý olup olmadýðýný kontrol ediniz Baþlamadan Önce Aksesuarlar Uzaktan Kumanda Uzaktan Kumanda Pilleri AAA Tipi Kullaným Kýlavuzu Video Audio Kablosu ...

Page 5: ...View 27 Ses Ýçin Dil Seçimi 29 Altyazý Ýçin Dil Seçimi 30 Kamera Açýsýnýn Deðiþtirilmesi 31 Anlýk Tekrar Oynatým Atlama Fonksiyonunun Kullanýmý 31 Ýþaretleme Fonksiyonunun Kullanýmý 32 Zoom Fonksiyonunun Kullanýmý 34 MP3 WMA JPEG MPEG4 Ýçin Klip Menüsü 35 Klasör Seçimi 35 MP3 WMA Çalma 36 Resim CD sinin Oynatýmý 40 Bölüm 5 Karaoke Fonksiyonu Karaoke Fonksiyonu 42 Bir Þarkýyý Ayýrmak 43 Vokal Fonks...

Page 6: ...ðlar Not Bu oynatýcýya uygun olmayan diskler DVD ROM DVD RAM CD ROM CDV CDI CVD SACD CD katmaný dýþýnda CDG ler sadece ses çalar görüntü yoktur Oynatabilme kayýt koþullarýna baðlý olabilir DVD R R CD RW DVD RW RW V modu Disk tipi veya kayýt koþullarýna baðlý olarak ünite bazý CD R CD RW ve DVD R diskleri çalamayabilir KOPYA KORUMA Çoðu DVD disk kopya korumalýdýr Bu nedenle DVD oynatýcýnýzý bir VCR...

Page 7: ...k Ses Görüntü Dolby Digital ve MPEG 2 sisteme göre DVD kusursuz ses ve görüntü içerir Çeþitli ekran ve ses fonksiyonlarý ekran üstü menü üzerinden kolaylýkla seçilebilir Disk Tipleri Logolar Kayýt Türü Disk Ebadý Maks Oynatma Süresi Karakteristikleri DVD 12 Cm 8 Cm 74 dk 20 dk Ses Görüntü CD ses ile görüntü VHS kalitesi ve MPEG 1 sýkýþtýrma teknolojisi VIDEO CD 12 Cm 8 Cm 74 dk 20 dk Ses Daha iyi ...

Page 8: ...in mikrofon takabilirsiniz 8 MÝKROFON SES SEVÝYESÝ Mikrofon ses seviyesini ayarlamak için kullanýn Tuþa basyn Ses seviyesini kontrol etmek için saða ya da sola çevirin 9 ATLAMA ARAMA Diskte ileri ya da geri arama yapmanýza izin verir Baþlýk Bölüm ya da Parça atlamak için de kullanabilirsiniz 10 EKRAN Operasyon göstergeleri burada görüntülenir 11 DÝSK TEPSÝSÝ Diski buraya yerleþtirin 1 8 7 9 10 11 ...

Page 9: ...þlerine baðlayýnýz 4 VÝDEO ÇIKIÞI BAÐLANTISI Televizyonun görüntü giriþine baðlamak için bir görüntü kablosu kullanýnýz Ayarlar menüsündeki görüntü çýkýþý için S Video Kompozit seçilmiþ olmalýdýr 5 S VIDEO ÇIKIÞI BAÐLANTISI Daha yüksek bir görüntü kalitesi için bu çýkýþý televizyonunuzdaki S Video giriþine baðlamak için S Video kablosu kullanýn Ayarlar menüsündeki görüntü çýkýþý için S Video Kompo...

Page 10: ...ilmek için kullanýn 13 ANLIK TEKRAR OYNATIM Tuþu Bir filmde o an ekrandaki görüntünün 10 saniye öncesini tekrar oynatmak için kullanýlýr 14 ANLIK ATLAMA Tuþu 10 saniye ileri atlamayý saðlar 15 OYNATMA DURAKLATMA Tuþu Disk oynatmayý Baþlatýr ya da Duraklatýr 16 BÝLGÝ Tuþu Mevcut disk modunu görüntüler 17 DÝSK MENÜ Tuþu Disk menüsünü ekrana getirir 18 GÝRÝÞ Düðmeleri Bu düðme geçiþ anahtarý olarak ç...

Page 11: ...kasýndaki VIDEO sarý AUDIO kýrmýzý ve beyaz OUT terminallerini TV nizin VIDEO sarý AUDIO kýrmýzý ve beyaz IN terminallerine baðlayýnýz 2 DVD oynatýcýyý ve TV yi çalýþtýrýnýz 3 DVD oynatýcýdan gelen görüntü sinyali TV ekranýnda belirene dek TV nizin uzaktan kumandasý üzerindeki giriþ seçiciye input selector basýnýz Not Ses kablosu güç kablosuna çok yakýnsa parazit oluþabilir Bir amplifikatör baðlam...

Page 12: ...sterebilir Lütfen TV nizin kullanma kýlavuzuna bakýnýz 1 Bir S Video kablosu ürünle beraber gelmez kullanarak DVD oynatýcýnýn arkasýndaki S VIDEO OUT terminalini TV nizin S VIDEO IN terminaline baðlayýnýz 2 Ses kablolarýný kullanarak DVD oynatýcýnýn arkasýndaki AUDIO kýrmýzý ve beyaz OUT terminallerini TV nizin AUDIO kýrmýzý ve beyaz IN terminallerine baðlayýnýz DVD oynatýcýyý ve TV yi çalýþtýrýný...

Page 13: ... R Y B Y Y veya Cr Cb Y ile gösterilebilir Terminallerin sayýsý ve yerleþimi TV ye göre deðiþiklik gösterebilir Lütfen TV nizin kullanma kýlavuzuna bakýnýz 1 Komponent görüntü kablolarý ürünle beraber gelmez kullanarak DVD oynatýcýnýn arkasýndaki COMPONENT VIDEO OUT terminallerini TV nizin COMPONENT IN terminallerine baðlayýnýz 2 Ses kablolarýný kullanarak DVD oynatýcýnýn arkasýndaki AUDIO kýrmýzý...

Page 14: ... oynatýcýnýn arkasýndaki AUDIO kýrmýzý ve beyaz OUT terminallerini TV nizin AUDIO kýrmýzý ve beyaz IN terminallerine baðlayýnýz DVD oynatýcýyý ve TV yi çalýþtýrýnýz 3 DVD oynatýcýdan gelen komponent sinyali TV ekranýnda belirene dek TV nizin uzaktan kumandasý üzerindeki giriþ seçiciye input selector basýnýz 4 Ekran ayarlarý menüsünde görüntü çýkýþýný Component P SCAN olarak ayarlayýnýz 52 ve 53 sa...

Page 15: ...cýnýn arkasýndaki AUDIO kýrmýzý ve beyaz OUT terminallerini amplifikatörün AUDIO kýrmýzý ve beyaz IN terminallerine baðlayýnýz 2 Görüntü sinyali kablolarýný kullanarak DVD oynatýcýnýn arkasýndaki VIDEO S VIDEO ya da COMPONENT OUT terminallerini televizyonunuzun VIDEO S VIDEO ya da COMPONENT IN terminaline sayfa 11 14 de anlatýldýðý þekilde baðlayýnýz 3 DVD oynatýcý TV ve amplifikatörü çalýþtýrýnýz...

Page 16: ...i Baðlantýsý Dolby Digital MPEG2 veya DTS Amplifikatör 1 Bir optik kablo kullanýyorsanýz optik kablo ürünle beraber gelmez DVD oynatýcýnýn arkasýndaki DIGITAL AUDIO OUT OPTICAL terminalini amplifikatörün DIGITAL AUDIO IN OPTICAL terminaline baðlayýnýz Koaksiyel kablo kullanýmý durumunda ürünle beraber gelmez DVD oynatýcýnýn arkasýndaki DIGITAL AUDIO OUT COAXIAL terminalini amplifikatörün DIGITAL A...

Page 17: ...izden emin olunuz Menü dilini seçtikten sonra dilerseniz ünitede disk yokken ünitenin ön panelindeki tuþuna 5 saniyeden uzun bir süre basarak bu seçimi deðiþtirebilirsiniz Bu iþlemi yaptýktan sonra tercih ettiðiniz dili yeniden ayarlayabileceðiniz SELECT MENU LANGUAGE penceresi ekranda tekrar belirecektir Oynatma 1 AÇMA KAPAMA tuþuna basýn BEKLEME göstergesinin ýþýðý sönecek ve disk tepsisi açýlac...

Page 18: ...ses duyulmaz Kaldýðý yerden devam için PLAY PAUSE tuþuna bir kez basýn Not Eðer oynatýcý 5 dakika kadar duraklatma PAUSE modunda kalýrsa duracaktýr 7 Kademeli Oynatým CD Hariç Oynatma sýrasýnda uzaktan kumandadaki STEP tuþuna basýn Tuþa her basýldýðýnda yeni bir kare görünecektir STEP modu sýrasýnda ses duyulmaz Normal oynatýma devam etmek için PLAY PAUSE nuþuna basýn Sadece ileri yönde kademeli o...

Page 19: ...D 2X 8X 32X 128X 4X 8X 2X 4X 8X Parçalarý Atlamak Bir DVD oynatýrken SKIP tuþuna basarsanýz bir sonraki bölüme geçiþ yapýlýr Eðer diðer yönde SKIP tuþuna basarsanýz bölümün baþýna gidilir Bir kez daha basarsanýz bir önceki bölümün baþýna gidilir Menü kapalý konumunda bir VCD 2 0 ya da VCD 1 1 ya da CD oynatýyorsanýz SKIP tuþuna bastýðýnýzda bir sonraki parçaya gidilir Eðer diðer yönde SKIP tuþuna ...

Page 20: ...k fonksiyon menüsündeki Info yu seçebilirsiniz 2 Ýstediðiniz maddeyi seçmek için tuþuna basýn Title Time Audio Chapter Subtitle 01 02 0 00 13 ENG 5 1CH Off DVD DVD VCD Track Time 01 0 00 48 VCD CD Track Time 01 0 00 48 CD VCD 2 0 sadece Menü Kapalý Off modunda ise bu fonksiyon çalýþýr 00639C_P350K_XSS_1 2 22 05 10 49 AM Sayfa 20 MPEG4 01 0 00 13 MP3 1 8 None 640x272 ...

Page 21: ...ebilirsiniz Bir DVD diskte en çok 32 farklý alt yazý olabilir Title Chapter Track Time Audio Subtitle 4 Ekran görüntüsünü yok etmek için tekrar INFO tuþuna basýn 00639C_P350K_XSS_1 2 22 05 10 49 AM Sayfa 21 3 Ýstediðiniz ayarý yapmak için œ tuþlarýna basýn ve sonra ENTER düðmesine basýn Baþlýk ve bölümlere doðrudan eriþebilmek için ya da istediðiniz zamandan oynatýmý baþlatabilmek için uzaktan kum...

Page 22: ...DISC MENU tuþuna basarak da Disk Menüsünü kullanabilirsiniz VCD 2 0 de DISC MENU tuþuna basarak Menu Off konumunu seçin Baþlýk Menüsünün Kullanýmý DVD 1 Bir DVD diski oynatýrken uzaktan kumanda üzerindeki MENU tuþuna basýn 2 Title Menu yü seçmek için tuþlarýna basýn ardýndan tuþuna ya da ENTER düðmesine basýn Not Diske baðlý olarak Baþlýk Menüsü çalýþmayabilir Baþlýk Menüsü sadece diskte en az iki...

Page 23: ...fo Bakýnýz Sayfa 20 21 Zoom Bakýnýz Sayfa 34 Bookmark Bakýnýz Sayfa 32 33 Repeat Bakýnýz Sayfa 24 25 EZ View Bakýnýz Sayfa 27 28 Bu fonksiyonlara uzaktan kumanda üzerindeki ilgili tuþlarý kullanarak doðrudan da ulaþabilirsiniz INFO EZ VIEW REPEAT 3 Beþ fonksiyondan birisini seçmek için tuþuna basýn Ardýndan fonksiyona eriþmek için tuþuna ya da ya da ENTER a basýn 00639C_P350K_XSS_1 2 22 05 10 49 A...

Page 24: ...nýmý 1 Uzaktan kumanda üzerinde REPEAT tuþuna basýn 2 A B yi seçmek için œ tuþlarýna basýn 3 Tekrar oynatýmýn baþlamasýný istediðiniz noktada ENTER tuþuna basýn A B otomatik olarak iþaretlenecektir 4 Tekrar oynatýmýn durmasýný istediðiniz noktada ENTER tuþuna basýn B Normal oynatýma geri dönmek için CLEAR tuþuna basýn Not A B REPEAT A noktasý ayarlandýktan sonra oynatým zamanýndan en az 5 saniye g...

Page 25: ...ýna basarak A B yi seçin Disk seçmiþ olduðunuz hýzda A dan B ye tekrar eden bir düzende çalmaya baþlayacaktýr Not VCD 2 0 sadece Menü Kapalý Off modunda ise bu fonksiyon çalýþýr A B REPEAT i ayarlamak için önce A yý ayarlayýn sonra aþaðýdaki yavaþ oynatým sürelerini takiben B yi ayarlayýn 1 8x 40 saniye bekleyin ve sonra B ye basýn 1 4x 20 saniye bekleyin ve sonra B ye basýn 1 2x 10 saniye bekleyi...

Page 26: ...rçayý seçmek için tuþuna baþýn ENTER düðmesine basýn Seçim numaralarý Program Sýralama Kutusunda görünecektir Bir önceki menü ekranýna dönmek için RETURN tuþuna basýn Seçilen proram sýrasýný iptal ermek için CLEAR tuþuna basýn Bu cihaz maksimum 20 programlanmýþ parçayý destekler Not Diske baðlý olarak Program ve Random Play fonksiyonlarý çalýþmayabilir Çalma modunda iken Program Çalma ya da Rastge...

Page 27: ...eyecektir Resim dikey olarak gerilmiþ görünecektir Diskin tipine baðlý olarak siyah bantlar tamamen kaybolmayabilir ZOOM FIT Ekranýn üstü altý saðý ve solu kesilir ve ekranýn merkez merkez kýsmý geniþler 4 3 formatyndaki diskler için Normal Wide DVD içeriðini 16 9 oranýnda gösterir Resim yatay olarak gerilmi görünecektir SCREEN FIT Ekranýn üst ve alt kýsýmlarý kesilir ve tam ekran görünür Resim di...

Page 28: ... kesilir ve tam ekran görünür Resim dikey olarak gerilmiþ görünecektir ZOOM FIT Ekranýn üstü altý saðý ve solu kesilir ve ekranýn merkez kýsmý geniþler 4 3 formatyndaki diskler için Normal Screen DVD içeriðini 4 3 ekran formatýnda gösterir SCREEN FIT Ekranýn üst ve alt kýsýmlarý kesilir ve tam ekran görünür Resim dikey olarak gerilmiþ görünecektir ZOOM FIT Ekranýn üstü altý saðý ve solu kesilir ve...

Page 29: ...ETURN tuþlarýna basýn ENG DOLBYDIGITAL 5 1CH AUDIO DVD VCD ya da CD çalarken Stereo Sað ya da Sol arasýndan seçim yapabilirsiniz Stereo AUDIO VCD CD Not Bu fonksiyon diske kodlanmýþ ses dili seçeneklerine baðlýdýr ve çalýþmayabilir Bir DVD disk maksimum 8 adet dil seçeneði içerir Bir diski her oynattýðýnýzda ayný ses dilinin gelmesi için Sayfa 48 deki Ses Dilinin Kullanýmý bölümüne bakýnýz 00639C_...

Page 30: ...RN tuþuna basýn Not DVD lere baðlý olarak istediðiniz altyazýyý Disk Menüsünde deðiþtirebilirsiniz DISC MENU tuþuna basýnýz Bu fonksiyon diske kodlanmýþ altyazý seçeneklerine baðlýdýr ve çalýþmayabilir Bir DVD disk maksimum 32 adet altyazý dili seçeneði içerir Bir DVD yi her oynattýðýnýzda ayný altyazý dilinin gelmesi için Sayfa 49 daki Altyazý Dilinin Kullanýmý bölümüne bakýnýz DVD Off SUBTITLE 0...

Page 31: ... sadece tek bir açýya sahipse bu özellik çalýþmayacaktýr Genelde az sayýda disk bu özelliðe sahiptir Not Diske baðlý olarak bu fonksiyonlar çalýþmayabilir Anlýk Tekrar Oynatým Atlama Fonksiyonunun Kullanýmý Anlýk Tekrar Oynatým Fonksiyonunun Kullaným DVD Bir sahneyi kaçýrdýðýnýzda bu fonksiyonu kullanarak onu tekrar izleyebilirsiniz INSTANT REPLAY tuþuna basýn Mevcut sahne yaklaþýk 10 saniye kadar...

Page 32: ...sýn 3 Bookmark ý seçmek için tuþlarýna basýn ardýndan tuþuna ya da ENTER düðmesine basýn 4 Ýþaretlemek istediðiniz sahneye eriþtiðinizde ENTER tuþuna basýn Bir seferde 3 sahne iþaretlenebilir 2 Function ý seçmek için tuþlarýna basýn ardýndan tuþuna ya da ENTER düðmesine basýn 1 Not VCD 2 0 sadece Menü Kapalý Off modunda ise bu fonksiyon çalýþýr Diske baðlý olarak Ýþaretleme Bookmark fonksiyonu çal...

Page 33: ...uþuna basarak iþaretlenmiþ sahneye geçiþ yapýn 4 Ýþaretlenmiþ bir sahneyi œ seçmek için tuþuna basýn Bir Ýþaretin Silinmesi 1 3 Ýlk 1 3 basamak sayfa 32 deki Ýþaretleme Fonksiyonunun Kullanýmý bölümüdeki ile ayný olacak 5 Ýþaret numarasýný silmek için CLEAR tuþuna basýn 4 œ tuþlarýna basarak silmek istediðiniz iþaret numarasýný seçin 1 2 3 1 2 3 00639C_P350K_XSS_2 2 22 05 10 50 AM Sayfa 33 ...

Page 34: ...ölgesini seçin ENTER düðmesine basýn DVD oynatým esnasýnda ENTER düðmesine basarak 2X 4X 2X Normal sýrasýnda zoom iþlemi yapabilirsiniz VCD oynatýn esnasýnda ENTER düðmesine basarak 2X Normal sýrasýnda zoom iþlemi yapabilirsiniz 2 tuþlarýna basarak Function ý seçin ardýndan tuþuna ya da ENTER düðmesine basýn Not VCD 2 0 oynatýrken bu fonksiyon sadece Menü Kapalý Off modunda iken çalýþýr 00639C_P35...

Page 35: ...ü tekrar eder Random Diskteki dosyalar rastgele bir düzende çalýnýr MP3 dosya ikonu WMA dosya ikonu JPEG dosya ikonu Dosya ikonu Çalýþan Dosya ikonu Ana Klasörü Seçmek Ana klasöre gitmek için RETURN tuþuna basýn ya da tuþlarýna basarak seçin ve ana klasöre gitmek için ENTER tuþuna basýn Eþ Klasörü Seçmek Sol pencereyi iþaretlemek için œ tuþlarýna basýn Ýstediðiniz klasörü seçmek için tuþlarýna bas...

Page 36: ...in REPEAT tuþuna basýn 4 mod vardýr Off Track Folder ve Random Off Normal çalma Track Mevcut þarký dosyasýný tekrar eder Folder Mevcut klasör içindeki ayný dosya uzantýsýna sahip þarký dosyalarýný terkrar eder Random Ayný dosya uzantýsýna sahip þarký dosyalarý rastgele bir düzende çalýnýr Normal çalma iþlemine devam etmek için CLEAR tuþuna basýn 00639C_P350K_XSS_2 2 22 05 10 50 AM Sayfa 36 R O O T...

Page 37: ...rý 128 Kbps nin altýnda olan dosyalar ise düzgün þekilde çalýnamaz WMA dosyalarý kaydettiðinizde dekompresyon aktarým hýzý en az 64Kbps olmalýdýr WMA dosyalarý söz konusu olduðunda ses kalitesi seçtiðiniz kompresyon dekompresyon oranýna baðlýdýr Ses CD si için analog dijital örnekleme yani WMA formatýna dönüþtürme hýzý gerekir Bu hýz en az 64Kbps dir ve 192Kbps ye dek çýkar Ancak dekompresyon hýzl...

Page 38: ...atým modunu deðiþtirmek için REPEAT düðmesine basýn 4 mod vardýr Off Kapalý Folder Klasör Title Baþlýk ve A B kullanýcý tarafýndan belirlenmiþ iki nokta arasýndaki uzaklýk Folder Klasör Mevcut klasör içindeki ayný uzantýya sahip AVI dosyalarýný tekrarlar Title Baþlýk Çalan baþlýðý tekrarlar A B Dosya üzerinde seçmiþ olduðunuz bir segmenti tekrarlar R O O T W M A J P E G M P 3 M P E G 4 R O O T R O...

Page 39: ...az aþaðýdaki maksimum deðerlere kadar tüm çözünürlükleri destekler ÝLERÝ FONKSÝYONLAR Fonksiyon Tanýmý Baþvuru Sayfasý Atlama veya Arama veya Yavaþ Çekim Oynatým Adým Adým Oynatým ZOOM Oynatým esnasýnda veya tuþuna basýn 5 dakika ileri ya da geri gidilir Oynatým esnasýnda SEARCH veya tuþuna basýn daha hýzlý arama için tekrar SEARCH tuþuna basýn Böylece AVI dosyasýnda daha hýzlý arama yapabilirsini...

Page 40: ...sim 4X oranýna kadar büyüyecektir 2X 4X 2X Normal Slayt Gösterim Ünite slayt gösterim moduna geçer Slayt gösterimine baþlamadan önce resim aralýklarý mutlaka ayarlanmalýdýr œ tuþlarýna basarak istediðiniz ikonu seçin ardýndan ENTER düðmesine basýn Resimler 6 saniyelik aralýklarla otomatik olarak deðiþecektir Resimler 12 saniyelik aralýklarla otomatik olarak deðiþecektir Resimler 18 saniyelik aralý...

Page 41: ...ir Tek bir CD üzerine en fazla 3000 resim kaydedilebilir Kodak Picture CD ler tavsiye edilir Bir Kodak Picture CD si oynatýldýðýnda sadece resim klasöründeki JPEG dosyalar gösterilebilir Kodak Picture CD Resim klasöründeki JPEG dosyalar otomatik olarak gösterilmeye baþlayabilir Konica Picture CD Resim dosyasý görmek için klipler mönüsünde JPEG dosyalarýný seçiniz Fuji Picture CD Resim dosyasý görm...

Page 42: ...ini ya da hoparlörün sesini kapatýn MP3 WMA DTS ve LPCM disk çalarken karaoke fonksiyonlarý çalýþmaz MÝKROFON baðlandýðý zaman Dijital Çýkýþ çalýþmaz VCD 2 0 de MIKROFON MIC baðlanýrsa Çalma otomatik olarak Menu Off moduna seçilir MIC ses çýkýþlarý sadece Analog Ses Çýkýþýndan alýnýr 1 Mixed Audio Çýkýþ terminallerini TV ya da Amplifikatöre baðlayýn Bakýnýz Sayfa 11 15 2 Mikrofon jakýna mikrofonu ...

Page 43: ...anýp sönen alana istediðiniz þarkýnýn numarasýný Parça ya da Bölüm No girin 10 kadar þarký için rezervasyon yapabilirsiniz Rezervasyonun Ýptali 1 KARAOKE tuþuna basýn 2 œ tuþlarýna basarak Request i seçin ardýndan ENTER düðmesine basýn 3 Rezerv edilmiþ þarkýyý iptal etmek için CLEAR tuþuna basýn ilk olarak en son rezerv edilen þarký silinecektir Not Eðer tekrar rezervasyon yapmanýz gerekirse yanýp...

Page 44: ...Disk Tipleri DVD Karaoke Disk CVD VCD CD Karaoke Disk Kanal Karaoke 5 Kanal DVD 2 Kanal DVD Kanal 1 CH L Sol stereo müzik Sol stereo müzik Vokal 2 CH R Sað stereo müzik Sað stereo müzik Vokal 3 CH M Kýlavuz melodi 4 CH V1 Vokal parça 5 CH V2 Vokal parþa Kanal Karaoke CVD VCD CD Kanal 1 CH CH1 SOL Sol stereo müzik Vokal Sol stereo müzik 1 CH CH1 SAÐ Sað stereo müzik Vokal Sað stereo müzik Vokal 2 C...

Page 45: ...izlememesi için kullanýcýlarýn seviye ayarlamasýna izin verir 1 Ünite Stop modunda iken uzaktan kumandanýzdaki MENU tuþuna basýn tuþlarýna basarak Setup ý seçin ardýndan tuþuna ya da ENTER düðmesine basýn 2 tuþlarýna basarak farklý özelliklere eriþebilirsiniz tuþuna ya da ENTER düðmesine basarak alt özelliklere eriþebilirsiniz 3 Ayarlama iþleminden sonra Ayar ekranýný yok etmek için tekrar MENU tu...

Page 46: ... 4 tuþlarýna basarak Player Menu yü seçin ardýndan tuþuna ya da ENTER düðmesine basýn 5 tuþlarýna basarak istediðiniz dili seçin ENTER düðmesine basýn Dil seçilecek ve ekran Dil Ayar Menüsüne geri dönecektir Ayar menüsünü ekrandan kaldýrmak için MENU tuþuna basýn 00639C_P350K_XSS_2 2 22 05 10 50 AM Sayfa 46 ardýndan tuþuna ya da Player Menu English Disc Menu English Audio English Subtitle Automati...

Page 47: ...ecektir Ayar menüsünü ekrandan kaldýrmak için MENU tuþuna basýn 1 Ünite Stop modunda iken MENU tuþuna basýn 2 tuþlarýna basarak Setup ý seçin ardýndan tuþuna ya da ENTER düðmesine basýn 3 00639C_P350K_XSS_2 2 22 05 10 50 AM Sayfa 49 tuþuna ya da ENTER düðmesine basýn tuþlarýna basarak Language Setup ý seçin ardýndan tuþuna ya da ENTER düðmesine basýn Player Menu English Disc Menu English Audio Eng...

Page 48: ...a iken MENU tuþuna basýn 2 tuþlarýna basarak Setup ý seçin ardýndan tuþuna ya da ENTER düðmesine basýn 3 00639C_P350K_XSS_2 2 22 05 10 50 AM Sayfa 48 tuþlarýna basarak Language Setup ý seçin ardýndan tuþuna ya da ENTER düðmesine basýn tuþlarýna basarak Audio yu seçin ardýndan tuþuna ya da ENTER düðmesine basýn tuþuna ya da ENTER düðmesine basýn Player Menu English Disc Menu English Audio English S...

Page 49: ... Player Menu English Disc Menu English Audio English Subtitle Automatic LANGUAGE SETUP Automatic English Français Subtitle Deutsch Español Thai Others SUBTITLE LANGUAGE Setup Language Setup Audio Setup Display Setup Parental Setup DivX R Registration Setup Language Setup Audio Setup Display Setup Parental Setup DivX R Registration Ses dili olarak serçilen dille ayný altyazý dilini istiyorsanýz Aut...

Page 50: ...çin ardýndan tuþuna ya da ENTER düðmesine basýn 1 Ünite Stop modunda iken MENU tuþuna basýn 2 tuþlarýna basarak Setup ý seçin ardýndan tuþuna ya da ENTER düðmesine basýn Ayar menüsünü ekrandan kaldýrmak için MENU tuþuna basýn 00639C_P350K_XSS_2 2 22 05 10 50 AM Sayfa 50 Dolby Digital Out PCM MPEG 2 Digital Out PCM DTS Off Dynamic Compression On PCM Down Sampling On AUDIO SETUP Setup Language Setup...

Page 51: ...log ses çýkýþý yoktur Dinamik Sýkýþtýrma Dynamic Compression On Dinamik sýkýþtýrma iþlevini çalýþtýrýr Off Standart aralýðý seçer ˆ PCM Aþaðý Örnekleme PCM Down Sampling On Oynatýcýya baðlanan amplifikatör 96KHz uyumlu deðilse bunu seçin Böyle bir durumda 96KHz sinyaller 48KHz e indirgenecektir Off Oynatýcýya baðlanan amplifikatör 96KHz uyumlu ise bunu seçin Böyle bir durumda tüm sinyaller deðiþik...

Page 52: ...ne basýn 1 Ünite Stop modunda iken MENU tuþuna basýn 2 tuþlarýna basarak Setup ý seçin ardýndan tuþuna ya da ENTER düðmesine basýn Ayar menüsünü ekrandan kaldýrmak için MENU tuþuna basýn 00639C_P350K_XSS_2 2 22 05 10 50 AM Sayfa 52 TV Aspect 4 3 L Box Still Mode Auto Screen Messages On Black Level Off TV System PAL Video Output COMPOSIT S VID DISPLAY SETUP Setup Language Setup Audio Setup Display ...

Page 53: ... PAL ý seçtiðiniz zaman Interlace çýkýþ formatý PAL 60 Hz çýkýþtýr TV sisteminiz sadece NTSC ye sahipse NTSC yi seçmelisiniz PAL PAL disk kullanýrken seçilir TV sisteminizde sadece NTSC Video giriþi varsa NTSC yi seçmelisiniz TV sisteminizde sadece PAL giriþi varsa PAL i seçmelisiniz Ø Video Çýkýþý Video Çýkýþýný seçin Kompozit S Video Video ve S Video çýkýþý kullanmak istediðiniz zaman bunu seçin...

Page 54: ...rünecektir 5 Parolanýzý girin Parolayý onaylamak için Parolayý Tekrar Girin ekraný açýlacaktýr Parolanýzý tekrar girin Oynatýcý kilitlenecektir 1 Ünite Stop modunda iken MENU tuþuna basýn 2 Ayar menüsünü ekrandan kaldýrmak için MENU tuþuna basýn 00639C_P350K_XSS_2 2 22 05 10 50 AM Sayfa 54 tuþlarýna basarak Setup ý seçin ardýndan tuþuna ya da ENTER düðmesine basýn Setup Language Setup Audio Setup ...

Page 55: ...sarak istediðiniz sýnýflandýrma seviyesini seçin ve ardýndan tuþuna ya da ENTER düðmesine basýn örn Seviye 6 ya ayarlamak 1 Ünite Stop modunda iken MENU tuþuna basýn 2 tuþuna basarak Setup ý seçin ardýndan tuþuna ya da ENTER düðmesine basýn 00639C_P350K_XSS_2 2 22 05 10 50 AM Sayfa 55 Setup Language Setup Audio Setup Display Setup Parental Setup DivX R Registration Setup Language Setup Audio Setup...

Page 56: ...sýn 2 Not Eðer parolanýzý unutursanýz Arýza Giderme Kýlavuzundaki Parola Unutma bölümüne bakýnýz Ayar menüsünü ekrandan kaldýrmak için MENU tuþuna basýn 00639C_P350K_XSS_2 2 22 05 10 50 AM Sayfa 56 tuþlarýna basarak Setup ý seçin ardýndan tuþuna ya da ENTER düðmesine basýn Setup Language Setup Audio Setup Display Setup Parental Setup DivX R Registration Setup Language Setup Audio Setup Display Set...

Page 57: ...ýrma tek oturum Düþük hýzda yazýn 1 Disk tepsisini açýn Diski tepsiye yerleþtirin Disk tepsisini kapatýn Yazýlým yükseltme ekraný görüntülenecektir 2 œ œ tuþlarýna basarak Total ý seçin ardýndan ENTER düðmesine basýn 3 Ýstediðiniz dili seçmek için tnumara tuþlarýna basýn Yazma iþleminin ortasýnda disk tepsisi otomatik olarak açýlacaktýr Diski aldýktan sonra lütfen yaklaþýk 2 dakika kadar bekleyini...

Page 58: ...un AYAR menüsünde ses çýkýþý Bitstream olarak mý ayarlanmýþ Özellikler veya iþlev gerçekleþtirilemiyor çünkü 1 DVD nin yazýlýmý o özelliði veya iþlevi kýsýtlýyor 2 DVD nin yazýlýmý o özelliði desteklemiyor örn açýlar 3 Özellik o an için kullanýlabilir durumda deðil 4 Alanýn dýþýnda kalan bir baþlýk bölüm numarasý veya arama süresi istediniz Diskin bir menüsü olup olmadýðýný kontrol edin Ayar menüs...

Page 59: ...ýzý 4 8 5 6 m sn Maksimum Çalma Süresi 74 dk Okuma Hýzý 4 8 5 6 m sn Maksimum Çalma Süresi 20 dk Okuma Hýzý 4 8 5 6 m sn Maksimum Çalma Süresi 74 dk Video Audio 1 kanal 1 0 Vp p 75 Ω yük Y 1 0 Vp p 75 Ω yük Pr 0 70 Vp p 75 Ω yük Pb 0 70 Vp p 75 Ω yük Luminance Sinyali 1 0 Vp p 75 Ω yük Chrominance Sinyali 0 3 Vp p 75 Ω yük Sol 1 L Sað 2 R 48 kHz Örnekleme 4 Hz 22 kHz 96 kHz Örnekleme 4 Hz 44 kHz 1...

Page 60: ...TR 60 00 P350K FES WC 3 8 05 6 48 PM Page 60 ...

Page 61: ...TR 61 00 P350K FES WC 3 8 05 6 48 PM Page 61 ...

Page 62: ...TR 62 00 P350K FES WC 3 8 05 6 48 PM Page 62 ...

Page 63: ...TR 63 00 P350K FES WC 3 8 05 6 48 PM Page 63 ...

Page 64: ...estic purposes Use of this product is for personal use only Do not put any container filled with liquid or any small metal objects on the player Exterior influences such as lightning and static electricity can affect normal operation of this player If this occurs turn the player off and on again with the POWER button or disconnect and then reconnect the AC power cord to the AC power outlet The pla...

Page 65: ...e does not cover any product unit other than this product unit and the license does not extend to any unlicensed product unit or process conforming to ISO OUR 11172 3 or ISO OUR 13818 3 used or sold in combination with this product unit The license only covers the use of this product unit to encode and or decode audio files conforming to the ISO OUR 11172 3 or ISO OUR 13818 3 No rights are granted...

Page 66: ...attery cover If the remote control doesn t operate properly Check the polarity of the batteries Dry Cell Check if the batteries are drained Check if remote control sensor is blocked by obstacles Check if there is any fluorescent lighting nearby Before you start Accessories Remote Control Batteries for Remote Control AAA Size User s Manual Video Audio Cable 00639M P350K_XFA_Eng_1 2 28 05 3 41 PM Pa...

Page 67: ...27 Selecting the Audio Language 29 Selecting the Subtitle Language 30 Changing the Camera Angle 31 Using the Instant Replay Skip Function 31 Using the Bookmark Function 32 Using the Zoom Function 34 Clips Menu for MP3 WMA JPEG MPEG4 35 Folder Selection 35 MP3 WMA Playback 36 MPEG4 Playback 38 Picture CD Playback 40 Chapter 5 Karaoke Functions Karaoke Functions 42 Reserving a Song 43 Vocal Function...

Page 68: ... with this player DVD ROM DVD RAM CD ROM CDV CDI CVD Super Audio CD except CD layer CDGs play audio only not graphics Ability to play back may depend on recording conditions DVD R R CD RW DVD RW RW V mode The unit may not play certain CD R CD RW and DVD R due to the disc type or recording conditions COPY PROTECTION Many DVD discs are encoded with copy protection Because of this you should only con...

Page 69: ... Video DVD contains excellent sound and video due to Dolby Digital and MPEG 2 system Various screen and audio functions can be easily selected through the on screen menu Disc Types Logos Recording Types Disc Size Max Playing Time Characteristics DVD 12 Cm 8 Cm 74 min 20 min Audio Video Video with CD sound VHS quality MPEG 1 compression technology VIDEO CD 12 Cm 8 Cm 74 min 20 min Audio CD is recor...

Page 70: ...nnect Microphone for karaoke functions 8 MICROPHONE VOLUME Use to adjust microphone volume level Use the button by pressing it Turn it to the left or right to control the volume 9 SKIP SEARCH Allow you to search forward backward through a disc Use to skip the title chapter or track 10 DISPLAY Operation indicators are displayed here 11 DISC TRAY Place the disc here 1 8 7 9 10 11 2 3 4 5 6 Front Pan...

Page 71: ...put jacks of your television or audio video receiver 4 VIDEO OUT JACK Use a video cable to connect to the Video input jack on your television The Video Output in Setup Menu must be set to COMPOSITE S VIDEO 5 S VIDEO OUT JACK Use the S Video cable to connect this jack to the S Video jack on your television for higher picture quality The Video Output in Setup Menu must be set to COMPOSITE S VIDEO No...

Page 72: ...INSTANT REPLAY Button This function is used to replay the previous 10 seconds of a movie from the current position 14 INSTANT SKIP Button This function skips playback ahead 10 seconds 15 PLAY PAUSE Button Begin Pause disc play 16 INFO Button Displays the current disc mode 17 DISC MENU Button Brings up the Disc menu 18 ENTER œ œ Buttons This button functions as a toggle switch 19 EZ VIEW Button The...

Page 73: ... the rear of the DVD player to the VIDEO yellow AUDIO red and white IN terminals of your TV 2 Turn on the DVD player and TV 3 Press the input selector on your TV remote control until the Video signal from the DVD player appears on the TV screen Note Noise may be generated if the audio cable placed too close to the power cable If you want to connect to an Amplifier please refer to the Amplifier con...

Page 74: ...V set Please refer to the user s manual of your TV 1 Using an S Video cable not included connect the S VIDEO OUT terminal on the rear of the DVD player to the S VIDEO IN terminal of your TV 2 Using the audio cables connect the AUDIO red and white OUT terminals on the rear of the DVD player to the AUDIO red and white IN terminals of your TV Turn on the DVD player and TV 3 Press the input selector o...

Page 75: ...instead of PR PB Y depending on the manufacturer The number and position of terminals may vary depending on the TV set Please refer to the user s manual of your TV 1 Using component video cables not included connect the COMPONENT VIDEO OUT terminals on the rear of the DVD player to the COMPONENT IN terminals of your TV 2 Using the audio cables connect the AUDIO red and white OUT terminals on the r...

Page 76: ...nect the AUDIO red and white OUT terminals on the rear of the DVD player to the AUDIO red and white IN terminals of your TV Turn on the DVD player and TV 3 Press the input selector on your TV remote control until the Component signal from the DVD player appears on the TV screen 4 Set the Video Output to Component P SCAN in the Display Setup menu See pages 52 to 53 Consult your TV User s Manual to ...

Page 77: ...O red and white OUT terminals on the rear of the DVD player to the AUDIO red and white IN terminals of the Amplifier 2 Using the video signal cable s connect the VIDEO S VIDEO or COMPONENT OUT terminals on the rear of the DVD player to the VIDEO S VIDEO or COMPONENT IN terminal of your TV as described on pages 11 to 14 3 Turn on the DVD player TV and Amplifier 4 Press the input select button of th...

Page 78: ...AL AUDIO OUT OPTICAL terminal on the rear of the DVD player to the DIGITAL AUDIO IN OPTICAL terminal of the Amplifier If using a coaxial cable not included connect the DIGITAL AUDIO OUT COAXIAL terminal on the rear of the DVD player to the DIGITAL AUDIO IN COAXIAL terminal of the Amplifier 2 Using the video signal cable s connect the VIDEO S VIDEO or COMPONENT OUT terminals on the rear of the DVD ...

Page 79: ...nguage you can change it by pressing the button on the front panel of the unit for more than 5 seconds with no disc in the unit Then the SELECT MENU LANGUAGE window appears again where you can reset your preferred language Playback 1 Press the OPEN CLOSE button The STANDBY indicator light goes out and the tray opens 2 Place a disc gently into the tray with the disc s label facing up 3 Press the PL...

Page 80: ... To resume press the PLAY PAUSE button once again Note If the player is left for about 5 minutes in pause mode it will stop 7 Step Motion Play Except CD Press the STEP button on the remote control during play Each time the button is pressed a new frame will appear No sound is heard during STEP mode Press the PLAY PAUSE button to resume normal play You can only perform step motion play in the forwa...

Page 81: ...g Tracks When playing a DVD if you press the SKIP button it moves to the next chapter If you press the SKIP button it moves to the beginning of the chapter One more press makes it move to the beginning of the previous chapter When playing a VCD 2 0 in Menu Off mode or a VCD 1 1 or a CD if you press the SKIP button it moves to the next track If you press the SKIP button it moves to the beginning of...

Page 82: ...ontrol You can select Info in the function menu by pressing the MENU button 2 Press the buttons to select the desired item MPEG4 When playing VCD 2 0 this function works only when the menu is off DVD VCD CD 01 02 0 00 13 ENG 5 1CH Off 01 0 00 13 MP3 1 8 None 640x272 01 0 00 43 01 0 00 48 00639M P350K_XFA_Eng_1 2 28 05 3 41 PM Page 20 ...

Page 83: ...eight different soundtracks The MP3 AC3 and WMA are supported DivX Refers to the subtitle languages available in the disc You will be able to choose the subtitle languages or if you prefer turn them off from the screen A DVD disc can have up to 32 different subtitles DivX File Size has a relationship with resolution of a title The larger file size is the higher resolution is displayed If the file ...

Page 84: ... MENU button on the remote control In VCD 2 0 the DISC MENU button is used to select Menu On or Menu Off mode Using the Title Menu DVD 1 During the playback of a DVD disc press the MENU button on the remote control 2 Press the buttons to select Title Menu then press the or ENTER button Note Depending on a disc the Title Menu may not work Title Menu will only be displayed if there are at least two ...

Page 85: ...es 20 to 21 Zoom See page 34 Bookmark See pages 32 to 33 Repeat See pages 24 to 25 EZ View See pages 27 to 28 You can also directly select these functions using their respective buttons on the remote control INFO EZ VIEW REPEAT 3 Press the buttons to select one of the five functions Then press the or ENTER button to access the function Info Zoom Bookmark Repeat EZ View 00639M P350K_XFA_Eng_1 2 28 ...

Page 86: ...remote control 2 Press the œ buttons to Select A B 3 Press the ENTER button at the point where you want repeat play to start A B is automatically highlighted 4 Press the ENTER button at the point where you want the repeat play to stop B To return to normal play press the CLEAR button Note A B REPEAT does not allow you to set point B until at least 5 seconds of playback time has elapsed after point...

Page 87: ...o select A B The disc will play from A to B repeatedly at the speed you chose Note When playing VCD 2 0 this function works only when the menu is off To set A B REPEAT set A first then set B after the following slow play time has elapsed 1 8x wait 40 seconds then press B 1 4x wait 20 seconds then press B 1 2x wait 10 seconds then press B 4 Press the ENTER button at the point where you want repeat ...

Page 88: ...the ENTER button The selection numbers appear in the Program Order box To return to the previous menu screen press the RETURN button To cancel the selected program order press the CLEAR button This unit can support a maximum of 20 programmed tracks Note Depending on a disc the Program and Random Play functions may not work While in playback mode press the CLEAR button on the remote control to canc...

Page 89: ...tically stretched Depending on a type of disc the black bars may not disappear completely ZOOM FIT The top bottom left and right of the screen are cut off and the central portion of the screen is enlarged For 4 3 aspect ratio discs Normal Wide Displays the content of the DVD title in 16 9 aspect ratio The picture will look horizontally stretched SCREEN FIT The top and bottom portions of the screen...

Page 90: ...he picture will look vertically stretched ZOOM FIT The top bottom left and right of the screen are cut off and the central portion of the screen is enlarged For 4 3 aspect ratio discs Normal Screen Displays the content of the DVD title in 4 3 aspect ratio SCREEN FIT The top and bottom portions of the screen are cut off and the full screen appears The picture will look vertically stretched ZOOM FIT...

Page 91: ...D disc can contain up to 8 audio languages To have the same audio language come up whenever you play a DVD Refer to Using the Audio Language on page 48 1 Press the AUDIO button The Audio changes when the button is pressed repeatedly The audio languages are represented by abbreviations ENG DOLBYDIGITAL 5 1CH AUDIO DVD When playing a VCD or CD you can select among Stereo Right or Left Press the œ œ ...

Page 92: ...CLEAR or RETURN button Note Depending on DVDs you have to change the desired subtitle in the Disc Menu Press the DISC MENU button This function depends on what subtitles are encoded on the disc and may not work on all DVDs A DVD disc can contain up to 32 subtitle languages To have the same subtitle language come up whenever you play a DVD Refer to Using the Subtitle Language on page 49 DVD SUBTITL...

Page 93: ...n press the CLEAR or RETURN button Note If the disc has only one angle this feature won t work Currently very few discs have this feature Note Depending on the disc these functions may not work 4 6 ANGLE Using the Instant Replay Skip Function Using the Instant Replay function DVD If you miss a scene you can see it again using this function Press the INSTANT REPLAY button The current scene moves ba...

Page 94: ...uttons to select Bookmark then press the or ENTER button 4 When you reach the scene you want to mark press the ENTER button Up to three scenes may be marked at a time 2 Press the buttons to select Function then press the or ENTER button Note When playing VCD 2 0 this function works only when the menu is off Depending on a disc the Bookmark function may not work Info Zoom Bookmark Repeat EZ View In...

Page 95: ...PLAY PAUSE button to skip to the marked scene 4 Press the œ buttons to select a marked scene Clearing a Bookmark 1 3 The first 1 3 steps are the same as those for Using the Bookmark Function on page 32 5 Press the CLEAR button to delete a bookmark number 4 Press the œ buttons to select the bookmark number you want to delete 00639M P350K_XFA_Eng_2 2 28 05 3 43 PM Page 33 ...

Page 96: ...lect the part of the screen you want to zoom in on Press the ENTER button During DVD play press ENTER to zoom in 2X 4X 2X Normal in order During VCD play press ENTER to zoom in 2X Normal in order 2 Press the buttons to select Function then press the or ENTER button Note When playing VCD 2 0 this function works only when the menu is off Info Zoom Bookmark Repeat EZ View Info Zoom Bookmark Repeat EZ...

Page 97: ...r Press the œ buttons to highlight the left window Press the buttons to select the desired folder then press ENTER To select the Sub Folder Press the œ buttons to highlight the right window Press the buttons to select the desired folder then press ENTER Folder Selection The folder can only be selected in the Stop mode Root WMA JPEG MP3 SONG FILE 3 MPEG4 FILES MUSIC SONG FILE 1 SONG FILE 2 1st 2nd ...

Page 98: ...D a y u W o n d e r f u l R O O T W M A J P E G M P 3 M P E G 4 Repeat Random playback 1 Press the REPEAT button to change the playback mode There are four modes Off Track Folder and Random Off Normal Playback Track Repeats the current song file Folder Repeats the song files which have the same extension in the current folder Random Song files which have the same extension will be played in random...

Page 99: ...ression rates below 128 Kbps will not be played properly Use a decompression transfer rate of at least 64Kbps when recording WMA files Sound quality with WMA files basically depends on the rate of compression decompression you choose Getting CD audio sound requires an analog digital sampling rate that is conversion to WMA format of at least 64Kbps and up to 192Kbps Conversely files with decompress...

Page 100: ...ess the REPEAT button to change playback mode There are 4 modes such as Off Folder Title and A B a distance between two points appointed by user Folder Repeats the AVI files which have the same extension in the current folder Title repeats the title that is playing A B repeats a segment of the file that you select R O O T W M A J P E G M P 3 M P E G 4 R O O T R O O T W M A J P E G M P 3 M P E G 4 ...

Page 101: ... XviD MPEG4 compliant Contents This unit supports all resolutions up to maximum below ADVANCED FUNCTIONS Function Description Reference page Skip or Search or Slow Motion Play Step Motion Play ZOOM During play press the or button it moves forward or backward 5 minutes During play press the SERACH or button and press again to search at a faster speed Allows you to search at a faster speed in an AVI...

Page 102: ... is pressed the picture is enlarged up to 4X 2X 4X 2X Normal Slide Show The unit enters slide show mode Before beginning the Slide Show the picture interval must be set Press the œ buttons to select a desired icon then press the ENTER button The pictures change automatically with about a 6 second interval The pictures change automatically with about a 12 second interval The pictures change automat...

Page 103: ...can be played only up to the blank segment A maximum of 3000 images can be stored on a single CD Kodak Picture CDs are recommended When playing a Kodak Picture CD only the JPEG files in the pictures folder can be played Kodak Picture CD The JPEG files in the pictures folder can be played automatically Konica Picture CD If you want to see the Picture select the JPEG files in the clips menu Fuji Pic...

Page 104: ...Press the œ buttons to change the desired tone To let 7 scales down by half scale Original scale To let 7 scales up by half scale Note If you hear feedback squealing or howling while using the karaoke feature move the microphone away from the speakers or turn down the microphone volume or the speaker volume When playing MP3 WMA DTS and LPCM disc the karaoke functions will not operate When the MIC ...

Page 105: ...ack or Chapter No of the desired song into the flickering part You can reserve up to 10 songs Cancellation of reservation 1 Press the KARAOKE button 2 Press the œ buttons to select Request then press the ENTER button 3 Press the CLEAR button to cancel the reserved song The last reserved song will be erased first Note If the reservation is required again input the song number in the flickering part...

Page 106: ...er Off Types of Karaoke disc DVD Karaoke Disc CVD VCD CD Karaoke Disc Channel Karaoke 5CH DVD 2CH DVD Channel 1 CH L Left stereo music Left stereo music Vocal 2 CH R Right stereo music Right stereo music Vocal 3 CH M Guide melody 4 CH V1 Vocal track 5 CH V2 Vocal track Channel Karaoke CVD VCD CD Channel 1 CH CH1 LEFT Left stereo music Vocal Left stereo music 1 CH CH1 RIGHT Right stereo music Vocal...

Page 107: ...io Setup Setup of the Audio Options ˇ Display Setup Setup of the Display Options Use to select which type of screen you want to watch and several display options Parental Setup Setup of the Parental Level Allows users to set the level necessary to prevent children from viewing unsuitable movies such as those with violence adult subject matter etc ˆ DivX R Registration Please use the Registration c...

Page 108: ...to select Player Menu then press the or ENTER button 5 Press the buttons to select the desired language then press the or ENTER button The language is selected and the screen returns to Language Setup menu To make the setup menu disappear press the MENU button Player Menu English Disc Menu English Audio English Subtitle Automatic LANGUAGE SETUP Setup Language Setup Audio Setup Display Setup Parent...

Page 109: ...nd the screen returns to Language Setup menu To make the setup menu disappear press the MENU button 1 With the unit in Stop mode press the MENU button 2 Press the buttons to select Setup then press the or ENTER button 3 Press the buttons to select Language Setup then press the or ENTER button Player Menu English Disc Menu English Audio English Subtitle Automatic LANGUAGE SETUP Setup Language Setup...

Page 110: ...ected and the screen returns to Language Setup menu To make the setup menu disappear press the MENU button 1 With the unit in Stop mode press the MENU button 2 Press the buttons to select Setup then press the or ENTER button 3 Press the buttons to select Language Setup then press the or ENTER button Player Menu English Disc Menu English Audio English Subtitle Automatic LANGUAGE SETUP Setup Languag...

Page 111: ...guage setting The language is selected and the screen returns to setup menu To make the setup menu disappear press the MENU button 1 With the unit in Stop mode press the MENU button 2 Press the buttons to select Setup then press the or ENTER button 3 Press the buttons to select Language Setup then press the or ENTER button Player Menu English Disc Menu English Audio English Subtitle Automatic LANG...

Page 112: ...e or ENTER button 1 With the unit in Stop mode press the MENU button 2 Press the buttons to select Setup then press the or ENTER button To make the setup menu disappear press the MENU button Digital Out PCM MPEG 2 Digital Out PCM DTS Off Dynamic Compression On PCM Down Sampling On AUDIO SETUP Setup Language Setup Audio Setup Display Setup Parental Setup DivX R Registration Setup Language Setup Aud...

Page 113: ... DTS sound disc Dynamic Compression On To select dynamic compression Off To select the standard range ˆ PCM Down Sampling On Select this when the Amplifier connected to the player is not 96KHz compatible In this case the 96KHz signals will be down converted to 48KHZ Off Select this when the Amplifier connected to the player is 96KHz compatible In this case all signals will be output without any ch...

Page 114: ...it in Stop mode press the MENU button 2 Press the buttons to select Setup then press the or ENTER button To make the setup menu disappear press the MENU button TV Aspect 4 3 L Box Still Mode Auto Screen Messages On Black Level Off TV System PAL Video Output COMPOSIT S VID DISPLAY SETUP Setup Language Setup Audio Setup Display Setup Parental Setup DivX R Registration Setup Language Setup Audio Setu...

Page 115: ...Video input you must choose PAL When you choose PAL Interlace output format is PAL 60 Hz output If your TV system only has NTSC input you must choose NTSC PAL In case of using PAL disc If your TV system only has NTSC Video input you must choose NTSC If your TV system only has PAL input you must choose PAL Ø Video Output Select Video Output COMPOSITE S VIDEO Select when you want to use Video and S ...

Page 116: ...rd screen appears 5 Enter your password The Re enter Password screen appears to confirm the password Enter your password again The player is locked 1 With the unit in Stop mode press the MENU button 2 Press the buttons to select Setup then press the or ENTER button To make the setup menu disappear press the MENU button Setup Language Setup Audio Setup Display Setup Parental Setup DivX R Registrati...

Page 117: ...to select the Rating Level you want then press the or ENTER button e g Setting up in Level 6 1 With the unit in Stop mode press the MENU button 2 Press the buttons to select Setup then press the or ENTER button Setup Language Setup Audio Setup Display Setup Parental Setup DivX R Registration Setup Language Setup Audio Setup Display Setup Parental Setup DivX R Registration Use Password Yes Rating L...

Page 118: ...tton 2 Press the buttons to select Setup then press the or ENTER button Note If you have forgotten your password see Forgot Password in the Troubleshooting Guide To make the setup menu disappear press the MENU button Setup Language Setup Audio Setup Display Setup Parental Setup DivX R Registration Setup Language Setup Audio Setup Display Setup Parental Setup DivX R Registration CHANGE PASSWORD Ent...

Page 119: ...t ISO 9660 Finalized single session Write speed low 1 Open the disc tray Place the disc on the tray Close the tray The Firmware upgrade screen appears 2 Press the œ œ buttons to select Total then press the ENTER button 3 Press the number buttons to select the desired language In the middle of the writing the tray will open automatically After taking out the disc please wait for about 2 minutes If ...

Page 120: ... Menu is the Audio Output set to Bitstream The features or action cannot be completed at this time because 1 The DVD s software restricts it 2 The DVD s software doesn t support the feature e g angles 3 The feature is not available at the moment 4 You ve requested a title or chapter number or search time that is out of range Check if the disc has a Menu Some of the functions selected in the Setup ...

Page 121: ...yer Disc 135 min Reading Speed 4 8 5 6 m sec Maximum Play Time 74 min Reading Speed 4 8 5 6 m sec Maximum Play Time 20 min Reading Speed 4 8 5 6 m sec Maximum Play Time 74 min Video Audio 1 channel 1 0 Vp p 75 Ω load Y 1 0 Vp p 75 Ω load Pr 0 70 Vp p 75 Ω load Pb 0 70 Vp p 75 Ω load Luminance Signal 1 0 Vp p 75 Ω load Chrominance Signal 0 3 Vp p 75 Ω load L 1 L R 2 R 48 kHz Sampling 4 Hz to 22 kHz...

Page 122: ...in Bldg 250 2 Ka Taepyung Ro Seoul Korea TEL 82 31 200 6077 FAX 82 31 200 9099 APPROVED BY ETL SEMKO Torshamnsgatan 43 Box 1103 SE 164 22 Kista Sweden TEL 46 8 750 00 00 FAX 46 8 750 60 30 www samsung com AK68 00639Q 00 00 P350K FES Cover 3 8 05 6 46 PM Page 2 ...

Reviews: