background image

ENG-

13

Connections

C

O N N E C T I O N S

Connecting to a TV (Interlace)

-

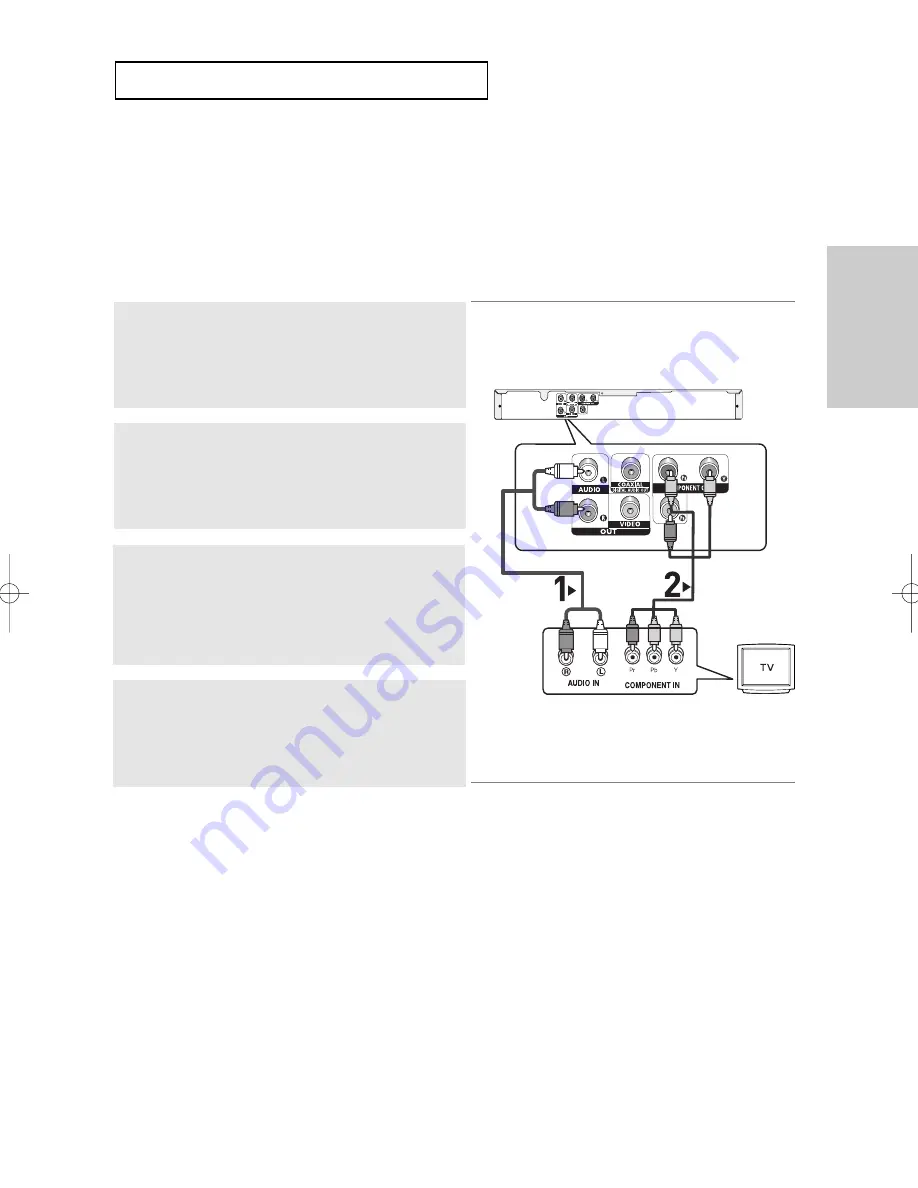
Connecting to your TV using Component video cables. 

- You will enjoy excellent quality and accurate color reproduction images. Component video

separates the picture element into black and white(Y), blue(P

B

), red(P

R

) signals to present clear

and clean images. (Audio signals are delivered through the audio output.)

Note

-

If you want to connect to an Amplifier, please refer to the Amplifier connection page. (See pages 15 to 16)

- The component jack of your TV may be marked “R-Y, B-Y, Y” or “Cr, Cb, Y” instead of “P

R

, P

B

, Y” 

depending on the manufacturer. The number and position of the jacks may vary depending on the TV set.
Please refer to the user's manual of your TV.

1

Using Component video cables (not included), connect the
COMPONENT VIDEO OUT jacks on the rear of the DVD player

to the 

COMPONENT IN jacks of your 

TV.

2

Using the audio cables, connect the AUDIO (red and white)

OUT

jacks on the rear of the DVD player to the AUDIO (red

and white) IN

jacks of your 

TV. 

Turn on your DVD player and TV.

4

Press the input selector on your 

TV remote control until the

Component signal from the DVD player appears on the TV
screen.

3

Set the V

ideo Output to 

I-SCAN (480i) in the Display Setup

menu. (See pages 49 to 50)

RED

WHITE

RED

BLUE

GREEN

RED

BLUE

GREEN

Audio Cable
(Included)

Component cable
(not included)

WHITE

RED

DVD_P181_XAA1.1  2/12/08  5:21 PM  Page 13

Summary of Contents for DVD-P181

Page 1: ...DVD Player DVD P181 www samsung com AK68 01505R...

Page 2: ...et consult an electrician for replacement of the obsolete outlet 10 Protect the power cord from being walked on or pinched particularly at plugs convenience receptacles and the point where they exit f...

Page 3: ...nect this equipment into an outlet on a circuit different from that to which the receiver is connected Consult the dealer or an experienced radio TV technician for help This class B digital apparatus...

Page 4: ...or sold in combination with this product unit The license only covers the use of this product unit to encode and or decode audio files conforming to the ISO IEC 11172 3 or ISO IEC 13818 3 No rights a...

Page 5: ...3 Replace the battery cover If the remote control doesn t operate properly Check the polarity of the batteries Check if the batteries are drained Check if the remote control sensor is blocked by obsta...

Page 6: ...20 Repeat Play 21 Slow Play 22 Chapter 4 Advanced Functions Adjusting the Aspect Ratio EZ View 23 Selecting the Audio Language 25 Selecting the Subtitle Language 26 Changing the Camera Angle 27 Using...

Page 7: ...layer CDGs play audio only not graphics Ability to play back may depend on recording conditions DVD R R CD RW DVD RW RW V mode The unit may not play certain CD R CD RW and DVD R due to the disc type...

Page 8: ...and MPEG 2 system Various screen and audio functions can be easily selected through the on screen menu Disc Types Logos Recording Types Disc Size Max Playing Time Characteristics DVD 5 3 1 2 74 min 2...

Page 9: ...lights up 3 DISC TRAY Place the disc here 4 DISPLAY Operation indicators are displayed here 5 OPEN CLOSE STOP Press to open and close the disc tray 6 PLAY PAUSE Begin or pause disc play Front Panel D...

Page 10: ...essive scan mode will work If I SCAN 480i is set to ON in Video Output of the Setup Menu interlaced scan mode will work 4 DIGITAL AUDIO OUT JACKS Use a coaxial digital cable to connect to a compatible...

Page 11: ...EZ VIEW Button The aspect ratio of a picture can easily be adjusted according to the screen size of your TV 16 9 or 4 3 13 DISC MENU Button Brings up the Disc menu 14 OPEN CLOSE Button To open and clo...

Page 12: ...ed through the audio output 1 Using Component video cables not included connect the COMPONENT VIDEO OUT jacks on the rear of the DVD player to the COMPONENT IN jacks of your TV To see the progressive...

Page 13: ...n the manufacturer The number and position of the jacks may vary depending on the TV set Please refer to the user s manual of your TV 1 Using Component video cables not included connect the COMPONENT...

Page 14: ...Using the audio cables connect the AUDIO red and white OUT jacks on the rear of the DVD player to the AUDIO red and white IN jacks of the Amplifier 2 Using the video signal cable s connect the VIDEO...

Page 15: ...S Amplifier 1 If using a Coaxial cable not included connect the DIGITAL AUDIO OUT COAXIAL jack on the rear of the DVD player to the DIGITAL AUDIO IN COAXIAL jack of the Amplifier 2 Using the video sig...

Page 16: ...sure that you select the language you want to use Once you select a menu language you can change it by pressing the button on the front panel of the unit for more than 5 seconds with no disc in the u...

Page 17: ...Note If the player is left for about 5 minutes in pause mode it will stop 7 Step Motion Play Except CD Press the STEP button on the remote control during play Each time the button is pressed a new fra...

Page 18: ...different from the actual playback speed No sound is heard during search mode Except CD DVD CD 2X 4X 64X 128X 2X 4X 8X Skipping Tracks When playing a DVD if you press the SKIP button it moves to the...

Page 19: ...io CD Allows playback of the film from a desired time You must enter the starting time as a reference The time search function does not operate on some discs Refers to the film s soundtrack language I...

Page 20: ...PEAT button on the remote control Repeat screen appears 2 Press the REPEAT buttons to change playback mode DVD repeat play by chapter title or disc VCD repeat play by disc or track Chapter repeats the...

Page 21: ...o set point B until at least 5 seconds of playback time has elapsed after point A has been set 3 To return to normal play press the REPEAT button again then press the buttons to select Off and press t...

Page 22: ...1 aspect ratio disc the black bars at the top and bottom of the screen will disappear The picture will look vertically stretched Depending on a type of disc the black bars may not disappear completely...

Page 23: ...n are cut off and a full screen appears The picture will look vertically stretched ZOOM FIT The top bottom left and right of the screen are cut off and the central portion of the screen is enlarged Fo...

Page 24: ...ontain up to 8 audio languages To have the same audio language come up whenever you play a DVD Refer to Using the Audio Language on page 44 1 Press the AUDIO button The Audio changes when the button i...

Page 25: ...sented by abbreviations 2 To remove the SUBTITLE icon press the CANCEL or RETURN button Note Depending on the DVD you may have to select the desired subtitle in the DVD s Disc Menu Press the DISC MENU...

Page 26: ...ction DVD If the disc contains multiple angles the ANGLE mark appears on the screen 1 During play press the INFO button on the remote control 2 Press the buttons to select 3 Press the buttons on the r...

Page 27: ...r time Using the Bookmark Function DVD 1 During play press the Bookmark button on the remote control 2 When you reach the scene you want to mark press the ENTER button Up to 12 scenes may be marked at...

Page 28: ...tons to select a marked scene Clearing a Bookmark 1 During play press the Bookmark button on the remote control 3 Press the CANCEL button to delete a bookmark number 2 Press the buttons to select the...

Page 29: ...Using the Zoom Function Using the Zoom Function DVD During DVD play press ENTER to zoom in the following order 2X O 3X O3X O Normal During DVD or VCD play or pause mode press the ZOOM button on the r...

Page 30: ...d this screen displays Current Playback Mode There are four modes They can be selected in order by pressing the REPEAT button Off Normal Playback Track Repeats the current track Folder Repeats the cur...

Page 31: ...ng file Repeat Random playback 1 Press the REPEAT button to change the playback mode There are four modes Off Track Folder and Random Off Normal Playback Track Repeats the current song file Folder Rep...

Page 32: ...sion rates below 128 Kbps will not be played properly Use a decompression transfer rate of at least 64Kbps when recording WMA files Sound quality with WMA files basically depends on the rate of compre...

Page 33: ...DivX XiviD and then press ENTER button Repeat and Repeat A B Playback Press the REPEAT button to change playback mode There are 3 modes Off Folder Title Folder repeats the AVI files which have the sa...

Page 34: ...ain when Bitrate returns to normal 720 x 480 30fps 720 x 576 25fps Maximum bitrate 4Mbps CD R AVI file This unit can play the following video compression formats within the AVI file format DivX 3 11 c...

Page 35: ...Depending on the file size the amount of time between each picture may be different from the set interval time If you don t press any button the slide show will start automatically in about 10 second...

Page 36: ...older can be played Kodak Picture CD The JPEG files in the pictures folder can be played automatically Konica Picture CD If you want to see the Picture select the JPEG files in the clips menu Fuji Pic...

Page 37: ...revent children from viewing unsuitable movies such as those with violence adult subject matter etc Divx Page Please use the Registration code to register this player with the DivX R Video On Demand f...

Page 38: ...o select Player Menu then press the or ENTER button 4 Press the buttons to select the desired language then press the ENTER button The language is selected and the screen returns to the Language Setup...

Page 39: ...is selected The language is selected and the screen returns to the Language Setup menu To make the setup menu disappear press the MENU button 1 With the unit in Stop mode press the MENU button 2 Press...

Page 40: ...he language is selected and the screen returns to the Language Setup menu To make the setup menu disappear press the MENU button 1 With the unit in Stop mode press the MENU button 2 Press the buttons...

Page 41: ...c will use its original language setting The language is selected and the screen returns to the setup menu To make the setup menu disappear press the MENU button 1 With the unit in Stop mode press the...

Page 42: ...ct Divx Page then press the or ENTER button 4 Press the buttons to select the desired language then press the ENTER button The language is selected and the screen returns to the setup menu To make the...

Page 43: ...ivx Page then press the or ENTER button 4 Press OK to see the Divx registration number If you press ok the setup menu disappear Divx VOD items can only be accessed in the stop mode DivX Page Divx Subt...

Page 44: ...n 2 Press the buttons to select Setup then press the or ENTER button To make the setup menu disappear press the MENU button Audio Setup Page Dolby Digital Out PCM MPEG2 Digital Output PCM Dynamic Comp...

Page 45: ...ession On To select dynamic compression This is useful for watching movies late at night as it balances the loud and quiet portions of a disc Off To select the standard range Dynamic Compression On To...

Page 46: ...ENTER button 3 Press the buttons to select the desired item then press the or ENTER button 1 With the unit in Stop mode press the MENU button To make the setup menu disappear press the MENU button Dis...

Page 47: ...Adjust the brightness of the screen On or Off It does not function in Progressive mode Video Output Select Video Output I SCAN Select when you want to use Component Interlace 480i Out P SCAN Select wh...

Page 48: ...s Safe level discs that contain level 2 or higher will not play 5 Press the buttons to select the Rating Level you want then press the or ENTER button e g Setting up in Kids Safe 1 With the unit in St...

Page 49: ...d then press the or ENTER button Enter your new password Re enter the new password again 1 With the unit in Stop mode press the MENU button Note If you have forgotten your password see Forgot Password...

Page 50: ...ait for about 2 minutes If the DVD player was successfully updated the disc tray will close and the unit will turn off and on When the unit turns on the Select Menu Language screen will appear 3 Press...

Page 51: ...y In a SETUP Menu is the Audio Output set to Bitstream The features or action cannot be completed at this time because 1 The DVD s software restricts it 2 The DVD s software doesn t support the featur...

Page 52: ...te Video 2 Channel Frequency Response S N Ratio Dynamic Range Total Harmonic Distortion AC 120 V 60 Hz 9 W 0 58 lbs 0 037 oz 14 4 W X 8 D X 1 48 H 5 C to 35 C 10 to 75 Reading Speed 3 49 4 06 m sec Ap...

Page 53: ...ng com ITALIA 800 SAMSUNG 726 7864 www samsung com LUXEMBURG 0035 0 2 261 03 710 www samsung com be NETHERLANDS 0900 SAMSUNG 726 7864 0 10 Min www samsung com nl NORWAY 815 56 480 www samsung com no P...

Page 54: ...e the purchaser must contact SAMSUNG for problem determination and service procedures SAM SUNG does not warrant uninterrupted or error free operation of the product All replaced parts and products bec...

Page 55: ...questions or comments relating to Samsung products please contact the SAMSUNG customer care center 1 800 SAMSUNG 7267864 www samsung com Samsung Electronics America Inc 105 Challenger Road Ridgefield...

Reviews: