background image

5

A. Connecting to a TV (VIDEO CVBS)

-  Using video/audio cables, connect the 

VIDEO


(yellow)/AUDIO (red and white) OUT

 terminals 

on the rear of the DVD player to the 

VIDEO (yellow)/AUDIO (red and white) IN

  terminals of TV.

-  Turn on the DVD player and TV.
-  Press the input selector on your TV remote control until the Video signal from the DVD player 

appears on the TV screen.

connections

Choosing a Connection

The following shows examples of connections commonly used to connect the DVD player with a TV 
and other components.

Before Connecting the DVD Player

-  Always turn off the DVD player, TV, and other components before you connect or disconnect any 

cables.

-  Refer to the user’s manual of the additional components you are connecting for more informa-

tion on those particular components.

1
2

3
4

5

6

7

8
9

10

11

12
13
14
15

18

17

16

19

20

21

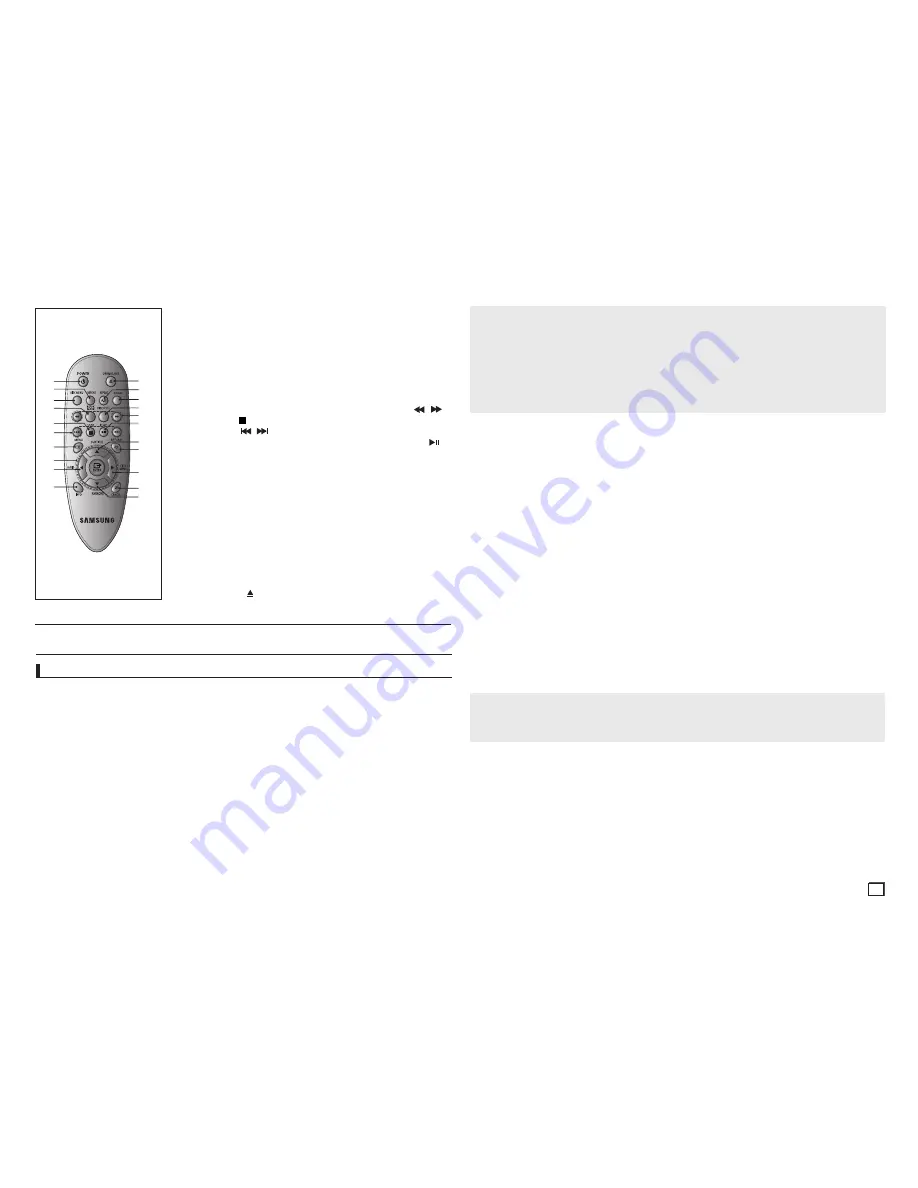
DVD-C350K
DVD-C350

1. DVD POWER Button

   Turns the power on or off.

2. REPEAT Button

  Allows you to repeat play a 

title, chapter, track, or disc.

3. DISC MENU Button

  Brings up the Disc menu.

4. BOOKMARK 

  Quickly find bookmark sections 

of a DVD.

5. STOP Button ( )

6. SKIP Buttons

 (

/

)

  Use to skip the title, chapter 

or track 

7. MENU Button

  Brings up the DVD player’s 

menu.

8. ENTER/

π/†

,

√/®

 Buttons

  This button functions as a 

toggle switch.

9. AUDIO Button (

)

  Use this button to access vari-

ous audio functions on a disc.

10. INFO Button

    Displays the current disc 
     mode.

11. OPEN/CLOSE ( ) Button

   To open and close the disc 

tray.

12. REPEAT A-B Button

    Allows you to repeat A-B  

disc.

13. ZOOM Button

    Enlarges the DVD Picture.

14. VIDEO SEL. Button

    Selects video output for
     mats. 

15. SEARCH Buttons (

/

)

    Allow you to search forward/
     back ward through a disc. 

16. PLAY/PAUSE Button (

)

    Begin/Pause disc play.

17. SUBTITLE Button (

π

)

18. RETURN Button

    Returns to a previous menu.

19. TITLE MENU Button (

®

    Brings up the Title menu.

20. CANCEL Button

    Use to remove menus 
     or status displays from the  
     screen. 

21. KARAOKE Button (

)

     (Only DVD-C350K)


Use to begin Karaoke func

     tions.

C. Connections to a TV Interlace / Progressive

- Using component video cables, connect the 

COMPONENT VIDEO OUT

 terminal on the rear of 

the DVD player to the 

COMPONENT IN

 terminal of TV.

- If using a coaxial cable, connect the 

DIGITAL AUDIO OUT (COAXIAL)

 terminal on the rear of the 

DVD player to the 

DIGITAL AUDIO IN (COAXIAL)

 terminal of the Amplifier.

- Using the audio cables, connect the 

AUDIO (red and white) OUT

 terminals on the rear of the 

DVD player to the 

AUDIO (red and white) IN

 terminals of TV.  Turn on the DVD player and TV.

- Press the input selector on your TV remote control until the Component signal from the DVD 

player appears on the TV screen. 

- Set the Video Output to 

I-SCAN/P-SCAN 

in the Display Setup menu. You can use the 

VIDEO 

SEL.

 button to change the Video Output mode.

B. Connection to an Audio System (2 Channel Amplifier, Dolby    


     Digital,MPEG2 or DTS Amplifier)

-  Using the audio cables, connect the 

AUDIO (red and white) OUT

 terminals on the rear of the 

DVD player to the 

AUDIO (red and white) IN

 terminals of the Amplifier.

-  If Using the video signal cable(s), connect the 

VIDEO

 terminals on the rear of the DVD player 

to the 

VIDEO

  terminal of your TV, If using a coaxial cable, connect the 

DIGITAL AUDIO OUT 

(COAXIAL)

 terminal on the rear of the DVD player to the 

DIGITAL AUDIO IN (COAXIAL)

 terminal 

of the Amplifier.

-  Turn on the DVD player, TV, and Amplifier.
-  Press the input select button of the Amplifier to select 

external input

  in order to hear sound 

from the DVD player.

   Refer to your Amplifier's user manual to set the Amplifier's audio input.

Note
-  Noise may be generated if the audio cable is too close to the power cable.

-  If you want to connect to an Amplifier, please refer to the Amplifier connection page.
-  The number and position of terminals can vary depending on your TV set.  


Please refer to the user's manual of the TV.

-  If there is one audio input terminal on the TV, connect it to the [AUDIO OUT][left] (white) terminal 

of the DVD player.

-  If you press the VIDEO SEL. button when DVD Player is in stop mode or no disc is inserted, the 

Video Output mode changes in the following sequence: (I-SCAN 

➝ 

P-SCAN ).

Note

-  What is "Progressive Scan"? Progressive scan has twice as many scanning lines as the inter-

lace output method has. Progressive scanning method can provide better and clearer picture 
quality.

D. Connection to a 5.1CH Analog Amplifier 
    (ONLY DVD-C360R,C370,C460)

-  If using audio cables for 5.1 CH  Analog Amplifier (not included) connect the 

5.1CH ANALOG 

AUDIO OUT

 terminals on the rear of the DVD player to the 

5.1CH ANALOG AUDIO IN

 terminals 

of the 5.1CH Analog Amplifier.

-  Using the video signal cable(s), connect the 

VIDEO  

or 

COMPONENT

 terminals on the rear of 

the DVD player to the 

VIDEO

 or 

COMPONENT

 terminals of your TV as described on pages.

-  Turn on the DVD player, TV, and Amplifier.
-  Press the input select button of the Amplifier to select 

external input

 in order to hear sound 

from the DVD player.

Summary of Contents for DVD-C460

Page 1: ...903A 04 imagine the possibilities Thank you for purchasing this Samsung product To receive more complete service please register your product at www samsung com global register DVD C460 DVD C450K C450 DVD C370 DVD C360R C360 DVD C350K C350 ...

Page 2: ...forming to ISO OUR 11172 3 or ISO OUR 13818 3 used or sold in combination with this product unit The license only covers the use of this product unit to encode and or decode audio files conforming to the ISO OUR 11172 3 or ISO OUR 13818 3 No rights are granted under this license for product features or functions that do not conform to the ISO OUR 11172 3 or ISO OUR 13818 3 CAUTION USE OF ANY CONTR...

Page 3: ...R due to the disc type or recording conditions COPY PROTECTION Many DVD discs are encoded with copy pro tection Because of this you should only con nect your DVD player directly to your TV not to a VCR Connecting to a VCR results in a dis torted picture from copy protected DVD discs This item incorporates copy protection tech nology that is protected by U S patents and other intellectual property ...

Page 4: ...r status displays from the screen Tour of the Remote Control 1 2 3 4 5 6 7 8 9 10 11 12 13 16 17 18 19 20 14 15 21 DVD C450K DVD C460 DVD C450 DVD C370 DVD C360 1 2 3 4 5 6 7 8 9 10 12 13 14 15 16 19 18 17 20 21 11 22 23 DVD C360R 1 DVD Power Button Turns the power on 2 REPEAT AUTO SCAN Button Allows you to repeat play a title chapter track or disc Returns to a previous menu Use this button to sea...

Page 5: ...ed and white OUT terminals on the rear of the DVD player to the AUDIO red and white IN terminals of TV Turn on the DVD player and TV Press the input selector on your TV remote control until the Component signal from the DVD player appears on the TV screen Set the Video Output to I SCAN P SCAN in the Display Setup menu You can use the VIDEO SEL button to change the Video Output mode B Connection to...

Page 6: ... in the player the first time you press the DVD POWER button this screen comes up If you want to select a language press a π button then press ENTER This screen will only appear when you plug in the player for the first time If the language for the startup screen is not set the settings may change whenever you turn the power on or off Therefore make sure that you select the language you want to us...

Page 7: ...soundtrack is played in English 5 1CH A DVD disc can have up to eight different soundtracks Bookmark function make you easily and quickly to find a track or chapter from DVD or CD The EZ View function is use for changing the aspect ratio in DVD The ZOOM function is use for Enlarge DVD Picture Using the A B Repeat function 1 Press the REPEAT A B button at the point where you want repeat play to sta...

Page 8: ...ote If the disc has only one angle this feature won t work Currently very few discs have this feature Depending on the disc these functions may not work 1 During play press the INFO button on the remote control 2 Press the π buttons to select Shortcut then press the ENTER button 3 Press the buttons to select Angle then press the ENTER button 4 Press the buttons on the remote control to select the ...

Page 9: ...ormal Playback Track Repeats the current song file Folder Repeats the song files which have the same extension in the current folder Random Song files which have the same extension will be played in random order To resume normal play press the CANCEL button MPEG4 Playback MPEG4 Play Function AVI files are used to contain the audio and video data Only AVI format files with the avi exten sions can b...

Page 10: ... of the unit This screen will be displayed Press ENTER to select disc 2 Press the RETURN button to display the ripping screen 3 Press the π buttons then press the ENTER button to select files for ripping To deselect files press ENTER button again 4 Press the and button to select START then press the ENTER button begin ripping The Ripping menu contain the following buttons Mode Fast Normal Bit Rate...

Page 11: ...the clips menu Rotation Each time the button is pressed the picture rotates 90 degrees clockwise Each time the π button is pressed the picture rotates 180 degrees Each time the button is pressed the picture changes to the mirror appearance FM Radio Only DVD C360R This feature lets you to listen FM radio from this DVD player Anytime we want to display FM radio menu just press FM RADIO button on the...

Page 12: ...om FRONT L CENTER FRONT R SURROUND R SURROUND L SUBWOOFER Note To make the Setup menu disappear or return to menu screen during set up press RETURN button The subwoofer test output signal is lower than the other speakers The MPEG Multichannel logo is a trademark registered by PHILIPS Corporation If you set Front L R Small LFE Subwoofer is set On automatically Display options enable you to set vari...

Page 13: ...e younger viewer Ø R Restricted Under 17 requires accompanying adult NC17 NC 17 No one 17 and under admitted ADULT Note If you have forgotten your password see Forgot Password in the Troubleshooting Guide Setting Up the DivX 1 With the unit in Stop mode press the MENU button 2 Press the buttons to select DivX Page then press the or ENTER button 3 Press the π buttons to select the desired item then...

Page 14: ...DVD C450 C450K C460 430mm W X 207mm D X 42mm H DVD C350 C350K C360 C360R C370 360mm W X 207mm D X 42mm H Operating Temperature Range 5 C to 35 C Operating Humidity Range 10 to 75 Video Output Component Video Y 1 0 Vp p 75 Ω load Pr 0 70 Vp p 75 Ω load Pb 0 70 Vp p 75 Ω load Audio Output Frequency Response 20Hz 20kHz 5 1 Channel DVD C360R C370 C460 F L F R R L R R CT S W Maximum Output Level 2Vrms ...

Page 15: ...memo ...

Page 16: ...1SAMSUNG 172678 022 607 93 33 www samsung com pl Portugal 80820 SAMSUNG 726 7864 www samsung com pt Slovakia 0800 SAMSUNG 726 7864 www samsung com sk Spain 902 1 SAMSUNG 902 172 678 www samsung com es Sweden 0771 726 7864 SAMSUNG www samsung com se U K 0845 SAMSUNG 7267864 www samsung com uk Eire 0818 717 100 www samsung com ie Austria 0810 SAMSUNG 7267864 å 0 07 min www samsung com at Switzerland...

Reviews: