background image

1 9

1 8

PREPARATION

PREPARATION

Inserting the compact flash memory card

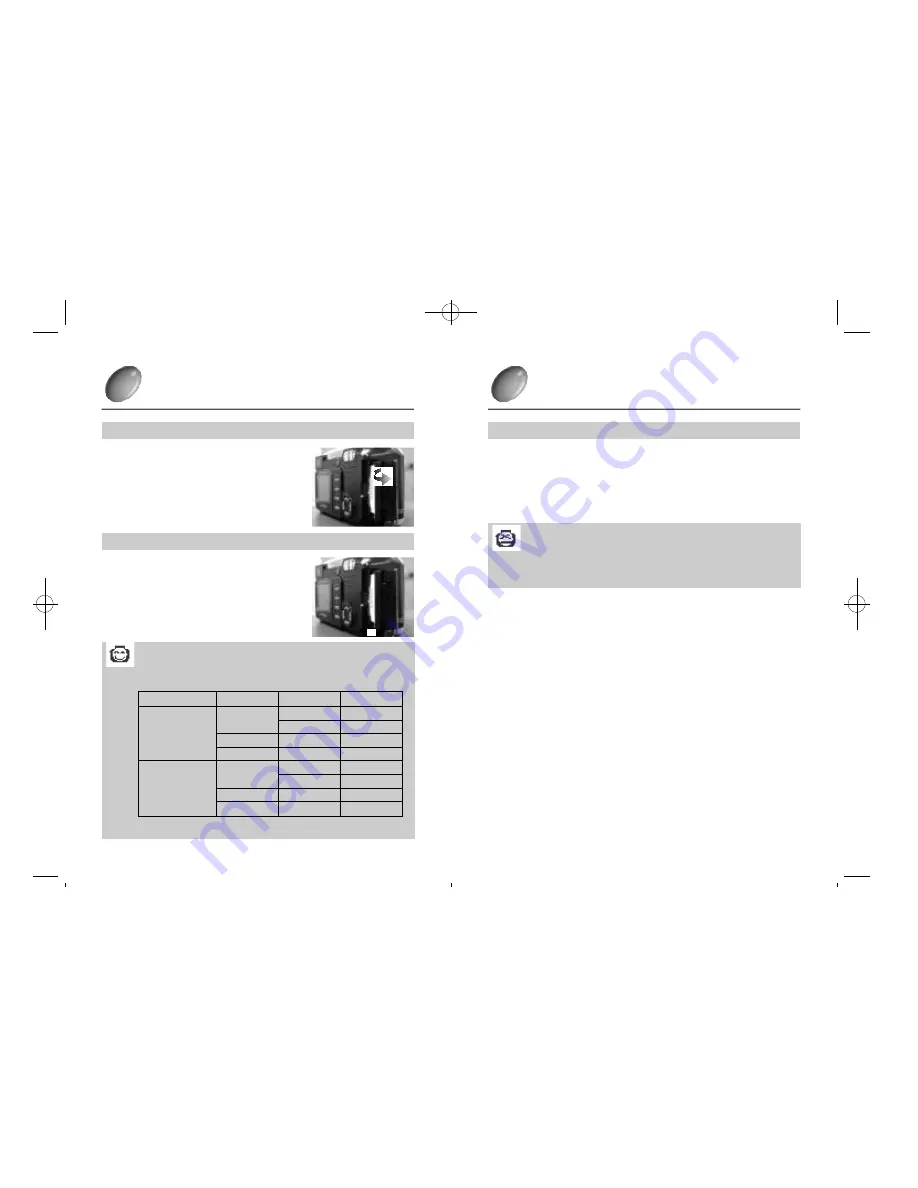
Push cover towards the arrow to open the card
cover.

1

Instructions on how to use a new memory card.

Inset the card.

2

To close, push towards the arrow until you hear a
click.

3

Removing compact flash memory card

Turn off the power using the power button (

®Á

).

1

Push the card removal button (

®Ë

)down.

2

Remove the card as shown in the picture below.

3

Reference

°§

Using an 8MB compact flash memory card, the specification/
shooting capacity will be as follows (This is based on the 
conditioning standard of our company.)

°ÿ

The number of the normal shots can be varied according to the 

type of the compact flash memorycard.

Recording size

Recording picture quality

File format

Amount of shots

.T I F 

1

L

.J P G 

8°æ

1

( 1 6 0 0°ø

1200 Pixel)

.J P G 

1 5°æ

1

.J P G 

3 0°æ

1

.T I F

5

S

.J P G 

3 0°æ

1

( 8 0 0°ø

600 Pixel)

.J P G 

5 9°æ

1

.J P G 

1 1 4°æ

1

°·

Before using, the card must be initialised.

°§

Intialising prepares the card for recording data.

°ÿ

For more details, please refer to the user manual,page 60.

°·

Preserving the memory card data

°§

The recorded data could be corrupted under the following conditions
-  When the card is used incorrectly

-  If the power is switched on whilst initialising, reading or removing the

memory card.

°§

Advice: Copy important data into other media (floppy disk, hard disk etc.)

- Samsung cannot be held responsible for lost data. Please copy important

files as soon as it is practical.

Note

°§

If you use it for a long time, you can

°Ø

t record a new image data. In this case, buy a new

c a r d .

°§

Always turn off the power when replacing the memory card.

®Á

Highest picture

quality

Highest picture

quality

Highest picture

quality

High picture quality

High picture quality

Standard picture quality

Standard picture quality

®Ë

-Digimax210SE(02~47)  00.10.24 8:32 AM  

D

‰¿Ã¡ˆ18

Summary of Contents for Digimax 210 SE

Page 1: ...T WEST ROAD BRENTFORD MIDDLESEX TW8 9RE U K TEL 44 181 232 3278 FAX 44 181 569 8385 SAMSUNG DEUTSCHLAND GmbH SAMSUNG HAUS AM KRONBERGER HANG 6 65824 SCHWALBACH GERMANY TEL 49 61 96 66 53 01 FAX 49 61 96 66 53 33 SAMSUNG FRANCE S A R L BP 51 TOUR MAINE MONTPARNASSE 33 AV DU MAINE 75755 PARIS CEDEX 15 FRANCE TEL 33 1 4279 2283 FAX 33 1 4320 4510 S MARKET COM IMP EXP LTDA RUA ALFERES MAGALHÃES 92 CON...

Page 2: ...quid monitor display mark 12 ßô Preparation 14 Connecting to power 14 Using the battery 14 Checking the battery 14 Using the AC power adapter 16 Attaching the strap 17 Attaching the lenscap 17 Insert the compact flash memory card 18 Note for memory card 19 Selecting the date and time 21 ßô Camera working mode 22 ßô A basic shooting 23 ßô Shooting mode 26 Setting up shooting function using photogra...

Page 3: ...f explsion Please keep this preduct away from children or animals or the following accidents may occur UChoking on the camera strap swsllowing of the batteries or the small camera accessories UPlease consult a doctor of any of these incidents occur UThey fire flash in front of their eyes and then a damage that recovering eyesight can be occurred UThey can be harmed by a camera s moving part Do not...

Page 4: ... batteries with new ones or mix brands of batteries UEnsure the batteries are positioned correctly with regard to polarity When the camera is not use for long periods such as during a vacation always unplug the camera from the power source batteries or AC Power Adapter for safety Leaking batteries can cause fire and pollution of the environment Do not radiate on the state that you close luminous p...

Page 5: ...ction buttons Left Direction buttons Up Direction buttons Right LCD monitor Flash indicator Red LED Select button Camera Status LCD Viewfinder Scroll button Flash fading control sensor Digital connection terminal RS232C output terminal USB connection terminal Video connection terminal Video output terminal Strap Attachment point Compact Flash card cover Memory card slot AC Adaptor connection point...

Page 6: ...ixel 800x600 pixel Setting up the Selftimer Picturing available remaining number Preparation power on Exposure compensation status Memory card warning installation Memory card warning low capacity Getting ready for the operation of the camera Saving the image of TIFF file form in the memorycard Play mode PC connection mode Fill in Flash Flash off Macro photography Battery status Preparing a new ba...

Page 7: ...emory card _When you select the play mode the last image is displayed Lock _It is displayed when you select Lock Shooting image Picturing available remaining number Date and Time Status indicating block White balance UAuto U Daylight UFluorescent light U Tungsten lamp Flash U Auto UAuto and Red eye reduction UFill in Flash UFlash off Shooting mode U Macro U Normal No Symbol Digital zoom Formatting...

Page 8: ... use for a period of time For more information regarding auto power off please refer to the power off section on page 49 NOTE Ú Important Information about battery usage Please remove the batteries if the camera will not be used for a long periods Batteries can lose power over time and are prone to leak if kept inside the camera Do not use manganese batteries as they cannot deliver sufficient powe...

Page 9: ...y of Duracell Company Maxi Tech ALKALINE battery of Varta Company ALKALINE battery of Panasonic Company Warning Always turn the power off before taking the AC adaptor out of the mains supply Treat the AC adaptor with the same care and attention that you would with any mains device 1 2 Use the retaining cord to prevent loss of the lens cap Refer to the illustrations above ÿAfter using keep the lens...

Page 10: ...æ 1 J P G 30 æ 1 T I F 5 S J P G 30 æ 1 800 ø 600 Pixel J P G 59 æ 1 J P G 114 æ 1 Before using the card must be initialised Intialising prepares the card for recording data ÿ For more details please refer to the user manual page 60 Preserving the memory card data The recorded data could be corrupted under the following conditions When the card is used incorrectly If the power is switched on whils...

Page 11: ...use the camera for the first time Turn the power on by pressing the power button 1 Set the mode dial to the shot mode macro normal 2 Press the MENU button When the liquid crystal monitor is automatically turned on the setup MENU frame is displayed 3 Move to the function block system by using the RIGHT button Ú among the four direction button 4 Move to the detail function list date time by using th...

Page 12: ...camera has 4 working modes these are listed below Ú Macro photography This mode is used for close range photography between 20cm 80cm The flash is set up to operate automatically but you can set the flash mode to your own preference Ú Normal pictures This mode is used for normal pictures from 80cm infinity In this mode the camera uses auto exposure auto white balance auto focus and the images are ...

Page 13: ...y When the image data has been stored the green LED light will go out After the green LED light has gone out you can re commence taking pictures 24 TAKING PHOTOS Set up the picture function by using the status LCD and the menu screen on the picture LCD monitor Refer to the page 35 51 about the selecting the shot function using the MENU frame on LCD panel 4 Decide the picture composition that you w...

Page 14: ...ye reduction high quality set status 26 SETTING UP THE SHOOTING FUNCTION Setting up the shooting function by using the photographing information indicator Using the photo information indicator set mode you can set the following flash image quality recording size self timer function setting The SCROLL button allows you to select certain features which will flash when avalable for selection Using th...

Page 15: ...ng time for the flash is normally within 7 seconds If the batteries are weak the charging time will be longer Note Please photograph within the flask shot range W 0 2 3m T 0 2 2m The image is saturated when you take it with a strong reflector or at close range Auto Flash Fill in Flash Flash off Auto Flash and red eye reduction If you want to cancel the setup mode press the scroll button until it c...

Page 16: ...or remaining pictures will decrease L 1600 ø 1200 pixel S 800 ø 600 pixel Select to Record size Reference The picture image file is normally stored in jpg but selecting the highest image quality enables tif files to be used Refer to page 40 for details of selecting the pictured image file form You can get the best quality shot with TIF file which is for the professionals However The number of the ...

Page 17: ...emory capacity short warning sound will When you are saving the tiff file form image in the memorycard The indicator blinks on the indicator for the number of the remaining shot _When the saving to the memorycard is completed The indicator is cancelled Indicator for the camera error When the error occurs while the operation of the camera The indicator on the shot information indicator blinks _Refe...

Page 18: ...oom is only possible when a liquid monitor is put on If you push zoom button T TELE in the state that 3x optical zoom is set up digital zoom setting is possibe Digital zoom is devied into 5 grades like DX 1 5 DX 2 0 and this grade is displayed on the left top of a liquid monitor according to zoom magnification 1 Working DIGITAL TELE If you push zoom button T software tele zooming is processed If y...

Page 19: ...ar cursor will move accordingly _The present status changes into the bar cursor marked function 4 Change into the set status that you want repeating steps 2 3 and 4 5 If you want to finish a set mode press the MENU button again _The menu screen will disappear and the camera image will be displayed on the LCD monitor However the moving images is displayed on LCD panel only when you press the LCD bu...

Page 20: ...ing image shooting it is saves as the moving images FLASH There are 4 flash modes auto auto and red eye reduction fill in flash flash off Select the most appropriate flash mode for the picture SELF Select self timer function 2 ADVANCE This is for more adventurous photographers who want to use advanced application modes W B white balance Different lighting conditions will affect the way the colour ...

Page 21: ...ra File format If you select or image quality the file format will default to jpg If you select image quality you can choose between a jpg or tif file format _The jpg file form shot is recommended in general cases _You can get the best image quality shot with TIF file which is for the professionals However The number of the shot is decreased and the time for the saving is lengthened _When saving a...

Page 22: ... a number of pictures of moving objects When the continuous shot is completed it is automatically set up as one shot take mode _If the Enter button is pressed after selecting continuous shooting the LCD screen will display the Burst Set menu where the amount of shots requires can be selected by using the directional buttons The maximum number of continuous shooting pictures is determined by the se...

Page 23: ...record size with the four direction button and the shot time on the setup the moving imagew shot frame it goes back to the setup MENU frame and the selected the moving images shot time is displayed as updated If you press the MENU button at this the setup MENU frame is cancelled and the camera is ready for the moving images shot take 1 If there is not enough space on the memory card the moving ima...

Page 24: ...decrease the exposure quantity you will obtain a darker image D ZOOM If you select ON the function of digital zoom is selected and it remains regardless of the power ON OFF setup _Because this camera support the digital zoom of up to two times you can get shot of six times zoom if you use it with the optical zoom of three times _Refer to the page 34 about the detail information on the digital zoom...

Page 25: ... allows you to control the brightness of the LCD You can choose from 7 levels of brightness BEEP buzzer sound If the beep is set to on you can confirm the camera s working status according to the button sound There will be a warning sound if a card disorder occurs and a continuous beep when the self timer is counting The Buzzer will sound when any button is pressed When a button is pressed for an ...

Page 26: ...ter the date and time with the 4 directional buttons Once you have completed this press Enter again and you will return to the date time screen The date and time will now have been updated _Once Enter has been press the seconds will start counting from 0 1 This camera will automatically correct the date when a leap year occurs _2000 2050 autocorrection of a leap year and month 2 When you select VI...

Page 27: ... will allow you to play any pictures or moving images stored on the memory card Play mode When play mode is selected the LCD on the top panel will show and the battery status No other icons will appear on the LCD Checking the battery The standards to decide the condition of the battery is same as the shot mode and please refer to the Indicator for the condition of the battery on page14 Starting th...

Page 28: ...xisting images being lost accidentally 3 ERASE ALL This will erase all images stored on the compact flash card 4 FORMAT This function initialises the compact flash memory card by formatting the data 5 Play function list The LCD display is as follows THUMBNAIL SLIDE SHOW 03 Ú sec PROTECT UNLOCK Ú ERASE ALL FORMAT Reference Ú A buser sound UIf beep is set on in a manual set mode of a shooting mode a...

Page 29: ...ed but deleted on FORMAT memory card begins 17 56 PLAY MODE If you push ENTER button after selecting a bar cursor into SLIDE SHOW in a manual starting screen status SLIDE SHOW is executed ÿ SLIDE SHOW Highlight slide show and press ENTER The LCD will give a time interval option between 1 10 seconds Use the left right directional buttons to select the required interval pre set at 3 seconds 1 Pressi...

Page 30: ...nitor 1 Select YES by highlighting it and then pressing ENTER All the images on the card will then be erased _The image counter will register no images Locked images will not be deleted AFTER selecting NO when you push the ENTER button _A manual starting screen is back and ERASE ALL of the screen is highlighted When deleted the setup MENU mode is cancelled if you press MENU ÿWhilst images are bein...

Page 31: ...LAY MODE After moving the bar cursor to FORMAT press ENTER then the following messages will appear on the LCD monitor 1 Move the bar cursor into YES or NO with the up and down directional buttons Then press the ENTER button for the action to be executed After selecting YES when you push ENTER button _After formatting the memory card a NO IMAGE message will appear on the LCD monitor After selecting...

Page 32: ...eed to select the external or AV channel If there is noise the picture is fuzzy please refer to your TV manual for more information If the picture is not in the centre of the screen please use the TV controls to centre it 62 PLAY MODE You can print out the saved images in compact memorycard as much as you set up with the digital photo printer which supports DPOF DPOF Direct Print Ordering Format I...

Page 33: ...es saved in memorycard Batteries will drain at a faster rate when using PC connection mode Indicators for the shot information on connecting to the PC mode The condition of the battery and the letters are displayed on the indicators for the shot information on connecting to the computer mode and the other indicatiors are off Checking batteries The standards to decide the condition of the battery i...

Page 34: ...essive vibration An area with high explosives or highly flammable materials Pesticides Dust and VinylNever bring into contact with sand Ú Never bring into contact with sand If sand gets into electronic devices like Digimax210SE it can cause severe malfunctions Please ensure that there is no contact with sand or similar particles Ú Always be cautious not to expose to extremes in temperature If the ...

Page 35: ... mode Refer to the selecting DATE TIME on the page 21 Before contacting service center please check the following Warning indicator The power is not turned on If the power will not turn on Battery power is drained quickly Camera does not take pictures when pressing the Shutter button The flash mode does not work The focus cannot be adjusted The wrong date time is displayed UNo memorycard UInsert t...

Page 36: ...y card is as follows BEFORE CONTACTING SERVICE CENTER UCamera not functioning prorerly URemove the batteries and insert them again UThere is a difference of the UStart the memorycard and use it beginning memorycard Refer to the FORMAT on the page 60 UThere is any trouble with the W B mode UThere is excessive exposure UReset exposure compensation Refer to page 47 E V UThe lens is smudged or dirty U...

Page 37: ... of setting up for using TWAIN Protocol 109 Set up the USB TWAIN Driver 110 Set up the Serial TWAIN Driver 110 Set up the Direct Download 111 Connect the Camera 112 Connecting the USB port 112 Connecting the internet port 112 How to use Direct Download program 113 How to use TWAIN Driver 115 How to solve the problems 117 BEFORE YOU SET UP THE SOFTWARE Ú Direct Download Program This is the program ...

Page 38: ...ou put the Drive CD ROM provided with this camera into the CD ROM drive the following frame is automatically run 1 Setup the Driver Select the driver you want on the above frame Refer to the page 76 in case of the USB TWAIN Driver setup for Windows Refer to the next contents for the details about setting up the Driver USetup the RS232C TWAIN Driver for Windows page 82 USetup the Direct Download_US...

Page 39: ...u want to see installing administrator Click orderly initiating menu A setting Acontroller A equipment administrator 7 SET UP THE TWAIN DRIVER FOR WINDOWS Installation of the USB Twain Driver Windows 98 After connecting the computer and the camera via the USB cable the message new hardware additional wizard will be displayed on your screen Click next to proceed 1 After selecting searching a driver...

Page 40: ...yed on your screen Click Next p button 1 After selecting Search for a suitable driver for my device recommended p click Next p button 2 Insert the Driver CD in CD ROM drive and select CD ROM drives p on the next frame and click Next p button 3 Click on the Next p button when this screen is shown 4 Click on the Yes p button when this screen is shown 5 Move the files you need from the Driver CD prov...

Page 41: ...en the MSVCRT DLL files on the frame below and then press the Confirmation button 2 USB TWAIN Driver p installation was finished After clicking Finish p button restart the computer 7 When installation has completed successfully you will be able to see Samsung Digimax 210SE Camera p in the Imaging Device p of the Device Manager p If you want to see Device Manager p click orderly Start menu Êsetting...

Page 42: ... UP THE DRIVER FOR WINDOWS Set up RS 232C Twain Driver When you click Serial TWAIN Driver on the frame displayed after you put the provided setup the Driver CD into the CD ROM Driver the following frame is displayed 1 If this screen is displayed click the NEXT button 2 Enter your user information and then click the NEXT button 3 Digimax210SE 72 00 10 24 8 35 AM D Ã ˆ82 ...

Page 43: ...am for windows Note Please play Direct download_USB program after setting up the TWAIN Driver first SET UP THE DIRECT DOWNLOAD PROGRAM When you click USB TWAIN Driver on the frame displayed after you put the provided setup the Driver CD into the CD ROM Driver the following frame is displayed 1 Click the Next button if you want to set up in the folder provided from the next frame and click the Next...

Page 44: ...ble to the digital camera 2 Switch the camera on 4 Set the mode dial 3 SET UP THE EDITING SOFTWARE Installation of Adobe Photo Deluxe 3 0 editing software Ú This software is provided only for Windows and guaranteed over Windows NT 4 0 with service Pack 3 or Windows 95 98 When Samsung digimax 210SE application is inserted into the CD Rom drive an Autoplay screen like the one above will appear Follo...

Page 45: ...t to download AVI themoving images AVI format stored in memory card This button will download the shot images from camera to computer Select this button when you want to cancel the action while downloading The image downloaded before selecting this button will be stored in computer This button will specify the folder where the downloaded images are to be stored Section Function ALL FILES CURRENT J...

Page 46: ...are sure that the program supports TWAIN select TWAIN Source Your TWAIN Driver may have more than one TWAIN Sources if the computer has been connected to Image Devices such as scanner In this case of using digital camera you should select digital camera source IF you select TWAIN Select Source you will see this dialog box 90 HOW TO USE DIRECT DOWNLOAD PROGRAM Âü í If the moving image you downloade...

Page 47: ... selecting TWAIN Source After selecting TWAIN Source select TWAIN Acquire and the following window will appear Here is the function of each icon Delete This button will erase the selected image Rotate This button will rotate the image to proper orientation Refresh This button will display the image stored in memory card Lock This button will set the unlocked image into locked Unlock This button wi...

Page 48: ...pening and editing pictures You can download pictures from various imaging products to Adobe Photo Deluxe 3 0 This will allow you to edit store and print your pictures How to use Adobe Photo Deluxe 3 0 π Calling pictures Adobe Photo Deluxe 3 0 can call the images shot by a camera pictures stored in a PC images of a scanner the pictures downloaded from internet several images and so on π Rotating a...

Page 49: ...Help will then be displayed 96 HOW TO USE EDITING SOFTWARE π Label Several kinds of labels and gift tags can be made using Adobe Photo Deluxe 3 0 π Frames The photo frames function can be used to frame photos or as a frame in the T shirt transfer π PhotoParade You can make and execute PotoParade And you can also obtain a detail information about Photoparade π Storage and Sending This is exactly th...

Page 50: ... on the monitor 4 Select the image that you want and click on it The camera will then download that image 5 98 HOW TO USE EDITING SOFTWARE Retrieving Images from the Digimax 210SE Select opening and editing pictures then click download pictures from the camera 1 If the following screen is displayed click 1 Camera 2 You will have to either select USB Samsung Digimax 210SE USB RS 232C Samsung Digima...

Page 51: ...ages will be distorted If you wish to download pictures and store them onto a hard disk etc the click on file store 1 After choosing a file name on the display screen click on the store button 2 100 HOW TO USE EDITING SOFTWARE Enlargement rate Select the arrow and select the enlargement rate Waste Box A selected portion of the picture is deleted Object Order You will be able to move objects to the...

Page 52: ...n of USB TWAIN Driver is completed when you eliminate Samsung TechwinCOACH INF in Other folders In case of Windows 2000 you can eliminate oem inf oem pnf in Inf folder Eliminate the file named Samsung Digimax 210SE Camera after opening the file named oem inf 4 How to remove the USB TWAIN Driver Click in order start menu setting controller system Select Samsung Digimax 210SE Camera on Imaging Devic...

Page 53: ...B p on the frame above and pressing addition elimination and then Direct Download_USB is automatically eliminated 2 How to remove the Serial TWAIN Driver When you select program addition elimination icon on the control board the frame below is displayed 1 After selecting Samsung Digimax 210SE TWAIN Driver on the frame above and pressing addition elimination and then Serial TWAIN Driver is automati...

Page 54: ...doesn t operate any more Follow Step 1 and 2 on the next page and check out if each of them works If this doesn t work out click the Ok button and then click Open Camera icon 3 When the problem occurs when this program is in process Follow Step 3 on the next page and check out if this works If this doesn t work out click the OK button and then click Open Camera icon 106 HOW TO REMOVE THE DRIVER AN...

Page 55: ...EMS Ú Check points Solutions 1 When TWAIN Driver is set up improperly These problems may occur when TWAIN Driver is set up improperly or TWAIN Driver has been already set up for another camera Select the proper camera model on the following frame displayed when you run the Adobe PhotoDeluxe testing version and then click open the image and correct it take the image camera 1 camera camera model in ...

Page 56: ...nformation regarding TWAIN Protocol installation 1 You see the frame below when you open MAC Serial TWAIN folder from Driver CD ROM 2 Select Samsung Digimax 210SE Serial file in MAC Serial TWAIN folder and copy it into TWAIN Data Sources folder in Extentions folder 3 If all process goes successfully the installation is completed 4 Setting up the Direct Download for Macintosh users is same either w...

Page 57: ...pter for Macintosh with the to the modem port 1 Connect the one end of the connected cable terminal to the DIGITAL connecting terminal of the camera 2 Switch the camera on 4 Set the mode dial 3 CONNECT THE CAMERA HOW TO USE DIRECT DOWNLOAD PROGRAM How to run the Direct Download for the Macintosh users Plug in the exclusive cable USB cable or Serial Cable to the USB port of the Macintosh or to the ...

Page 58: ...ge Group After that press the download button Select the folder the downloaded images should be saved It is the beginning menu folder with DirectDown that should be used in downloading Download the taken images in the selected folder Section Image List Image Group Select Folder Download Function How to use TWAIN Driver TWAIN Driver is not used dependently It is called only by other graphic program...

Page 59: ...ill enable you to search for the images via First Up Down Last Searching image Type 1 The memory is not enough or the memory is abnormal End the program you are using and run the program again Begin the Mac again if you need Type 2 This the error that happens when you first set up the USB port or communication port You cannot use the Samsung Digimax 210SE TWAIN Driver in the several programs at th...

Page 60: ...SB or communication port is already done Check the power on off or check whether there is the memory card in Samsung Digimax 210SE Camera or check if the camera mode is on the PC mode You should run the application program again after ending it Type 5 This is the error that happens when you erase the image though all the beginning set up is done Check if the image is locked If you want to erase th...

Reviews: