background image

S

PECIAL 

F

EATURES

C

H A P T E R  

F

IVE: 

S

P E C I A L  

F

E A T U R E S  

5 . 1

In this chapter, you will learn how to use the demonstration mode, how to repeat
sections of a tape, how to view closed captions, how to view a tape frame-by-frame or in
slow motion, and how to re-record a video tape.

V i e w i n g   t h e   D e m o n s t r a t i o n   M o d e

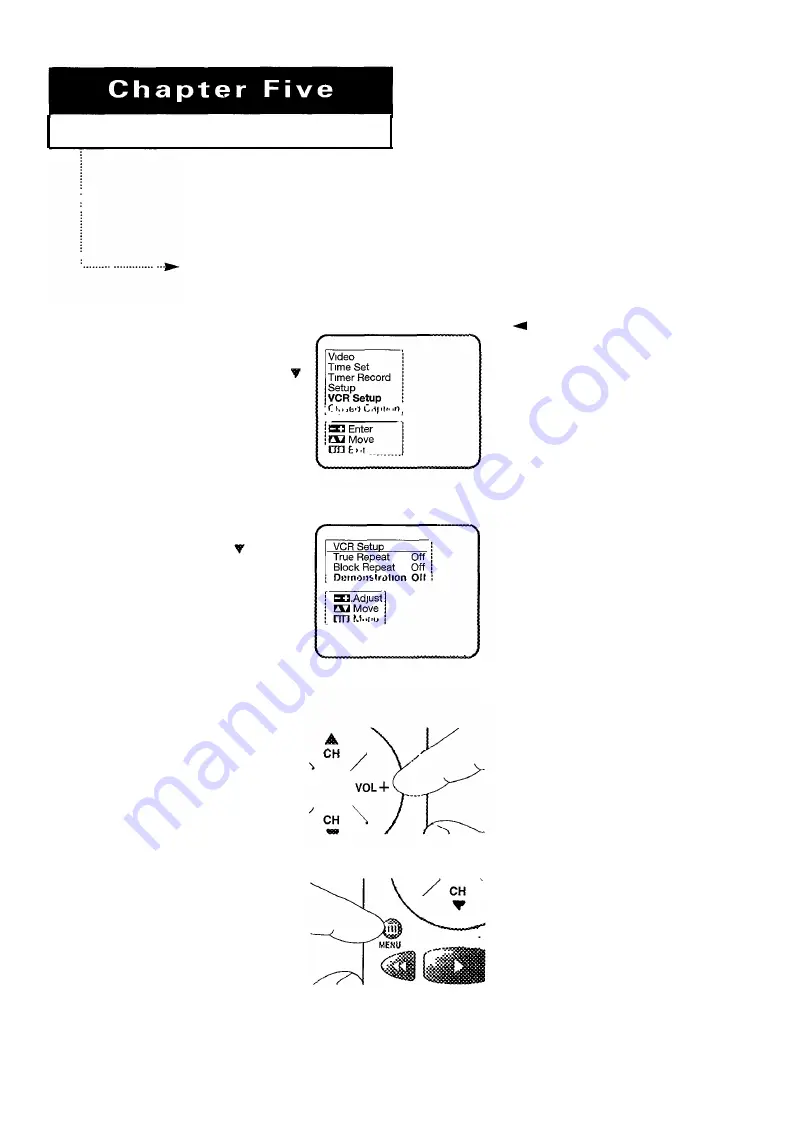
The demonstration mode displays all on-screen menus and programmable features.

1

With the main menu on
the screen, press 

CH 

until "VCR Setup” is
highlighted.

Press VOL +.

3

Press 

VOL 

+.

4

For information on viewing the

main menu, see page 3.2.

Press 

MENU 

to exit the

demonstration mode
and return to normal

viewing.

2

press 

C H

u n t i l

"Demonstration" is

highlighted.

The TV/VCR cycles

through the various
menus and settings
available.

Summary of Contents for CXD1332

Page 1: ...Owner s Instructions Printed in Mexico L5000 0118 ...

Page 2: ...t I that provides guidelines for proper grounding and in particular specifies that the cable ground shall be connected to the grounding system of the building as close to the point of cable entry as practical Caution FCC regulations state that any unauthorized changes or modifications to this equipment may void the user s authority to operate it Caution To prevent electric shock match the wide bla...

Page 3: ...rsonal injury l Do not use the TV VCR where contact with or immersion in water is a possibility such as near bath tubs sinks washing machines swimming pools etc l Do not place the TV VCR on an unstable cart stand tripod bracket or table The TV VCR may fall causing serious injury to a child or adult and serious damage to the appliance Use only with a cart stand tripod bracket or table recommended b...

Page 4: ...ntenna or cable system is grounded so as to provide some LEAD IN WIRE protection against voltage surges and built up static ANTENNA charges Section 81 0 of the National Electrical Code DlSCHARGE UNIT NEC SECTION 810 20 ANSI NFPA No 70 1984 provides information with respect to proper grounding of the mast and supporting structure grounding of the lead in wire to an antenna discharge unit size of gr...

Page 5: ... 4 Chapter 3 TV Operation 3 1 Viewing the On Screen Display 3 1 Viewing the Main Menu 3 2 Selecting the On Screen Language 3 2 Selecting the Signal Source 3 3 Programming the Channels 3 3 Storing Channels in Memory 3 3 Adding and Erasing Channels in Memory 3 4 Setting the Clock and Calendar 3 5 Choosing Picture Settings 3 7 Customizing Picture Settings 3 7 Using Standard Picture Settings 3 8 Setti...

Page 6: ...3 5 4 5 5 5 5 5 5 5 5 5 6 5 6 5 7 Chapter 6 Troubleshooting 6 1 Identifying TV Problems 6 1 Identifying VCR Problems 6 1 Getting Help 6 2 S p a n i s h Q u i c k R e f e r e n c e G u i d e S p a n i s h Q u i c k R e f e r e n c e G u i d e 7 1 7 1 Appendix Appendix A 1 Cleaning and Maintaining Your TV VCR A l Learning About Video Cassette Tapes A l Choosing the Proper Tapes A l Caring for Video ...

Page 7: ...nding l High Quality video circuitry l 181 channel capability frequency synthesized tuner l Auto channel programming l One touch recording up to 4 hours l Eight hour recording on a single T 160 video cassette l Tri lingual on screen displays English Spanish and French Checking Parts Once you have unpacked your TV VCR check to make sure that you have all the parts shown here If any piece is missing...

Page 8: ...ing listen to the TV VCR without disturbing play record rewind or fast forward others Use earphones with a mini Ejects a video tape once the tape jack has stopped VIDEO IN and AUDIO IN REW rewind Option Press to rewind a tape Use these jacks to record video and audio from auxiliary equipment such as a PLAY camcorder or another VCR Press to play a tape POWER light FF fast forward Lights when the po...

Page 9: ...IO VIDEO Mount the VHF rod antenna here See Use this terminal labeled VHF UHF IN Use these jacks to record video and page 2 1 FROM ANT to connect the TV VCR to a audio from auxiliary equipment such as 75 ohm outdoor antenna or cable a camcorder or another VCR Models system See pages 2 2 2 4 CXE1331 CXEl1931 CXD2512 and CXD2514 only VHF Rod Antenna and Twin Lead Cable Connect this cable to screws o...

Page 10: ... advance a tape frame by frame or to use skip search Models CXD1334 CXD1934 CXD2514 only STOP Press to stop a video tape 1 4 C H A P T E R O N E YO U R N E W T V V C R EJECT Press to eject a tape MONITOR Press to switch the image on the TV from video tape to the television broadcast LINE IN Press to selectthe line sources connected to the Audio Video jacks on the back of the TV VCR SPEED Press to ...

Page 11: ...h the unit If your lead looks like this you have a 75 ohm round lead This is the type of lead on a coaxial cable Antennas with 300 ohm Flat Twin Leads The rod antenna included with your TV VCR except models CXD2512 CXD2514 uses 300 ohm twin flat leads If you are using a different antenna like a roof antenna that also has 300 ohm twin flat leads follow the directions below but skip the first step 2...

Page 12: ...and UHF Antennas If you have two separate antennas for your TV VCR one VHF and one UHF you must combine the two wires into one in order to connect the TV VCR This procedure requires a combiner attachment You ll find the type of combiner you need at an electronics store Push the stem of the VHF rod antenna if applicable unto the antenna mount at the top of the rear panel 3 Plug the comblner into th...

Page 13: ...ou don t need a cable box converter for basic cable channels Cable with a Converter Box If your cable company scrambles some channels and requires you to use a converter box for only those channels use these instructions to connect cable to your TV You will need the following pieces of equipment l A 2 way splitter l An RF A B switch l Four lengths of coaxial cable You can find these accessories at...

Page 14: ... of the converter box usually channel 3 or 4 Installing Batteries in the Remote Control 1 Open the battery compartment by pressing down on the back cover s tab then sliding it off 2 Install two AAA size batteries included with your TV VCR Make sure to match the and ends of the batteries with the diagram inside the compartment 3 Replace the cover Remove the batteries and store them in a cool dry pl...

Page 15: ...lso activate the on screen displays manually by using the remote control 1 With the power on press DISPLAY The on screen display items appear on the screen If you have a video tape in the TV VCR the display includes the status of this tape Stop Play etc 2 Press DlSPLAY again while the display items are still on the TV VCR screen to display the time counter 3 Press DISPLAY again to display the coun...

Page 16: ...don t press any buttons on the remote Selecting the On Screen Language You can choose to have your menus and displays read in English Spanish or French With the main menu on the screen press CH until Setup is high lighted Press VOL 2 You will see the Setup menu Press CH until Language is highlighted Press VOL or VOL button to Select the on screen language you want For information on viewing the ma...

Page 17: ... r a m m i n g t h e C h a n n e l s Storing Channels in Memory Your TV VCR can automatically memorize all the channels you receive Once these channels are in memory you can use the CH and buttons to select the channels eliminating the need to enter individual channel digits with the number buttons 1 For information on viewing the main menu see page 3 2 With the menu on the screen press CH until S...

Page 18: ... air when you start programming Likewise an unavailable channel may be included in channel memory if there is noise or stray signals on that channel during programming For information about adding and erasing channels from memory see below Adding and Erasing Channels in Memory You can manually add a channel to memory or erase one from memory To add a channel to memory or erase a channel from memor...

Page 19: ...e the number buttons to select the channel Setting the Clock and Calendar If you plan to record television programs while you re away or if you want to use the sleep timer on the TV VCR you must first set the built in clock and calendar For information on viewing the main menu see page 3 2 With the main menu on the screen press CH until Time Set is highlighted Press VOL 2 The Time Set menu will ap...

Page 20: ...blink Press CH or CH to set the current year The day of the week will be set automatcally 7 Press MENU to lock in the time and date and to return to the first menu Press MENU again to remove the main menu from the screen and return to normal viewing 3 6 C H A P T E R TH R E E TV OP E R A T I O N If you make a mistake while setting the clock and calendar press VOL to move back to the incorrect item...

Page 21: ... memory and how to switch back to the standard settings Customizing Picture Settings Press VOL 1 With the main menu on the screen press CH or C H until Video is highlighted The Video menu appears on the screen 3 Press VOL or VOL to change the setting you have chosen For information on viewing the main menu see page 3 2 continued C HAPTER THREE TV OPERATION 3 7 2 Press CH or CH t o select contrast ...

Page 22: ...ther picture setting or press MENU to exit the video menu Using Standard Picture Settings You can switch from your customized picture settings to the standard settings 1 With the power on press P STD The word Custom appear8 for a moment in the upper left corner of the screen indicating that the current picture settings are customized and stored in memory 2 Press P STD again before the word Custom ...

Page 23: ...V VCR remains on before turning off automatically This is especially convenient if you like to fall asleep with the television on Press VOL 1 With the main menu on the screen press CH or C H until Setup is highlighted 2 Press CH until Sleep is highlighted Press VOL or VOL to set the length of time you want the TV VCR to remain on Your timer choices are 10 20 30 60 90 120 240 or 360 minutes 3 Press...

Page 24: ...u want the set to turn on Press VOL 4 Press CH or CH to highlight Timer Press VOL to turn the timer on For information on viewing the main menu see page 3 2 If you want to set the Off Timer select Off Time in this step and set the hour when you want the TV VCR to turn off If you are setting the Off Timer set the minute when you want the TV VCR to turn off 5 Press MENU twice to return to normal vie...

Page 25: ... tapes labeled VHS European PAL VHS video tapes and S VHS pre recorded tapes aren t compatible with this unit Choose brand name high quality tapes for best results If the power is off when you insert a tape the TV VCR turns on automatically If the safety tab of your video tape has been removed the tape begins to play automatically You don t have to press PLAY For more information on the safety tab...

Page 26: ...ing press P STILL when you want to interrupt play The tape pauses temporarily 2 Press PLAY to resume playing the tape For information on inserting a video tape see page 4 1 For information on automatic tracking see page 4 3 For information on the time counter see page 4 4 The TV VCR does not play sound while a video tape is paused See Using Automatic Tracking on the next page If the tape is still ...

Page 27: ...ng Automatic tracking adjusts a video tape s tracking automatically in just a few seconds 1 1 Insert and play a video cassette tape As soon as the tape begins to play the TV VCR begins automatic tracking 2 If automatic tracking doesn t remove the streaks from the picture press and hold the TRK or TRK button until the streaks disappear For information on inserting and playing a tape see pages 4 1 a...

Page 28: ...The time counter appears in the upper left corner of the screen 2 Press CLEAR to set the counter to 00 00 00 3 Press DISPLAY twice again to remove the time counter from the screen For information on inserting and playing tapes see pages 4 1 and 4 2 The counter displays time only for recorded sections of tape Blank tapes or blank sections of tapes do not affect the counter display The TV VCR automa...

Page 29: ...ape To mark the scene 2 Press CLEAR to reset the timer to 00 00 00 For information on inserting and playing a tape see pages 4 1 and 4 2 3 Press DISPLAY again to enter the scene into memory continued If you want to remove the time counter memory from the screen and cancel the memory stop feature just press DISPLAY again C HAPTER FO U R VCR OPERATION 4 5 1 While playing a tape when you reach the sc...

Page 30: ...on until the time counter and the letter M are both on the screen Recording TV Programs As You Watch Recording With your TV VCR turned on and with a tape in the unit press SPEED The tape speed appears in the upper left corner of the screen For information on inserting a video tape see page 4 1 Be sure the record safety tab is in place For information on the record safety tab see page A 2 SP Standa...

Page 31: ...inates and the TV VCR begins recording Press STOP at any time to stop recording We don t recommend changing tape speeds while a recording is in progress Doing so may cause distortion of the picture during playback When you re finished recording rewind the tape to the beginning and remove it from the TV VCR to protect the tape Editing While Recording You can edit while recording selecting only thos...

Page 32: ...ording OTR lets you record television programs with the touch of a button You can even program the length of time up to four hours that you want to record 1 lnsert a video cassette tape Set the tape speed and select the channel you want to record For information see Recording Programs As You Watch on page 4 6 The TV VCR won t record on a video cassette tape if the record safety tab on the tape has...

Page 33: ...timer for unattended recording of up to eight different TV programs The timer can turn on the TV VCR at the time you select record for a selected length of time and then turn off the TV VCR all without you being there You can also choose to record a program one time daily every day Monday through Friday or weekly the same day every week For information on viewing the main menu see page 3 2 The clo...

Page 34: ...CT The type of programming you choose will be displayed in the first line of the on screen display m the example to follow One Time Program has been chosen The instructions for using the feature are the same regardless of which type of programming you have chosen The TV VCR assigns a program number 1 8 to your entry This number which appears to the right of the channel is used in the pro gram revi...

Page 35: ...recording 6 Press VOL The ending minute will blink Use CH or CH to select the minute when you want to end recording Press VOL to lock in the minute Press C H t o hlghlight Start date 7 Press VOL The month will blink Use C H or CH t o select the month when you went to begin recording Press VOL The date will blink Use CH o r CH to select the date when you want to begin recording continued The TV VCR...

Page 36: ...e front panel of the TV VCR illuminates when program times have been stored The TV VCR should be turned off to record the programs you ve chosen IMPORTANT l The TV VCR should be off to record the programs you ve chosen But if you are recording a channel that comes through a cable box be sure to leave the cable box turned on and tuned to the channel you want to record l When a timer recording is in...

Page 37: ...view Press VOL For information on viewing the main menu and the timer record menu see pages 3 2 and 4 9 respec tively Program Review IS only available if you have programmed your TV VCR to record at a later time For information on recording at a later time see page 4 9 If you re recording through a cable box the Program Review screen displays the output channel of the cable box as the channel numb...

Page 38: ...special features C h a p t e r F i v e ...

Page 39: ...o re record a video tape Viewing the Demonstration Mode The demonstration mode displays all on screen menus and programmable features 1 With the main menu on the screen press CH until VCR Setup is highlighted Press VOL 3 Press VOL 4 For information on viewing the main menu see page 3 2 Press MENU to exit the demonstration mode and return to normal viewing 2 press C H until Demonstration is highlig...

Page 40: ...e tape until it reaches a the end of the tape Then the TV VCR will stop the tape rewind it to the beginning and begin playing again 4 Press STOP to end the repeat For information on viewing the main menu see page 3 2 For information on viewing the VCR setup menu see page 5 1 For information on inserting and playing a tape see pages 4 1 and 4 2 If the TV VCR reaches an unrecorded section of tape be...

Page 41: ...d the tape to beginning of the block and repeat it For information on viewing the menu see page 3 2 For information on viewing the VCR setup menu see page 5 1 You can choose to have your block repeat from one to ten times or endlessly For information on inserting and playing a tape see pages 4 1 and 4 2 The word Repeat will appear on the screen To stop block repeat press the STOP P STILL or POWER ...

Page 42: ...h use CH CH or VOL to change the channel or held Then press MENU to return to normal viewing For information on viewing the main menu see page 3 2 Misspellings and unusual characters sometimes occur in closed caption transmissions especially those of live events There may be a small delay before captions appear when you change channels Captions usually appear at the bottom of the screen and they o...

Page 43: ...F ADV SKIP repeatedly to move forward frame by frame Do not hold the button down Press PLAY to resume normal playback Skip Search Skip search allows you to quickly search through a short section of tape While a tape is playing press F ADV SKIP The TV VCR will fast forward through the tape for 60 seconds then continue playing If you press F ADV SKIP twice the TV VCR will fast forward through the ta...

Page 44: ...s with connectors You can find these at most electronics supply stores We recommend that you play the pre recorded tape in the separate VCR or camcorder and record on your TV VCR Making the Connections Option Attach one end of the first cable to the VIDEO OUT connector of the playback VCR or camcorder and the other end to the VIDEO IN connector of the TV VCR For models CXE1331 CXE1931 CXD2512 and ...

Page 45: ...tape you want to copy into the playback VCR or camcorder Important Warning One Federal Court has held that unauthorized recording of copyrighted TV programs may be an infringement of copyright laws The TV VCR will be recording from the incoming line rather than from the normal broadcast signal Line in will remain on screen until the PLAY button is pressed on the playback VCR CH APTER FIVE SPECIAL ...

Page 46: ...SPECIAL FEATURES When you are finished press STOP on both the VCR or camcorder and the TV VCR to stop recording Press LINE IN to return to normal TV viewing 5 8 CHAPTER FIVE SPECIAL FEATURES ...

Page 47: ...ntifying VCR Problems Problem Unit won t turn on Unit won t take video tape Unit didn t record a program Unit didn t record a timer program There is no picture the picture is distorted during video tape playback or there is noise or streaks in the picture Possible Solution Make sure the unit is plugged into a working wall outlet Press the POWER button Make sure the tape is window side up with the ...

Page 48: ... during pause mode Make sure the VCR is not in pause mode Make sure the tape hasn t already been rewound Make sure the VCR is not in pause mode Make sure the tape hasn t already been forwarded This is normal for SP and LP recordings Getting Help If you have a problem you can t solve by yourself just call our toll free help number and our experts will be glad to help you 1 800 SAMSUNG l 800 726 786...

Page 49: ...a memoria localización de la escena STOP FF o REW cuando la cinta está parada Uso repetición real POWER introducción cinta MENU CH CHI CHI CHI VOL VOL MENU MENU PLAY Uso repetición de bloque POWER introducción cinta MENU CHI CHI CHI CHI VOL CHI VOL repetidas veces MENU MENU PLAY REPEAT al inicio de1 bloque REPEAT al final del bloque Grabación Grabación POWER introducción cinta SPEED seleccionar ca...

Page 50: ...s Visualización en pantalla POWER DISPLAY Visualización de menú principal POWER MENU Visualización menú VCR POWER MENU CHI CHI CHI CHI VOL Programación Selección de serial POWER MENU CHI CHI CHI VOL VOL Almacenamiento canales POWER MENU CHI CHI CHI VOL CHI VOL Añadir y suprimir canales POWER seleccionar canal MENU CHI CHI CHI VOL CHI CHI VOL Ajuste de1 reloj POWER MENU CHI VOL VOL CHI o CHA VOL CH...

Page 51: ...ación de capturas Fin de capturas POWER CAPTION CHI CHI CHI CAPTION CAPTION CHI CHI VOL VOL Selección de un idioma de menú POWER MENU CHI CHI CHI VOL CHI CHI CHI CHI VOL repetidas veces Encendido de1 temporizador POWER MENU CHI VOL CHI VOL CHI o CHA VOL CHI o CHA VOL CHI CHI VOL Apagado de1 temporizador POWER MENU CHI VOL CHI CHI VOL CHI o CHA VOL CHI o CHA VOL CHI VOL SP A N I S H Q U I C K R E F...

Page 52: ...A p p e n d i x ...

Page 53: ...eo Heads l Obtain a head cleaning tape from your local video dealer to clean dirt that accumulates on the video heads l Be sure to follow instructions that come with the cleaning tape as excessive use of a cleaning tape can shorten head life Temperature l If your TV VCR is suddenly moved from a cold to a warm place unplug the power cord and allow at least two hours for moisture that may have forme...

Page 54: ...that prevents accidental erasure The safety tab is on the end of the tape opposite from where the arrow points The tab must be intact to record You can record over and over on the same tape as long as the tab is intact If you want to protect a tape from accidental erasure break off the tab with a screwdriver as shown here If you wish to erase a recorded tape or to record on a cassette with the tab...

Page 55: ...l 2 inch 33 35 mm s 1 31 in s 16 67 mm s 0 66 in s 11 12 mm s 0 43 in s 480 min with T 160 used in SLP mode Less than 3 min with T 120 Video 2 rotary heads 4 rotary heads CXD1334 1934 2514 Audio Control 1 stationary head Erase 1 full track erase 1 audio track erase VIDEO IN jack RCA 1 OVp p 75 ohm unbalanced better than 43dB Color Monochrome more than 220 lines VIDEO IN lack RCA 8dBm 50K ohm unbal...

Page 56: ...I n d e x ...

Page 57: ... 5 6 Contrast 3 7 converter box 2 3 copyright laws 5 7 Custom 3 8 customizing picture settings 3 7 D date 3 6 Dally Program 4 10 dally recording 4 9 12 demonstration mode 5 1 DISPLAY 1 4 4 4 5 display on screen 4 10 11 dubbing 5 6 8 E earphone 1 2 editing while recording 4 7 EJECT 1 4 ejecting a video cassette tape 4 1 4 4 English 3 2 Enter 3 2 entering the date 3 6 entering the time 3 5 6 Erase 3...

Page 58: ...ide back cover setting the clock and cal endar 3 5 setting the time counter 4 4 setting the sleep timer 3 9 Setup 3 2 Sharpness 3 7 signal source 3 3 skip search 5 5 Sleep 3 9 sleep timer 3 9 SLOW 1 4 5 5 6 Slow Motion 5 5 SLP 4 7 A 2 SP 46 7 A 2 Spanish 3 2 7 l 2 Spanish quick reference guide 7 1 special features 5 1 specifications A 3 SPEED 1 4 4 6 7 splitter 2 3 Standard 3 8 9 standard play 4 6...

Page 59: ...ales receipt is the only acceptable proof of purchase It must be presented to the authorized service center at the time the service is requested Exclusions This warranty does not cover damage due to accident fire flood and or other acts of God incorrect line voltage improper installation improper or unauthorized repairs commercial use or damage which occurs in shipping Exterior and interior finish...

Page 60: ...memo ...

Page 61: ...memo ...

Page 62: ...memo ...

Page 63: ......

Page 64: ......

Reviews: