background image

27

GB

Cooking Guide

GRILL

The grill-heating element is located underneath the ceiling of the cavity. It
operates while the door is closed and the turntable is rotating. The turntable’s
rotation makes the food brown more evenly. Preheating the grill for 4 minutes will
make the food brown more quickly.
Cookware for grilling:
Should be flameproof and may include metal. Do not use any type of plastic
cookware, as it can melt.
Food suitable for grilling:
Chops, sausages, steaks, hamburgers, bacon and gammon rashers, thin fish
portions, sandwiches and all kinds of toast with toppings.
IMPORTANT REMARK:
Whenever the grill only mode is used, make sure that the grill-heating element is
under the ceiling in the horizontal position and not on the back-wall in the vertical
position. Please remember that food must be placed on the high rack, unless
another instruction is recommended.

MIC GRILL

This cooking mode combines the radiant heat that is coming from the grill with the
speed of microwave cooking. It operates only while the door is closed and the
turntable is rotating. Due to the rotation of the turntable, the food browns evenly.
Three combination modes are available with this model:
600 W + Grill, 450 W + Grill and 300 W + Grill.
Cookware for cooking with mic grill
lease use cookware that microwaves can pass through. Cookware should be
flameproof. Do not use metal cookware with combination mode. Do not use any
type of plastic cookware, as it can melt.
Food suitable for mic grill cooking:
Food suitable for combination mode cooking include all kinds of cooked food
which need reheating and browning (e.g. baked pasta), as well as foods which
require a short cooking time to brown the top of the food. Also, this mode can be
used for thick food portions that benefit from a browned and crispy top (e.g.
chicken pieces, turning them over half way through cooking). Please refer to the
grill table for further details.

IMPORTANT REMARK:
Whenever the combination mode (mic grill) is used, make sure that the
grill heating element is under the ceiling in the horizontal position and not on the
back-wall in the vertical position. The food should be placed on the high rack,
unless another instruction is recommended. Otherwise it has to be placed directly
on the turntable. Please refer to the instructions in the following chart.
The food must be turned over, if it is to be browned on both sides.

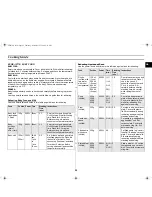
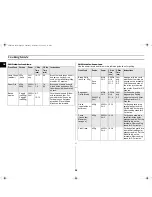
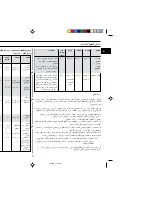
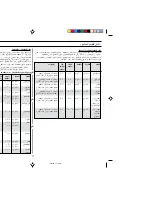
Grill Guide for fresh food

Preheat the grill with the grill-function for 4 minutes.
Use the power levels and times in this table as guide lines for grilling.

Fresh Food

Portion

Power 1. Side

Time
(min)

2. Side
Time
(min)

Instructions

Toast Slices 4pcs

(each25g)

Grill
only

3½-4½

3-4

Put the toast slices side by side
on the rack.

Bread Rolls
(already
baked)

2-4 pieces Grill

only

2½-3½

1½-2½

Put bread rolls first with the
bottom side up in a circle
directly on the turntable.

Grilled
Tomatoes

200g
(2pcs)
400g
(4pcs)

300W
+ Grill

3½-4½

5-6

-

Cut tomatoes into halves. Put
some cheese on top. Arrange
in a circle in a flat glass pyrex
dish. Place it on the rack.

Tomato-
Cheese
Toast

4 pcs
(300g)

300W
+ Grill

4-5

-

Toast the breas slices first. Put
the toast with topping on the
rack. Stand for 2-3 minutes.

Toast
Hawaii
(pineapple,
ham, cheese
slices)

2 pcs
(300g)
4 pcs
(600g)

450W
+ Grill

3½-4½

6-7

-

Toast the bread slices first. Put
the toast with topping on the
rack. Put 2 toasts opposite
directly on the rack. Stand for
2-3 minutes.

Baked
Potatoes

250g
500g

600W
+ Grill

4½-5½
6½-7½

-

Cut potatoes into halves. Put
them in a circle on the rack with
the cut side to the grill.

Gratin
Potatoes/
vegetables
(chilled)

500g

450W
+ Grill

9-11

-

Put the fresh gratin into a small
glass Grill pyrex dish. Put the
dish on the rack. After cooking
stand for 2-3 minutes.

Chicken
Pieces

450g
(2pcs)
650g
(2-3pcs)
850g
(4pcs)

300W
+ Grill

7-8

9-10

11-12

7-8

8-9

9-10

Brush chicken pieces with oil
and spices. Put them in a circle
with the bones to the middle.
Put one chicken piece not into
the centre of the rack. Stand for
2-3 minutes.

Roast
Chicken

900g
1100g

450W
+ Grill

10-12
12-14

9-11
11-13

Brush chicken with oil and
spices. Put chicken first breast
side down, second side breast
side up directly on turntable.
Stand for 5 minutes after
grilling.

CE2974-GB.fm Page 27 Thursday, November 21, 2002 5:21 PM

Summary of Contents for CE2974N

Page 1: ...t Reheat Cook Feature CE2914N CE2914NT 13 Instant Reheat Cook Setting CE2914N CE2914NT 13 Using the Auto Defrost Feature CE2974N CE2974NT 13 Auto Defrost Settings CE2974N CE2974NT 14 Manual Defrosting...

Page 2: ...oking starts The oven beeps four times when cooking is over 1 Place the frozen food in the oven Turn the Cooking Control knob to Manual Cook symbol 2 Select the type of food by press the Auto button o...

Page 3: ...WER CONTROL knob to defrost symbol 2 Turn the TIMER knob to select the appropriate time Leave the food in the oven Turn the TIMER knob to desired time 1 Turn the COOKING POWER CONTROL knob to Grill sy...

Page 4: ...FEATURE SELECTION 6 POWER LEVEL SETTING 7 COMBI MODE SELECTION 8 GRILL MODE SELECTION 9 CLOCK SETTING 10 TURNTABLE ON OFF 11 STOP CANCEL BUTTON 12 START BUTTON DIAL KNOB cook time weight and serving s...

Page 5: ...urfaces Ensure that the door and door sealing surfaces are kept clean by wiping after use first with a damp cloth and then with a soft dry cloth c Do not operate the oven if it is damaged until it has...

Page 6: ...self if the container is too hot A risk of delayed eruptive boiling exists To prevent delayed boiling and possible scalding you should put a plastic spoon or glass stick into the beverages and stir be...

Page 7: ...lt clock The time can be displayed in either the 24 hour or 12 hour notation You must set the clock When you first install your microwave oven After a power failure Do not forget to reset the clock wh...

Page 8: ...manual cook Model CE2914N CE2914NT Turn the cooking control knob to manual cook The oven must be plugged into an appropriate wall socket The turntable must be in position in the oven If a power level...

Page 9: ...o solve this problem install the oven away from televisions radios and aerials If interference is detected by the oven s microprocessor the display may be reset To solve this problem disconnect the po...

Page 10: ...g COOKING POWER CONTROL knob MAXIMUM POWER 900 W 2 Set the time by turning TIMER knob Result The oven light comes on and the turntable starts rotating Power Level Output CE2974N CE2974NT CE2914N CE291...

Page 11: ...N CE2914NT 1 To stop Timerarily Open the door Result Cooking stops To resume cooking close the door and press again 2 To stop completely Press the button Result The cooking stops If you wish to cancel...

Page 12: ...150 ml 1 cup 300 ml 2 cups 450 ml 3 cups 600 ml 4 cups 1 2 mins Pour into a ceramic cup and reheat uncovered Place 1 cup in the centre 2 opposite of each other and 3 or 4 in a circle Stir carefully b...

Page 13: ...g reheating function with a power level of 180W Refer to the section entitled Cooking Reheating on page 9 for further details 1 Turn the COOKING POWER CONTROL knob to Max Power 2 Turn the TIMER knob t...

Page 14: ...tion 1 Meat 0 2 2kg 20 60mins Shield the edges with aluminium foil Turn the meat over when the oven beeps This programme is suitable for beef lamb pork steaks chops minced meat 2 Poultry 0 2 2kg 20 60...

Page 15: ...The end reminder signal will beep 3 times once every minute 3 The current time is displayed again Code Symbol Serving Type Portion Standing Time Recommendations d 1 Ready meal Chilled 2x300 350g 2x400...

Page 16: ...heat crusty plate Put the frozen pizza on the crusty plate Put crusty plate on the rack Mini Pizza chilled 100 150g 200 250g 600W Grill 5min 3 3 min 4 4 min Preheat crusty plate Put the chilled pizza...

Page 17: ...towels etc For further details on suitable cookware and utensils refer to the Cookware Guide on page 22 To set the heating element to the Then Horizontal position grill or combined microwave grill Pu...

Page 18: ...pressing the button and set the preheat time by turning the dial knob 3 Press the button 4 Open the door and place the food on the rack 5 Press the button Result The follwing indications are displaye...

Page 19: ...3 Turn the Cooking Control knob to Manual Cook symbol 4 Press the Combi button Result Select the appropriate power level by pressing the Combi button again until the corresponding power level is disp...

Page 20: ...t The following indication is displayed The oven does not beep each time you press a button or cooking ends 2 To switch the beeper back on press the and buttons again at the same time Result The follo...

Page 21: ...ou turn the dish by hand halfway through the cooking process Warning Never operate the oven without local when turntable button is off Result This condition may cath fire and extre damage the oven Mod...

Page 22: ...tyrene cups containers Paper bags or newspaper Recycled paper or metal trims Can be used to warm food Overheating may cause the polystyrene to melt May catch fire May cause arcing Glassware Oven to ta...

Page 23: ...itable glass pyrex bowl with lid Cook covered for the minimum time see table Continue cooking to get the result you prefer Stir twice during cooking and once after cooking Add salt herbs or butter aft...

Page 24: ...is preferable to underestimate cooking time and add extra heating time if necessary Heating and standing times When reheating food for the first time it is helpful to make a note of the time taken for...

Page 25: ...tem perature carefully Baby milk 100ml 200ml 300W 30 40 sec 1 min to 1 min 10 sec 2 3 Stir or shake well and pour into a sterilised glass bottle Place into the centre of turntable Cook uncovered Shake...

Page 26: ...50g 900 W 3 4 5 6 2 3 Pour into two deep ceramic plates and cover Put one plate directly on the turntable other on the rack Stir well after reheating Stir again before serving Chicken Curry Rice chill...

Page 27: ...grill heating element is under the ceiling in the horizontal position and not on the back wall in the vertical position The food should be placed on the high rack unless another instruction is recomme...

Page 28: ...uctions Bread Rolls each ca 50 g 2 pcs 4 pcs MW Grill 300W Grill 1 2 2 3 Grill only 2 3 2 3 Arrange rolls in a circle with the bottom side up directly on the turntable Grill the second side of the rol...

Page 29: ...ass pyrex bowl with lid Cook covered for 6 to 7 minutes using 900 W Stir several times well during cooking BROWNING ALMOND SLICES Spread 30 g sliced almonds evenly on a medium sized ceramic plate Stir...

Page 30: ...ree place Reason Dust and damp may adversely affect the working parts in the oven This microwave oven is not intended for commercial use Technical Specifications SAMSUNG strives to improve its product...

Page 31: ...M U dHK U b VK v X W U w dH b UO d6 s UO f U8 d d8Q qB d dA bF U b6K e R dH kH U G s UO U U U U UJ d U 8 U G d u R b8 W e _ w WKJA b v WK UF dH w dJ U d d rLB dO c n U W T dJ U n uA W wFL a D WOF T P...

Page 32: ...D UM 5 d l u s dH U qO vK t e w W V UM U s r dO U d n UDG f dJ s d bO UN b6 U WIO8 b UN6 d d b v UNKI a D UM d U U dOGB v d U uK UDG U WODG q 8 ozU8 b dE V u K u e dJ U m Z M ULOKF UF d KOK VOK d bO t...

Page 33: ...K uA bF b dE W ozU8 pL d q UJ pL D uA d uA W e U X dDF UA W u U M pL l q d VM v q c v d vK U UH W UH W UH VI U uA W e U VO d v d dA iF l uK s z 5 UH U UH l W UH vK s D s l vK U d dO vK s B l fO b WOMO...

Page 34: ...c U b6 U u UC U s b t dJ U U w w bF U b6 UF u b6 wFL a D WOF c b8 t wJO U s S u V UM UFD u lOL u wFL a D WOF u D WLF _ s w W 56 U v U dODH q dOL u WLF _ V U v uKD dOB8 b a DK W sJ1 UL UFD s UOKF D dO...

Page 35: ...G s U b d ZK W s W UM U n L UFD l K8 UD b o w b dl ZK W UM t qzU b q wK UN d d VK8 UJ b8 vK W ZCM t s b Q K U UO UFD h L rFD s WFD8 WFD8 dGl X l d U UN pMJ1 W b W8U8 u s WO bF uOM ZK W UM W U b D X l...

Page 36: ...t 56 d d t d bI q 8 d d e s l w d l w d oLF UDG tOD d wJO U UO 56 UM d d t d UE q 8 bI dODH d dODH l w O U q WBKB U s WO zUBF WBKB U d e s l vK iO w U UDG UNOD D dJ ULK d n q 8 UN bI dODH d dODH l u...

Page 37: ...J d WKN UN r K WKl q r a D u 56 q 8 U nOH dOGB lDI 56 U sJ1 j d U M W8U b6 U UNMO6 U pMJ1 WLF _ iF s b UNCF ULMO U8U b6 U UNMO6 U v U qC _ s U qO b b l UFD W U w iH6M oO8 UOL dODH s lD8 U qO vK b d K8...

Page 38: ...U U s U d WIFK d KOK n WK dOGl UF U U s uH d w IFK d KOK n dC dOGl UF U U s dC d WIFK d KOK n e W dOGl UF U U s U e WK dC d WIFK d KOK n e W dOGl UF U U s uK wMOB b6 s U UM U dO U f U dOGl UF WIFK qJ...

Page 39: ...O UF WOJO WOMO U OI WOJO d U UH UN b6 pMJ1 u W bM W UM c UFD W b s b s U U6 UFD s rKOH W d6 dHK UO e WOKG K WK U8 X U UN b6 b b s b dHK UC uN uA VI W U bM W d U UH UN b6 pMJ1 u W UFD d lM u W8U IOI UF...

Page 40: ...U d vK jG W O M dF U bM R w U d b WOMOB b dK b v u b WOMOB d vK jG d d W O M b WOMOB b b d U Model CE2974N CE2974NT vK jGC a D WOKL UM b WOMOB b W LK qOGA bM vK jG W O M b WOMOB vK jGC lD r b b WOMOB...

Page 41: ...vN dK UHB D v u d d vK jG u fH w d X8 d W O M dF R w U d UHl oKDM d dH s d u fH w vK jG X8 W O M dF R w U d u UO pMJ1 dH j WHO fH w vK jG dH UG u d X8 d W O M wG M UL dH qOGA pMJ1 4NT j U X8 vK jG HB...

Page 42: ...wFL a D vK jG W O M u d vK jGC U V UM W8UD d wFL a D d dF v u d w W8UD UO b U j sJ1 d W uA w W j b a D X8 d UL WIK d b vB8 WIO8 a DK X8 v K jG W O M UN bM wFL a D U dH b U bM UHB oKDM d l dH s UHB oKD...

Page 43: ...U d j d s a D X8 b o d vB8 uA K X8 WIO8 W v K jG W O M bM uA U dH b U UN bM W UHB oKDM d l dH s UHB oKDM d U W UNM v d WIO8 q dF u d w U X8 WO U Model CE2974N CE2974NT 6 uA s W w rJ WIK b R WIK d U l...

Page 44: ...zU ozU U s B s lD u W ozU UI dOL K d UF WIFK0 s B lD dOGV e s l X vK pL l UV dz qJA s B K bF UN nB bF lD WIO lD ozU d ozU ozU U s B s d u W ozU UI dOL K UF WIFK s B dOGV e s l X vK U b bV s B s B l d...

Page 45: ...dOL D wC b VM WOJO UI K b s B s UFD qI bM UN b dOL s V lDI q dOL s V vK UFD l dOL s V vK w lC WOMOV b dH wC dOL s V lC d wC dOL s V l b WOMOB w bF dJ U dC wC n d a D X u V UM W UD u b l u WO U W HB w...

Page 46: ...U j a D W8U j a D W8U j a D W8U j a D W8U j v WIK u UO V UM X8 W O M ZK W S dH b U bM b6 dJ ULK WO U _ w jI n u l s 5 b WOMOB b WOMOB WIK UFD d vK jG W O M bM bM M M F b6 a D WHO d b6 ULz d b6 Lz w bF...

Page 47: ...c UFD uM tM ZK W b b l u u e WK UI W HB w qOlUH s b b UFD d d vK jG ZzU M ZK W S dH b U bM UHB oKDM ZK W UM dH s U UFD VOKI v d vK jG d ZK W UN b WK W pMJ1 d c q s UC U a D WHO dJ U U u vK 56 U n W8UD...

Page 48: ...N qHKH q q d vK UNF uK qHK K 5 FD8 d lH qH _ v UN D t K8 UHB D bM UN lD8 lD8 ozU8 e U q UJ pL X n dDF UA _ W u q d dD8 vK UJL l K8 UHB oKDM U U t A 2 A 3 WIK WIK dA U b6 ULK WO U _ w dA U d KOK WBKl U...

Page 49: ...HB w b l v K jG W O M a D UN bM a D U dH b U bM UHB oKDM d l dH s UHB oKDM d U W UNM v d WIO8 q dF u d w U X8 WO U b6 dJ ULK WO U _ w jI n 8 U d K O K d 8 N u K O V u U U O K K d u 5 O K K d u O K K d...

Page 50: ...jG a D WOF STOP d UI d Model CE2974N CE2974NT UG pMJ1 vK jGC U qOGA U b q 8 j C UOF R a D UI U 8 U W O M u U bM a D s dH n8 uFK v U oK a D U U9 a D UI WIK v 0 Model CE2914N CE2914NT Model CE2974N CE2...

Page 51: ...UC U bM dH b WOMOB b b d U Model CE2914N CE2914NT dJ U d qGA dH bM n tH u dOOG pMJ1 b a D UM W8UD WIK d WIO8 v u u l8 w ozU8 u u l8 w ozU8 u u l8 w w U 5 U u w U j u j u iH6M j ZK W iH6M u W wFL wFL w...

Page 52: ...u V UM W8UD dA b dH UM WF8 uI dH q W dNJ wzU d l UI b6 q WO bF t d q u X dH q d w bF U W d q uOM W8U8 d8 WO b s W b dH R dH eN w q b b v d u eHK u eN w qOK8 q b b b8 eHK d u dH qOGA UM u wFO d c WKJA...

Page 53: ...UFD hzUB WOLJ W U J u U W d W _ d UF WO dE a _ d s UFD j d o u v a D dL d dH s UFD X u WO UOI a D U8 u UHl w W a D d s b c p U ULOKF w p c _ c U ULC U8 U qJA UFD a u s j u d W tK UFD vK jG d UL WIK b...

Page 54: ...t W U w vI dH U qJA d UO d6 v UO f U8 q WOB6A W q s u fO U d X e _ pK U qlu b U w l Ul q 8 s tK b s b UN cN UO pK w d qO R wM t U b dD VM q s tO q d dJ U d V U UJ w n d8 UJ q j d s V W b UN bOKI d s...

Page 55: ...d U u _U U WOJO UO _ dJ U d b6 nOH n U _ dH U o U b dNJ UO vK jG UI wzU b UO d6 s UO f U8 d dO W UM c u 56 bM qz UH WLF _ d u UFD X8 U qLF s dH UI bF q8_ vK WO U b ULz UE _ W d d W U bM tMO6 UM UFD d...

Page 56: ...I D d vK d d b6 pMJ1 uA U a D w w bF W wFL a D CE2974NT CE2914NT l W HB bN UFD dOL w dOL U U s B b6 w qC _ dH 5 wFL a D WOF uA dODH dOL V UM s B c W e O 5 dJ U d qGA F U WIK b n b WOMOB d c l w qAH q...

Page 57: ...l CE2914N CE2914NT bO a D UO 56 U UO u wJO U a D UO u wJO U e a D UO UO WHO ZK W u WOJO U u j W8UD UO wFL a D WOF UO uA WOF W W U j b WOMOB UI qOGA UG UI UG UI WIK qOGA u a D X8 U _ b W bI a D j WIK Z...

Page 58: ...K u UO V UM X8 dH w UFD l WIK u v uKD X8 w rJ WIK u uA e W WIK u UO V UM X8 Model CE2914N CE2914NT Model CE2974N CE2974NT F U WIK uA dF qHIK U _ U wK b uC qHIK U _ U wK b uC Model CE2914N CE2914NT U8U...

Page 59: ...IK WIK WIK d UL b vK jG W O M a D U dH b U bM UHB oKDM dH s d l UN bM a D Model CE2974N CE2974NT d H w UFD vK jG 30s d WO U U b L UFD l dH w b v e vK jGC U UFD u d AUTO d d d b a D X8 d d UL b vK jG w...

Page 60: ...D UI j a D X8 b6 a D 56 U WHO u a D 56 U j u wJO U b6 e U UFD 56 U WHO b6 ZK W WHO u W OJO U T ZK W j WOF u WOJO U NT bO ZK W UFD s W CE2914NT b6 e a D WHO CE2974NT dOL K U s B b6 2914NT dOL K U s B...

Reviews: