background image

English -

SETTING UP YOUR TV

Figures and illustrations in this User Manual are provided for reference only and may differ from actual product appearance. 

Product design and specifications may be changed without notice in order to enhance product performance.

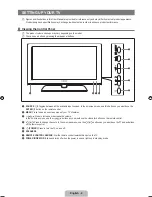
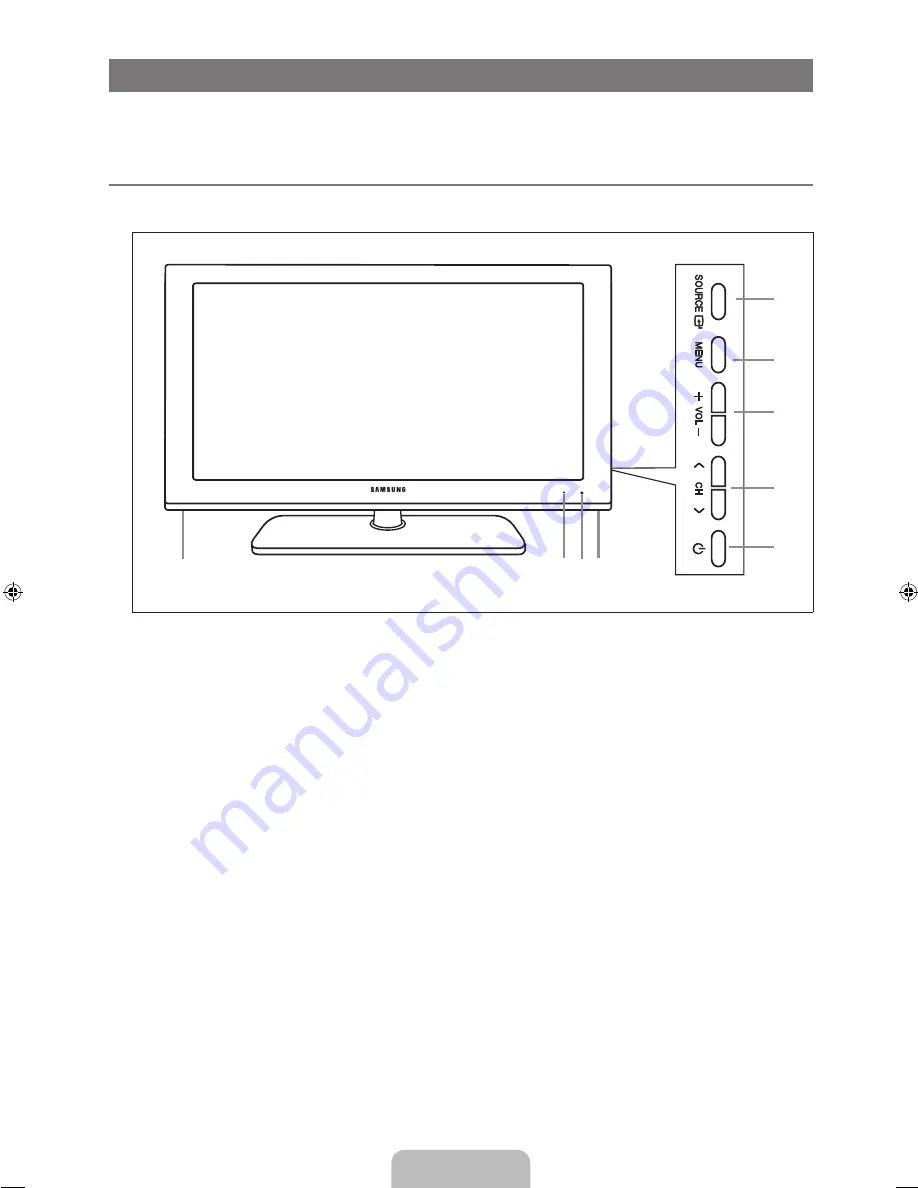
Viewing the Control Panel

The product colour and shape may vary depending on the model.

You can use a button by pressing the side panel buttons.

1

  SOURCE


E

: Toggles between all the available input sources. In the on-screen menu, use this button as you would use the 

ENTER

E

 button on the remote control.

2

  MENU

: Press to see an on-screen menu of your TV’s features.

3


y

: Press to increase or decrease the volume. 

In the on-screen menu, use the 

y

 buttons as you would use the ◄ and ► buttons on the remote control.

4


Z

:


Press to change channels. In the on-screen menu, use the 

Z

 buttons as you would use the ▼ and ▲ buttons 

on the remote control.

5


P

 (POWER)

:


Press to turn the TV on and off.

6

  SPEAKERS

7

  REMOTE CONTROL SENSOR

: Aim the remote control towards this spot on the TV.

8

  POWER INDICATOR

: Blinks and turns off when the power is on and lights up in stand-by mode.

N

¦

N

N

6

8 7 6

1

2

3

4

5

[530]BN68-01983A-00Eng.indb   2

2009-03-17   �� 5:36:21

Summary of Contents for BN68-01983A-00

Page 1: ... my NEW ZEALAND 0800 SAMSUNG 0800 726 786 www samsung com nz PHILIPPINES 1 800 10 SAMSUNG 726 7864 1 800 3 SAMSUNG 726 7864 02 5805777 www samsung com ph SINGAPORE 1800 SAMSUNG 726 7864 www samsung com sg THAILAND 1800 29 3232 02 689 3232 www samsung com th TAIWAN 0800 329 999 www samsung com tw VIETNAM 1 800 588 889 www samsung com vn SOUTH AFRICA 0860 SAMSUNG 726 7864 www samsung com za U A E 80...

Page 2: ...f brightness and contrast of the screen when displaying a still image Watching the LCD TV in 4 3 format for a long period of time may leave traces of borders displayed on the left right and centre of the screen caused by the difference of light emission on the screen Playing a DVD or a game console may cause a similar effect to the screen Damages caused by the above effect are not covered by the W...

Page 3: ...as a Computer PC Display 15 Setting up the TV with your PC 16 SOUND Configuring the Sound Menu 16 Selecting the Sound Mode 17 SETUP Configuring the Setup Menu 18 INPUT Input Menu 20 ANYNET Connecting Anynet Devices 21 Setting Up Anynet 22 Switching between Anynet Devices 22 Recording 23 Troubleshooting for Anynet 24 RECOMMENDATIONS Teletext Feature 25 Installing the Stand 26 Disconnecting the Stan...

Page 4: ...n the on screen menu use this button as you would use the ENTERE button on the remote control 2 MENU Press to see an on screen menu of your TV s features 3 y Press to increase or decrease the volume In the on screen menu use the y buttons as you would use the and buttons on the remote control 4 Z Press to change channels In the on screen menu use the Z buttons as you would use the and buttons on t...

Page 5: ...nding on the model Owner s Instructions Warranty card Safety Guide Registration Cards Please make sure the following items are included with your LCD TV If any items are missing contact your dealer Warranty card Safety Guide Registration Cards Not available in all locations The items colour and shape may vary depending on the model N N N ...

Page 6: ... and the audio cables to the PC DVI AUDIO IN jacks on the back of the TV If this happens contact the company that provided the DVD Blu ray player Cable Box Satellite receiver Set Top Box to confirm the HDMI version then request an upgrade Use the HDMI IN 1 DVI jack for DVI connection to an external device Use a DVI to HDMI cable or DVI HDMI adapter DVI to HDMI for video connection and the PC DVI A...

Page 7: ...rear of your set and the other ends to corresponding audio in connectors on the Amplifier or DVD Home Theatre 8 SERVICE Connector for service only 9 COMPONENT IN 1 2 Connect component video cables optional to component connector PR PB Y on the rear of your set and the other ends to corresponding component video out connectors on the DVD If you wish to connect both the Set Top Box and DVD you shoul...

Page 8: ...e these buttons in the DMA and Anynet modes This remote can be used to control recording on Samsung recorders with the Anynet feature TV Selects the TV mode directly PRE CH Enables you to return to the previous channel you were watching MUTE M Press to temporarily cut off the sound P Press to change channels MENU Displays the main on screen menu HDMI Selects the HDMI mode directly RETURN Returns t...

Page 9: ...on 2 The main menu appears on the screen The menu s left side has icons Picture Sound Channel Setup Input 3 Press the or button to select one of the icons 4 Then press the ENTERE button to access the icon s sub menu 5 Press the or button to select the icon s submenu 6 Press the or button to decrease or increase the value of a particular item The adjustment OSD may differ depending on the selected ...

Page 10: ... the TV for 5 seconds 4 The message Check antenna input is displayed with OK selected Press the ENTERE button Please check that the antenna cable is connected correctly 5 Select the appropriate area by pressing the or button Press the ENTERE button to confirm your choice 6 The Auto Store menu is displayed with the Start selected Press the ENTERE button The channel search will start and end automat...

Page 11: ...mme mode When completing tuning the broadcasting stations in your area have been assigned to position numbers from P00 to P99 You can select a channel by entering the position number in this mode C Air channel mode You can select a channel by entering the assigned number to each air broadcasting station in this mode S Cable channel mode You can select a channel by entering the assigned number for ...

Page 12: ...lowing characters are available Letters of the alphabet A Z Numbers 0 9 Special characters space Fine Tune If the reception is clear you do not have to fine tune the channel as this is done automatically during the search and store operation If the signal is weak or distorted you may have to fine tune the channel manually Fine tuned channels that have been saved are marked with an asterisk on the ...

Page 13: ... the picture Brightness Adjusts the brightness level of the picture Sharpness Adjusts the edge definition of the picture Colour Adjusts colour saturation of the picture Tint G R Adjusts the colour tint of the picture In TV AV1 AV2 modes of the PAL system you cannot use the Tint G R Function When you make changes to Backlight Contrast Brightness Sharpness Colour or Tint G R the OSD will be adjusted...

Page 14: ...lour Space automatically adjusts to the most natural colour tone based on programme sources Native Native Colour Space offers deep and rich colour tone White Balance You can adjust the colour temperature for more natural picture colours R Offset Adjusts the red colour darkness G Offset Adjusts the green colour darkness B Offset Adjusts the blue colour darkness R Gain Adjusts the red colour brightn...

Page 15: ... static image on the set for more than two hours Wide Zoom Move the screen up down using the or button after selecting the by pressing the or ENTERE button Zoom Select by pressing the or button Use the or button to move the picture up and down After selecting use the or button to magnify or reduce the picture size in the vertical direction After selecting Screen Fit in HDMI 1080i 1080p or Componen...

Page 16: ...ay notice that the picture in the PIP window becomes slightly unnatural when you use the main screen to view a game or karaoke PIP Off On You can activate or deactivate the PIP function Source You can select a source of the sub picture Size à À Œ You can select a size of the sub picture If main picture is in HDMI mode Size is available Position à œ You can select a position of the sub picture In D...

Page 17: ...Frequency MHz Sync Polarity H V IBM 640 x 350 31 469 70 086 25 175 720 x 400 31 469 70 087 28 322 MAC 640 x 480 35 000 66 667 30 240 832 x 624 49 726 74 551 57 284 1152 x 870 68 681 75 062 100 000 VESA CVT 720 x 576 35 910 59 950 32 750 1152 x 864 53 783 59 959 81 750 1280 x 720 44 772 59 855 74 500 1280 x 720 56 456 74 777 95 750 1280 x 960 75 231 74 857 130 000 VESA DMT 640 x 480 31 469 59 940 2...

Page 18: ...utton on the remote control Standard Selects the normal sound mode Music Emphasizes music over voices Movie Provides the best sound for movies Clear Voice Emphasizes voice over other sounds Custom Recalls your customized sound settings Equalizer The sound settings can be adjusted to suit your personal preferences Balance L R Adjusts the balance between the right and left speaker 100Hz 300Hz 1KHz 3...

Page 19: ...ings will be limited TV s Internal Speakers Audio Out L R Out to Sound System RF AV Component PC HDMI RF AV Component PC HDMI TV Speaker Sound Output Sound Output External Speaker Mute Sound Output Video No Signal Mute Mute Sound Select Main Sub When the PIP feature is activated you can listen to the sound of the sub PIP picture You can select this option when PIP is set to On Press the TOOLS butt...

Page 20: ...tting you ve chosen set to Activated Repeat Select Once Everyday Mon Fri Mon Sat or Sat Sun Volume Select the desired turn on volume level Programme When the On Timer is active you can turn on a specific channel You can set the hour minute and channel by pressing the number buttons on the remote control Auto Power Off When you set the timer On the television will eventually turn off if no controls...

Page 21: ...vice is connected to TV check if Game Mode is On Set Game Mode to Off and connect external devices If Game Mode is On Picture mode is automatically changed to Standard and cannot be changed Melody Off Low Medium High A melody sound can be set to come on when the TV is powered On or Off The Melody does not play When no sound is output from the TV because the MUTE button has been pressed When no sou...

Page 22: ...STB Satellite STB PVR STB AV Receiver Game Camcorder PC DVI DVI PC TV IPTV Blu ray HD DVD DMA Name the device connected to the input jacks to make your input source selection easier When a PC with a resolution of 1920 x 1080 60Hz is connected to the HDMI IN 1 DVI port you should set the HDMI1 DVI mode to DVI PC in the Edit Name of the Input mode When connecting an HDMI DVI cable to the HDMI IN 1 D...

Page 23: ...3 jack on the TV and the HDMI OUT jack of the corresponding Anynet device using an HDMI cable 2 Connect the HDMI IN jack of the home theatre and the HDMI OUT jack of the corresponding Anynet device using an HDMI cable Connect only one Home Theatre You can connect an Anynet device using the HDMI 1 3 cable Some HDMI cables may not support Anynet functions Anynet works when the AV device supporting A...

Page 24: ...t cancel the operation during the switching operation The time required to scan for devices is determined by the number of connected devices When the device scan is complete the number of devices found are not displayed Although the TV automatically scans devices when it is turned on using the POWER button devices connected when the TV is on or under a specific circumstance are not displayed in th...

Page 25: ...et devices using the buttons on the TV You can control Anynet devices only using the TV remote control The TV remote control may not work under certain conditions If this occurs reselect the Anynet device The Anynet functions do not operate with other manufacturers products The π μ operations may differ depending on the device Recording You can make a recording of a TV programme using a recorder P...

Page 26: ...you want I want to exit Anynet Select View TV in the Anynet menu Press the SOURCE button on the TV remote control and select a device other than Anynet devices Press P PRE CH to change the TV mode Note that the channel button operates only when a tuner embedded Anynet device is not connected The message Connecting to Anynet device appears on the screen You cannot use the remote control when you ar...

Page 27: ...etext page are colour coded and can be selected by pressing the coloured buttons Press one of them corresponding to the required The page is displayed with other coloured information that can be selected in the same way To display the previous or next page press the corresponding coloured button 6 Teletext on mix Press to activate Teletext mode after selecting the channel providing the Teletext se...

Page 28: ...not support version 2 5 are not capable of displaying any additional graphics or text regardless of the Teletext transmission Press the TV button to exit from the Teletext display Installing the Stand Preset Place the Guide Stand and Cover Neck onto the stand and fasten it using the screws Applicable to 32inch models only N Front Back 1 Attach your LCD TV to the stand Two or more people should car...

Page 29: ...ation on installing the wall mount see the instructions provided with the Wall Mount items Contact a technician for assistance when installing the wall mounted bracket Samsung Electronics is not responsible for any damage to the product or injury to yourself or others if you elect to install the TV on your own Do not install your Wall Mount Kit while your TV is turned on It may result in personal ...

Page 30: ...id the TV from falling 1 Put the screws into the clamps and firmly fasten them onto the wall Confirm that the screws have been firmly installed onto the wall You may need additional material such as an anchor depending on the type of wall Since the necessary clamps screws and string are not supplied please purchase these additionally 2 Remove the screws from the centre back of the TV put the screw...

Page 31: ... indoor aerial Remote control malfunctions Replace the remote control batteries Clean the upper edge of the remote control transmission window Check the battery terminals Check signal cable message is displayed Check that the signal cable is firmly connected to the PC or video sources Check that the PC or video sources are turned on On PC mode Not Supported Mode message is displayed Check the maxi...

Page 32: ...ight 20 20 Model Name LA40B530 LA46B530 Screen Size Diagonal 40 inch 46 inch PC Resolution Optimum 1920 x 1080 60 Hz 1920 x 1080 60 Hz Sound Output 10W X 2 10W X 2 Dimensions WxDxH Without Stand With stand 998 X 78 X 621 mm 998 X 240 X 686 mm 1127 X 78 X 712 mm 1127 X 260 X 766 mm Weight With Stand 18 kg 24 kg Environmental Considerations Operating Temperature Operating Humidity Storage Temperatur...

Reviews: