24
English
Wiring Work
Instal
lation
Communication wiring connections
•
Communication wires connect through side of air handler and be 2 X 16 AWG shielded.
•
Use an approved connector at the cabinet of the unit to prevent pulling or shorting of control wires.
•
F1/F2 in the air handler must connect to the F1/F2 communication bus for that system between all indoor units, MCU’s,
EEV kits, and the outdoor unit.
ATTENTION
•
Control wire must be rated for 600V minimum.
•
Control wire insulation must be rated for temperatures up to 90°C.
1. Insert the wires through the holes of the right side on the top casing and through the cable connectors.
2. Connect the communication wires to the F1/F2 connection terminal with compressed ring terminals.
3. Connect F3, F4 (for communication) when installing the wired remote control. F3/F4 does not have screw terminals to
connect to. Locate white/blue wires in control box and remove the plug on the end (labeled). Connect with crimp wire
connectors or wire nuts. Up to 16 indoor units can connect to a single wired controller (group control). Compatible wired
controllers: MWR-WE10N, MWR-SH00N.
•
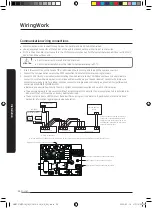
Below is an example how to wire the main system communication wires and wired controller wires.
•
The example below is for indoor units without accessory electric heat kits. If an accessory heat kit is installed in an
indoor unit, that unit must be on its own dedicated circuit.
• The sum of all indoor unit MCA must be below 10A on a single circuit. Refer to "Specification of Electronic Wire"
section for information regarding wire size calculation.
※ When Installing ELCB(MCCB + ELB) indoor unit, do not connect with other indoor units attached to other outdoor units.
ELCB
MCCB+
ELB
1(L) 2(N)
Indoor Unit 1
Indoor Unit 2
Indoor Unit 3
208-230V~
or
※ ELCB : Mandatory
1(L) 2(N)
1(L) 2(N)
F1 F2
F1 F2
F1 F2
F3
F4
F3 F4
Maximum Breaker
Size: 10A
F1 F2
PBA ground screw/connection to chassis
1(L)/2(N) high voltage connection terminals
F1/F2 communication connection terminals
Supply power ground connection point
F3/F4 does not have screw terminals to
connect to. Locate white/blue wires in
control box and remove the plug on the
end (labeled). Connect with crimp wire
connectors or wire nuts.
Outdoor Unit
Wired Remote
Control
AM072TNZDCH_IM_DVM V-AHU_AA_EN_.indd 24
2020-02-14 오전 10:33:35
Summary of Contents for AM0 SERIES
Page 45: ...45 English Appendix Memo AM072TNZDCH_IM_DVM V AHU_AA_EN_ indd 45 2020 02 14 오전 10 33 41 ...
Page 46: ...AM072TNZDCH_IM_DVM V AHU_AA_EN_ indd 46 2020 02 14 오전 10 33 41 ...
Page 91: ...45 Français Annexe Note AM072TNZDCH_IM_DVM V AHU_AA_FR_ indd 45 2020 02 14 오전 10 35 49 ...
Page 92: ...AM072TNZDCH_IM_DVM V AHU_AA_FR_ indd 46 2020 02 14 오전 10 35 49 ...

