background image

English


_47

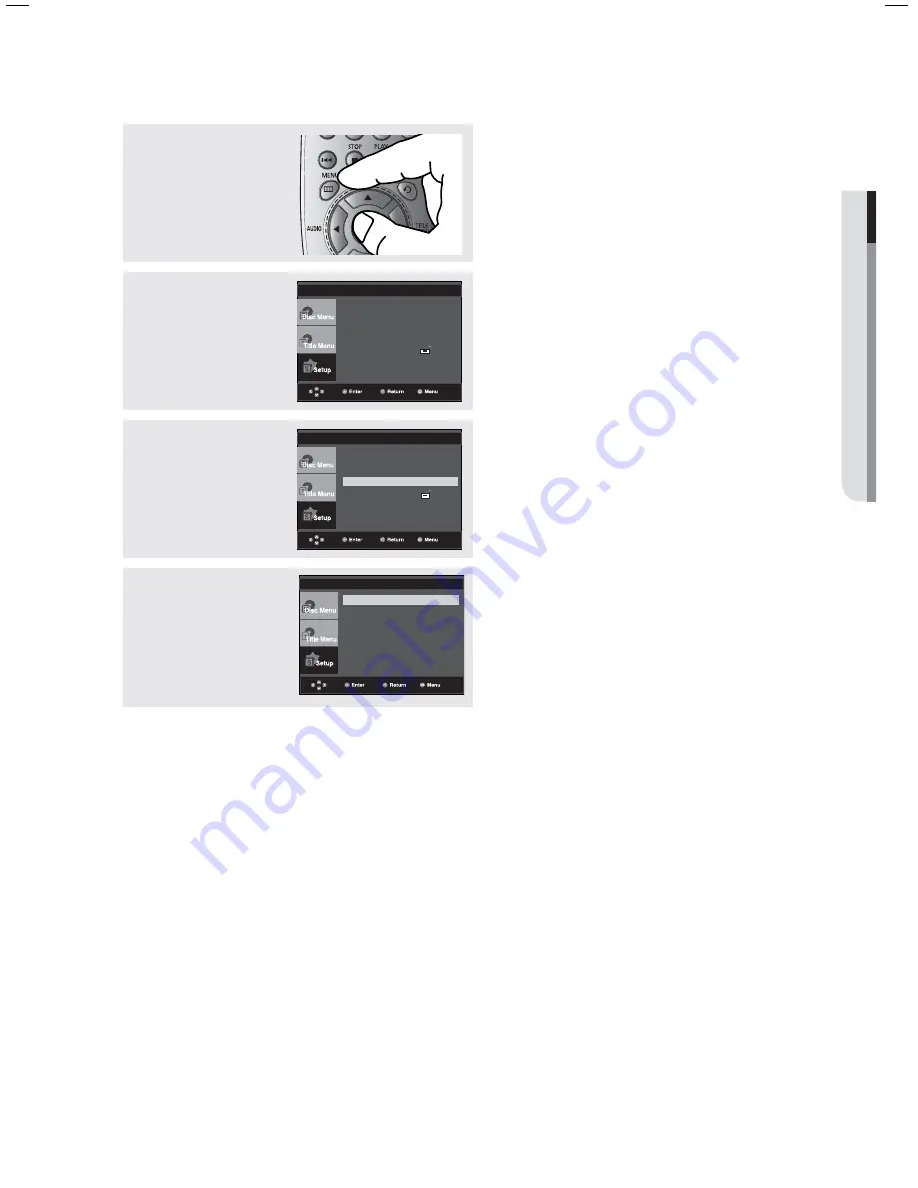
  NAVIGATING THE SETUP MENU

Setting Up the Display Options

Display options enable you to set various video functions of the player.

3

Press the 

π

/

 buttons 

to select 

Display Setup

then press the 

®

 or 

ENTER

 button.

4

Press the 

π

/

 buttons 

to select the desired 
item, then press the 

®

 or 

ENTER

 button.

1

With the unit in Stop 
mode, press the 

MENU


button.

2

Press the 

π

/

 buttons to 

select 

Setup

, then press 

the 

®

 or 

ENTER

 button.

To make the setup menu disappear, press the 
MENU button.

TV Aspect 

: 16:9 Wide

Screen Messages  : On

Black Level 

: Off

Video Output 

: I-SCAN

DISPLAY SETUP

Language Setup 

®

Audio Setup 

®

Display Setup 

®

Parental Setup :     


®

DivX(R)Registration  

®

Language Setup 

®

Audio Setup 

®

Display Setup 

®

Parental Setup :     


®

DivX(R)Registration  

®

Summary of Contents for AK68-01765A

Page 1: ... the possibilities Thank you for purchasing this Samsung product To receive more complete service please register your product at www samsung com global register DVD Player user manual DVD P191 AK68 01765A 03 ...

Page 2: ...it into your outlet consult an electrician for replacement of the obsolete outlet 10 Protect the power cord from being walked on or pinched particularly at plugs convenience receptacles and the point where they exit from the apparatus 11 Only use attachments accessories specified by the manufacturer 12 Use only with cart stand tripod bracket or table specified by the manufacturer or sold with the ...

Page 3: ...receiver Connect this equipment into an outlet on a circuit different from that to which the receiver is connected Consult the dealer or an experienced radio TV technician for help This class B digital apparatus meets all requirements of the Canadian Interference Causing Equipment Regulations CLASS 1 LASER PRODUCT KLASSE 1 LASER PRODUKT LUOKAN 1 LASER LAITE KLASS 1 LASER APPARAT PRODUCTO LÁSER CLA...

Page 4: ...EC 13818 3 used or sold in combination with this product unit The license only covers the use of this product unit to encode and or decode audio files conforming to the ISO IEC 11172 3 or ISO IEC 13818 3 No rights are granted under this license for product features or functions that do not conform to the ISO IEC 11172 3 or ISO IEC 13818 3 Handling Cautions Before connecting other components to thi...

Page 5: ...igned correctly 3 Replace the battery cover If the remote control doesn t operate properly Check the polarity of the batteries Check if the batteries are drained Check if the remote control sensor is blocked by obstacles Check if there is any fluorescent lighting nearby Before you start Accessories Remote Control AK59 00103C User s Manual AK68 01765A Video Audio Cable AC39 22017Z AC39 42001U ...

Page 6: ...ctions 20 Using the Display Function 21 Using the Disc and Title Menu 22 Repeat Play 23 Slow Play ADVANCED FUNCTIONS 24 24 Adjusting the Aspect Ratio EZ View 26 Selecting the Audio Language 27 Selecting the Subtitle Language 28 Changing the Camera Angle 29 Using the Bookmark Function 31 Using the Zoom Function 32 Clips Menu for MP3 WMA JPEG MPEG4 CD Audio 32 Folder Selection 33 MP3 WMA CD Audio Pl...

Page 7: ...D layer CDGs play audio only not graphics Ability to play back may depend on recording conditions DVD R R CD RW DVD RW RW V mode The unit may not play certain CD R CD RW and DVD R due to the disc type or recording conditions COPY PROTECTION Many DVD discs are encoded with copy protection Because of this you should only connect your DVD player directly to your TV not to a VCR Connecting to a VCR re...

Page 8: ...and MPEG 2 system Various screen and audio functions can be easily selected through the on screen menu Disc Types Logos Recording Types Disc Size Max Playing Time Characteristics DVD 5 3 1 2 74 min 20 min Audio CD is recorded as a Digital Signal with better audio quality less distortion and less deterioration of audio quality over time AUDIO CD Disc Markings DIGITAL SOUND STEREO NTSC Play Region N...

Page 9: ... displayed here 4 OPEN CLOSE STOP Press to open and close the disc tray Stops disc play 5 PLAY PAUSE Begin or pause disc play Front Panel Display Displays the Total playing time and various messages concerning operations such as PLAY STOP LOAD NOdISC No disc loaded OPEn The disc tray is open LOAd Player is loading disc information 1 2 3 4 5 ...

Page 10: ...enu progressive scan mode will work If I SCAN 480i is set to ON in Video Output of the Setup Menu interlaced scan mode will work 4 DIGITAL AUDIO OUT JACKS Use either an coaxial digital cable to connect to a compatible Dolby Digital receiver Use a coaxial digital cable to connect to an A V Amplifier that contains a Dolby Digital MPEG2 or DTS decoder Note Consult your TV User s Manual to find out if...

Page 11: ...u 8 ENTER π Buttons This button functions as a toggle switch 9 AUDIO Button Use this button to access various audio functions on a disc 10 INFO Button Displays the current disc mode 11 OPEN CLOSE Button To open and close the disc tray 12 REPEAT A B Button Allows you to repeat A B disc 13 ZOOM Button Enlarge DVD Picture 14 VIDEO SEL Button Change video output mode 15 SEARCH Buttons Allow you to sea...

Page 12: ...t 1 Using Component video cables not included connect the COMPONENT VIDEO OUT jacks on the rear of the DVD player to the COMPONENT IN jacks of your TV To see the progressive video output Consult your TV User s Manual to find out if your TV supports Progressive Scan If Progressive Scan is supported follow the TV User s Manual regarding Progressive Scan settings in the TV s menu system Depending on ...

Page 13: ...he manufacturer The number and position of the jacks may vary depending on the TV set Please refer to the user s manual of your TV 1 Using Component video cables not included connect the COMPONENT VIDEO OUT jacks on the rear of the DVD player to the COMPONENT IN jacks of your TV 2 Using the audio cables connect the AUDIO red and white OUT jacks on the rear of the DVD player to the AUDIO red and wh...

Page 14: ... to connect to an Amplifier please refer to the Amplifier connection page See pages 15 to 16 The number and position of the jacks may vary depending on your TV set Please refer to the user s manual of your TV If there is one audio input terminal on the TV connect it to the AUDIO OUT left white jack of the DVD player 3 Press the input selector button on your TV remote control until the Video signal...

Page 15: ...o cables connect the AUDIO red and white OUT jacks on the rear of the DVD player to the AUDIO red and white IN jacks of the Amplifier 2 Using the video signal cable s connect the VIDEO or COMPONENT jacks on the rear of the DVD player to the VIDEO or COMPONENT jacks of your TV as described on pages 12 to 16 3 Turn on your DVD player TV and Amplifier 4 Press the input select button of the Amplifier ...

Page 16: ... 1 If using a Coaxial cable not included connect the DIGITAL AUDIO OUT COAXIAL jack on the rear of the DVD player to the DIGITAL AUDIO IN COAXIAL jack of the Amplifier 2 Using the video signal cable s connect the VIDEO or COMPONENT jacks on the rear of the DVD player to the VIDEO or COMPONENT jacks of your TV as described on pages 12 to 14 3 Turn on your DVD player TV and Amplifier 4 Press the inp...

Page 17: ...artup screen is not set the settings may change whenever you turn the power on or off Therefore make sure that you select the language you want to use Once you select a menu language you can change it by pressing the button on the front panel of the unit for more than 5 seconds with no disc in the unit Then the SELECT MENU LANGUAGE window appears again where you can reset your preferred language P...

Page 18: ...g Play Press the PLAY PAUSE button on the remote control during play Screen stops no sound To resume press the PLAY PAUSE button once again Note If the player is left for about 5 minutes in pause mode it will stop No sound is heard during slow mode Press the PLAY PAUSE button to resume normal play 5 Removing the Disc Press the OPEN CLOSE button 7 Slow Motion Play Press the SEARCH button to choose ...

Page 19: ...ferent from the actual playback speed No sound is heard during search mode Except CD DVD CD 2X 4X 64X 128X 2X 4X 8X Skipping Tracks When playing a DVD if you press the SKIP button it moves to the next chapter If you press the SKIP button it moves to the beginning of the chapter Pressing the Skip button twice makes the DVD move to the beginning of the previous chapter When playing a CD if you press...

Page 20: ...n Playing a DVD MPEG4 1 During play press the INFO button on the remote control 2 Press the π buttons to select the desired item 3 Press the buttons to make the desired setup and then press the ENTER button 4 To make the screen disappear press the RETURN button again ...

Page 21: ...ilar to tracks on an audio CD Allows playback of the film from a desired time You must enter the starting time as a reference The time search function does not operate on some discs Refers to the film s soundtrack language A DVD disc can have up to eight different soundtracks Refers to the subtitle languages available in the disc You will be able to choose the subtitle languages or if you prefer t...

Page 22: ...e displayed if there are at least two titles in the disc Press ENTER key for Title Menu Repeat Play Repeat the current track chapter title a chosen section A B or all of the disc When playing a DVD 1 Press the REPEAT button on the remote control Repeat screen appears 2 Press the REPEAT buttons to select Chapter Title A DVD repeats play by chapter or title Chapter repeats the chapter that is playin...

Page 23: ...ast 5 seconds of playback time has elapsed after point A has been set 3 To return to normal play press CANCEL button Note Depending on the disc the Repeat function may not work Slow Play This feature allows you slowly to repeat scenes containing sports dancing musical instruments being played etc so you can study them more closely When playing a DVD 1 During play press the PLAY PAUSE button 2 Pres...

Page 24: ...black bars at the top and bottom of the screen will disappear The picture will look vertically stretched Depending on a type of disc the black bars may not disappear completely ZOOM FIT The top bottom left and right of the screen are cut off and the central portion of the screen is enlarged For 4 3 aspect ratio discs Normal Wide Displays the content of the DVD title in 16 9 aspect ratio The pictur...

Page 25: ...nd a full screen appears The picture will look vertically stretched ZOOM FIT The top bottom left and right of the screen are cut off and the central portion of the screen is enlarged For 4 3 aspect ratio discs Normal Screen Displays the content of the DVD title in 4 3 aspect ratio SCREEN FIT The top and bottom portions of the screen are cut off and the full screen appears The picture will look ver...

Page 26: ...uages To have the same audio language come up whenever you play a DVD Refer to Using the Audio Language on page 42 1 Press the AUDIO button The Audio changes when the button is pressed repeatedly The audio languages are represented by abbreviations ENG DOLBYDIGITAL 5 1CH AUDIO DVD MPEG4 AUDIO PCM 1 2 MPEG4 is a compressed video format designed to deliver DVD quality video at lower data rates and s...

Page 27: ...n the DVD s Disc Menu Press the DISC MENU button This function depends on what subtitles are encoded on the disc This function may not work with all DVDs A DVD disc can contain up to 32 subtitle languages To have the same subtitle language come up whenever you play a DVD Refer to Using the Subtitle Language on page 43 DVD Off SUBTITLE Press the Subtitle button on the remote control repeatedly to s...

Page 28: ...ontains multiple angles the ANGLE mark appears on the screen 1 During play press the INFO button on the remote control 2 Press the π buttons to select Shortcut 3 Press the buttons to select Angle then press the ENTER button 4 Press the buttons on the remote control to select the desired angle 4 6 Note If the disc has only one angle this feature won t work Currently very few discs have this feature...

Page 29: ...tion DVD 1 During play press the INFO button on the remote control 4 When you reach the scene you want to mark press the ENTER button Up to three scenes may be marked at a time Note Depending on the disc the Bookmark function may not work CANCEL 2 Press the π buttons to select Shortcut 3 Press the buttons to select Bookmark then press the ENTER button Bookmark Enter Shortcut ...

Page 30: ...e 29 4 Press the buttons to select a marked scene Clearing a Bookmark 4 Press the buttons to select the bookmark number you want to delete 1 3 The first 1 3 steps are the same as those for Using the Bookmark Function on page 29 CANCEL 5 Press the CANCEL button to delete a bookmark number 5 Press the PLAY PAUSE button to skip to the marked scene CANCEL ...

Page 31: ...Function DVD During DVD play press ENTER to zoom in the following order 2X k 4X k 2X k Normal 1 During play or pause mode press the ZOOM button on the remote control Press the ENTER button 2 Press the π or buttons to select the part of the screen you want to zoom in on 2x ...

Page 32: ...EAT button Off Normal Playback Track Repeats the current track Folder Repeats the current folder Random Files in the disc will be played in random order MP3 file icon WMA file icon JPEG file icon AVI file icon CD Audio file icon Folder icon Current Folder icon To select the Parent Folder Press the RETURN button to go to the parent folder or press the π buttons to select and press ENTER to go to th...

Page 33: ...here are four modes Off Track Folder and Random Off Normal Playback Track Repeats the current song file Folder Repeats the song files which have the same extension in the current folder Random Song files which have the same extension will be played in random order To resume normal play press the CANCEL button O f f P l a y B e c a u s e Yo u C a c t u s S a d D a y u W o n d e r f u l B e c a u s ...

Page 34: ... decompression rates below 128 Kbps will not be played properly Use a decompression transfer rate of at least 64Kbps when recording WMA files Sound quality with WMA files basically depends on the rate of compression decompression you choose Getting CD audio sound requires an analog digital sampling rate that is conversion to WMA format of at least 64Kbps and up to 192Kbps Conversely files with dec...

Page 35: ...hich have the same extension in the current folder Title repeats the title that is playing Off No Repeat mode S t o p 0 0 0 0 0 0 Return Enter Menu Off O f f S t o p a 0 1 _ d i v x 5 1 b 8 a 0 2 _ d i v x 5 0 5 b 8 a 0 3 _ d i v x 5 0 2 s p 8 a 0 4 _ d i v x 4 1 2 8 M P E G 4 00 0 0 0 0 Enter Return T T Menu Press the REPEAT button to change playback mode There are 3 modes Off Folder Title Press ...

Page 36: ...ormal 720 x 480 30fps 720 x 576 25fps Maximum bitrate 4Mbps CD R AVI file This unit can play the following video compression formats within the AVI file format DivX 3 11 contents DivX 4 contents Based on MPEG 4 Simple Profile DivX 5 contents MPEG 4 simple profile plus additional features such as bi directional frames Qpel and GMC are also supported XviD MPEG 4 compliant Contents This unit supports...

Page 37: ... you want to zoom in on Press the ENTER button Each time the ENTER button is pressed the picture is enlarged up to 2X Slide Show The unit enters slide show mode Before beginning the Slide Show the picture interval must be set The pictures change automatically with about a 6 second interval The pictures change automatically with about a 12 second interval The pictures change automatically with abou...

Page 38: ...isc the disc can be played only up to the blank segment A maximum of 500 images can be stored on a single CD Kodak Picture CDs are recommended When playing a Kodak Picture CD only the JPEG files in the pictures folder can be played Kodak Picture CD The JPEG files in the pictures folder can be played automatically Konica Picture CD If you want to see the Picture select the JPEG files in the clips m...

Page 39: ...ent children from viewing unsuitable movies such as those with violence adult subject matter etc Divx R Registration Please use the Registration code to register this player with the DivX R Video On Demand format To learn more go to www divx com vod 1 With the unit in Stop mode press the MENU button on the remote control Press the π buttons to select Setup then press the or ENTER button 2 Press th...

Page 40: ...Language Setup then press the or ENTER button 4 Press the π buttons to select Player Menu then press the or ENTER button 5 Press the π buttons to select the desired language then press the or ENTER button The language is selected and the screen returns to the Language Setup menu To make the setup menu disappear press the MENU button Language Setup Audio Setup Display Setup Parental Setup DivX R Re...

Page 41: ... language is selected and the screen returns to the Language Setup menu To make the setup menu disappear press the MENU button 1 With the unit in Stop mode press the MENU button 2 Press the π buttons to select Setup then press the or ENTER button 3 Press the π buttons to select Language Setup then press the or ENTER button Player Menu English Disc Menu English Audio English Subtitle Automatic DivX...

Page 42: ... language is selected The language is selected and the screen returns to the Language Setup menu To make the setup menu disappear press the MENU button 1 With the unit in Stop mode press the MENU button 2 Press the π buttons to select Setup then press the or ENTER button 3 Press the π buttons to select Language Setup then press the or ENTER button Player Menu English Disc Menu English Audio Englis...

Page 43: ...s original language setting The language is selected and the screen returns to the setup menu To make the setup menu disappear press the MENU button 1 With the unit in Stop mode press the MENU button 2 Press the π buttons to select Setup then press the or ENTER button 3 Press the π buttons to select Language Setup then press the or ENTER button Player Menu English Disc Menu English Audio English S...

Page 44: ...s the π buttons to select the desired language then press the or ENTER button The language is selected and the screen returns to the setup menu To make the setup menu disappear press the MENU button Player Menu English Disc Menu English Audio English Subtitle Automatic DivX Subtitle Western LANGUAGE SETUP LANGUAGE SETUP Player Menu Disc Menu Audio Subtitle DivX Subtitle Western Turkish Central Cyr...

Page 45: ...desired item then press the or ENTER button 1 With the unit in Stop mode press the MENU button 2 Press the π buttons to select Setup then press the or ENTER button To make the setup menu disappear press the MENU button Dolby Digital Out PCM MPEG 2 Digital Out PCM Dynamic Compression On PCM Down Sampling On Power On Off Music On AUDIO SETUP Language Setup Audio Setup Display Setup Parental Setup Di...

Page 46: ...rts to PCM 2CH audio Bitstream Converts to MPEG 2 Digital Bitstream 5 1CH Select Bitstream when using the Digital Audio Output Dynamic Compression On To select dynamic compression Off To select the standard range PCM Down Sampling On Select this when the Amplifier connected to the player is not 96KHz compatible In this case the 96KHz signals will be down converted to 48KHZ Off Select this when the...

Page 47: ...sired item then press the or ENTER button 1 With the unit in Stop mode press the MENU button 2 Press the π buttons to select Setup then press the or ENTER button To make the setup menu disappear press the MENU button TV Aspect 16 9 Wide Screen Messages On Black Level Off Video Output I SCAN DISPLAY SETUP Language Setup Audio Setup Display Setup Parental Setup DivX R Registration Language Setup Aud...

Page 48: ...o turn on screen messages On or Off Black Level Adjust the brightness of the screen On or Off It does not function in Progressive mode Video Output Select Video Output I SCAN Select when you want to use Component Interlace 480i Out P SCAN Select when you want to use Component Progressive 480p Out If the Yes No selection in the Display Setup sub Menu is not made within 10 seconds the screen returns...

Page 49: ...vel you want then press the or ENTER button e g Setting up in Kids Safe 1 With the unit in Stop mode press the MENU button 2 Press the π buttons to select Setup then press the or ENTER button Setting Up the Parental Control The Parental Control function works in conjunction with DVDs that have been assigned a rating which helps you control the types of DVDs that your family watches There are up to...

Page 50: ...t Setup then press the or ENTER button Note If you have forgotten your password see Forgot Password in the Troubleshooting Guide To make the setup menu disappear press the MENU button PARENTAL SETUP Rating Level Kids Safe Change Password Menu Return Enter 0 Rating Level Kids Safe Change Password Enter Password PARENTAL SETUP Menu Return Enter 0 Rating Level Kids Safe Change Password Enter New Pass...

Page 51: ... P191 Place the burned disc on the tray Close the tray The Firmware upgrade screen will appear Firmware upgrade menu appears Firmware upgrade Firmware upgrade starts During the firmware upgrade process the tray will open Please remove the disc and wait for about 2 minutes If the DVD player was successfully updated the disc tray will close and the unit will turn off and on When the unit turns on th...

Page 52: ...g played has the 5 1 ch mark on the outside Check if your audio system is connected and working properly In a SETUP Menu is the Audio Output set to Bitstream The features or action cannot be completed at this time because 1 The DVD s software restricts it 2 The DVD s software doesn t support the feature e g angles 3 The feature is not available at the moment 4 You ve requested a title or chapter n...

Page 53: ...ISC Composite Video Component Video 2 Channel Maximum Output level Output Terminal Digital Audio output Frequency Response AC 120 V 60 Hz 8 W 2 9 lbs 14 4 W X 8 D X 1 48 H 41 F to 95 F 10 to 75 Reading Speed 3 49 4 06 m sec Approx Play Time Single Sided Single Layer Disc 135 min Reading Speed 4 8 5 6 m sec Maximum Play Time 74 min Reading Speed 4 8 5 6 m sec Maximum Play Time 20 min 1 channel 1 0 ...

Page 54: ...HUNGARY 06 80 SAMSUNG 7267864 www samsung com hu ITALIA 800 SAMSUNG 7267864 www samsung com it LUXEMBURG 0032 0 2 201 24 18 www samsung lu NETHERLANDS 0900 20 200 88 0 10 Min www samsung com nl NORWAY 231 627 22 www samsung com no POLAND 0 801 801 881 www samsung com pl PORTUGAL 80 8 200 128 www samsung com pt SLOVAKIA 0800 SAMSUNG 726786 www samsung com sk SPAIN 902 10 11 30 www samsung com es SW...

Page 55: ...the purchaser must contact SAMSUNG for problem determination and service procedures SAM SUNG does not warrant uninterrupted or error free operation of the product All replaced parts and products become the property of SAMSUNG and must be returned to SAMSUNG Replacement parts and products assume the remaining original warranty or ninety 90 days whichever is longer This limited warranty covers manuf...

Page 56: ...ny questions or comments relating to Samsung products please contact the SAMSUNG customer care center 1 800 SAMSUNG 7267864 www samsung com Samsung Electronics America Inc 105 Challenger Road Ridgefield Park NJ 07660 0511 1 800 SAMSUNG 7267864 www samsung com ...

Reviews: