


8
850 820 R. 04/14
SAMOA Industrial, S.A. · Pol. Ind. Porceyo, I-14 · Camino del Fontán, 831 · 33392 Gijón - Spain · Tel.: +34 985 381 488 · www.samoaindustrial.com
2014_04_01-11:30
WARNING
ATENCIÓN
Part. No.
/ Cód. /
Réf.
Art. Nr.
Description /
Descripción /
Description /
Beschreibung
Standard pre tension turns /
Vueltas nominales pretensión trabajo /
Tours de tension nominale du ressort /
Standard Umdrehungen
Max. pre tension turns /
Vueltas máximas pretensión de trabajo /
Tours de tension maximale du ressort /
Maximale Umdrehungen
850310
Standard spring /
Resorte estandar /
Ressort standard /
Feder - standard
5
9
850311
Severe spring /
Resorte severo /
Ressort renforcé /
Feder - verstärkt
5
10
850313
High spring /
Resorte alto /
High spring /
Feder - extra verstärkt
7
7
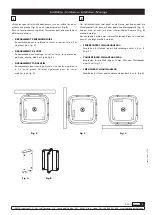
Fig. 11
Fig. 12
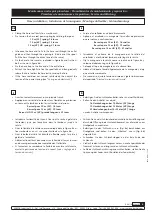
Spring load adjustment / Ajuste de la tensión del resorte /
Réglage de la tension du ressort / Ändern der Federstärke
Maintenance and repair procedures / Procedimientos de mantenimiento y reparación /
Procédures de maintenance et réparation / Service und Wartung
GB
E
F
D
Fig.12
Fig.11
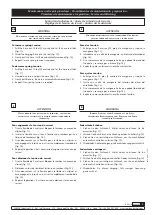
Fig.14
Fig.13
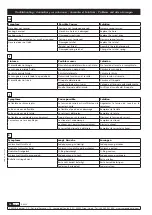
Swivel replacement / Sustitución de la rótula / Remplacement de la rotule / Austausch des Drehgelenks
b
efore
removing
the
damaged
swivel
,
close
the
nearest
shut
off
valve
to
the
reel
and
open
the
fluid
control
gun
to
release
the
pressure
inside
the
hose
.
• Pull the hose out and let the hose reel latch (fig. 15).
• Unscrew the nuts with two spanners (fig. 16).
• Remove the circlip and pull the swivel. Be careful not to damage
the swivel O-Ring (fig. 17).
• Assemble the new swivel and re-assemble the pieces in reverse
order.
GB
a
ntes
de
retirar
la
rótula
dañada
,
cierre
la
llave
de
servicio
más
cercana
al
enrollador
y
abra
la
pistola
de
suministro
a
fin
de
liberar
el
fluido
a
presión
de
la
manguera
.
• Tire de la manguera hasta que quede trincada en el enrollador
(fig. 15).
• Con dos llaves, afloje la manguera de la rótula (fig. 16).
• Quite la arandela de seguridad y tire de la rótula hacia fuera con
cuidado de no dañar la junta interior (fig. 17).
• Coloque la nueva rótula y realice los pasos anteriores en sentido
inverso.
E


