background image

13

7.0

Setting the Auto-Off Timer

You can set an auto-off timer so that the scale will power down automatically 

after a period of inactivity. This functions only when the scale is powered by the 

battery.

1.

From normal mode, press and hold the 

On/Off

 and 

Accu

 keys at the 

same time until the scale beeps…

SEtUP

 is displayed in the WEIGHT window, 

A.oFF.t

 is displayed in 

the PIECE WEIGHT window and the current value for the auto-off 

timer is displayed in the COUNT window. You can choose from 0 to 

30 minutes. If you pick 0, auto-off is disabled and the scale will not 

power down automatically.

2.

Key in the number of minutes of scale inactivity that will trigger the auto-

off function and press the 

Enter

 key to accept this value…

The scale returns to normal mode.

8.0

Setting LED Brightness

You can set the LED brightness by following these instructions:

1.

In normal weighing mode, hold the 

ON/OFF

 and 

ENTER

 keys at the 

same time until

SETUP

 is displayed in the WEIGHT window, 

Led.brn

 (LEd 

brightness) is displayed in the PIECE WEIGHT window, and 

x

 (x=

1

-

3

is displayed in the COUNT window. This means that the LED 

brightness is currently set to 

x

.

2.

Press the 1 2 or 3 numerical key to change the brightness level. Three 

is the brightest level. When the brightness you want is displayed, press 

the ENTER key save this setting.

The scale will auto-reset and return to normal weighing mode. 

Summary of Contents for B 130

Page 1: ...p n AWT35 500632 issue AA July 2010 MODEL B 130 Counting Scale User Manual...

Page 2: ...CTRICAL WARNINGS MEAN THAT FAILURE TO FOLLOW SPECIFIC PRACTICES OR PROCEDURES MAY RESULT IN ELECTROCUTION ARC BURNS EXPLOSIONS OR OTHER HAZARDS THAT MAY CAUSE INJURY OR DEATH WARNING This is a Warning...

Page 3: ...power cable supplied with the unit DANGER RISK OF ELECTRICAL SHOCK NO USER SERVICEABLE PARTS REFER TO QUALIFIED SERVICE PERSONNEL FOR SERVICE CAUTION The power cable must be connected to an earth gro...

Page 4: ...nce Always turn off the machine and isolate from the power supply before starting any routine maintenance to avoid the possibility of electric shock Make sure that it is placed securely on a flat and...

Page 5: ...lass A digital device pursuant to Part 15 of the FCC Rules These limits are designed to provide reasonable protection against harmful interference when the equipment is operated in a commercial enviro...

Page 6: ......

Page 7: ...rminal and the black wire to the black battery terminal Place battery in the compartment with the padding placed as shown and replace the battery cover and tighten the screw Note To improve battery li...

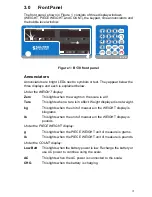
Page 8: ...s lights when a tare is in effect Weight displayed is net weight kg This lights when the unit of measure in the WEIGHT display is kilograms lb This lights when the unit of measure in the WEIGHT displa...

Page 9: ...0 of capacity an empty container or weight not required in thecalculation of anaverage piece weight Use of tare will reduce the scale s maximum weight capacity by the tare value stored Accu Used to ad...

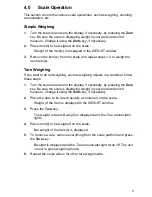
Page 10: ...objects in a container follow these steps 1 Turn the scale on and zero the display if necessary by pressing the Zero key Be sure the scale is displaying weight in your preferred unit of measure Chang...

Page 11: ...lays the number entered If the piece weight window shows SPL PCS press the CLEAR key and increase your sample weight Counting by Sampling Follow these steps to count items using the sampling method Fo...

Page 12: ...Entering a Known Piece Weight You can enter a known piece weight and begin counting without sampling This can also be used with the tare function active After you have setthe piece weight place the it...

Page 13: ...e scale on and zero the display if necessary using the Zero key Be sure the scale is displaying weight in your preferred unit of measure Change it using the Units key if necessary 2 Use sampling or en...

Page 14: ...nt is displayed press the Accu key to accumulate the count to memory The count is added into memory and temporarily Add is displayed in the WEIGHT window the number of accumulations is displayed in th...

Page 15: ...e condition before you can count more items and perform a successful accumulation again 5 0 Calibration You should periodically calibrate your scale to ensure accuracy Follow these steps to calibrate...

Page 16: ...in the WEIGHT window 3 Remove all weight from the scale wait for the scale to be stable the Unit annunciator stops flashing and press the Enter key to capture the zero point If the scale successfully...

Page 17: ...d in the PIECE WEIGHT window and the A to D counts code is displayed in the COUNT window Vol stands for voltage and X X is the current voltage of the battery If no battery is installed or the connecti...

Page 18: ...y 2 Key in the number of minutes of scale inactivity that will trigger the auto off function and press the Enter key to accept this value The scale returns to normal mode 8 0 Setting LED Brightness Yo...

Page 19: ...Err There is an error in calibration maybe the loaded weight is too small or the input weight is not correct Ad Input signal of ADC is over max range Ad _ _ _ _ Input signal of ADC is below min range...

Page 20: ...drops below 5 5V the scale beeper will sound and work for approximately two minutes before powering off When the scale is powered by the AC adapter the AC annunciator will turn on When the battery is...

Page 21: ...16...

Page 22: ...0 444 6132 Fax 44 0 870 010 2241 Email sales salterbrecknell co uk Web Site www averyweigh tronix com USA Salter Brecknell Weighing Products USA 1000 Armstrong Drive Fairmont MN 56031 Toll free 800 63...

Reviews: