background image

30

TROUBLESHOOTING

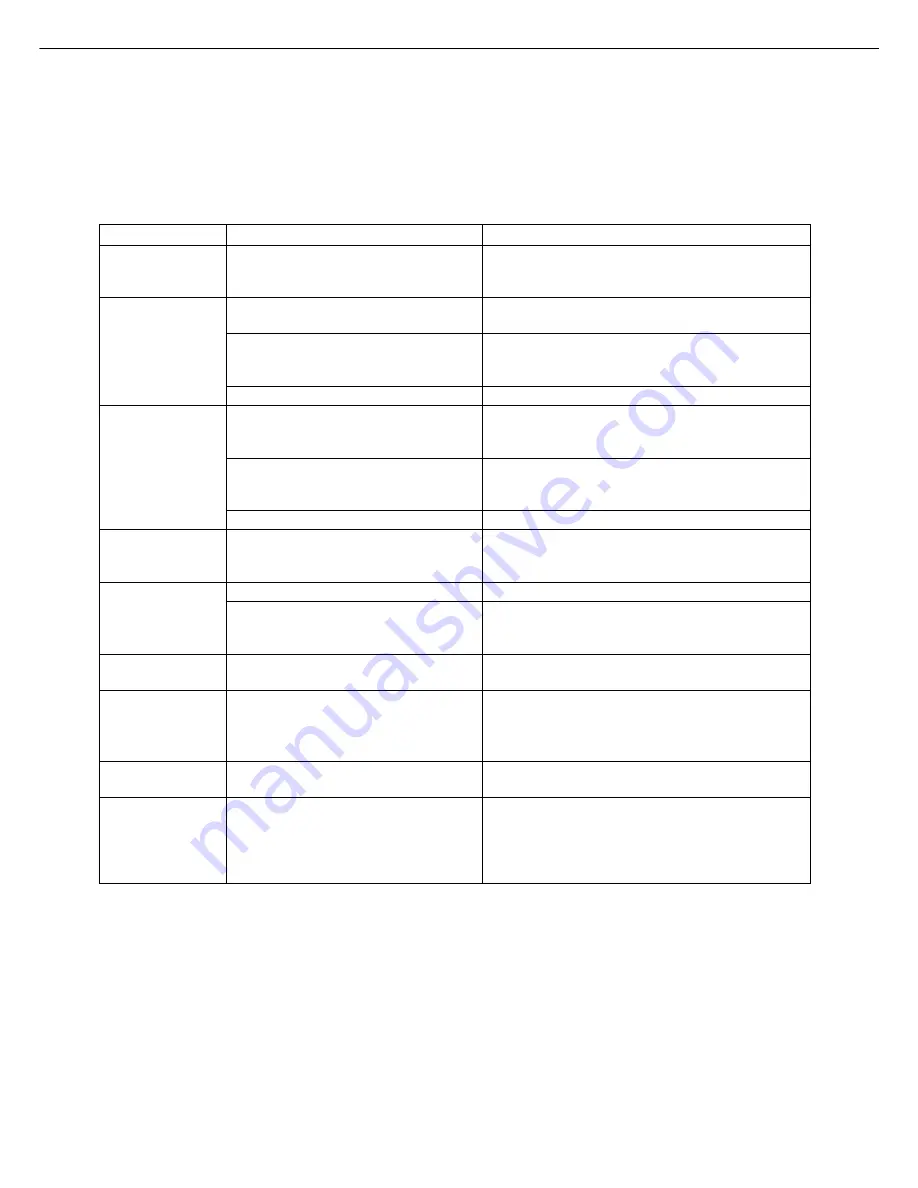
Whenever the machine stops or operation is not possible, check the operation panel display for messages. In most
cases, these messages will give sufficient information to return the machine to an operating condition. In cases where
this information is not enough, check the list below for more information. This section describes problems concerning
copier features. For troubleshooting specific problems related to printer, facsimile, or network scanner features, see
the separate manuals provided for them. For problems related to other peripheral devices, see chapter 5 of the
“Operation manual (for printer operation and general information)”.

Problem

Machine does not
operate.

Copies are too
dark or too light.

Smudges appear
on copies.

Image cannot be
rotated.

Part of original
image is not
copied.

Blank copies

Order of copies
incorrect

Job cancelation
needed
Scanning of
originals is
incomplete.

Is the START key indicator off?

Is the original image too dark or too
light?

Is the exposure mode set to AUTO?

Is the exposure mode set to PHOTO?

Document glass or document
transport area dirty?

Black stripes on copies when the
document feeder is used?

Original smudged or blotchy?

Is the auto paper select or auto
image function set?

Is the original positioned correctly?

Is the copy ratio proper for the original
and paper sizes?

Is the original placed face down?

Is the order of originals correct?

Is a message requesting cancelation
of job displayed?

Is a message indicating memory is
full displayed?

Check

Solution or cause

If the indicator is not on, the machine may be
warming up. Warm-up should be completed in
approximately 80 seconds.
Adjust the exposure in the manual mode. (See page
15.)
The exposure level in the AUTO mode can be
adjusted using a key operator program. Contact
your key operator. (See page 33.)
Cancel the PHOTO exposure mode. (See page 15.)
Clean regularly. (See page 4-12 of the “Operation
manual (for printer operation and general
information)”.)
Clean the original scanning window. (See page
4-12 of the “Operation manual (for printer operation
and general information)”.)
Use a clean original.
Rotation copy functions only if the machine is either
in the auto paper select mode or in the auto image
mode. (See pages 8 and 16.)
Set the original properly. (page 7)
Use the auto image function to select the
appropriate copy ratio based on the original and
copy sizes. (See page 16.)
Place the original face down in the document feeder
tray or on the document glass. (See page 7.)
When using the document glass, set the originals
from the first page one sheet at a time.
When using the automatic document feeder, set
the originals with the first page down.
Press the [CA] (clear all) key to cancel the current
job.
If the data amount exceeds the limit when using
the pamphlet copy or multi shot copy which requires
scanning of all originals, scanning will be canceled
and copying will not be performed. If you install a
hard disk drive, the storage capacity will increase.

Summary of Contents for MF9500

Page 1: ...S Operation Manual for Copier MF9500 30000113480 01...

Page 2: ...hat manual Separate manuals are provided for the operation of network scanning and facsimile functions Refer to the Operation manual for scanner and Operation manual for facsimile for these descriptio...

Page 3: ...XPOSURE ADJUSTMENTS 15 REDUCTION ENLARGEMENT ZOOM 16 Automatic selection auto image 16 Manual selection 17 SPECIAL PAPERS 18 SPECIAL MODES 19 Common operation procedure for using the special functions...

Page 4: ...just to the size of the originals Document feeder tray page 7 Set the originals here for automatic feeding Operation panel next page Use for operation of copier network scanner and facsimile features...

Page 5: ...ke numerical entries for setting operations C key clear key Press to clear a copy quantity entry If this key is pressed while the automatic document feeder is being used any originals in progress will...

Page 6: ...at can be selected by touching this key are described on page 19 Paper size display The display shows the location of the paper trays the size of the paper in the trays and the approximate amount of p...

Page 7: ...er tray be sure to remove any staples or paper clips If originals have damp spots from correction fluid ink or glue from pasteups be sure they are dried before they are fed If not the interior of the...

Page 8: ...corner with the tip of the scale mark at the left rear corner of the glass as shown in the illustrations When using the automatic document feeder 1 Ensure that there is no original on the document gla...

Page 9: ...originals larger than 8 1 2 x 11 or A4 is selected rotation cannot be done Example This function operates in the auto paper select or auto image mode Rotation copying can be disabled with a key operat...

Page 10: ...y will be highlighted 5 Touch the OK key OK 0 6 Ensure that paper of the same size as the originals is automatically selected Note COPY RATIO AUTO PAPER SELECT 100 A4 The selected tray will be highlig...

Page 11: ...the desired number of copies Up to 999 can be set Use the C clear key to cancel an entry if a mistake has been made NORMAL COPYING Five sets of copies Originals Five copies of each original Originals...

Page 12: ...dule DSPF SG SSM that supports two sided scanning is installed This function can be used even if a duplex module SG DM1 is not installed 1 Place the originals in the document feeder tray page 7 2 Touc...

Page 13: ...o 5 are not needed 3 Ensure that paper of the same size as the original is automatically selected Note COPY RATIO AUTO PAPER SELECT 100 A4 The selected tray will be highlighted or the message LOAD xxx...

Page 14: ...als are placed in the document feeder tray a sort icon will appear on the touch panel and the sort copy mode will be automatically selected In this case copies will be delivered as shown in the upper...

Page 15: ...7 2 Touch the 2 SIDED COPY key 2 SIDED COPY OUTPUT 3 Touch the 1 sided to 2 sided copy key Original Copy NORMAL COPYING The image to be copied onto the second side of 2 sided copies can be inverted so...

Page 16: ...on the original to be copied PHOTO TEXT TEXT PHOTO NOTE Exposure mode selection TEXT This mode is useful for producing dark text copies with minimum background TEXT PHOTO This provides the best balan...

Page 17: ...nd A3 B4 A4 A4R or A5 in the AB system 2 Touch the PAPER SELECT key and then select the desired paper size TRANSPA A4 1 X A4 A3 1 2 3 PLAIN PLAIN When the desired paper size key is touched the paper s...

Page 18: ...2 86 141 B4 B5 A3 A4 B5 A4 B4 A3 B5 A5 B4 A4 A5 B5 A4 B4 A4 B5 A3 B4 B5 B4 A4 A3 If the message IMAGE IS LARGER THAN THE COPY PAPER appears image loss will occur In this case either continue with imag...

Page 19: ...pass tray or in the multi purpose drawer For the paper loading instructions see Loading paper in the bypass tray page 5 3 of the Operation manual for printer operation and general information or Loadi...

Page 20: ...ng procedures for modes requiring setting screens start on the next page The dual page copy and job build functions do not require setting screens MARGIN SHIFT SPECIAL MODES PAMPHLET COPY ERASE JOB BU...

Page 21: ...opying Image shifted to the right Image shifted to the left Original Image shifted to the right Image shifted to the left Margin Margin or Margin Margin 3 Set the shift amount as needed and touch the...

Page 22: ...ound the edges of copies and eliminates the shadow at the center of copies 1 Touch the ERASE key on the SPECIAL MODES screen The erase setting screen will appear 2 Select the desired erase mode ERASE...

Page 23: ...ace the originals on the document glass Center line of original Index This page is copied first 81 2 x11 or A4 Dual page copy Book original When copying book originals When copying a thick book press...

Page 24: ...per select the desired size and touch the AUTO IMAGE key The appropriate copy ratio will be selected automatically based on the original size and the paper size See steps 2 and 3 on page 16 7 Make all...

Page 25: ...D The JOB BUILD key will be highlighted 2 Touch the OK key on the special modes screen while JOB BUILD is highlighted OK ERASE JOB BUILD DUAL PAGE COPY MULTI SHOT 3 Place the first section originals i...

Page 26: ...e copied 1 Touch the MULTI SHOT key on the SPECIAL MODES screen MULTI SHOT The multi shot setting screen will appear 2 Select the number of originals to be copied onto one sheet of copy paper on the m...

Page 27: ...UMBER STORE DELETE 2 3 4 7 8 9 3 Touch a number key from 1 to 10 on the storage register screen 1 6 RECALL ESS PROGRAM NUMBER PROGRAMS STORE 2 3 4 7 8 9 Highlighted storage register numbers are regist...

Page 28: ...umber of the program to be deleted 5 10 3 8 4 9 EXIT STORE DELETE If a number key for which no job program has been stored is selected the screen will change to the screen of step 4 on the previous pa...

Page 29: ...ed in step 2 the INTERRUPT touch key will be replaced by the CANCEL key as shown in the illustration To cancel interrupt copying at any time touch the CANCEL key 3 Make all other desired settings such...

Page 30: ...oval will be displayed on the touch panel 1 Open the document feeding area cover and remove any misfed originals Document feeding area cover 2 Close the document feeding area cover Close the cover sec...

Page 31: ...der of originals correct Is a message requesting cancelation of job displayed Is a message indicating memory is full displayed Check Solution or cause If the indicator is not on the machine may be war...

Page 32: ...om the document feeder One sided scanning from the document glass Original feed system Automatic continuous feeding Original exit system Face down output Original transport system DSPF and SPF sheet t...

Page 33: ...settings 33 Exposure adjustment 33 Rotation copy setting 33 Auto paper selection setting 33 600dpi x 600dpi scanning mode 33 Quick scan from document glass 33 Device control Original size detector set...

Page 34: ...is 5 1 indicates lighter density and 9 indicates darker density on the touch panel Rotation copy setting If this program is set the image of originals will rotate when the orientation of the originals...

Page 35: ...functions and no original size will be displayed Disabling of document feeder This program is used to prevent use of the automatic document feeder when the scanner module malfunctions In this case sc...

Reviews: