30
31
STEAMING
CLEANING / SAFETY MECHANISMS / CLEANING
will automatically be prevented from brewing
coffee if the correct brewing temperature has not
been reached.
The brewing function is automatically
blocked if the machine is in the
steaming function (light
24
is on).
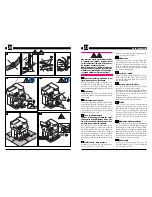
Press the steam button (
23
) and wait until the
corresponding light comes on. The light will blink
until the correct temperature has been reached.
Slowly open the knob (
6
) counterclockwise. Allow
the excess condensation to exit. When only steam
is being produced, immerse the arm into the
container holding the beverage to be heated.
Slowly open the steam knob completely and
heat the beverage, using a circular movement
from bottom to top. When the beverage has
reached the desired temperature, close the knob
and clean the arm with a damp cloth.
Warning:
Use extreme caution when handling
the steam arm: it may be very hot!
Upon completion of steaming, turn the function
off by pressing the button (
23
). Open the steam
knob again and prime the machine (the pump
automatically starts) until water flows in a steady
stream from the steam arm and the two lights
(
22
and
24
) stop blinking. (See also the section
above describing priming the system).
Close the steam knob. The machine is now ready
to brew.
Frothing milk for cappuccino
Fill a container 1/3 full with cold milk. Immerse
the steam arm (
5
) just below the milk surface.
Turn the steam knob (
6
) open and begin moving
the container in a circular motion to form a thick
froth. Then immerse the arm further into the
container to heat the milk.
Safety devices
If the service door is open, the machine is
automatically deactivated and will not operate.
It is not possible to brew espresso or pro-
duce steam if the brew group, dump box,
or drip tray are not positioned in the
machine.
Electronic grinder protection
The grinder will automatically stop after approx.
20 seconds when the bean hopper becomes
empty. The corresponding light (
26
) comes on.
Fill the bean hopper and press the button (
21
)
to reactivate the espresso cycle.
Electronic pump protection
The machine will automatically stop if the water
tank is empty in order to protect the pump. The
light (
26
) will come on.
Electronic temperature control
Both the brewing and the steaming temperatures
are controlled so as to assure the proper tempe-
rature for each function. Espresso brewing will
be automatically interrupted if the temperature
is too low or too high (safety thermostat and
protection against overheating).
Grinder safety mechanism
Even premium beans may contain some
impurities, i.e. a little pebble. The grinder has a
built-in safety mechanism to prevent damage
from such impurities. You will hear a strange
sound if a little pebble is stuck in the grinder.
Immediately turn off the machine.
If the machine is not manually turned off, the
grinder will automatically block itself after 20
seconds.
Important:
In order to avoid damaging the
motor, remove the foreign object from the grinder
before turning on the machine again. You may
need to contact an authorized service center for
help.
Cleaning and maintenance
General cleaning
Always keep your machine clean to ensure
brewing quality and a longer working life of your
machine.
Before cleaning the machine, turn it
off and unplug it.
Before cleaning the machine, allow it
to cool.
Do not immerse the machine into
water or any other fluids.
Do not wash any parts of the machine
in the dishwasher.
Always air or hand-dry all parts of the
machine; do not dry them in the oven
or microwave.
Water tank; drip tray; dump box;
dispensing head; machine housing
It is recommended to empty the dump box
(
1
) daily.
The water tank (
7
), drip tray (
2
), grill (
3
), and
the dump box (
1
) should be cleaned with a
neutral, non-abrasive detergent periodically. Dry
these parts carefully.
The dispensing head (
4
) can be removed
for easy cleaning. Pull it gently toward you and
rinse the tubes thoroughly with hot water.
Wipe the external housing of the machine
periodically with a clean, damp, non-abrasive
cloth.
Brew group
The brew group (
14
) should be cleaned on a
regular basis, or at least once a week. Turn the
machine off and open the service door (
13
).
Remove the dump box (
1
) and the drip tray (
2
).
Remove the brew group (
14
) by holding its
handle and pressing on the part marked
PRESS. Wash the brew group with hot water
only.
Do not use detergents
.
Check the two steel filters of the brew group
for eventual clogging. The upper filter can be
removed for more detailed cleaning by
unscrewing counterclockwise the plastic pin. A
special key is provided to unscrew the pin.
Thoroughly dry all the parts of the brew group,
replace the filter, and screw the pin on carefully
with the special key.
Remove the drip tray (
2
) to clean it
thoroughly. Do not use abrasive detergents.
Thoroughly dry the drip tray before replacing it.
Replace the brew group by holding it by its
handle. It should easily but firmly click into place.
Close the service door and replace the dump
box.
When replacing the brew group into the
machine, do not press the PRESS lever.
Simply hold the brew group by its handle
and click it gently into place.
Warning:
If the brew group is not replaced or
incorrectly positioned in the machine, the light
(
26
) will blink and the machine will block itself.
It will not brew espresso.
Grinder
Never pour water into the bean
hopper: the machine could be
damaged. Use only the grinder cleaning brush
provided to clean the grinder. Do not clean with
water or any other liquids.
The grinder does not need regular maintenance.
For any problems relating to the proper
functioning of the grinder, please contact an
authorized service center.
33
32
35
34
37
36
31
Summary of Contents for 10002885
Page 3: ...5 4 27 28 30 32 35 37 29 31 33 34 36 ...
Page 18: ...34 35 NOTE NOTE ...
Page 54: ...107 OPMERKING 106 OPMERKING ...

