11
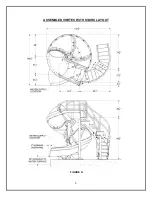
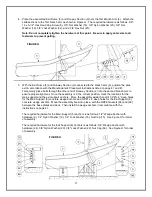
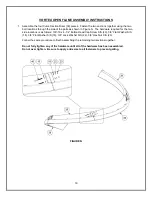
4. Place the assembled Exit Flume (3) and Runway Section (2) over the first Branch Arm (4). Attach the
slide sections to the first branch arm as shown in Figure G
. The required hardware is as follows: 3/8”-
16 x 5-
1/2” Hex Head Cap Screw (8), 3/8” Flat Washer (18), 3/8” Nylon Washer (20), 3/8” Flat
Washer (18), 3/8” Lock Washer (22), and a 3/8” Hex Nut (23).
Note: Do not completely tighten the hardware at this point. Be sure to apply anti-seize to all
fasteners to prevent galling.
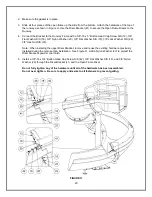
5. With the Exit Flume (3) and Runway Section (2) connected to the branch arm (4), position the slide
exit in accordance with the Manufacturer’s Placement Instructions listed on page 41 and 41.
Temporarily place bolts through the other end of Runway Section (2) into the second branch arm to
ensure proper alignment. Once the assembly is in the correct position, mark the locations for the
main support and the exit support anchors. Move the assembly aside then drill 1/2”Ø x 4” deep holes
for the Main Support (5) concrete wedge
anchors and 3/8”Ø x 4” deep holes for the Exit Support (6)
concrete wedge anchors. Move the assembly back into place, with the HDPE Gaskets (68) and (69)
between the base plates and deck. Then install the wedge anchors in accordance with the
instructions on page 41.
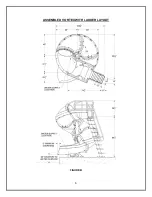
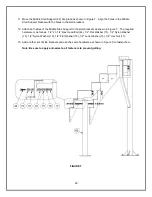
The required hardware for the Main Support (5) anchors is as follows: 1/2” Wedge Anchor with
hardware (9), 1/2” Nylon Washer (19), 1/2” Lock Washer (16), Nut Cap (75). See Figure H for order
of assembly.
The required hardware for the Exit Support (6) anchors is as follows: 3/8” Wedge Anchor with
hardware (24
), 3/8” Nylon Washer (20), 3/8” Lock Washer (22), Nut Cap (69). See Figure H for order
of assembly.
FIGURE G
FIGURE H


