background image

14

www.sc-black.com

SECTION 2: INSTALLATION AND SETUP

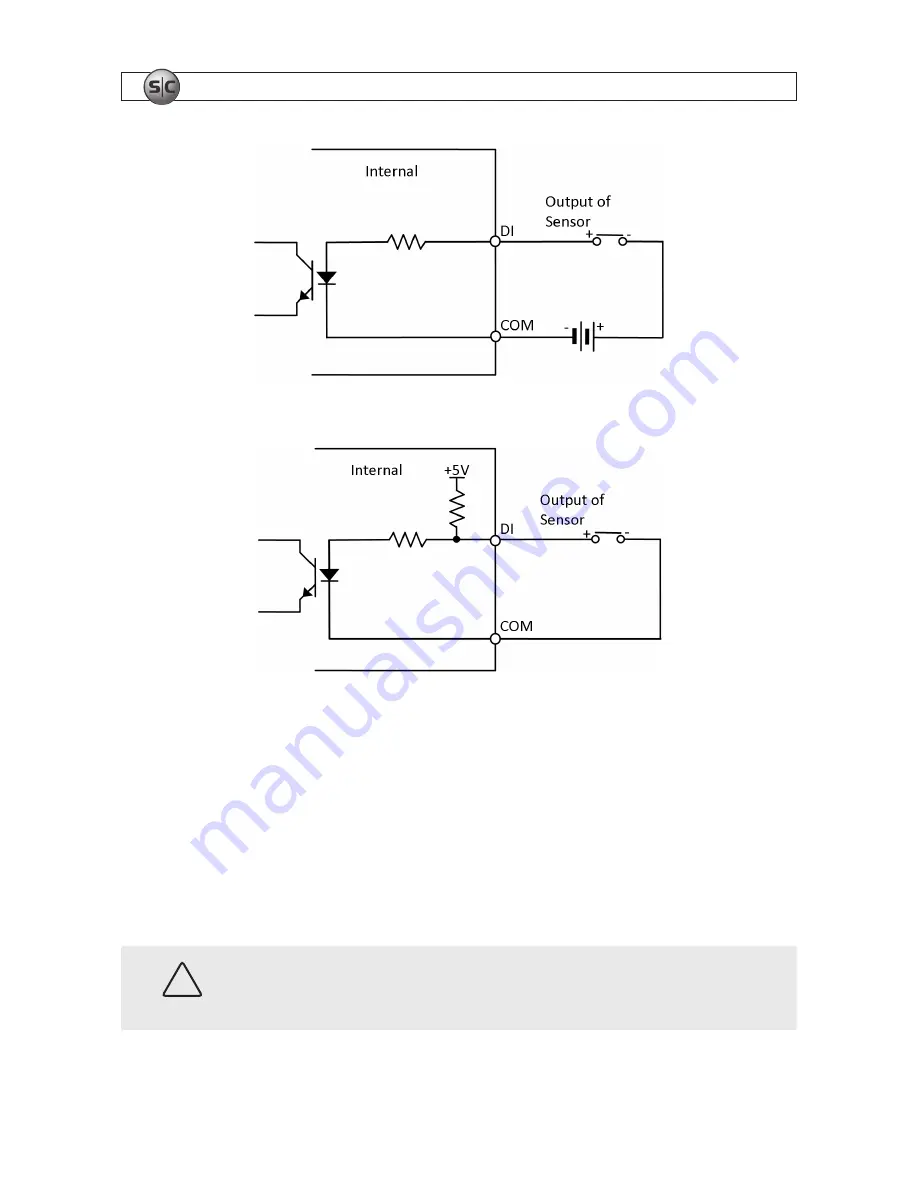
Voltage type sensor wiring schematic

Relay type sensor wiring schematic

To connect a sensor to the camera, strip 1/4” of insulation from the sensor wires and insert them into 
the terminal block in the DI pin locations shown above. The pin marked “C” in the terminal block is the 
common (COM) pin. 

2.7.3  Alarm out (DO) connection

The camera supports one alarm out connection to relay type device. It provides up to 24 VAC @ 500 mA 
or 12 V DC @ 1 A. The configuration of the relay type alarm wiring is illustrated in the diagram below. 


CAUTION

Do not exceed the maximum relay rating. Refer to the specifications in this manual 
for more information. 

Summary of Contents for BLK-IPS101

Page 1: ...twork IP Camera User Manual Product BLK IPS101 Please read this manual before using your camera and always follow the instructions for safety and proper use Save this manual for future reference BLK I...

Page 2: ...without their consent or a court order is strictly prohibited by law Supercircuits makes no representations concerning the legality of certain product applications such as the making transmission or r...

Page 3: ...the camera 10 2 7 Connections 11 2 8 Configure the camera IP address 16 2 9 Setup the camera Basic Configuration 18 2 10 Aim focus and image quality adjustments 22 2 11 Speaker microphone setup 23 2 1...

Page 4: ...de De interlacing on DSP Unicast multicast support H 264 MPEG 4 MJPEG 25 30 fps D1 G 711 Law aLaw PCM audio compression Analog video for external monitors Video motion detection support 2 way mono aud...

Page 5: ...ttings See Appendix A Troubleshooting for more information USB connector For a USB storage device or Wi Fi networking device Power adaptor connector DC 12V For use with the DC jack adapter and DC12V p...

Page 6: ...ck com SECTION 1 FEATURES LAN connector Ethernet For an RJ 45 LAN cable with 10 100 Base T Ethernet 9 pin terminal block For DI DO audio and RS 485 communications Analog Video out Loop out for local v...

Page 7: ...on software software manual and camera manual this document 2 2 Tools you need To install the camera you will need Phillips 1 or 0 screwdriver Mounting bracket Compatible lens PC with Microsoft Window...

Page 8: ...ttaching the camera to the LAN for network settings to ensure that your camera won t initially conflict with other devices Your network administrator should also setup WAN Internet access to the camer...

Page 9: ...you are using Windows Vista or Windows 7 the IP address is identified as the IPv4 Address Table 2 PC Camera network settings Computer PC Camera IP Address Subnet Mask Default Gateway CAUTION If conne...

Page 10: ...ping command is ping IP address To test this IP address enter ping 192 168 1 200 Any reply received from the ping indicates that a device on the network is already using this IP address and you can c...

Page 11: ...t where the camera will be connected open a Command Prompt window and enter ping 192 168 0 100 The Request timed out response indicates that the IP address is not in use and the camera can be connecte...

Page 12: ...ions provided with the bracket 2 Determine where the camera will be mounted and record the Media Access Control MAC address of the camera The MAC address can be found on label on the bottom of the cam...

Page 13: ...4 pin connector on the back of the camera Pin definitions are shown in the table below 8 Attach the camera to the mounting bracket Use the instructions provided with the bracket 9 Remove the protectiv...

Page 14: ...into the mating connector on the back of the camera 2 7 1 Audio in out connections The camera includes an interface for a mono audio input from a microphone and a mono audio output to a speaker The a...

Page 15: ...s of the microphone and speaker share the same terminal block pin 2 7 2 Sensor in DI connection The camera provides one channel for sensor input that can be connected to either a voltage type or relay...

Page 16: ...lock in the DI pin locations shown above The pin marked C in the terminal block is the common COM pin 2 7 3 Alarm out DO connection The camera supports one alarm out connection to relay type device It...

Page 17: ...e RS 485 interface connection The wiring signal polarity to the connector block is shown in the schematic below RS 485 device wiring schematic To connect an RS 485 device wiring to the camera strip 1...

Page 18: ...f the camera Connect the red wire of the adapter cable to the terminal and the black or white wire to the terminal DC jack adapter cable 3 Attach the power plug appropriate for your powering source to...

Page 19: ...3 Right click on the entry for your camera and select IP Address 4 In the IP Setup window a Select the Static option if it is not selected This option is required if camera video will be recorded by a...

Page 20: ...fresh and verify that the entry representing the camera now shows the new IP address 2 9 Setup the camera Basic Configuration In this procedure use Microsoft Internet Explorer IE browser to setup the...

Page 21: ...IE prompt to install ActiveX control Typical initial camera view NOTE If after logging into your camera you cannot see live video and the message Can not Create XMLDOMDocument Install MSXML4 0 appears...

Page 22: ...and click OK The default administrator values are root and pass The Basic Configuration window will open 5 Under the Basic Configuration menu click Date Time In the Date Time Setting options a Select...

Page 23: ...User Manual SECTION 2 INSTALLATION AND SETUP 6 In the Basic Configuration menu click Users 7 In the User List click root and then click Modify and follow the prompts Setup the administrator user with...

Page 24: ...ght corner of the window to return to the camera live view 2 10 Aim focus and image quality adjustments Use the documentation provided with your camera mounting bracket and lens to aim the camera at y...

Page 25: ...htness contrast hue saturation sharpness and or other parameters on screen Click Apply to see the effect of the change Make any necessary adjustments to produce the best video image 4 Close the PREVIE...

Page 26: ...the microphone on your computer 5 At your computer listen for sounds from the microphone at the camera If necessary adjust the volume from the camera Click SETUP Video Audio Audio to re open the Bi di...

Page 27: ...urface with a soft cloth moistened with a mild detergent solution then rinse and dry it with a soft cloth Remove all foreign particles such as plastic or rubber materials attached to the camera housin...

Page 28: ...TO AGC Control OFF LOW MIDDLE HIGH selectable White Balance ATW AWC MANUAL 1 800 K 10 500 K Electronic Shutter Speed AUTO MANUAL X256 1 60 sec 1 120 000 sec Sens up and Sens up Limit is selectable fli...

Page 29: ...x 500 mA 24 V AC or 1A 12 V DC Power Source Approx 12 V DC 300 mA or PoE IEEE 802 3af Class 0 Environmental requirements Operating Temperature 32 F 122 F 0 C 50 C Operating Humidity Up to 85 RH Table...

Page 30: ...28 www sc black com SECTION 3 SPECIFICATIONS Meta Data Binary XML format Image Stabilization Electronic Stabilization Removes camera sway...

Page 31: ...er ID reset to root Password reset to pass To force the camera to the factory settings 1 Disconnect the power adapter from the device 2 While pressing and holding down the Reset button connect the pow...

Page 32: ...nto the IE address field https IP ADDRESS nvc cgi admin param cgi action list and https IP ADDRESS nvc cgi admin vca cgi action list where IP ADDRESS is the IP address of your camera The server report...

Page 33: ...age range and provides a regulated low ripple and low noise output The AC DC converter also has built in overload and short circuit output protection B 1 PoE compatibility With non Power Sourcing Equi...

Page 34: ...32 www sc black com APPENDIX C DIMENSIONS APPENDIX C Dimensions...

Reviews: