background image

12

OPERATION

SAFETY VALVE

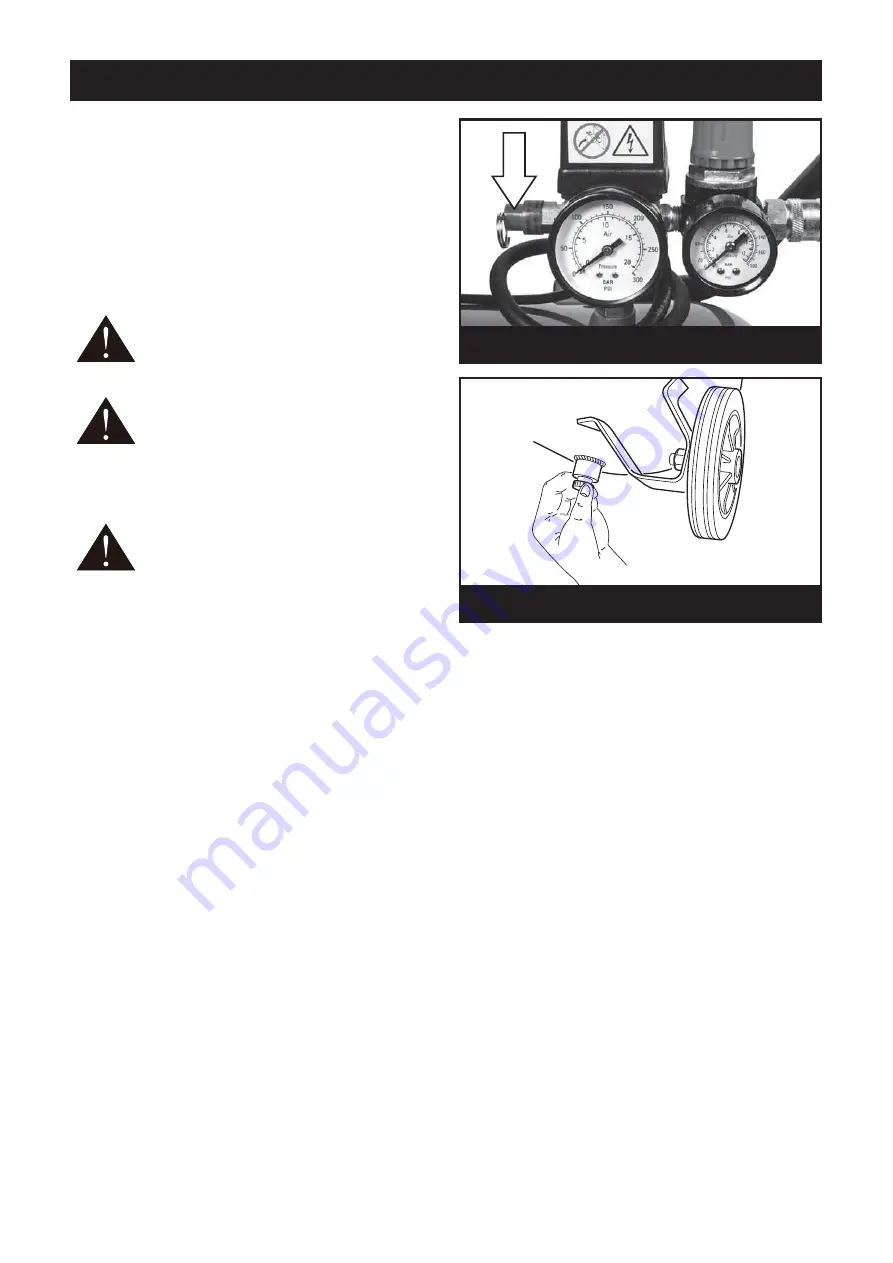
Check the operation of the safety valve, under
pressure, daily by pulling the ring as shown in
Fig.14. Air should be released when you pull the
ring and stop when the ring is released.

If the valve does not operate as described, or
if the valve is stuck, it must be replaced by
qualified service personnel before using the
compressor.

WARNING.

Do not remove or attempt to

adjust the safety valve.

DANGER.

Do not attempt to tamper with

the safety valve. Anything loosened from
this device could fly up and hit you.
Failure to heed this warning could result
in death or serious personal injury.

DRAINING THE RESERVOIR

CAUTION.

It is important to drain the

reservoir before storage to help prevent
tank corrosion.

Switch the air compressor off, by pressing the
On/Off button to the off position (pressed down),
and remove the plug from the mains supply.

Pull the ring on the safety valve to release pressure
until pressure gauge reads less than 20 psi.

Release the ring.

Place a suitable container beneath the compressor
to catch any condensation.

Carefully undo the drain valve nut anti-clockwise
until you hear a hissing noise, this is the reservoir
depressurising (Fig.15).

When the gauge indicates zero and the hissing has
stopped, tighten the drain valve nut again.

OIL CHANGING

Replace the oil after the first 100 hours of
operation and every 300 hours subsequently.
Remember to check the oil level at regular
intervals.

For changing the pump oil, be sure to do the
following:

1. Turn the unit off and unplug the power cord

from the receptacle.

2. Allow the compressor time to cool if it has been

in operation.

3. Open the drain valve to bleed all air from the

tank.

4. Close the drain valve.

5. Remove the dipstick on the pump.

6. Remove the oil drain plug with a box end

wrench or socket. Drain the oil into a suitable
container and dispose of properly. The
compressor may need to be tipped slightly
towards the drain hole to allow all of the oil to
drain.

7. Reattach the oil drain plug.

8. Refill the compressor pump with an air

compressor oil such as SAE-30 non-detergent
(API CG/CD Heavy Duty) oil at slow intervals
until the oil reaches between the minimum and
maximum marks on the dipstick. Take care not
to exceed the maximum mark. Use SAE-10
during extreme winter conditions.

Fig. 14

Fig. 15

Summary of Contents for RC-3100B

Page 1: ... enjoy years of safe reliable service SPECIFICATIONS Voltage 230V 50Hz R Intermittent duty S3 75 ated power 2 2kW 3 0HP Receiver capacity 100l Type Oil lubricated Free air delivery FAD 365l min Oil type SAE 30 Oil capacity 500ml CFM 12 9 Working pressure 10bar 145psi No load speed 1375min 1 Sound pressure level LpA71 5dB A k 3dB A Sound power level LWA91 5dB A k 3dB A Net weight 59 2kg THANK YOU F...

Page 2: ...gs and safety instructions in this manual and on the product Ensure that this compressor is disconnected from the mains supply when not in use and the air receiver fully discharged before servicing lubricating or making adjustments and when changing accessories Always switch ON and OFF using the ON OFF switch on the compressor before switching OFF at the mains supply WARNING When spraying paint or...

Page 3: ...fe Never weld or drill holes in the air tanks Only use recommended parts To avoid the risk of bursting only hoses with a rated pressure of 10 bar or more should be used Never attempt to re pair faulty hoses Avoid kinking or trapping the air hose Always replace faulty hoses never attempt a repair if a leak is detected Make sure the hose is free of obstructions or snags Entangled or snarled hoses ca...

Page 4: ... with ANSI Z87 1 c Additional safety protection will be required in some environments For example the working area may include exposure to a noise level which can lead to hearing damage The employer and user must ensure that any necessary hearing protection is provided and used by the operator and others in the work area Some environments will require the use of head protection equipment When requ...

Page 5: ...ct is powered by a precision built electric motor It should be connected to a power supply that is 230 V AC only normal household current 50 Hz Do not operate this product on direct current DC A substantial voltage drop will cause a loss of power and the motor will overheat If the product does not operate when plugged into an outlet double check the power supply GROUNDING INSTRUCTIONS This product...

Page 6: ... regulated 5 Transportation handle 6 Air outlet pressure gauge 7 Air receiver pressure gauge 8 Rubber foot x 2 9 Wheel x 2 10 Drain valve 11 Air receiver tank 12 Oil drain plug 13 Dipstick 14 Air filter 15 Safety valve 16 Air outlet pressure regulator lock ring DESCRIPTION 11 2 3 8 9 4 6 7 5 14 13 10 1 12 15 16 ...

Page 7: ...TS Belt driven compressor Wheels x 2 Wheel fixings bolt nut x 2 Rubber foot x 2 Rubber foot fixings bolt nut x 2 Dipstick Operator s Manual WARNING If any parts are damaged or missing do not operate this product until the parts are replaced Use of this product with damaged or missing parts could result in serious personal injury WARNING Do not connect to power supply until assembly is complete Fai...

Page 8: ...ease all tank air pressure before removing the dipstick Be sure the air vent in dipstick Fig 3 is free from debris If air vent is blocked pressure can build in crankcase causing damage to the compressor and possible personal injury Remove the dipstick by twisting it upwards by hand Fill the compressor pump with an air compressor oil such as SAE 30 non detergent API CG CD Heavy Duty oil at slow int...

Page 9: ... used play an important role in the operation of this product Wiring intended for lights cannot properly carry an air compressor motor and wire that is heavy enough for a short distance may be insufficient for a greater distance Before using this product verify your receptacle is wired appropriately for air compressor use and the length and gauge of any extension cord used is sufficient to carry t...

Page 10: ...ion pressed in Fig 6 Check that the air outlet pressure regulator is closed Fig 7 Check that the drain valve is closed Fig 8 Connect the compressor to a suitable 16A mains supply Switch on the compressor by pulling up the On Off switch Fig 9 The compressor will now start When the air receiver tank is pressurised to its working capacity the compressor will automatically switch off When the compress...

Page 11: ...at the same time observing the air outlet pressure gauge until the pressure gauge reads the minimum pressure for the accessory Fine adjustments to the air pressure can be made until the accessory is working at its optimum performance When the correct operating air pressure has been set the air outlet pressure regulator can be locked by tightening the locking ring Fig 12 Do not exceed the maximum r...

Page 12: ...ondensation Carefully undo the drain valve nut anti clockwise until you hear a hissing noise this is the reservoir depressurising Fig 15 When the gauge indicates zero and the hissing has stopped tighten the drain valve nut again OIL CHANGING Replace the oil after the first 100 hours of operation and every 300 hours subsequently Remember to check the oil level at regular intervals For changing the ...

Page 13: ...emove the securing bolt and pull the filter from the compressor Fig 16 Unclip the front and rear of the filter and pull out the filter element Fig 17 Clean the filter using a soft brush If necessary the filter can be carefully cleaned in warm soapy water Rinse and let the filter dry completely before refitting If the filter or filter element is damaged you must replace it Reassemble the filter and...

Page 14: ... it is advisable to give the compressor a thorough clean This should include the removal of all fitted accessories Do not use any solvents as these can damage plastic parts Only use a clean cloth dampened with warm soapy water Any metal parts should be given a wipe with a light machine oil to prevent rusting WARNING Do not at any time let brake fluids gasoline petroleum based products penetrating ...

Page 15: ...ghten if necessary Switch off and wait approx 5 minutes Press the reset button and switch on again Contact your nearest service agent Return the machine to your nearest service agent Open drain valve to expel air Compressor should start again when pressure reduces Drain receiver completely of air Remove the valve end plug Carefully clean the valve seat and the gasket Reassemble Replace regulator R...

Page 16: ...rdous Voltage Disconnect from power source before servicing Do not use in damp conditions Hot Surface To reduce the risk of injury or damage avoid contact with any hot surface Enclosure Alert Do not operate the portable compressor with the doors or enclosure open Unexpected Starting The compressor may start without warning Recycle Symbol Waste electrical products should not be disposed of with hou...

Page 17: ...17 NOTES ...

Page 18: ...18 NOTES ...

Page 19: ...19 NOTES ...

Page 20: ......

Reviews: