background image

7 — English

App images may vary.

TAKING MEASUREMENTS

See Figure 4.

  The laser distance measurer calculates distance, area, 

volume, and height using the Pythagorean method  
(a

2

 + b

2

 = c

2

). 

  Tap the icon in the vertical menu that corresponds to the 

type of measurement you want. The icon will be high-
lighted green. The measurement to be taken will begin 
flashing. 

  To change to another type of measurement, tap the 

De-

lete 

icon and make a different selection.

  Double tap to change the measurement from feet to 

meters (

ft

 to 

m

). 


NOTE: 

Tap 

Ok

 to accept the laser 

DANGER

 that appears 

when the laser is on.

 DANGER:

Avoid direct eye exposure when using the laser and do 
not project the laser beam directly into the eyes of others. 
Serious eye injury could result.

USING THE LASER DISTANCE MEASURER

For the most accurate measurements:

  Limit the range of measurement to 90 ft.

  Measurements are calculated from the bottom of the 

device.

  Aiming at glossy surfaces may deflect the laser beam 

and affect accuracy.

  Colorless liquids, dust-free glass, Styrofoam, or other 

semi-permeable surfaces may cause measurement er-
rors.

  Periodically perform test measurements, especially after 

extended use and before, during and after critical mea-
surements.

STRAIGHT DISTANCE MEASUREMENT 

See Figure 5.

  Tap the 

Distance

 icon.

  Position the device so that the measurement originates 

from the bottom of the device.

  Tap the 

Laser

 icon to turn the laser 

On. 

  The measurement appears along with a notation of the 

type of measurement (for example, 

Distance

). 

  Tap the green button to capture the measurement.

  Turn the laser 

Off.  

 The measurement remains on the 

screen. 

  To take another measurement, repeat the above steps.
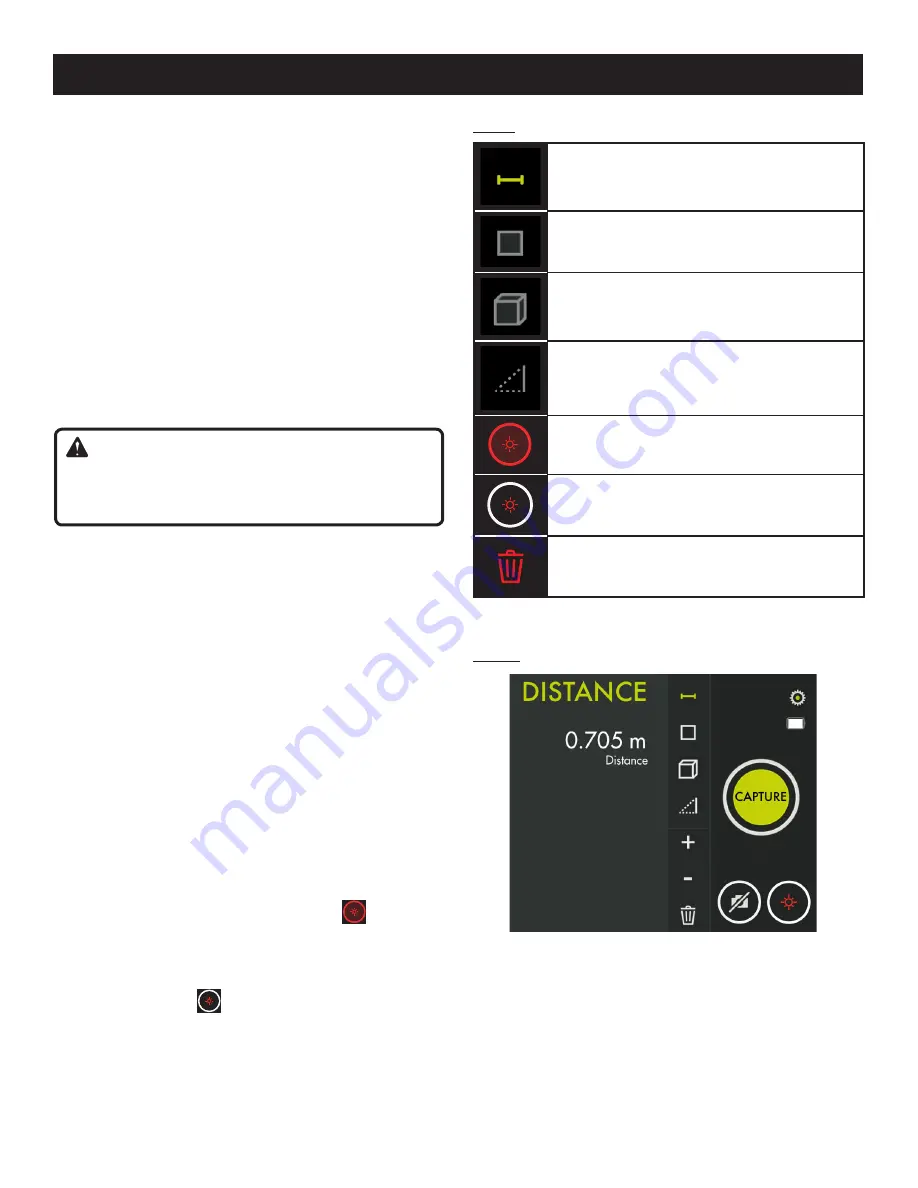
Fig. 4

Fig. 5 

OPERATION

Distance

Area

Volume

Height - Pythagorean method

Laser is ON

Laser is OFF

Delete

Summary of Contents for Phone Works ES1000

Page 1: ...s may increase the risk of electric shock or cause damage to the device Do not use on a ladder or unstable support Stable footing on a solid surface enables better control of the device in unexpected...

Page 2: ...rious injury to the user could result IMPORTANT SAFETY INSTRUCTIONS Ensure the device is disconnected and turned off before inserting or changing batteries Do not mix old and new batteries or differen...

Page 3: ...property damage SYMBOLS Some of the following symbols may be used on this device Please study them and learn their meaning Proper interpretation of these symbols will allow you to operate the device...

Page 4: ...t Pythagorean method Add to previous measurement Subtract from previous measurement Delete ICON DESCRIPTION FUNCTION Main RYOBI Phone Works app home screen Laser is ON Laser is OFF Take a picture Capt...

Page 5: ...device Before first use remove the red pull tab to activate the batteries Disconnect the device from your smartphone Remove the battery cover by inserting the edge of a coin into the slot and twisting...

Page 6: ...pen the LASER DISTANCE MEASURER app segment The user must read the Laser Radiation DANGER that appears on the screen The app will not become active until the user taps OK at the bottom right of the sc...

Page 7: ...e most accurate measurements Limit the range of measurement to 90 ft Measurements are calculated from the bottom of the device Aiming at glossy surfaces may deflect the laser beam and affect accuracy...

Page 8: ...EASUREMENT See Figure 7 Select the Area icon Position the device to take a width measurement NOTE The icon will flash to show which measurement you are taking Turn the laser On When the laser is turne...

Page 9: ...icon The dotted line indicating the base a will begin flashing Position the device for a horizontal measurement which will be calculated from the bottom of the device Tap the Laser button The measurem...

Page 10: ...has a dotted line that aligns with a solid line when the device is level Both will indicate 0 Fig 12 Fig 11 DRAWING MEASUREMENTS ON A PHOTO See Figures 11 16 Choose the type of measurement you want to...

Page 11: ...asure ment Touch a point to indicate the start and end for all measure ments taken 2 for area length and width 3 for volume length width height Tap SAVE to save the photo with measurement to the proje...

Page 12: ...e for your project Use Existing Scroll through the list of project names and select the one you wish to access Tap Done to load the project OPERATION Fig 17 CREATING NOTES Tap the notes icon in the to...

Page 13: ...home screen will dis play all projects and icons representing the app segments used for each project PROJECT SUMMARY See Figures 19 Accessing the file cabinet from within a project will display the ap...

Page 14: ...sh can ap pears next to each item you have selected to delete Tap DELETE to select the item Tap DELETE again to delete the project view To delete an entire project across multiple devices return to th...

Page 15: ...122 F such as on a dashboard or vehicle interior BATTERY RECYCLING Consult the Earth 911 website www earth911 com or your local waste authority for information regarding available re cycling and or d...

Reviews: